Fix Windows Modules Installer Worker High CPU Usage
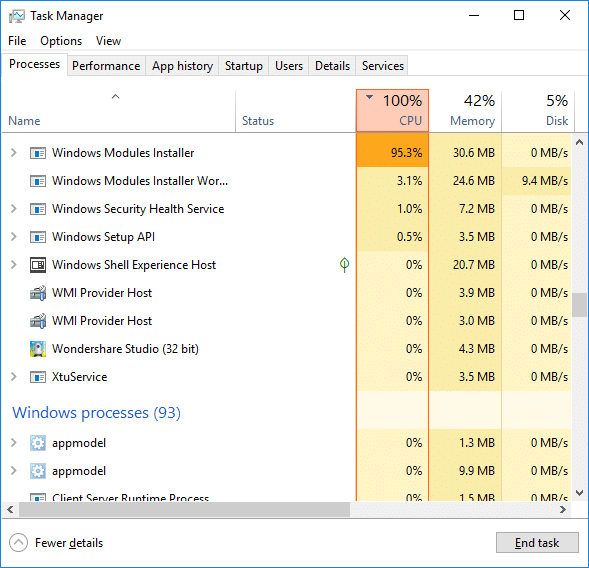
If you are facing the High CPU Usage by Windows Modules Installer Worker, then don’t worry as thousands of other users are also facing the similar problem and therefore, there are many working fixes which we will be discussing today in this article. To verify if you are facing this issue open Task Manager (Ctrl + Shift + Esc) and you will find that the Windows Modules Installer Worker is consuming High CPU or Disk Usage.

پرو نکتہ: You may leave your PC overnight or for a few hours to see the issue rectify itself once the Windows is finished downloading and installing updates.
What is Windows Modules Installer worker (WMIW)?
Windows Modules Installer worker (WMIW) is a service which takes cares of automatically installing Windows Update. According to its service description, WMIW is a system process that enables automatic installation, modification, and removal of Windows updates and optional components.
This process is responsible for finding new Windows Update automatically and installing them. As you might be aware that Windows 10 automatically install newer builds (i.e. 1803 etc.) via Windows Updates, so this process is responsible for installing these updates in the background.
Although this process is called Windows Modules Installer worker (WMIW) and you will see the same name in the Processes tab in the Task Manager, but if you switch to Details tab, then you will find the name of the file as TiWorker.exe.
Why Is Windows Modules Installer worker Using So Much CPU?
As Windows Modules Installer worker (TiWorker.exe) runs continuously in the background, sometimes it might utilize high CPU or disk usage when installing or uninstalling Windows Updates. But if its constantly using high CPU then the Windows Modules Installer worker may have become unresponsive while checking new updates. As a result, you may be experiencing lags, or your system might hang or freeze completely.
The first thing users do when they experience freezing, or lagging issues on their system is to restart their PC, but I assure you that this strategy won’t work in this case. This is because the issue will not resolve by itself until and unless you fix the underlying cause.
Fix Windows Modules Installer Worker High CPU Usage
کچھ غلط ہونے کی صورت میں بحالی پوائنٹ بنانا یقینی بنائیں۔
Windows Modules Installer Worker (WMIW) is an important service, and it should not be disabled. WMIW or TiWorker.exe is not a virus or malware, and you cannot just delete this service from your PC. So without wasting any time let’s see How to Fix Windows Modules Installer Worker High CPU Usage ذیل میں درج ٹربل شوٹنگ گائیڈ کی مدد سے۔
طریقہ 1: ونڈوز اپ ڈیٹ ٹربل شوٹر چلائیں۔
1. کھولنے کے لیے Windows Key + I دبائیں۔ ترتیبات پھر پر کلک کریں اپ ڈیٹ اور سیکیورٹی آئیکن۔
![]()
2. بائیں ہاتھ کے مینو سے، منتخب کریں۔ دشواری حل کریں کے تحتاٹھ جاؤ اور چل رہا ہے" پر کلک کریں ونڈوز اپ ڈیٹ.
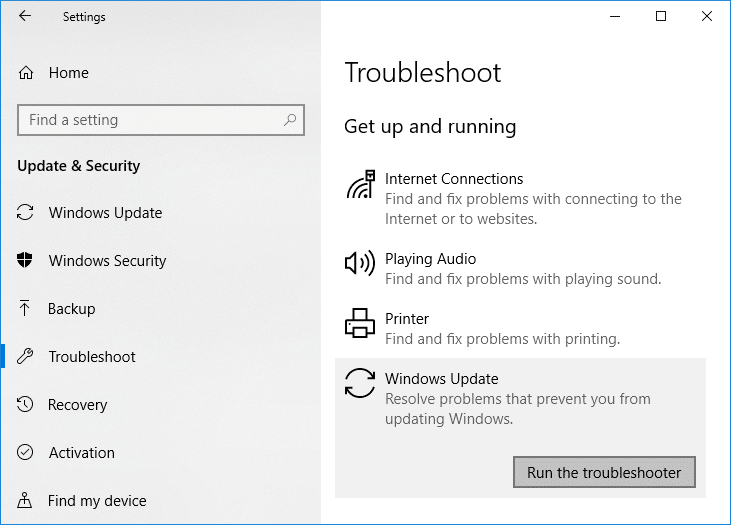
3. اب پر کلک کریں “خرابی کا سراغ لگانا چلائیں"ونڈوز اپ ڈیٹ کے تحت۔
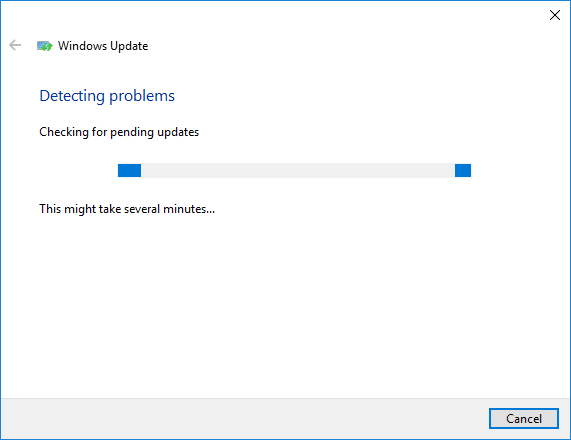
4. Let the troubleshooter run, and it will automatically fix any issues found with Windows Update taking forever.
Method 2: Manually Check for Windows Updates
1. ونڈوز کی + I دبائیں پھر منتخب کریں۔ تازہ کاری اور سیکیورٹی۔
2. بائیں طرف سے، مینو پر کلک کرتا ہے۔ ونڈوز اپ ڈیٹ.
3. اب "پر کلک کریںاپ ڈیٹس کی جانچ پڑتال کریںکسی بھی دستیاب اپ ڈیٹس کو چیک کرنے کے لیے بٹن۔

4. اگر کوئی اپ ڈیٹس زیر التواء ہیں، تو کلک کریں اپ ڈیٹس ڈاؤن لوڈ اور انسٹال کریں۔

5. اپ ڈیٹس ڈاؤن لوڈ ہونے کے بعد، انہیں انسٹال کریں، اور آپ کی ونڈوز اپ ٹو ڈیٹ ہو جائے گی۔
Method 3: Configure Windows Update to Manual
احتیاط: This method will switch Windows Update from automatically installing the new updates to the manual. This means you have to manually check for Windows Update (weekly or monthly) to keep your PC secure. But follow this method, and you can again set the Updates to Automatic once the issue is resolved.
1. ونڈوز کی + R دبائیں پھر ٹائپ کریں۔ services.msc اور داخل کریں.

2. Scroll down and find ونڈوز ماڈیول انسٹالر service in the list.
3. پر دائیں کلک کریں Windows Modules Installer service اور منتخب کریں پراپرٹیز.
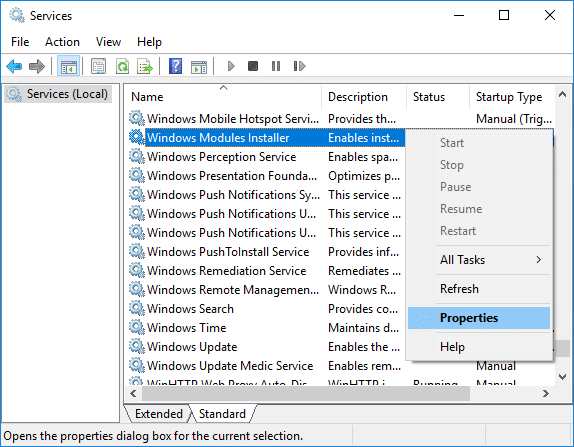
4. اب پر کلک کریں بند کرو then from the شروع کی قسم drop-down select دستی.
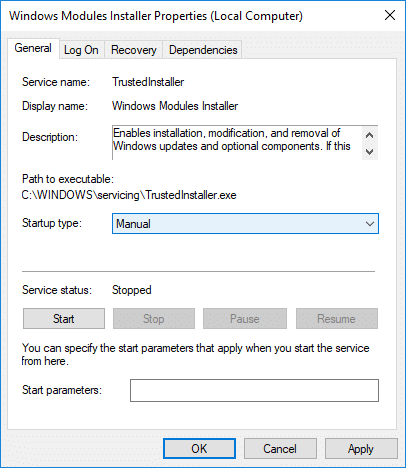
5. اپلائی پر کلک کریں، اس کے بعد ٹھیک ہے.
6. Similarly, follow the same step for the ونڈوز اپ ڈیٹ سروس۔
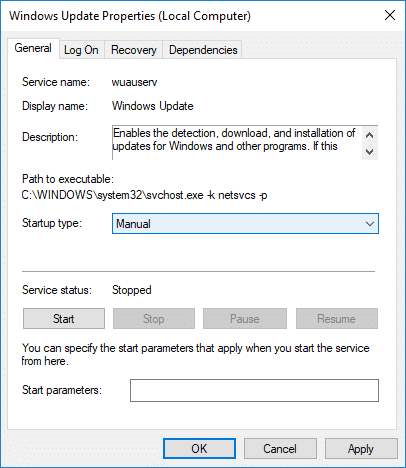
7. تبدیلیاں محفوظ کرنے کے لیے اپنے پی سی کو ریبوٹ کریں۔
8 دوبارہ کے لئے چیک کریں Windows Updates Manually اور کسی بھی زیر التواء اپ ڈیٹس کو انسٹال کریں۔
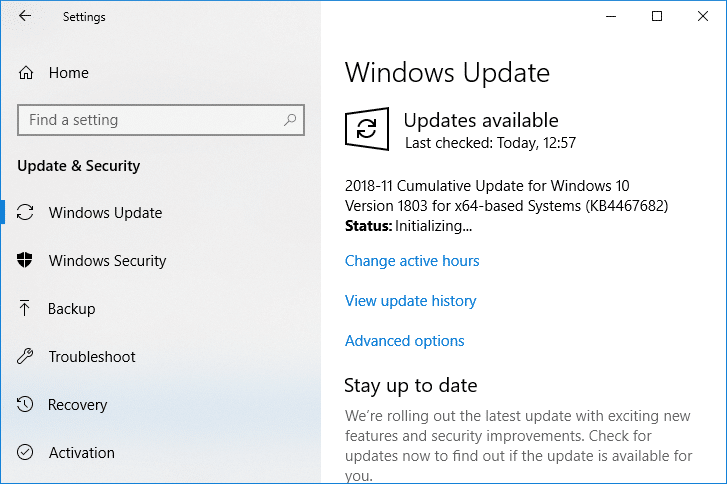
9. Once is done, again go back to services.msc window and open the Windows Modules Installer & Windows Update Properties کھڑکی.
10. مقرر کریں شروع کی قسم کرنے کے لئے خودکار اور پر کلک کریں آغاز. Then click Apply followed by OK.
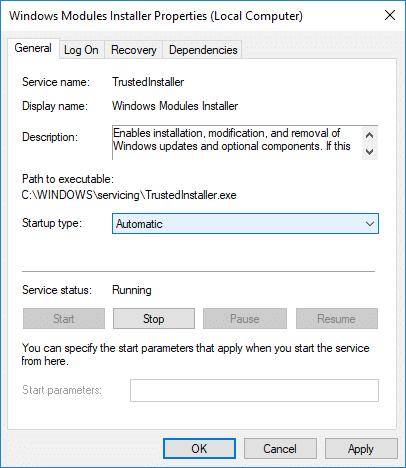
11. تبدیلیاں محفوظ کرنے کے لیے اپنے پی سی کو ریبوٹ کریں۔
طریقہ 4: سسٹم مینٹیننس ٹربل شوٹر چلائیں۔
1. Windows Key + R دبائیں پھر کنٹرول ٹائپ کریں اور کھولنے کے لیے Enter دبائیں۔ کنٹرول پینل.
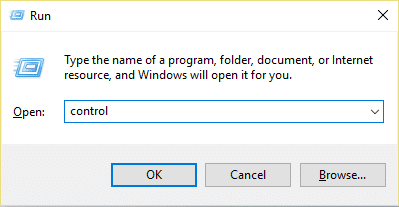
2. ٹربل شوٹ تلاش کریں اور پر کلک کریں۔ خرابیوں کا سراغ لگانا.

3. اگلا ، پر کلک کریں تمام ملاحظہ کریں بائیں پین میں.
4. پر کلک کریں “System Maintenance” چلانے کے لئے System Maintenance Troubleshooter.

5. ٹربل شوٹر اس قابل ہو سکتا ہے۔ Fix Windows Modules Installer Worker High CPU Usage, but if it didn’t, then you need to run System Performance Troubleshooter.
6. کمانڈ پرامپٹ کھولیں۔ صارف تلاش کرکے یہ مرحلہ انجام دے سکتا ہے۔ 'سینٹی میٹر' اور پھر درج کریں دبائیں.

7. درج ذیل کمانڈ کو cmd میں ٹائپ کریں اور Enter دبائیں:
msdt.exe / id کارکردگی تشخیصی
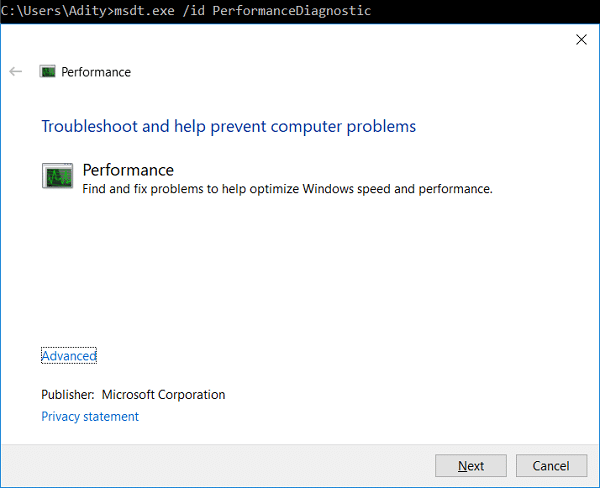
8. Follow the on-screen instruction to run the troubleshooter and fix any issues find the System.
9. Finally, exit the cmd and reboot your PC.
Method 5: Disable Automatic Maintenance
Sometimes Automatic Maintenance can conflict with the Windows Modules Installer Worker service, so try to disable Automatic Maintenance using this guide and see if this fixes your issue.
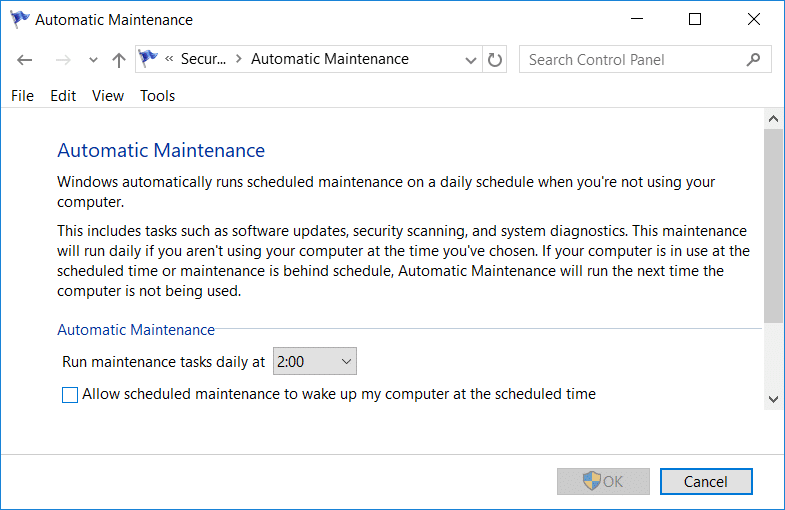
Although disabling Automatic Maintenance is not a good idea, but there might be some case where you need to actually disable it, for example, if your PC freezes during automatic maintenance or Windows Modules Installer Worker High CPU Usage issue then you should disable maintenance to troubleshoot the issue.
Method 6: Run System File Checker and DISM
1. کمانڈ پرامپٹ کھولیں۔ صارف تلاش کرکے یہ مرحلہ انجام دے سکتا ہے۔ 'سینٹی میٹر' اور پھر درج کریں دبائیں.
2.اب cmd میں درج ذیل کو ٹائپ کریں اور انٹر دبائیں:
Sfc /scannow sfc /scannow /offbootdir=c: /offwindir=c:windows (اگر اوپر ناکام ہوجاتا ہے تو اسے آزمائیں)

3. مندرجہ بالا عمل کے ختم ہونے کا انتظار کریں اور ایک بار مکمل ہونے کے بعد، اپنے کمپیوٹر کو دوبارہ شروع کریں۔
4. دوبارہ cmd کھولیں اور درج ذیل کمانڈ کو ٹائپ کریں اور ہر ایک کے بعد انٹر کو دبائیں۔
Dism/Online/Cleanup-Image/CheckHealth Dism/Online/Cleanup-Image/ScanHealth Dism/Online/Cleanup-Image/RestoreHealth

5. DISM کمانڈ کو چلنے دیں اور اس کے ختم ہونے کا انتظار کریں۔
6. اگر اوپر کی کمانڈ کام نہیں کرتی ہے، تو نیچے کی کوشش کریں:
Dism/Image:C:offline/Cleanup-Image/RestoreHealth/Source:c:testmountwindows Dism/Online/Cleanup-Image/RestoreHealth/Source:c:testmountwindows/LimitAccess
نوٹ: C:RepairSourceWindows کو اپنے مرمت کے ذریعہ (ونڈوز انسٹالیشن یا ریکوری ڈسک) سے تبدیل کریں۔
7. تبدیلیاں محفوظ کرنے کے لیے اپنے پی سی کو ریبوٹ کریں اور دیکھیں کہ آیا آپ قابل ہیں یا نہیں۔ Fix Windows Modules Installer Worker High CPU Usage.
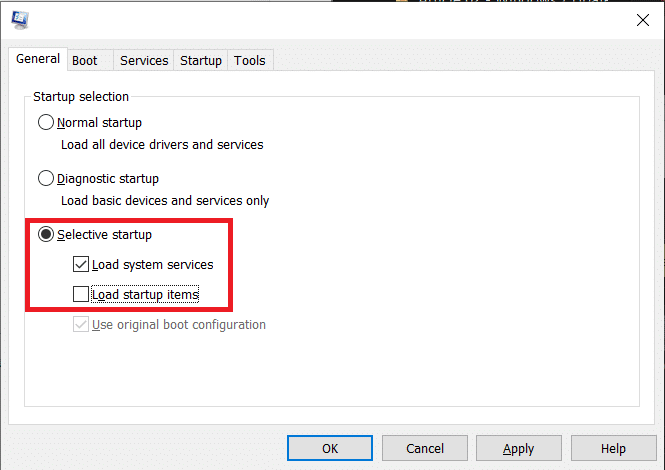
طریقہ 7: کلین بوٹ انجام دیں۔
Sometimes 3rd party software can conflict with Windows and can cause the issue. To Fix Windows Modules Installer Worker High CPU Usage issue، آپ کو اپنے پی سی پر کلین بوٹ کرنے اور مسئلے کی مرحلہ وار تشخیص کرنے کی ضرورت ہے۔
Method 8: Set your WiFi as Metered Connection
نوٹ: This will stop Windows Automatic Update, and you will need to manually check for Updates.
1. کھولنے کے لیے Windows Key + I دبائیں۔ ترتیبات پھر پر کلک کریں نیٹ ورک اور انٹرنیٹ۔

2. بائیں ہاتھ کے مینو سے، منتخب کریں۔ Wi-Fi
3. Under Wi-Fi, کلک کریں on your currently connected network (WiFi).
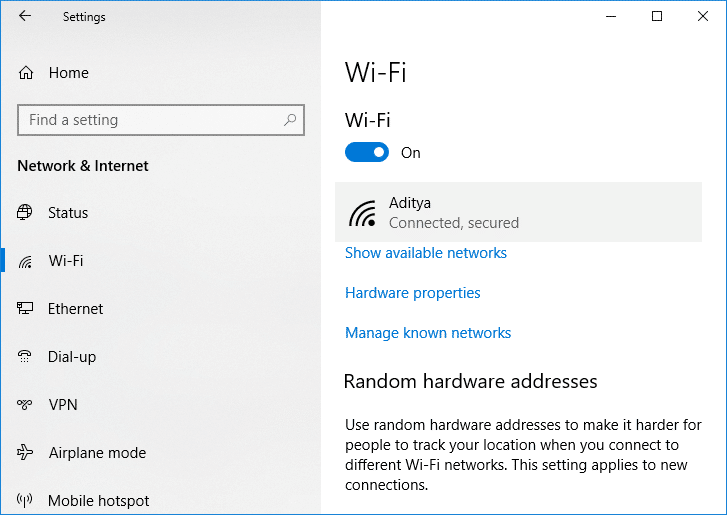
4. Scroll down to Metered connection and ٹوگل کو فعال کریں کے تحتمیٹھی کنکشن کے طور پر مقرر کریں".
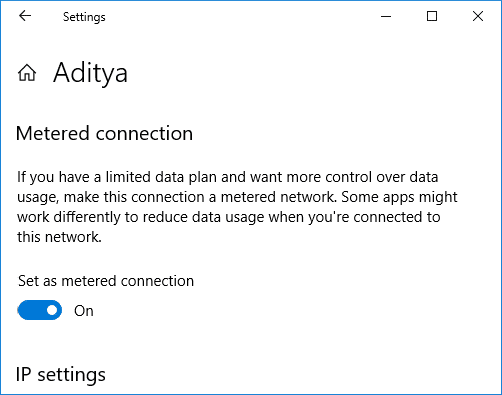
5. Close Settings and reboot your PC to save changes.
سفارش کی جاتی ہے:
یہ ہے، آپ کو کامیابی سے Fix Windows Modules Installer Worker High CPU Usage لیکن اگر آپ کے پاس اب بھی اس ٹیوٹوریل کے حوالے سے کوئی سوالات ہیں تو بلا جھجھک ان سے تبصرے کے سیکشن میں پوچھیں۔
