Windows Updates Error 0x8024401c Fix

If you are facing error code 0x8024401c while trying to update Windows 10, then you are at the right place as today we are going to discuss how to resolve this issue. Basically, you won’t be able to download or install any updates because of this error 0x8024401c. Windows updates are an essential part of your system to easily prevent your PC from vulnerabilities, leading to malware or virus, spyware, or adware installed on your system. Depending upon user’s system configuration, you could face the following error:
There were some problems installing updates, but we’ll try again later. If you keep seeing this and want to search the web or contact support for information, this may help: (0x8024401c)
Now you could face this error message because of a number of reasons such as corrupt registry entries, corrupted system files, outdated or incompatible drivers, incomplete installation or uninstallation of a program etc. So without wasting any time let’s see how to actually Fix Windows Updates Error 0x8024401c with the help of below-listed steps.
Windows Updates Error 0x8024401c Fix
کچھ غلط ہونے کی صورت میں بحالی پوائنٹ بنانا یقینی بنائیں۔
طریقہ 1: ونڈوز اپ ڈیٹ ٹربل شوٹر چلائیں۔
1. Open control panel and search Troubleshooting in the Search Bar on the top right side and click on Troubleshooting.

2. اگلا، بائیں ونڈو سے، پین کو منتخب کریں۔ سب دیکھیں.
3. پھر کمپیوٹر کے مسائل حل کرنے کی فہرست سے منتخب کریں۔ ونڈوز اپ ڈیٹ.
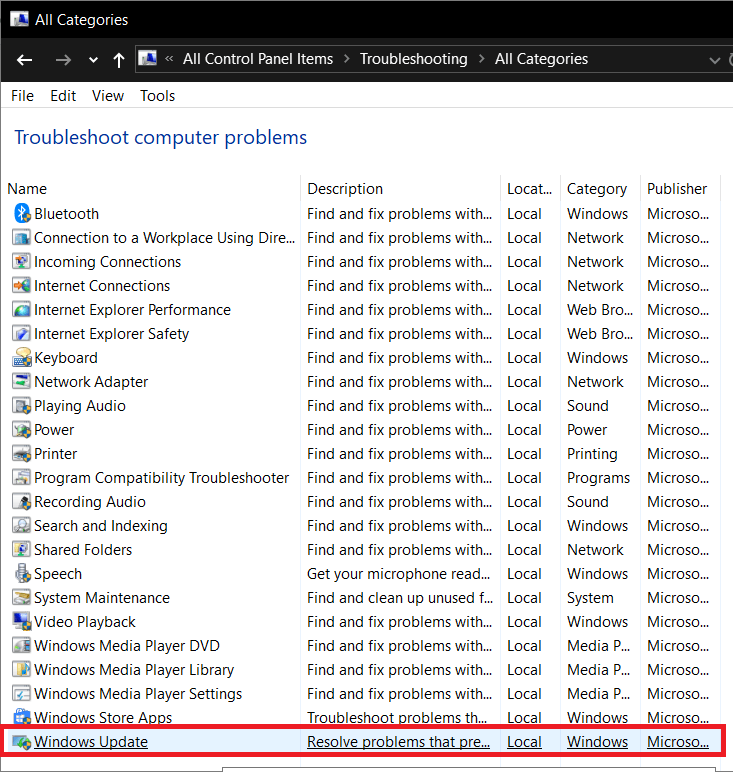
4. آن اسکرین ہدایات پر عمل کریں اور ونڈوز اپڈیٹ ٹربل شوٹ کو چلنے دیں۔
5. اپنے پی سی کو دوبارہ شروع کریں، اور آپ اس قابل ہو سکتے ہیں۔ Fix Windows Updates Error 0x8024401c.
طریقہ 2: SFC اور CHKDSK چلائیں۔
1. کھولو کمانڈ پرامپٹ. صارف تلاش کرکے یہ مرحلہ انجام دے سکتا ہے۔ 'سینٹی میٹر' اور پھر درج کریں دبائیں.

2. اب cmd میں درج ذیل کو ٹائپ کریں اور انٹر دبائیں:
sfc/scannow sfc/scannow/offbootdir=c: /offwindir=c:windows

3. مندرجہ بالا عمل کے ختم ہونے کا انتظار کریں اور ایک بار مکمل ہونے کے بعد، اپنے کمپیوٹر کو دوبارہ شروع کریں۔
4. اگلا، فائل سسٹم کی خرابیوں کو ٹھیک کرنے کے لیے CHKDSK چلائیں۔
5. مندرجہ بالا عمل کو مکمل ہونے دیں اور تبدیلیوں کو بچانے کے لیے اپنے کمپیوٹر کو دوبارہ شروع کریں۔
طریقہ 3: DISM چلائیں۔
1. کھولو کمانڈ پرامپٹ. صارف تلاش کرکے یہ مرحلہ انجام دے سکتا ہے۔ 'سینٹی میٹر' اور پھر درج کریں دبائیں.
2. Now type the following in the cmd and hit enter after each one:
Dism/Online/Cleanup-Image/CheckHealth Dism/Online/Cleanup-Image/ScanHealth Dism/Online/Cleanup-Image/RestoreHealth

3. DISM کمانڈ کو چلنے دیں اور اس کے ختم ہونے کا انتظار کریں۔
4. اگر اوپر کی کمانڈ کام نہیں کرتی ہے، تو نیچے کی کوشش کریں:
Dism/Image:C:offline/Cleanup-Image/RestoreHealth/Source:c:testmountwindows Dism/Online/Cleanup-Image/RestoreHealth/Source:c:testmountwindows/LimitAccess
نوٹ: C:RepairSourceWindows کو اپنے مرمت کے ذریعہ (ونڈوز انسٹالیشن یا ریکوری ڈسک) سے تبدیل کریں۔
5. تبدیلیاں محفوظ کرنے کے لیے اپنے پی سی کو ریبوٹ کریں اور دیکھیں کہ آیا آپ قابل ہیں یا نہیں۔ Fix Windows Updates Error 0x8024401c.
طریقہ 4: IPv6 کو غیر فعال کریں۔
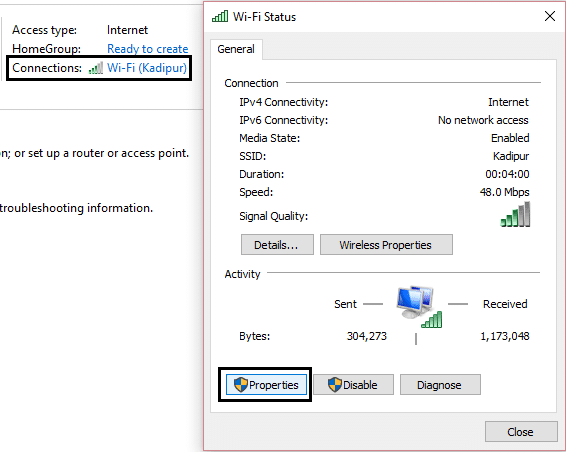
1. سسٹم ٹرے پر وائی فائی آئیکون پر دائیں کلک کریں اور پھر "پر کلک کریں۔اوپن نیٹ ورک اور شیئرنگ سینٹر."
![]()
2. اب اپنے موجودہ کنکشن پر کلک کریں۔ کھولنے کی ترتیبات
نوٹ: اگر آپ اپنے نیٹ ورک سے منسلک نہیں ہو سکتے ہیں، تو کنیکٹ کرنے کے لیے ایتھرنیٹ کیبل کا استعمال کریں اور پھر اس قدم پر عمل کریں۔
3. کلک کریں پراپرٹیز بٹن کھڑکی میں جو ابھی کھلی ہے۔
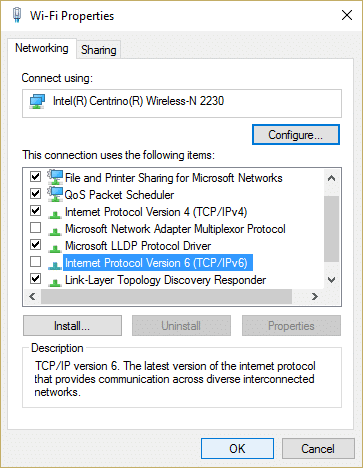
4. یقینی بنائیں انٹرنیٹ پروٹوکول ورژن 6 (TCP/IP) کو غیر چیک کریں۔
5. ٹھیک ہے پر کلک کریں، پھر بند کریں پر کلک کریں۔ تبدیلیاں محفوظ کرنے کے لیے اپنے کمپیوٹر کو ریبوٹ کریں۔
طریقہ 5: سسٹم کی بحالی کو چلائیں۔
1. Windows Key + R دبائیں اور ٹائپ کریں۔ system.cpl پھر انٹر کو دبائیں۔

2. منتخب کریں سسٹم تحفظ ٹیب اور منتخب کریں نظام کی بحالی.
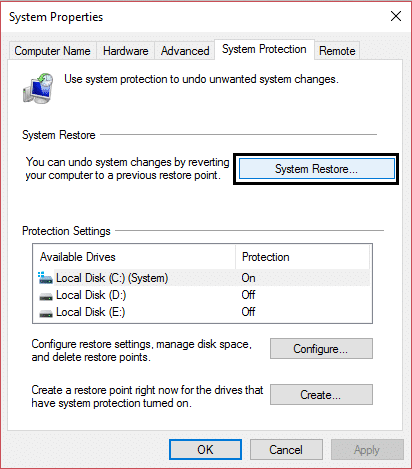
3. اگلا پر کلک کریں اور مطلوبہ کو منتخب کریں۔ سسٹم ریسٹور پوائنٹ.
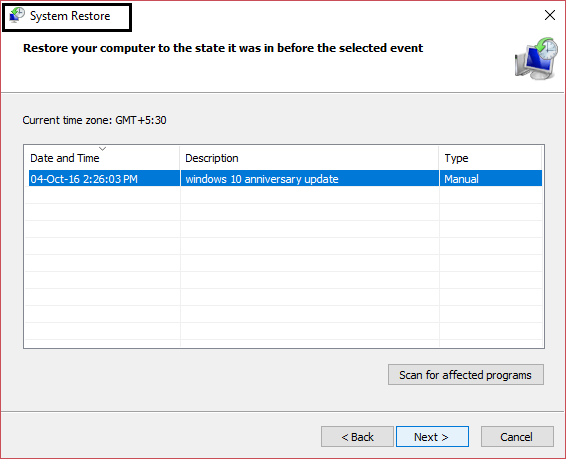
4. سسٹم کی بحالی کو مکمل کرنے کے لیے اسکرین پر دی گئی ہدایات پر عمل کریں۔
5. ریبوٹ کے بعد، آپ قابل ہو سکتے ہیں۔ Fix Windows Updates Error 0x8024401c.
طریقہ 6: رجسٹری درست کریں۔
1. Windows Key + R دبائیں پھر ٹائپ کریں۔ کی regedit اور رجسٹری ایڈیٹر کھولنے کے لیے Enter کو دبائیں۔

2. درج ذیل رجسٹری کلید پر جائیں:
ComputerHKEY_LOCAL_MACHINESOFTWAREPoliciesMicrosoftWindowsWindowsUpdateAU
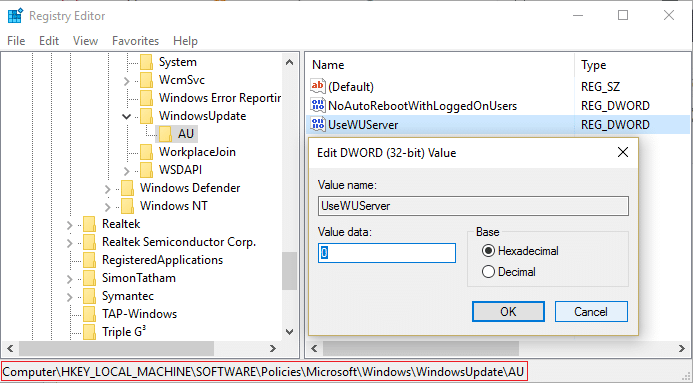
3. Make sure to select AU than in the right window pane double click on UseWUServer DWORD.
نوٹ: If you can’t find the above DWORD then you need to create it manually. Right-click on AU then select نئی > DWORD (32-bit) قدر. Name this key as WUServer استعمال کریں۔ اور داخل کریں.
4. Now, in the Value data field, enter 0 اور ٹھیک پر کلک کریں.
5. تبدیلیاں محفوظ کرنے کے لیے اپنے پی سی کو ریبوٹ کریں۔
طریقہ 7: گوگل ڈی این ایس استعمال کریں۔
You can use Google’s DNS instead of the default DNS set by your Internet Service Provider or the network adapter manufacturer. This will ensure that the DNS your browser is using has nothing to do with the YouTube video not loading. To do so,
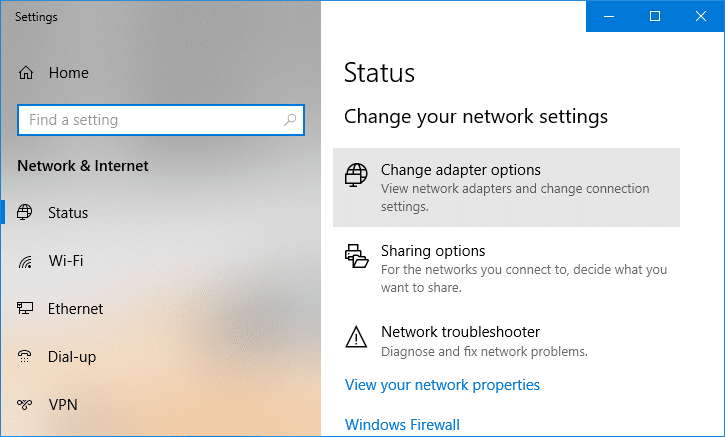
1. دایاں کلک کریں پر network (LAN) icon کے دائیں سرے میں ٹاسک بار، اور پر کلک کریں Open Network & Internet Settings.
![]()
2. میں ترتیبات app that opens, click on اڈاپٹر کے اختیارات کو تبدیل کریں دائیں پین میں۔
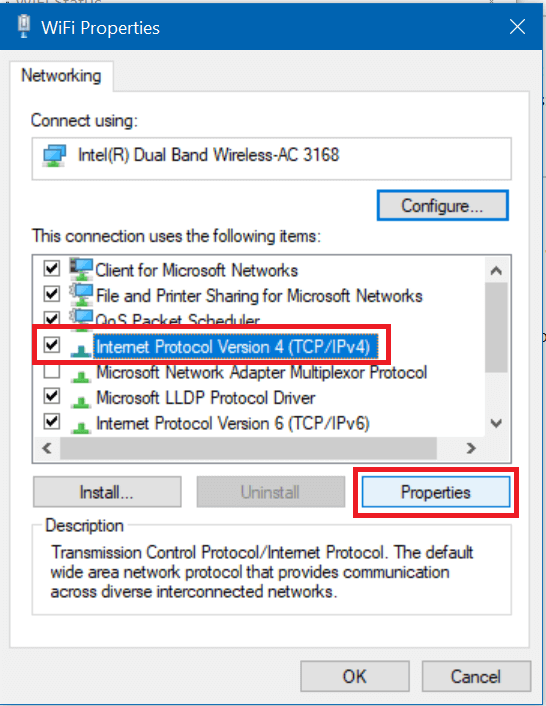
3. دایاں کلک کریں on the network you want to configure, and click on پراپرٹیز.

4. پر کلک کریں انٹرنیٹ پروٹوکول ورژن 4 (IPv4) in the list and then click on پراپرٹیز.
بھی پڑھیں: Fix Your DNS Server might be unavailable error
5. Under the General tab, choose ‘مندرجہ ذیل DNS سرور کے پتوں کا استعمال کریں’ and put the following DNS addresses.
ترجیحی DNS سرور: 8.8.8.8
متبادل DNS سرور: 8.8.4.4
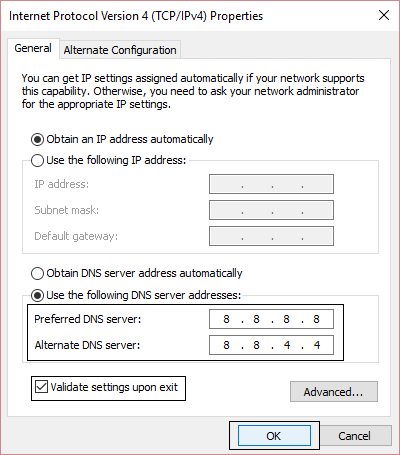
6. آخر میں ، کلک کریں OK at the bottom of the window to save changes.
7. Reboot your PC and once the system restart, see if you’re able to Fix Windows Updates Error 0x8024401c.
طریقہ 8: کلین بوٹ انجام دیں۔
Sometimes 3rd party software can conflict with Windows and can cause Windows Update error. To Fix Windows Updates Error 0x8024401c, you need to perform a clean boot on your PC and diagnose the issue step by step.

سفارش کی جاتی ہے:
یہ آپ نے کامیابی سے حاصل کی ہے۔ Fix Windows Updates Error 0x8024401c لیکن اگر آپ کے پاس اب بھی اس گائیڈ کے بارے میں کوئی سوالات ہیں تو تبصرے کے سیکشن میں بلا جھجھک ان سے پوچھیں۔