Tobelik xizmati yoki guruh ishga tushmadi

Fix The Dependency Service or Group Failed to Start: If you are facing this error “The Dependency Service or Group Failed to Start” then it’s because of Windows Services not starting. It seems like a Windows files is being mistaken as a virus and hence it becomes corrupt which in turn conflict with the Windows Network Location Awareness service. The main function of this service is to collect and store Network configuration information and notifies the Window when this information is changed. So if this service is corrupted any programs or services depending upon it will also fail. The Network List Service will not start as it explicitly depends on the Network Location Awareness service which is already disabled due to the corrupt configuration. The Network Location Awareness service is found in nlasvc.dll which is located in the system32 directory.
You will see the following error when trying to connect to a network:
A red “X” on the network icon in the system tray displaying error message – Connection status: Unknown The dependency service or group failed to start
The main problem associated with this problem is that users are unable to connect to the Internet even if they connect via an Ethernet cable. If you run the Windows Network troubleshooter it will just display the another error message “The Diagnostic Policy Service is not running” and will close without fixing the problem. This is because the service required for internet connection which are localservice and networkservice have been corrupted or removed from your PC.

Both of the above cases are fixable pretty easily, and users affected by this problem seems to get back their Internet connectivity as soon as the error is resolved. So without wasting any time let’s see how to actually Fix The Dependency Service or Group Failed to Start Error message with the below-listed troubleshooting guide.
Tobelik xizmati yoki guruh ishga tushmadi
Agar biror narsa noto'g'ri bo'lsa, tiklash nuqtasini yaratganingizga ishonch hosil qiling.
Method 1: Add Localservice and Networkservice to Administrators Group
1.Windows Key + X tugmalarini bosing va keyin tanlang Buyruqning xohishi (Admin).

2. cmd ga quyidagi buyruqni kiriting va har biridan keyin Enter tugmasini bosing:
net localgroup administrators localservice /add
net localgroup administrators networkservice /add
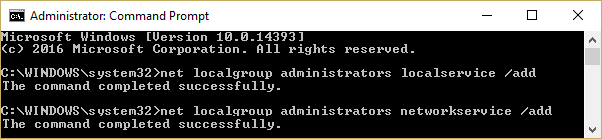
3.Exit the command prompt and reboot your PC to save changes.
Once your computer reboot you must have Fix The Dependency Service or Group Failed to Start issue.
Method 2: Give Network and Local service accounts access to all of the registry subkeys
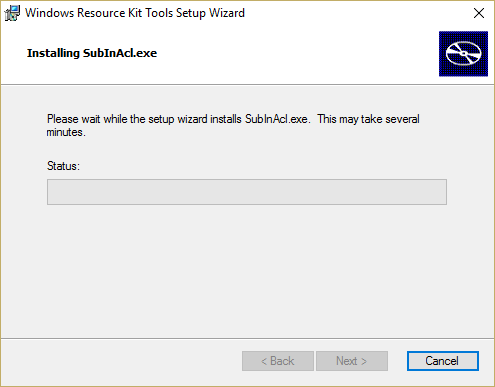
1.Download the SubInACL command-line tool Microsoft tomonidan.
2.Install it and then run the program.
3.Open a notepad file and save the file with the name permission.bat (The file extension is important) and change the save as type to “All files” in notepad.
subinacl.exe /subkeyreg “HKEY_LOCAL_MACHINEsystemCurrentControlSetservicesNlaSvc” /grant=”Local Service”
subinacl.exe /subkeyreg “HKEY_LOCAL_MACHINEsystemCurrentControlSetservicesNlaSvc” /grant=”Network Service”

4.If you are facing permission issue with DHCP then run the below command:
subinacl.exe /subkeyreg “HKEY_LOCAL_MACHINEsystemCurrentControlSetservicesdhcp” /grant=”Local Service”
subinacl.exe /subkeyreg “HKEY_LOCAL_MACHINEsystemCurrentControlSetservicesdhcp” /grant=”Network Service”
5.O'zgarishlarni saqlash uchun kompyuteringizni qayta ishga tushiring.
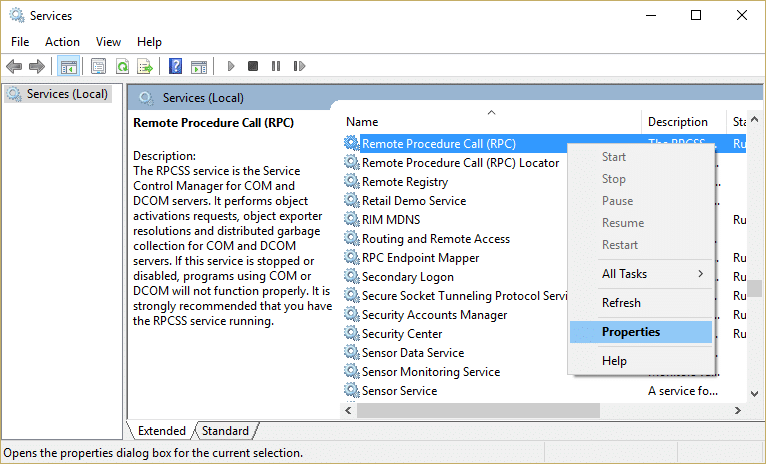
Method 3: Manually Turn on the required Services
1.Windows + R tugmalarini bosing va keyin yozing services.msc va Enter tugmasini bosing.

2.Make sure the following services are running and their startup type is set to Automatic:
Ilova qatlami shlyuzi xizmati
Tarmoq ulanishlari
Tarmoq joylashuvidan xabardorlik (NLA)
Plug va ishga tushirish
Masofaviy kirish avtomatik ulanish menejeri
Masofaviy kirish ulanish menejeri
Masofaviy protsedura qo'ng'irog'i (RPC)
Telefoniya
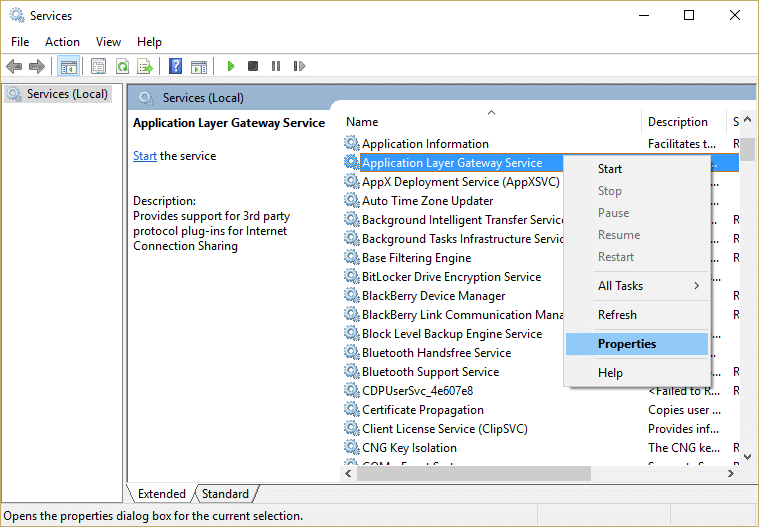
3.Sichqonchaning o'ng tugmachasini bosing va tanlang xususiyatlari for the above services then click start if the service is not already running and set their startup type to avtomatik. Do this for all the above services.

4.Reboot your PC to save changes and again check if the issue is resolved or not.
5.If you are again facing the issue then also start these services and set their startup type to Avtomatik:
COM+ Voqealar tizimi
Computer browser
DHCP mijozi
Tarmoq do'koni interfeysi xizmati
DNS mijozi
Tarmoq ulanishlari
Tarmoq joylashuvidan xabardorlik
Tarmoq do'koni interfeysi xizmati
Masofaviy protsedura chaqiruvi
Masofaviy protsedura qo'ng'irog'i (RPC)
Server
Xavfsizlik hisoblari menejeri
TCP/IP Netbios helper
WLAN Avtomatik sozlash
Ish stantsiyani
Eslatma: While running DHCP client you may receive the error “Windows could not start the DHCP Client Service on Local Computer. Error 1186: Element not found.” Just ignore this error message.
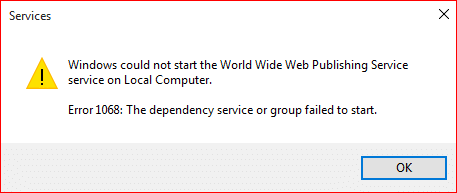
Similarly, you can get the error message “Windows could not start the Network Location Awareness service on Local Computer. Error 1068: The dependency service or group failed to start” when running Network Location Awareness service, again just ignore the error message.
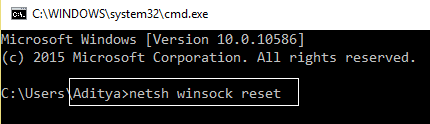
4 -usul: Tarmoq adapterini tiklash
1.Windows Key + X tugmalarini bosing va keyin tanlang Buyruqning xohishi (Admin).

2. cmd ga quyidagi buyruqni kiriting va har biridan keyin Enter tugmasini bosing:
netsh winsock reset katalog
netsh int ip reset reset.log hit
3.You will get a message “Successfully reset the Winsock Catalog."
4.Reboot your PC and this will Fix The Dependency Service or Group Failed to Start error.
Method 5: Resetting TCP/IP to Default
1.Windows Key + X tugmalarini bosing va keyin tanlang Buyruqning xohishi (Admin).
2. cmd ga quyidagi buyruqni kiriting va har biridan keyin Enter tugmasini bosing:
- ipconfig / flushdns
- nbtstat –r
- netsh int ip reset reset c:resetlog.txt
- netsh winsock reset
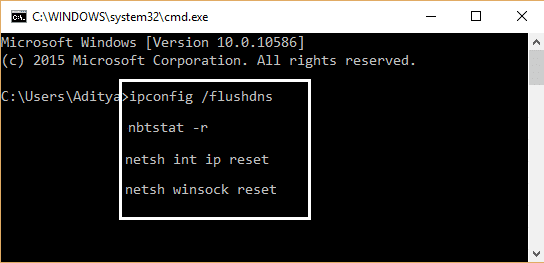
3.O'zgarishlarni qo'llash uchun qayta ishga tushiring. DNS-ni tozalash kabi ko'rinadi Fix The Dependency Service or Group Failed to Start.
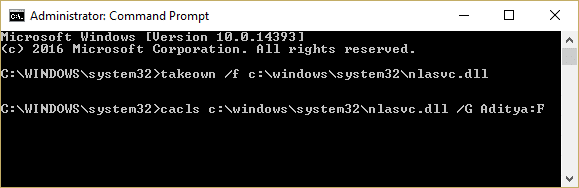
Method 6: Replace the corrupted nlasvc.dll
1.Make sure you have access to one of the working computer. Then navigate to the following directory in the working system:
C:windowssystem32nlasvc.dll
2.Copy the nlasvc.dll into USB and then insert the USB into the non-working PC which is showing the error message “The Dependency Service or Group Failed to Start.”

3.Next, press Windows Key + X then select Buyruqning xohishi (Admin).
4. cmd ga quyidagi buyruqni kiriting va har biridan keyin Enter tugmasini bosing:
takeown /f c:windowssystem32nlasvc.dll
cacls c:windowssystem32nlasvc.dll /G your_username:F
Eslatma: Replace your_username with your PC username.
5.Now navigate to the following directory:
C:windowssystem32nlasvc.dll
6. nomini o'zgartiring nlasvc.dll to nlasvc.dll.old and copy the nlasvc.dll from the USB to this location.
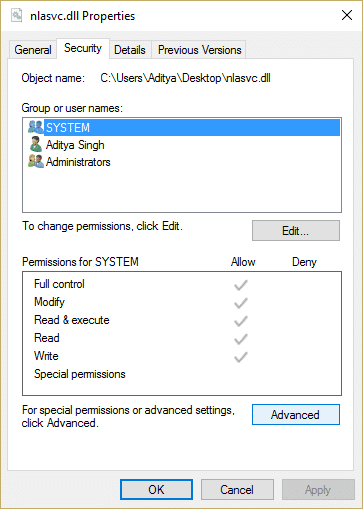
7.Right-click on the nlasvc.dll file and select Xususiyatlar.
8.Then switch to Xavfsizlik yorlig'i bosing Murakkab.
9.Under Owner O'zgartirish tugmasini bosing va keyin yozing NT SERVICEtrustedInstaller and click Check Names.
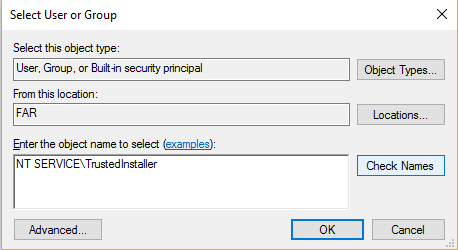
10. Keyin bosing OK on the dialog box. Then click Apply followed by OK.
11.O'zgarishlarni saqlash uchun kompyuteringizni qayta ishga tushiring.
7-usul: Windows 10-ni o'rnating
Bu usul oxirgi chora hisoblanadi, chunki agar hech narsa ishlamasa, bu usul sizning shaxsiy kompyuteringizdagi barcha muammolarni albatta tuzatadi. Ta'mirlash Tizimda mavjud bo'lgan foydalanuvchi ma'lumotlarini o'chirmasdan, tizim bilan bog'liq muammolarni tuzatish uchun faqat joyida yangilash yordamida o'rnating. Shunday qilib, Windows 10 ni qanday qilib oson o'rnatishni tiklashni ko'rish uchun ushbu maqolani kuzatib boring.
Siz uchun tavsiya etiladi:
Siz muvaffaqiyatga erishdingiz Tobelik xizmati yoki guruh ishga tushmadi ammo agar sizda ushbu qo'llanma bo'yicha savollaringiz bo'lsa, ularni sharhlar bo'limida so'rashingiz mumkin.