- in cửa sổ by quản trị viên
Khắc phục MultiVersus không khởi chạy trong Windows 10

MultiVersus is a famous online multiplayer fighting game that is rocking today’s gaming world. Yet, few users complain about the MultiVersus not launching issue when the game is launched on their Windows 10 PC. If you are in the same boat, the troubleshooting hacks discussed in this article will help you sail the problem.
How to Fix MultiVersus Not Launching in Windows 10
If you are vexed by MultiVersus won’t launch issue in your Windows 10 computer, here are a few possible reasons why you must analyze them carefully to sort out the problem.
- PC không đáp ứng được yêu cầu cơ bản của trò chơi.
- Một số chương trình nền khác đang can thiệp vào trò chơi.
- Bạn đang sử dụng phiên bản trình điều khiển chưa được xác minh.
- The graphics settings of the game are misconfigured.
- Sự hiện diện của phần mềm độc hại và virus.
- .NET framework và hệ điều hành không được cập nhật lên phiên bản mới nhất.
- DirectX version is not up-to-date.
- Ép xung.
- Bất kỳ tập tin cài đặt trò chơi bị cấu hình sai hoặc bị hỏng cũng gây ra sự cố.
- Các tệp có thể phân phối lại của Microsoft C++ không tương thích với trò chơi và PC.
Here are a few possible troubleshooting methods that will help you fix the discussed issue.
Phương pháp 1: Phương pháp khắc phục sự cố cơ bản
Thực hiện theo các phương pháp khắc phục sự cố cơ bản này để khắc phục sự cố đã nói.
1A. Check System Requirements
Nhiều phiên bản Yêu cầu hệ thống tối thiểu
- CPU: Intel Core i5-2300 hoặc AMD FX-8350
- RAM: 4 GB
- THẺ VIDEO: Nvidia GeForce GTX 550 Ti or AMD Radeon HD 5850 | Intel UHD 750
- PIXEL SHADERS: 5.0
- VERTEX SHADES: 5.0
- KHÔNG GIAN TRỐNG CỦA ĐĨA: 6 GB
- RAM VIDEO ĐƯỢC CHỈ ĐỊNH: 1024 MB
Nhiều phiên bản Yêu cầu đề xuất
- CPU: Intel Core i5-3470 hoặc AMD Ryzen 3 1200
- RAM: 8 GB
- THẺ VIDEO: Nvidia GeForce GTX 660 or AMD Radeon R9 270
- PIXEL SHADERS: 5.0
- VERTEX SHADES: 5.0
- KHÔNG GIAN TRỐNG CỦA ĐĨA: 6 GB
- RAM VIDEO ĐƯỢC CHỈ ĐỊNH: 2048 MB
1B. Check your internet connection
Unstable internet connection leads to MultiVersus is not working issue, also if there are any obstacles between your router and your computer, they may interfere with the wireless signal and will cause intermittent connection problems.
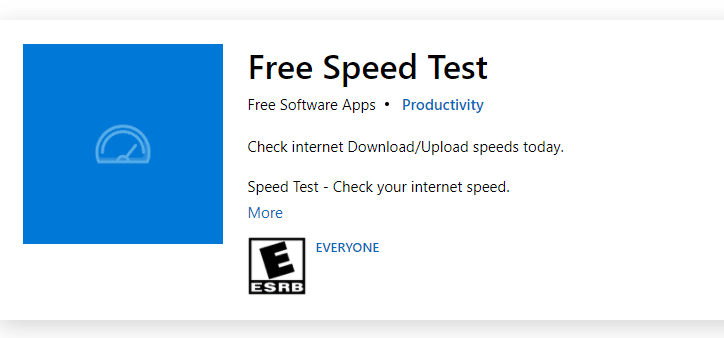
Bạn có thể chạy một kiểm tra tốc độ để biết mức tốc độ mạng tối ưu cần thiết để có kết nối thích hợp.
Đảm bảo rằng thiết bị của bạn đáp ứng các tiêu chí dưới đây.
- Tìm cường độ tín hiệu của mạng của bạn và nếu nó rất thấp, hãy loại bỏ tất cả các vật cản trên đường đi.
- Tránh có quá nhiều thiết bị kết nối vào cùng một mạng.
- Luôn mua modem/bộ định tuyến được Nhà cung cấp dịch vụ Internet (ISP) của bạn xác minh và chúng không có xung đột.
- Không sử dụng bột thấm hút và làm sạch dầu cáp cũ, đứt hoặc hư hỏng. Thay thế các dây cáp nếu cần thiết.
- Đảm bảo dây dẫn từ modem đến bộ định tuyến và từ modem đến tường ổn định và không bị nhiễu.
Nếu có bất kỳ sự cố kết nối internet nào, hãy xem hướng dẫn của chúng tôi Cách khắc phục sự cố kết nối mạng trên Windows 10 để khắc phục sự cố tương tự.
1C. Stop Overclocking
- Every high-end computer is built with the option of Overclocking which helps in outputting more juice than your specifications that you already have. Running the graphics card or processor faster than the default speed refers to overclocking.
- Khi điều này xảy ra, máy tính của bạn sẽ đạt nhiệt độ tối đa sau một thời gian cụ thể. Máy tính phát hiện điều này và điều chỉnh tốc độ xung nhịp về tốc độ bình thường cho đến khi nguội hẳn. Tốc độ đồng hồ được tăng trở lại sau khi chúng nguội đi.
- Điều này làm tăng hiệu suất máy tính của bạn và giúp ích rất nhiều nếu bạn không có một máy tính mạnh mẽ.
- It must be noted that all the games do not support overclocking. The same applies to MultiVersus. So, you must try disabling all overclocking on your computer and try launching the game. If it launches well, the issue is fixed.
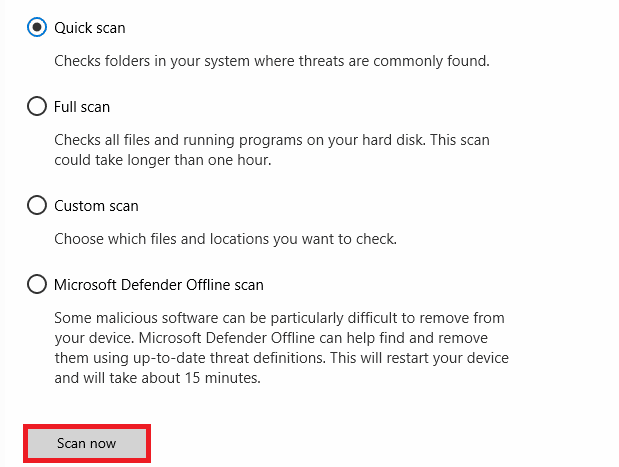
1D. Chạy quét phần mềm độc hại
The presence of a virus or malware attack will result in gaming problems on your computer. If in case, the virus attack is very severe, you cannot connect to any online game continuously at all. To resolve the problem, you have to remove the virus or malware completely from your Windows 10 computer.
Bạn nên quét máy tính của mình theo hướng dẫn trong hướng dẫn của chúng tôi Làm cách nào để chạy Quét vi-rút trên máy tính của tôi?
Ngoài ra, nếu bạn muốn xóa phần mềm độc hại khỏi máy tính của mình, hãy xem hướng dẫn của chúng tôi Cách xóa phần mềm độc hại khỏi PC trong Windows 10.
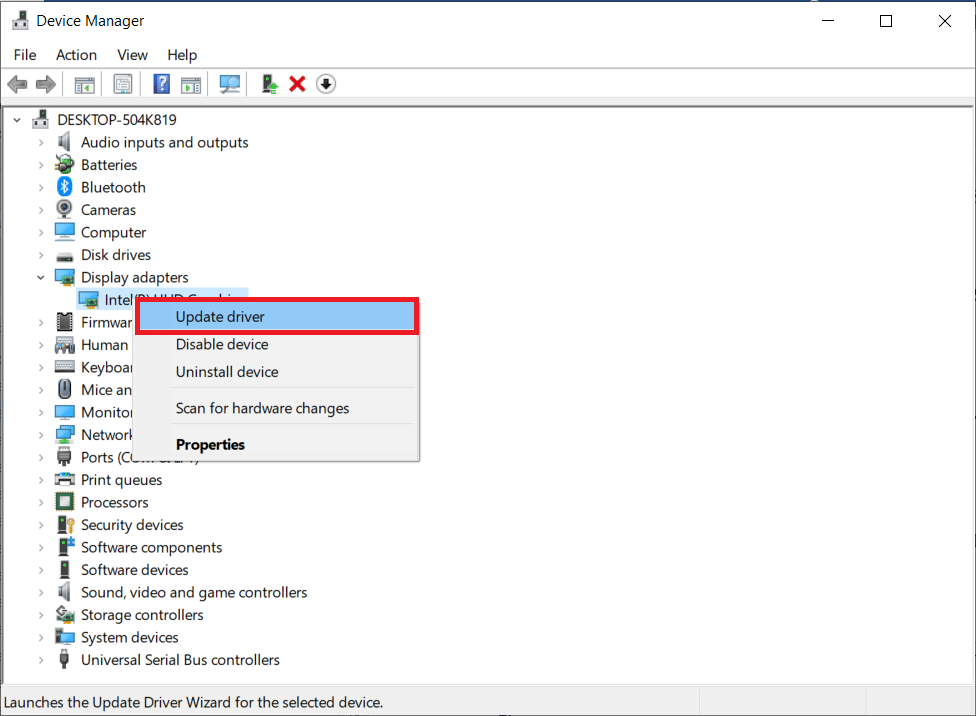
1E. Update GPU Drivers
Graphical drivers are responsible for heavy graphical images and video processing games. If you face any launching conflicts in the MultiVersus game, make sure you use an updated version of device drivers, as they serve as a link between the hardware and Operating System of your PC. Many users have suggested that updating drivers have fixed MultiVersus not working issue. Read and implement the steps instructed in our guide 4 Ways to Update Graphics Drivers in Windows 10 to do so.
Cũng đọc: Sửa lỗi trình điều khiển được tìm thấy trong Windows cho thiết bị của bạn nhưng gặp lỗi
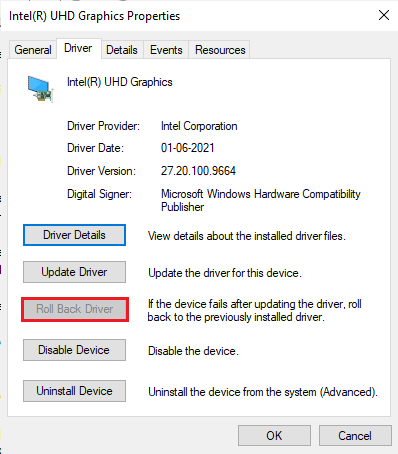
1F. Roll Back GPU Drivers
Sometimes, the current version of GPU drivers may cause the discussed launching issue in MultiVersus, and in this case, you have to restore previous versions of installed drivers. This process is called khôi phục trình điều khiển và bạn có thể dễ dàng khôi phục trình điều khiển máy tính của mình về trạng thái trước đó bằng cách làm theo hướng dẫn của chúng tôi Cách khôi phục trình điều khiển trên Windows 10.
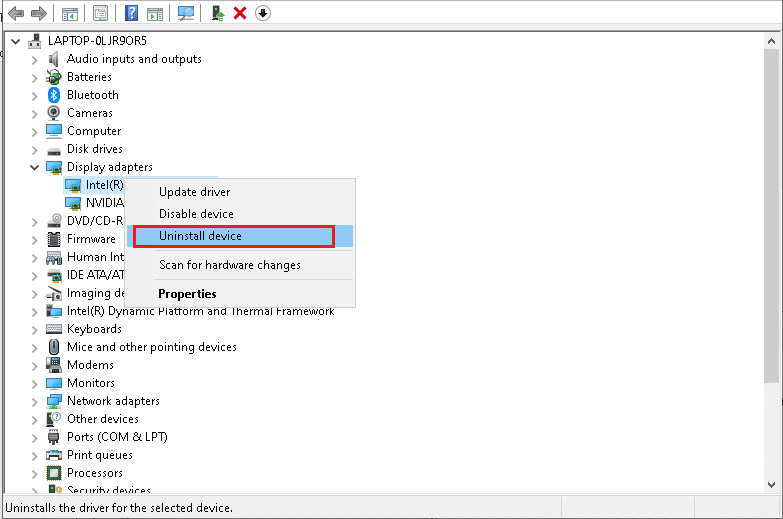
1G. Reinstall GPU Driver
If you still face MultiVersus not starting issue after updating your GPU drivers, then reinstall device drivers to fix any incompatibility issues. There are several ways to reinstall drivers on your computer. Yet, you can easily reinstall Graphical drivers as instructed in our guide How to Uninstall and Reinstall Drivers on Windows 10.
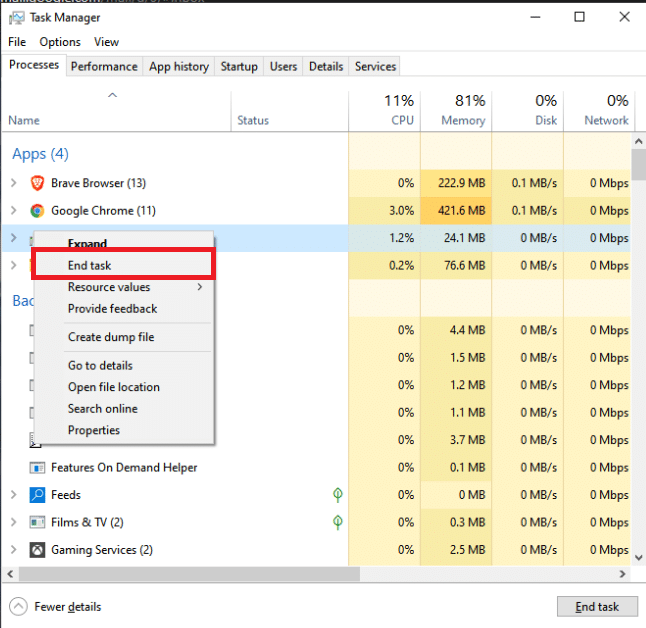
1H. End Background Processes
Several users have confirmed that MultiVersus not starting on PC can be resolved by closing all the background tasks running on your PC. To implement the task, follow our guide How to End Task in Windows 10, and proceed as instructed.
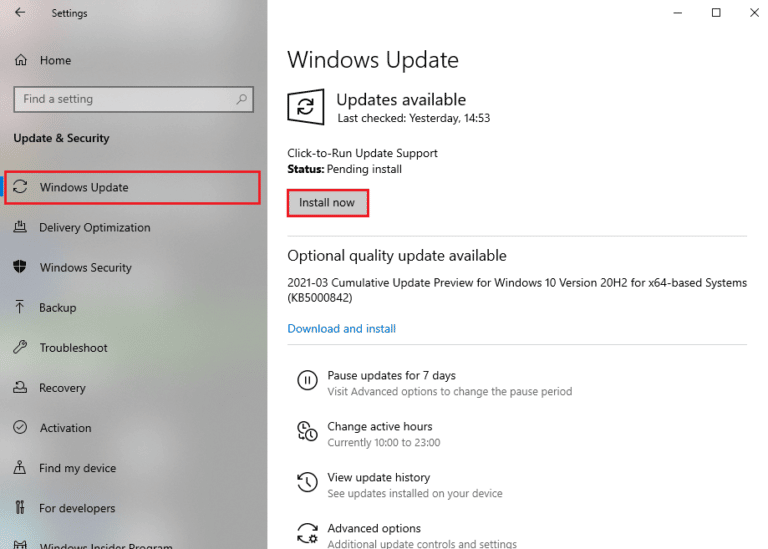
1I. Update Windows
Bạn cũng có thể xóa lỗi trong máy tính và trò chơi bằng cách cập nhật Hệ điều hành của mình. Luôn đảm bảo rằng bạn đã cập nhật Hệ điều hành Windows của mình và nếu có bất kỳ bản cập nhật nào đang chờ xử lý, hãy sử dụng hướng dẫn của chúng tôi Cách tải xuống và cài đặt bản cập nhật mới nhất của Windows 10
1J. Disable Antivirus Temporarily (If Applicable)
Some incompatible antivirus programs installed on your computer will cause MultiVersus launching problem. To avoid conflicts, you must ensure the security settings of your Windows 10 computer and check if they are stable or not. To find whether the antivirus suite is the reason for the discussed issue, disable it once and try connecting to a network.
Đọc hướng dẫn của chúng tôi về Cách tắt tạm thời phần mềm chống vi-rút trên Windows 10 và làm theo hướng dẫn để tạm thời tắt chương trình Chống vi-rút trên PC của bạn.
Nếu bạn đã khắc phục được sự cố của mình sau khi tắt chương trình chống vi-rút trên máy tính, bạn nên gỡ cài đặt hoàn toàn chương trình đó khỏi PC.
Read our guide Force Uninstall Programs which won’t Uninstall in Windows 10 to uninstall your antivirus program on your computer.
Cũng đọc: Cách gỡ cài đặt McAfee LiveSafe trong Windows 10
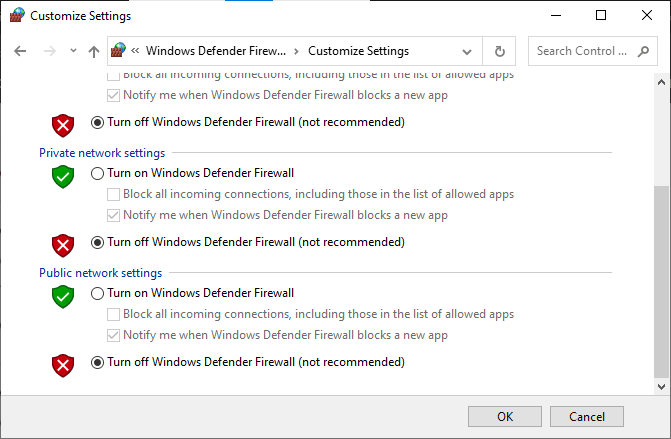
1K. Turn Off Windows Defender Firewall (Not Recommended)
Your computer will face MultiVersus is not working issue, due to an over-protective firewall suite in the Windows 10 PC. To resolve the problem, you can either add a new rule for your game, whitelist the game or as the last fix, disable the firewall temporarily.
Our guide on How to Disable Windows 10 Firewall will help you.
1L. Sửa chữa tập tin hệ thống
If there are any missing or damaged files on your Windows 10 PC, you will face MultiVersus takes forever to launch issue. Yet, you are repairing these corrupt files by using inbuilt utilities namely, System File Checker và Quản lý và phục vụ hình ảnh triển khai.
Đọc hướng dẫn của chúng tôi về Cách sửa chữa tệp hệ thống trên Windows 10 và làm theo các bước theo hướng dẫn để sửa chữa tất cả các tệp bị hỏng của bạn.
Method 2: Run MultiVersus Game as Administrator
If MultiVersus does not have required administrative privileges, a few essential features of the game will be limited causing you MultiVersus not launching issue whenever you open the game or install any updates. Follow the below-mentioned instructions to run the game as an administrator.
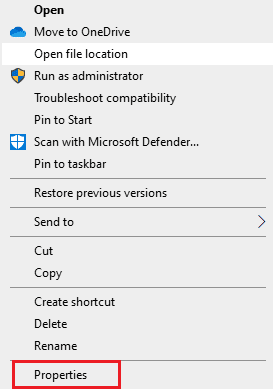
1. Nhấp chuột phải vào MultiVersus shortcut trên Máy tính để bàn.
Lưu ý: Bạn cũng có thể đi đến thư mục cài đặt và nhấp chuột phải vào nó.
2. Sau đó, chọn Bất động sản tùy chọn.
3. Bây giờ, chuyển sang Khả năng tương thích tab và nhấp vào Chạy chương trình này như là Administrator.
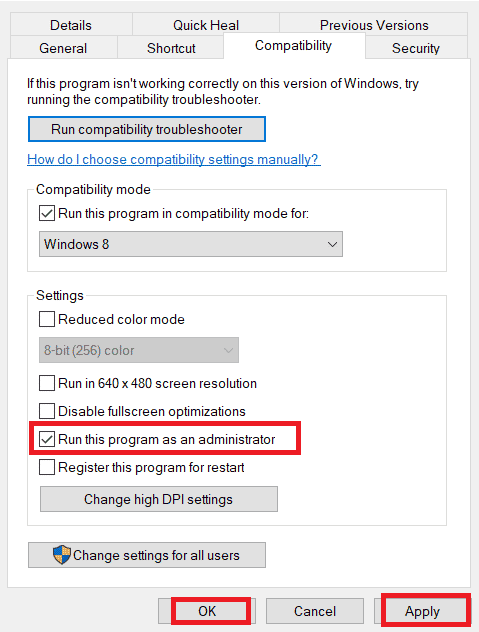
4. Cuối cùng, nhấp vào Áp dụng> OK để lưu các thay đổi.
Check if you have fixed MultiVersus launching issues.
Cũng đọc: Sửa lỗi WoW mất mãi mãi để khởi chạy trong Windows 10
Phương pháp 3: Thay đổi mức độ ưu tiên của quy trình trò chơi
The preference of an application or process tells the computer the importance and if it should be given preference over the others while allocating the resources. The priority of every application is normal except the system processes, by default. MultiVersus might crash if it didn’t get enough resources.
1. Nhấn nút Các phím Ctrl + Shift + Esc cùng nhau mở Thanh tác vụ.
2. Bây giờ, hãy tìm kiếm MultiVersus process.
3. Sau đó thay đổi mức độ ưu tiên thành Ưu tiên cao và kiểm tra xem điều này có hiệu quả không.
Lưu ý: Thay đổi mức độ ưu tiên hết sức thận trọng vì việc thay đổi mức độ ưu tiên của quy trình một cách bất cẩn có thể khiến hệ thống của bạn cực kỳ chậm hoặc không ổn định.
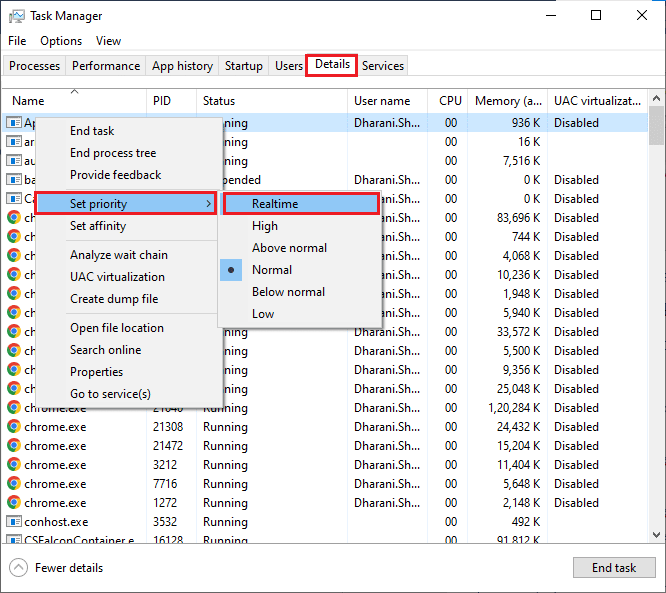
4. Đóng Task Manager và khởi động lại máy tính của bạn.
Phương pháp 4: Đặt hiệu suất cao
Bạn cũng có thể tối ưu hóa trò chơi của mình khi cài đặt cài đặt gói điện hiệu suất cao. Các gói nguồn này được phát triển để quản lý cài đặt nguồn trên cài đặt di động. Thực hiện theo các hướng dẫn được đề cập bên dưới để sử dụng cài đặt gói nguồn hiệu suất cao trong hệ thống của bạn.
1. Nhấn nút Các phím Windows + I đồng thời mở Cài đặt Windows.
2. Bây giờ, hãy nhấp vào WELFARE thiết lập.
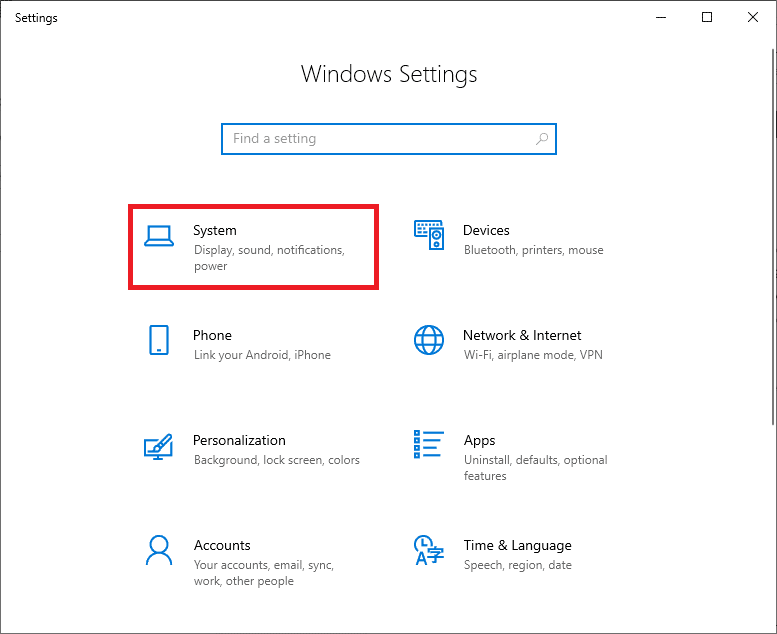
3. Bây giờ, chọn Sức mạnh và giấc ngủ tùy chọn và nhấp vào thiết lập quyền lực bổ sung Dưới Cài đặt liên quan.
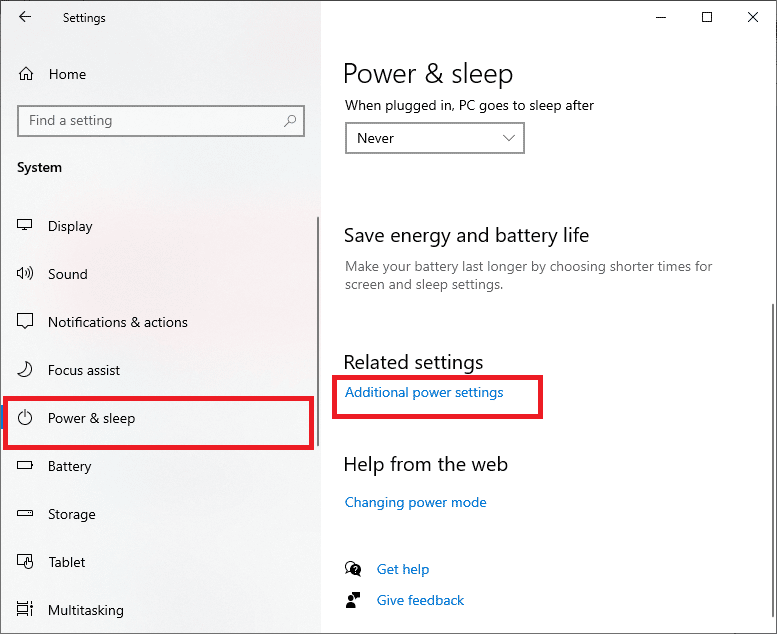
4. Bây giờ, hãy chọn Hiệu năng cao tùy chọn theo Kế hoạch bổ sung cao như thể hiện trong hình ảnh dưới đây.
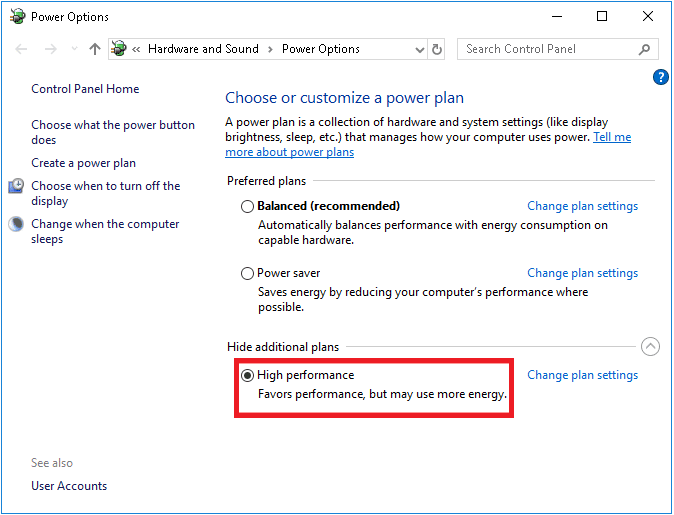
Now you have optimized your system, check if you have fixed MultiVersus won’t launch on startup issue.
Cũng đọc: Sửa lỗi thiếu file tải về trên Steam
Method 5: Update Steam App & MultiVersus Game
If you use an outdated Steam application, you cannot access any games smoothly. Hence always make sure you use an updated version of Steam and MultiVersus game before launching it.
1. Đánh Chốt cửa sổ và loại hơi nước, sau đó nhấp vào Mở.
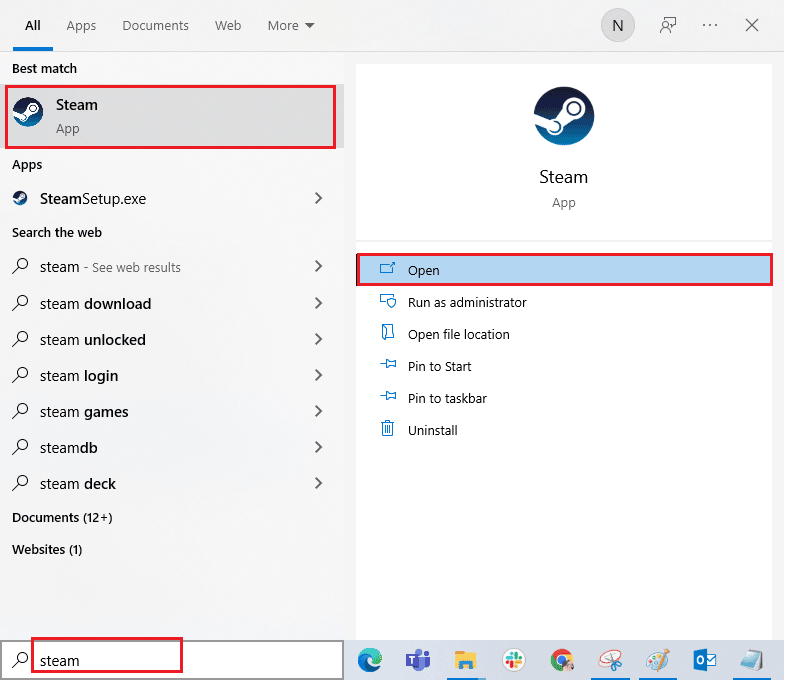
2. Bây giờ, hãy nhấp vào hơi nước ở góc trên bên trái của màn hình, theo sau là Kiểm tra cập nhật ứng dụng khách Steam… như được đánh dấu bên dưới.
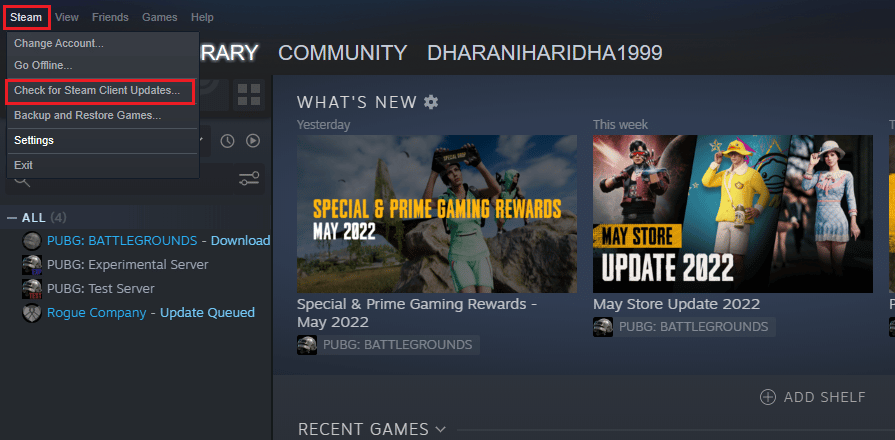
3. Nếu bạn có bất kỳ bản cập nhật mới nào cần tải xuống, hãy cài đặt chúng và đảm bảo ứng dụng khách Steam của bạn đã được cập nhật.
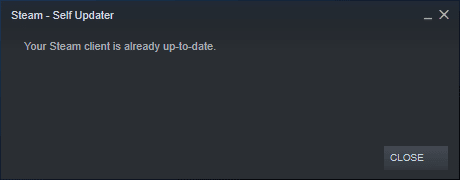
4. Bây giờ, khởi chạy lại hơi nước và kiểm tra xem vấn đề đã được giải quyết ngay bây giờ chưa.
Likewise, it is always essential that your game run at its latest version to avoid any conflicts. Until your game is updated, you cannot log in to MultiVersus servers successfully.
Đến cập nhật trò chơi của bạn, hãy làm theo các bước được đề cập dưới đây.
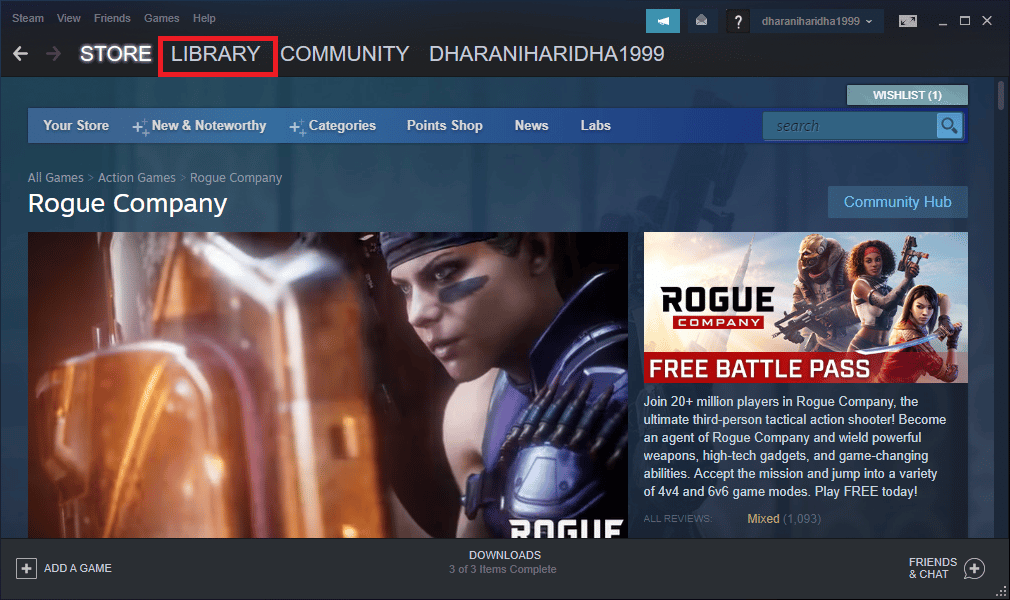
1. Phóng hơi nước và điều hướng đến THƯ VIỆN.
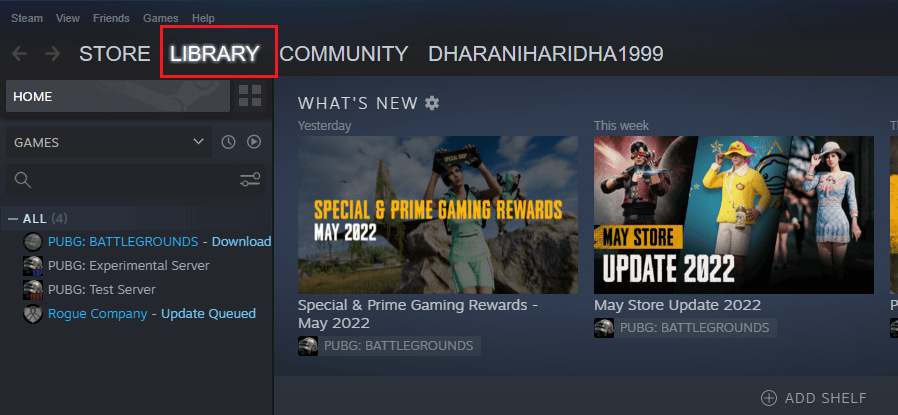
2. Bây giờ, hãy nhấp vào TRANG CHỦ and search for MultiVersus.
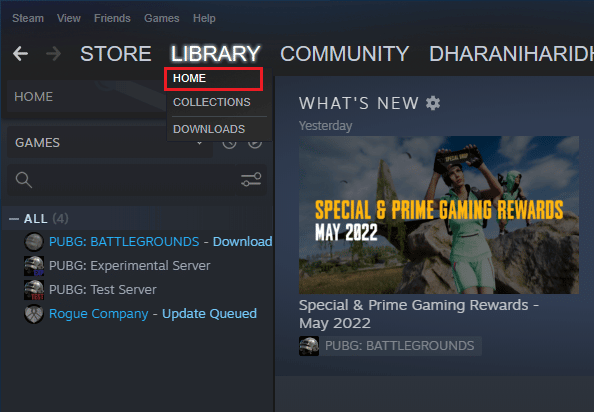
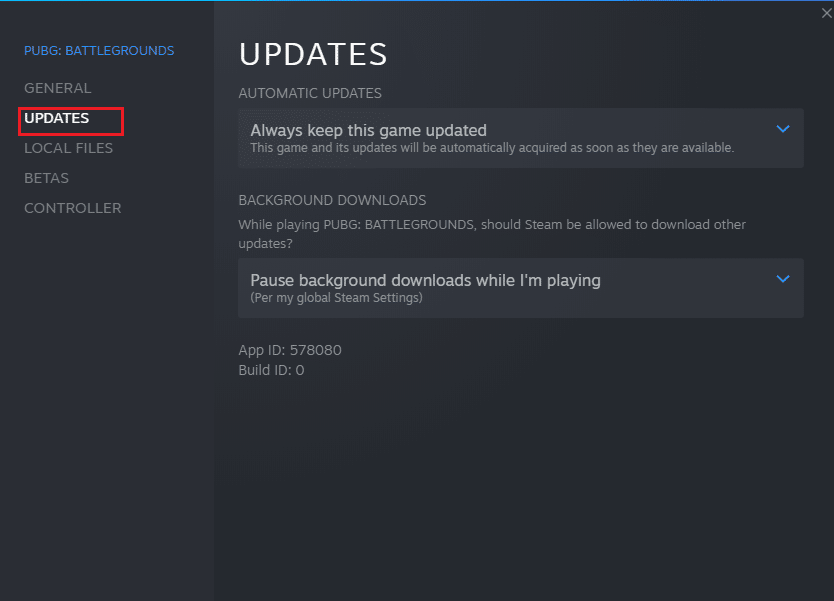
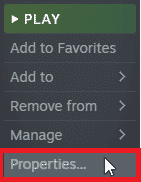
3. Sau đó, nhấp chuột phải vào trò chơi và chọn Tính chất… tùy chọn.

4. Bây giờ, chuyển sang CẬP NHẬT tab và kiểm tra xem có bản cập nhật nào đang chờ xử lý hay không. Nếu vậy, hãy làm theo hướng dẫn trên màn hình để tải xuống bản cập nhật mới nhất.
After an update, check if MultiVersus not launching issue is fixed.
Phương pháp 6: Vô hiệu hóa tối ưu hóa toàn màn hình
Few users have suggested that disabling full-screen optimizations on PC has helped them fix MultiVersus is not launching issue. Follow as instructed.
1. Navigate to the Steam THƯ VIỆN đơn.
2. Now, right-click on the MultiVersus game and click on Tính chất…
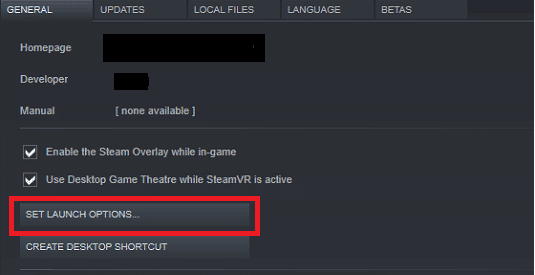
3. Bây giờ, chuyển sang CÁC VẤN ĐỀ CHUNG tab và nhấp vào THIẾT LẬP CÁC TÙY CHỌN KHỞI ĐỘNG… như mô tả.
4. Bây giờ, một cửa sổ mới sẽ được mở với cảnh báo nâng cao cho người dùng. Để mở trò chơi ở chế độ cửa sổ, hãy nhập –Window tham số.
5. Bây giờ, hãy lưu các thay đổi bằng cách nhấp vào OK và thoát khỏi cửa sổ Thuộc tính.
6. Bây giờ, khởi chạy lại các trò chơi and ensure that it runs in windowed mode.
Lưu ý: You can also navigate to THIẾT LẬP CÁC TÙY CHỌN KHỞI ĐỘNG… một lần nữa và gõ các tham số sau thay vì tham số cuối cùng.
–có cửa sổ -w 1024
7. Now, save the changes by clicking on OK.
Tham số này sẽ thiết lập trò chơi được khởi chạy ở chế độ cửa sổ.
Cũng đọc: Fix Steam App Configuration Unavailable in Windows 10
Phương pháp 7: Vô hiệu hóa lớp phủ trong trò chơi
The Steam Overlay is a piece of Steam that allows the users to access friends list, and web browser and allows in-game purchasing. It is a significant tool, yet it sometimes triggers MultiVersus not launching on startup issue. If you want to solve this problem, then turn off the Steam game overlay.
1. Mở hơi nước ứng dụng và bấm vào THƯ VIỆN.
2. Bây giờ, nhấp chuột phải vào Nhiều phiên bản và click vào Tính chất…

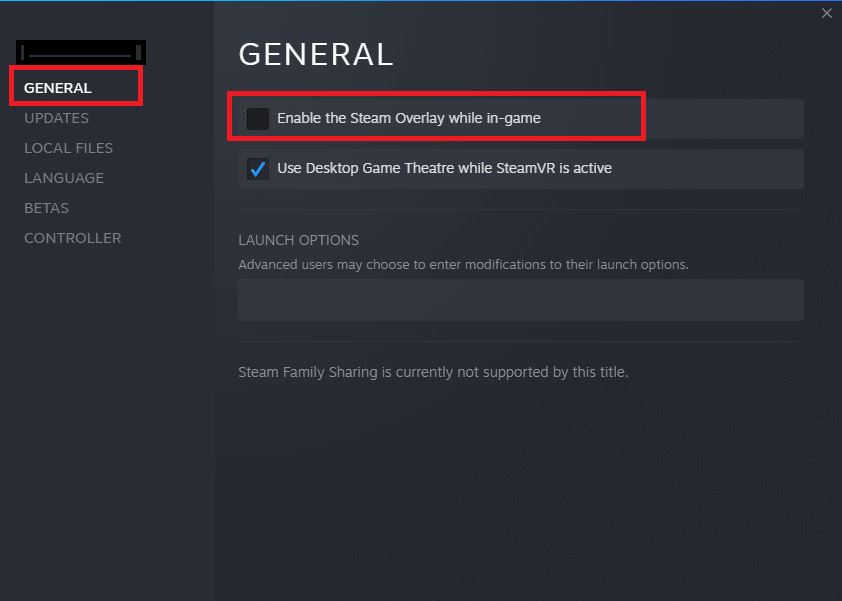
3. Bây giờ, chuyển sang CÁC VẤN ĐỀ CHUNG tab và bỏ chọn hộp chứa Kích hoạt Lớp phủ Steam khi đang trong trò chơi.
4. Cuối cùng, khởi động lại trò chơi and check if the MultiVersus launching issue is solved.
Phương pháp 8: Xác minh tính toàn vẹn của tệp trò chơi
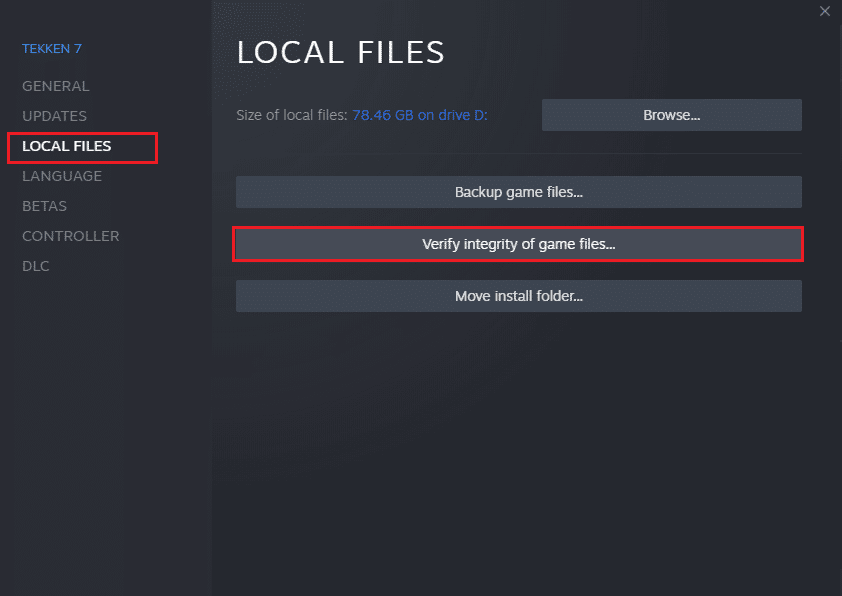
We have seen many cases in which the game files are either missing or corrupt or it had incomplete installations. Users could also experience MultiVersus not starting on PC issue if they are interrupted by the update process or if the game files are being moved. In this method, you will be opening Steam and using the built-in function for verifying the integrity of the game. It will be replaced if the application finds something. Read our guide on how to verify integrity of game files on Steam.
Cũng đọc: Sửa lỗi Steam Client Bootstrapper không phản hồi trong Windows 10
Phương pháp 9: Cập nhật .NET Framework
.NET framework in Windows 10 computer is essential for uninterrupted service of modern apps and games. Many games have an auto-update feature for the .NET framework, and thus it will be updated automatically whenever an update is available. In another case, if an update prompts in your PC, you can manually install the latest version of the .NET framework, as discussed below, to fix MultiVersus not launching issue.
1. Kiểm tra cập nhật mới cho NET framework từ Trang web chính thức của Microsoft.
2. Nếu có bất kỳ cập nhật nào, hãy nhấp vào/đề nghị liên kết và nhấp vào Tải xuống .NET Framework 4.8 Thời gian chạy tùy chọn.
Lưu ý: Đừng bấm vào Tải xuống gói nhà phát triển .NET Framework 4.8 vì nó được sử dụng bởi các nhà phát triển phần mềm.
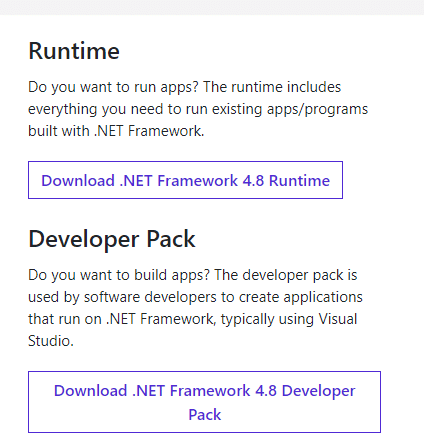
3. Đi đến Tải xuống của tôi, nhấp đúp chuột vào file cài đặt để chạy file đã tải xuống và làm theo hướng dẫn hướng dẫn trên màn hình to install the .NET framework successfully on your Windows PC. Once done, check if you have fixed the discussed issue or not.
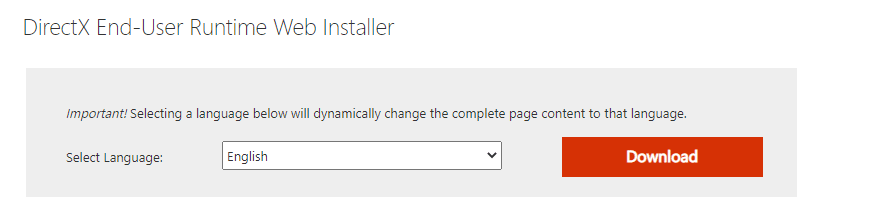
Phương pháp 10: Cập nhật DirectX
To enjoy a seamless multimedia experience on MultiVersus, you have to make sure whether DirectX is installed, and it is updated to its latest version. DirectX helps you improve the visual media experience for graphical games and applications especially. It is worth updating DirectX needed for this game.
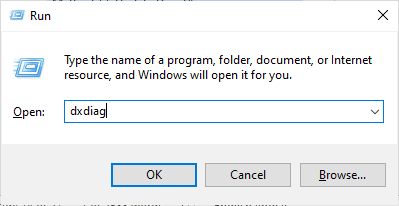
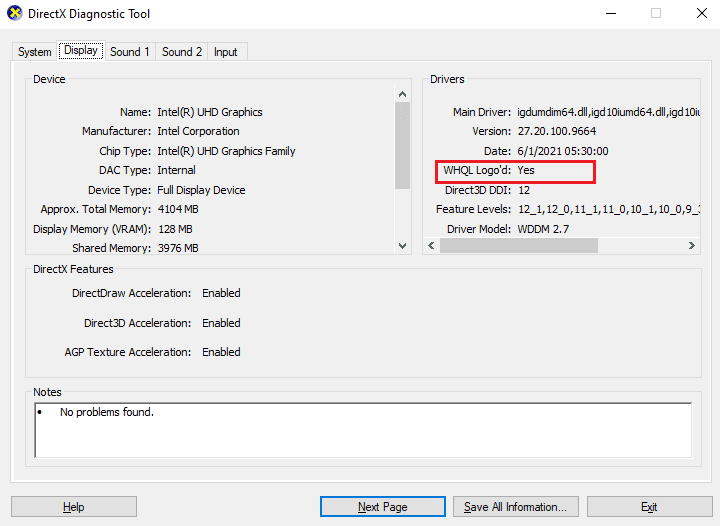
1. Nhấn vào Phím Windows + R đồng thời khởi động chạy hộp thoại.
2. Kiểu dxdiag và nhấn Nhập khóa để mở DirectX Diagnostic Tool.
3. Kiểm tra Phiên bản DirectX, if it contains DirectX 12 hay không.
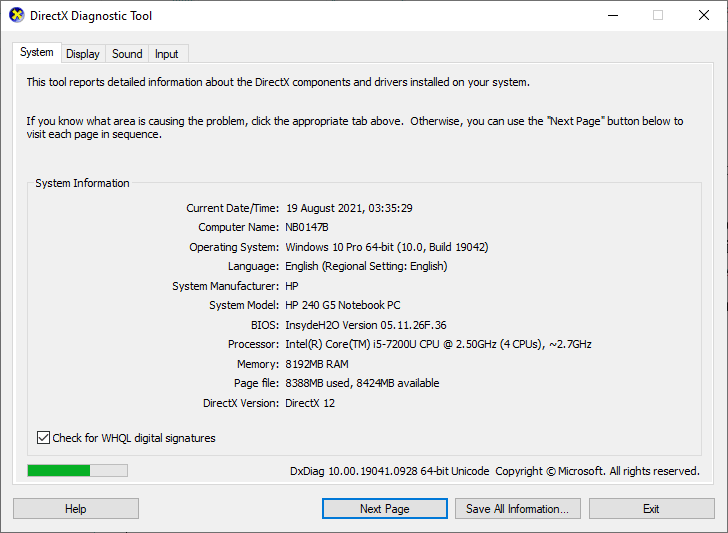
4. If you do not have DirectX 12 in your system, download and install it from the Trang tải xuống DirectX bằng cách làm theo hướng dẫn trên màn hình.
After installing DirectX, check if the issue occurs again.
Lưu ý: Đảm bảo Check for WHQL digital signatures box is checked in WELFARE tab and in all tabs, check whether WHQL Logo'd được đặt thành Có.
Phương pháp 11: Sửa chữa Microsoft Visual C++ Redistributable
Alternately, you can try to repair the Microsoft Visual C++ Redistributable packages to fix MultiVersus not launching issue as follows:
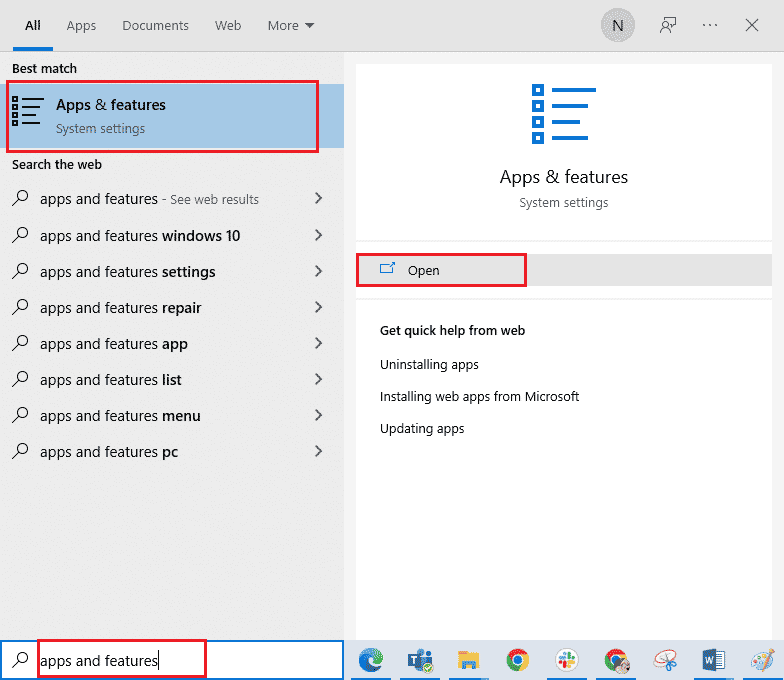
1. Nhấn vào Chốt cửa sổ, kiểu Ứng dụng và tính năng, sau đó nhấp vào Mở.
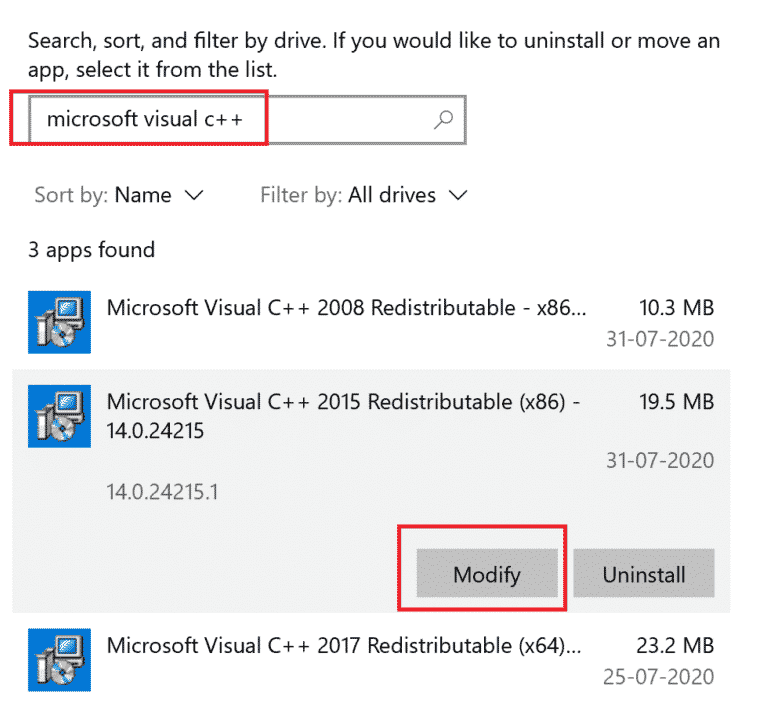
2. Tìm kiếm Microsoft Visual C ++ Redistributable gói.
3. Then, select the package, and click on Sửa đổi tùy chọn.
4. Sau đó, nhấp vào Có trên User Account Control hộp thoại.
5. In the pop-up window that appears, click on Sửa chửa. Chờ cho quá trình kết thúc.
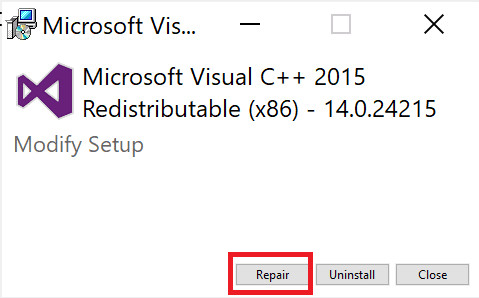
6. Repeat the above steps to modify all the Microsoft Visual C++ Redistributable packages.
7. Cuối cùng, khởi động lại PC.
Open the application that you were unable to open previously. If this did not work, try reinstalling the C++ redistributable instead.
Cũng đọc: Khắc phục lỗi thiết lập có thể phân phối lại của Microsoft Visual C++ 2015 Lỗi 0x80240017
Phương pháp 12: Cài đặt lại Microsoft Visual C++ Redistributable
If the previous method of repairing the Microsoft C++ Visual Redistributable did not fix MultiVersus won’t launch issue, then you will have to reinstall the redistributable. Follow the given steps to uninstall & then install these again.
1. Mở Ứng dụng và tính năng Cài đặt hệ thống.
2. Chọn Microsoft Visual C ++ Redistributable package, then click on Gỡ bỏ cài đặt tùy chọn.
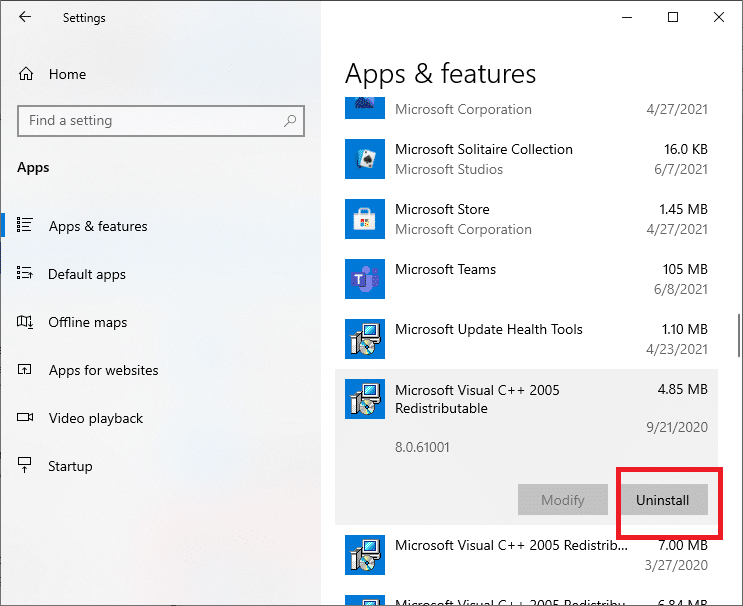
3. Nhấp vào Gỡ bỏ cài đặt option again to confirm and remove the package.
Lưu ý: Make sure to uninstall all the Microsoft Visual C++ Redistributable packages.
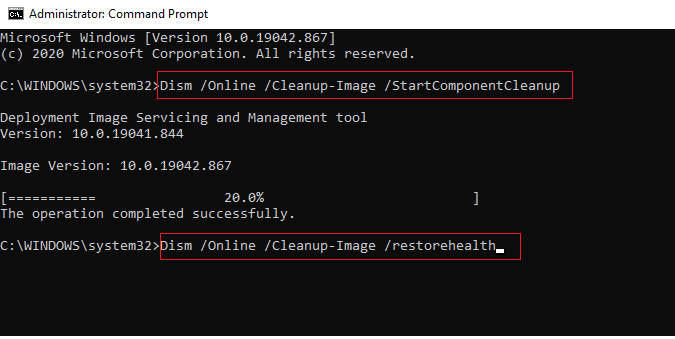
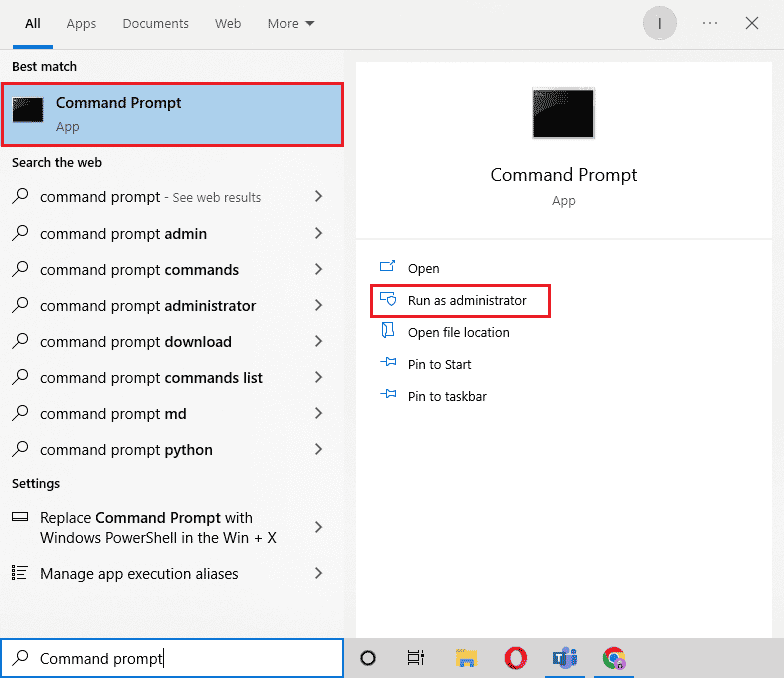
4. Nhấn vào Chốt cửa sổ, kiểu Command Prompt, sau đó nhấp vào Run as administrator.
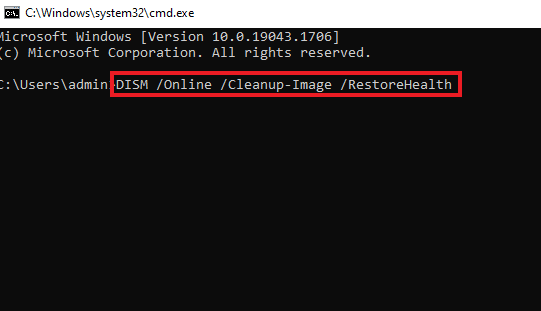
5. Nhập thông tin sau lệnh và báo chí đăng ký hạng mục thi chính sau mỗi cái:
DISM /online /Cleanup-Image /StartComponentCleanup
DISM /online /Cleanup-Image /RestoreHealth
6. Sau khi quá trình hoàn tất, khởi động lại PC.
7. Tiếp theo, hãy truy cập Microsoft Visual C++ Redistributable webpage to download the latest C++ package as shown here.
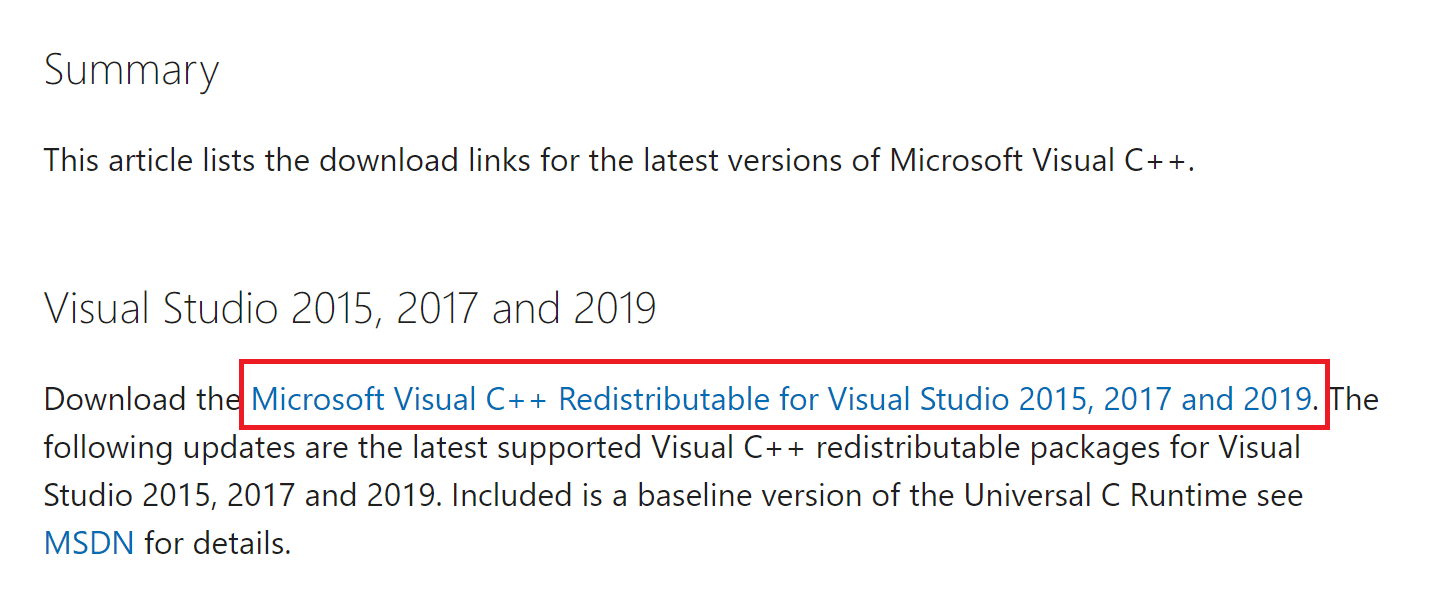
8. Once downloaded, open the tập tin tải về by double-clicking on it in Tải xuống của tôi. đặt the package by following the on-screen instructions.
9. Once the installation is complete, finally khởi động lại PC.
Đề nghị:
Chúng tôi hy vọng rằng hướng dẫn này hữu ích và bạn có thể khắc phục MultiVersus not launching issue on your Windows 10 PC. Let us know which method worked for you the best. Feel free to reach out to us with your queries and suggestions via the comments section below.