If you are facing Windows Update Error 80246008, then this means that there are issues with Background Intelligent Transfer Service or with COM+ Event System. Either of these services cannot start which are important for Windows Update to work and hence the error. While sometimes configuration error with BITS can cause the above issue, as you see, there are different reasons, but they are all associated with BITS. So without wasting any time let’s see how to actually Fix Windows Update Error 80246008 with the below-listed troubleshooting guide.
Sửa lỗi Windows Update 80246008
Đảm bảo tạo điểm khôi phục đề phòng trường hợp xảy ra sự cố.
Method 1: Make Sure BITS and COM+ Event System Services are running
1. Press Windows Keys + R then type services.msc và nhấn Enter.

2. Now find BITS and COM+ Event System Services, then double click on each of them.
3. Đảm bảo loại Khởi động được đặt thành Tự động, and each of the above services is running, if not then click on the Bắt đầu .

4. Nhấp vào Áp dụng, sau đó nhấp vào OK.
5. Reboot your PC and again try to update Windows.
Phương pháp 2: Sửa lỗi đăng ký
1. Open Notepad and copy the below content as it is:
Windows Registry Editor Version 5.00
[HKEY_LOCAL_MACHINESYSTEMCurrentControlSetservicesBITS]
“DisplayName”=”@%SystemRoot%system32qmgr.dll,-1000”
“ImagePath”=hex(2):25,00,53,00,79,00,73,00,74,00,65,00,6d,00,52,00,6f,00,6f,00,
74,00,25,00,5c,00,53,00,79,00,73,00,74,00,65,00,6d,00,33,00,32,00,5c,00,73,
00,76,00,63,00,68,00,6f,00,73,00,74,00,2e,00,65,00,78,00,65,00,20,00,2d,00,
6b,00,20,00,6e,00,65,00,74,00,73,00,76,00,63,00,73,00,00,00
“Description”=”@%SystemRoot%system32qmgr.dll,-1001”
“ObjectName”=”LocalSystem”
“ErrorControl”=dword:00000001
“Start”=dword:00000002
“DelayedAutoStart”=dword:00000001
“Type”=dword:00000020
“DependOnService”=hex(7):52,00,70,00,63,00,53,00,73,00,00,00,45,00,76,00,65,00,
6e,00,74,00,53,00,79,00,73,00,74,00,65,00,6d,00,00,00,00,00
“ServiceSidType”=dword:00000001
“RequiredPrivileges”=hex(7):53,00,65,00,43,00,72,00,65,00,61,00,74,00,65,00,47,
00,6c,00,6f,00,62,00,61,00,6c,00,50,00,72,00,69,00,76,00,69,00,6c,00,65,00,
67,00,65,00,00,00,53,00,65,00,49,00,6d,00,70,00,65,00,72,00,73,00,6f,00,6e,
00,61,00,74,00,65,00,50,00,72,00,69,00,76,00,69,00,6c,00,65,00,67,00,65,00,
00,00,53,00,65,00,54,00,63,00,62,00,50,00,72,00,69,00,76,00,69,00,6c,00,65,
00,67,00,65,00,00,00,53,00,65,00,41,00,73,00,73,00,69,00,67,00,6e,00,50,00,
72,00,69,00,6d,00,61,00,72,00,79,00,54,00,6f,00,6b,00,65,00,6e,00,50,00,72,
00,69,00,76,00,69,00,6c,00,65,00,67,00,65,00,00,00,53,00,65,00,49,00,6e,00,
63,00,72,00,65,00,61,00,73,00,65,00,51,00,75,00,6f,00,74,00,61,00,50,00,72,
00,69,00,76,00,69,00,6c, 00,65,00,67,00,65,00,00,00,00,00
“FailureActions”=hex:80,51,01,00,00,00,00,00,00,00,00,00,03,00,00,00,14,00,00,
00,01,00,00,00,60,ea,00,00,01,00,00,00,c0,d4,01,00,00,00,00,00,00,00,00,00
[HKEY_LOCAL_MACHINESYSTEMCurrentControlSetservicesBITSParameters]
“ServiceDll”=hex(2):25,00,53,00,79,00,73,00,74,00,65,00,6d,00,52,00,6f,00,6f,
00,74,00,25,00,5c,00,53,00,79,00,73,00,74,00,65,00,6d,00,33,00,32,00,5c,00,
71,00,6d,00,67,00,72,00,2e,00,64,00,6c,00,6c,00,00,00
[HKEY_LOCAL_MACHINESYSTEMCurrentControlSetservicesBITSPerformance]
“Library”=”bitsperf.dll”
“Open”=”PerfMon_Open”
“Collect”=”PerfMon_Collect”
“Close”=”PerfMon_Close”
“InstallType”=dword:00000001
“PerfIniFile”=”bitsctrs.ini”
“First Counter”=dword:0000086c
“Last Counter”=dword:0000087c
“First Help”=dword:0000086d
“Last Help”=dword:0000087d
“Object List”=”2156”
“PerfMMFileName”=”GlobalMMF_BITS_s”
[HKEY_LOCAL_MACHINESYSTEMCurrentControlSetservicesBITSSecurity]
“Security”=hex:01,00,14,80,94,00,00,00,a4,00,00,00,14,00,00,00,34,00,00,00,02,
00,20,00,01,00,00,00,02,c0,18,00,00,00,0c,00,01,02,00,00,00,00,00,05,20,00,
00,00,20,02,00,00,02,00,60,00,04,00,00,00,00,00,14,00,fd,01,02,00,01,01,00,
00,00,00,00,05,12,00,00,00,00,00,18,00,ff,01,0f,00,01,02,00,00,00,00,00,05,
20,00,00,00,20,02,00,00,00,00,14,00,8d,01,02,00,01,01,00,00,00,00,00,05,0b,
00,00,00,00,00,18,00,fd,01,02,00,01,02,00,00,00,00,00,05,20,00,00,00,23,02,
00,00,01,02,00,00,00,00,00,05,20,00,00,00,20,02,00,00,01,02,00,00,00,00,00,
05,20,00,00,00,20,02,00,00
2. Now from Notepad menu, nhấp vào Tập tin sau đó nhấn vào Lưu thành.
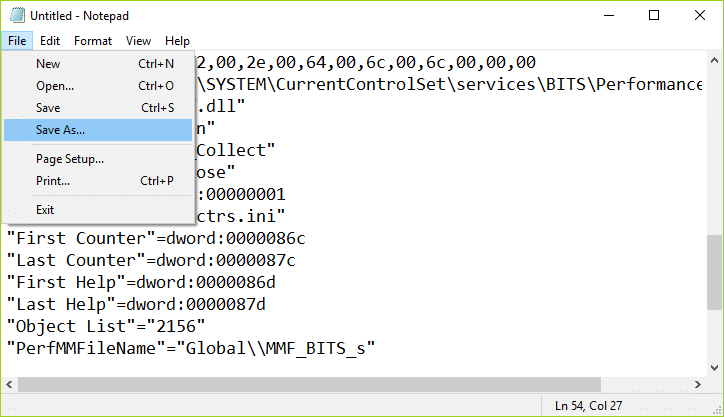
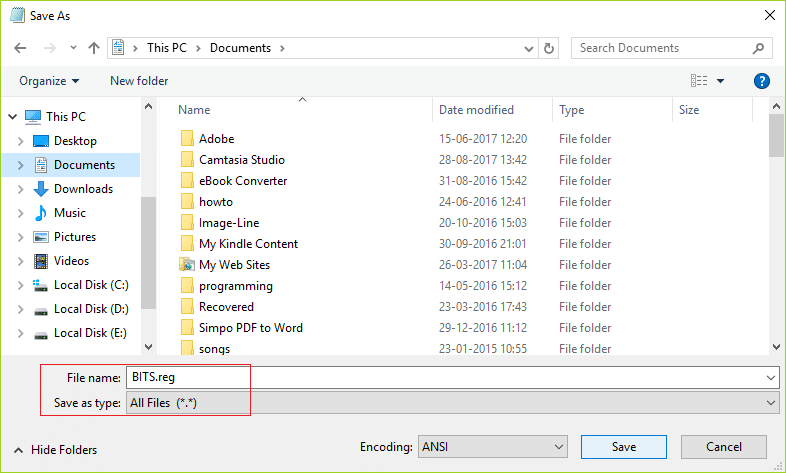
3. Select your desired location (most preferably Desktop) and then name the file as BITS.reg (the .reg extension is important).
4. From the Save as type drop-down select All file và sau đó nhấp vào Lưu.
5. Right-click on the file (BITS.reg) and select Run as Administrator.
6. If will give warning, select Có để tiếp tục.
7. Khởi động lại PC của bạn để lưu các thay đổi.
8. Công khai Command Prompt. Người dùng có thể thực hiện bước này bằng cách tìm kiếm 'cmd' Và sau đó nhấn Enter.

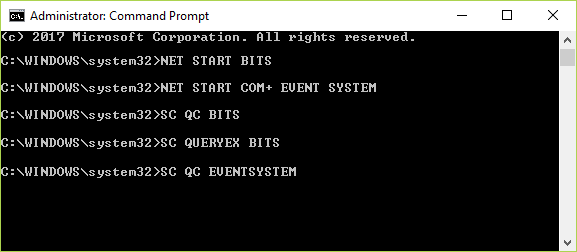
9. Type the following command into cmd and hit Enter after each one:
NET START BITS
NET START COM+ EVENT SYSTEM
SC QC BITS
SC QUERYEX BITS
SC QC EVENTSYSTEM
10. Again try to Update Windows and see if you’re able to Fix Windows Update Error 80246008.
Phương pháp 3: Chạy Trình khắc phục sự cố Windows Update
1. In control panel search Xử lý sự cố in the Search Bar on the top right side and then click on Xử lý sự cố.

2. Tiếp theo, từ cửa sổ bên trái, chọn Xem tất cả.
3. Sau đó, từ danh sách Khắc phục sự cố máy tính, hãy chọn Windows Update.

4. Làm theo hướng dẫn trên màn hình và để quá trình Khắc phục sự cố Windows Update chạy.

5. Khởi động lại PC của bạn và xem liệu bạn có thể fix Windows Update Error 80246008.
Phương pháp 4: Đặt lại các thành phần Windows Update
1. Công khai Command Prompt. Người dùng có thể thực hiện bước này bằng cách tìm kiếm 'cmd' Và sau đó nhấn Enter.
2. Type the following command into cmd and hit Enter after each one:
bit dừng net
net stop wuauserv
net stop appidsvc
net stop cryptsvc

3. Delete the qmgr*.dat files, to do this again open cmd and type:
Del “%ALLUSERSPROFILE%Application DataMicrosoftNetworkDownloaderqmgr*.dat”
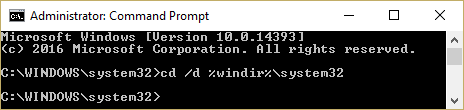
4. Type the following into cmd and hit Enter:
cd / d% windir% system32
5. Reregister the BITS files and the Windows Update files. Type each of the following commands individually in cmd and hit Enter after each one:
regsvr32.exe atl.dll
regsvr32.exe urlmon.dll
regsvr32.exe mshtml.dll
regsvr32.exe shdocvw.dll
regsvr32.exe browseui.dll
regsvr32.exe jscript.dll
regsvr32.exe vbscript.dll
regsvr32.exe scrrun.dll
regsvr32.exe msxml.dll
regsvr32.exe msxml3.dll
regsvr32.exe msxml6.dll
regsvr32.exe actxprxy.dll
regsvr32.exe softpub.dll
regsvr32.exe wintrust.dll
regsvr32.exe dssenh.dll
regsvr32.exe rsaenh.dll
regsvr32.exe gpkcsp.dll
regsvr32.exe sccbase.dll
regsvr32.exe slbcsp.dll
regsvr32.exe cryptdlg.dll
regsvr32.exe oleaut32.dll
regsvr32.exe ole32.dll
regsvr32.exe shell32.dll
regsvr32.exe initpki.dll
regsvr32.exe wuapi.dll
regsvr32.exe wuaueng.dll
regsvr32.exe wuaueng1.dll
regsvr32.exe wucltui.dll
regsvr32.exe wups.dll
regsvr32.exe wups2.dll
regsvr32.exe wuweb.dll
regsvr32.exe qmgr.dll
regsvr32.exe qmgrprxy.dll
regsvr32.exe wucltux.dll
regsvr32.exe muweb.dll
regsvr32.exe wuwebv.dll
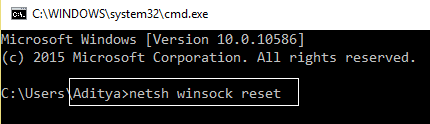
6. To reset Winsock:
netsh winsock reset
7. Reset the BITS service and the Windows Update service to the default security descriptor:
sc.exe sdset bits D:(A;;CCLCSWRPWPDTLOCRRC;;;SY)(A;;CCDCLCSWRPWPDTLOCRSDRCWDWO;;;BA)(A;;CCLCSWLOCRRC;;;AU)(A;;CCLCSWRPWPDTLOCRRC;;;PU)
sc.exe sdset wuauserv D:(A;;CCLCSWRPWPDTLOCRRC;;;SY)(A;;CCDCLCSWRPWPDTLOCRSDRCWDWO;;;BA)(A;;CCLCSWLOCRRC;;;AU)(A;;CCLCSWRPWPDTLOCRRC;;;PU)
8. Again start the Windows update services:
bit bắt đầu ròng
bắt đầu net wuauserv
net start appsvc
bắt đầu net cryptsvc

9. Install the latest Windows Update Agent.
10. Reboot your PC and see if you’re able to fix the issue.
Đề nghị:
Thế là bạn đã thành công Sửa lỗi Windows Update 80246008 nhưng nếu bạn vẫn có bất kỳ thắc mắc nào liên quan đến hướng dẫn này thì vui lòng hỏi họ trong phần bình luận.

