连接鼠标时自动禁用触摸板

If you use a traditional mouse over Touchpad, you could automatically disable touchpad when you plug in the USB Mouse. This can be easily done via Mouse Properties in Control Panel where you have a label called “Leave touchpad on when a mouse is connected”, so you need to uncheck this option and you’re good to go. If you have Windows 8.1 with the latest update, you could easily configure this option right from PC settings.
This option makes it easier for users to navigate and you don’t need to worry about accidental touch or click over touchpad when using a USB Mouse. So without wasting any time let’s see How to Automatically disable Touchpad when Mouse is Connected in Windows 10 with the help of the below-listed guide.
连接鼠标时自动禁用触摸板
确保创建一个还原点,以防出现问题。
Method 1: Disable Touchpad when Mouse is connected via Settings
1. 按 Windows 键 + I 打开 个人设置 然后点击 设备。

2. 从左侧菜单中选择 触摸板。
3. Under Touchpad 取消选中 “连接鼠标时保持触摸板开启“。
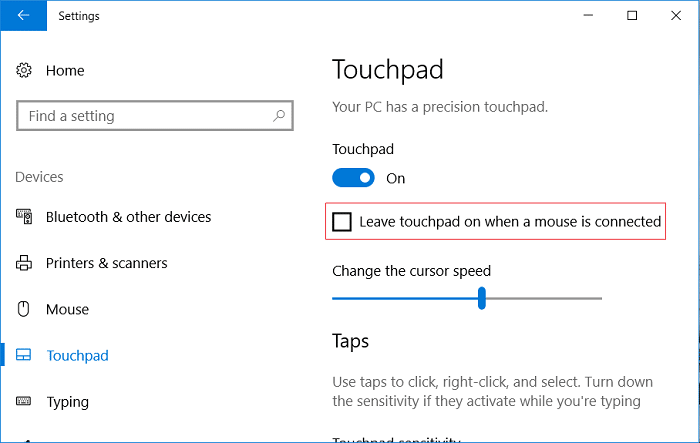
4. 重新启动电脑以保存更改。
Method 2: Disable Touchpad when Mouse is connected via Mouse Properties
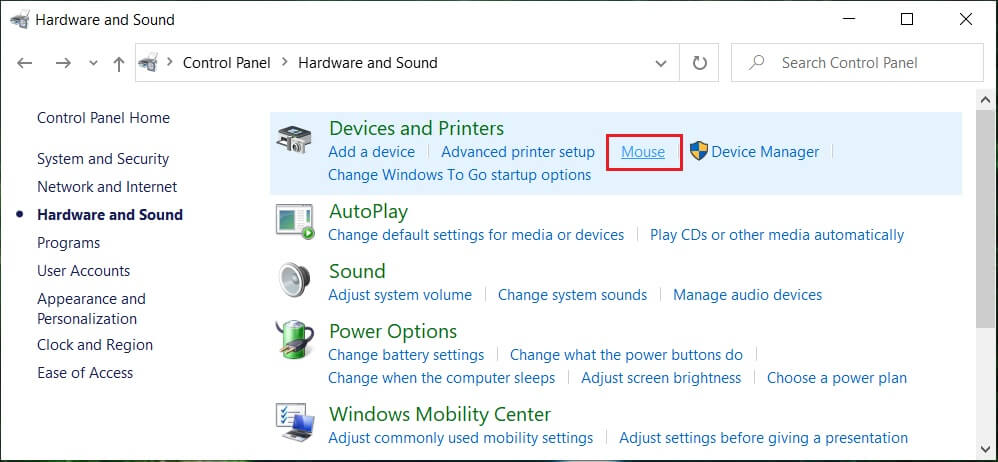
1. 按 Windows 键 + Q 打开搜索,输入 控制, 并点击 控制面板 从搜索结果中。

2。 接下来,单击 硬件和声音。

3. Under Devices and Printers click on 老鼠。
4.切换到 ELAN or Device Settings tab then 取消选中 “Disable internal pointing device when the external USB pointing device is attached“ 选项。
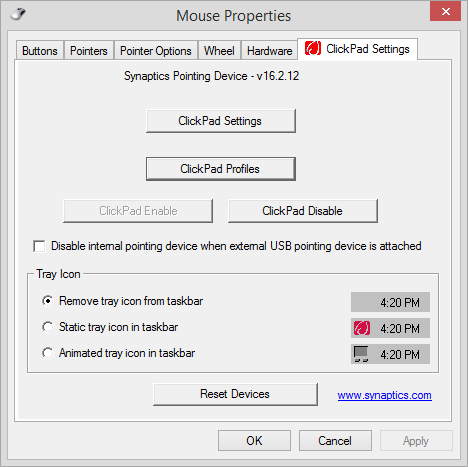
5. 单击应用,然后单击 确定。
Method 3: Disable Dell Touchpad when Mouse is connected
1. 按 Windows 键 + R,然后输入 main.cpl 然后按Enter打开 鼠标属性。

2. Under Dell Touchpad tab, click on “Click to change Dell Touchpad settings“。
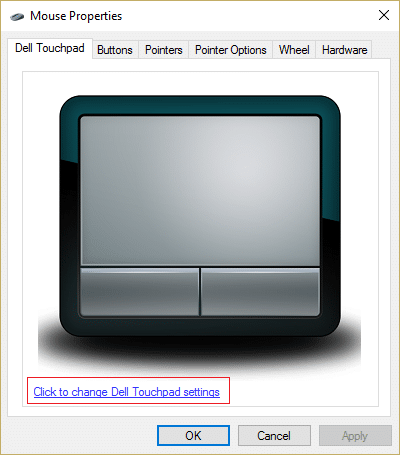
3. From Pointing Devices, select the Mouse picture from the top.
4. 勾选“Disable Touchpad when USB mouse is present“。
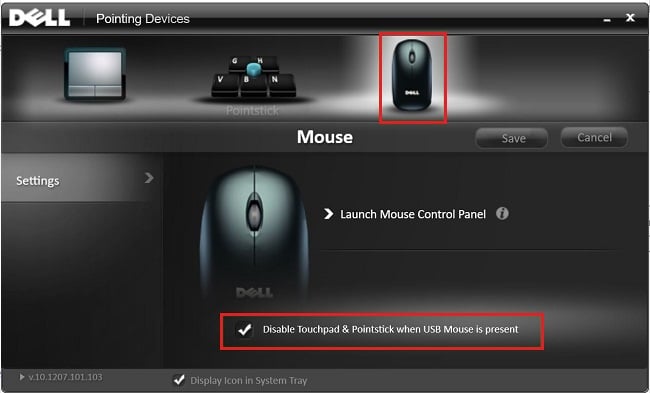
5. 重新启动电脑以保存更改。
Method 4: Disable Touchpad when Mouse is connected via Registry
1. 按 Windows 键 + R,然后输入 注册表编辑器 并按 Enter 打开注册表编辑器。

2. 导航到以下注册表项:
HKEY_LOCAL_MACHINESOFTWARESSynapticsSynTPEnh
3。 右键单击 SynTPEnh 然后选择 新 > DWORD(32 位)值。
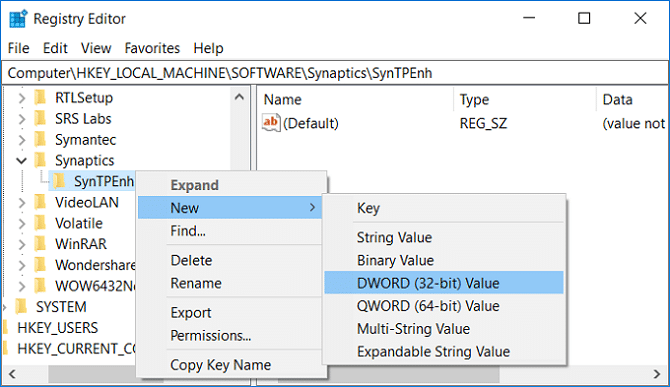
4. Name this DWORD as DisableIntPDFeature and then double click on it to change its value.
5.确保 Hexadecimal is selected under Base then 将其值更改为33 并点击确定。
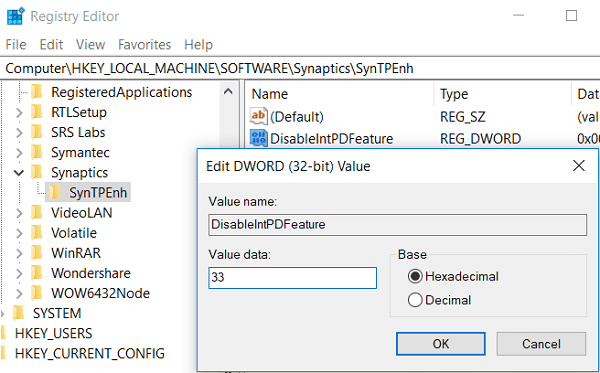
6. 重新启动电脑以保存更改。
Method 5: Disable Touchpad when Mouse is Connected in Windows 8.1
1. Press Windows Key + C key to open 个人设置 魅力。
2。 选择 修改PC设置 than from the left-hand menu click on PC and Devices.
3.然后点击 鼠标和触摸板, then from the right window look for an option labelled as “连接鼠标时保持触摸板开启“。
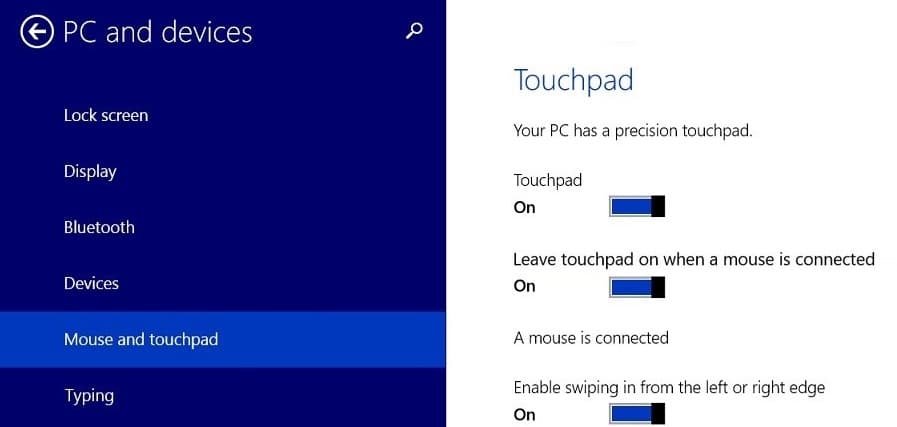
4。 确保 disable or turn off the toggle for this option.
5. Reboot your PC to save changes, and this will automatically disable Touchpad when Mouse is connected.
推荐:
这样你就成功了 Disable Touchpad when Mouse is Connected in Windows 10 但如果您对本指南仍有任何疑问,请随时在评论部分提问。