Change Diagnostic and Usage Data Settings in Windows 10

Change Diagnostic and Usage Data Settings in Windows 10: You must be aware of the Diagnostic and Usage Data Settings which allows Microsoft to collect performance and usage information which helps Microsoft to troubleshoot issues with Windows and improve their product & services and resolve bugs as soon as possible. But the best part of this feature is that you can actually control the amount of diagnostic and usage data sent to Microsoft from your system.
You can select to only send basic diagnostic information which contains info about your device, its settings, and capabilities or you can select the Full diagnostic information which contains all the information about your system. You can also delete the Windows Diagnostic Data that Microsoft has collected from your device. Anyway, without wasting any time let’s see How to Change Diagnostic and Usage Data Settings in Windows 10 with the help of the below-listed tutorial.
Change Diagnostic and Usage Data Settings in Windows 10
確保建立一個還原點,以防出現問題。
The initial settings can be configured during the Windows Setup when you get to Choose privacy settings for your device simply enable the toggle for Diagnostics to select “Full” and leave it disabled if you want to set Diagnostic and usage data collection policy to “Basic”.
Method 1: Change Diagnostic and Usage Data Settings in Settings App
1.按Windows鍵+ I打開 設定 然後點擊 隱私圖示。
2.從左側菜單中選擇 診斷和反饋。
3.Now either select Basic or Full for the Diagnostic and usage data.
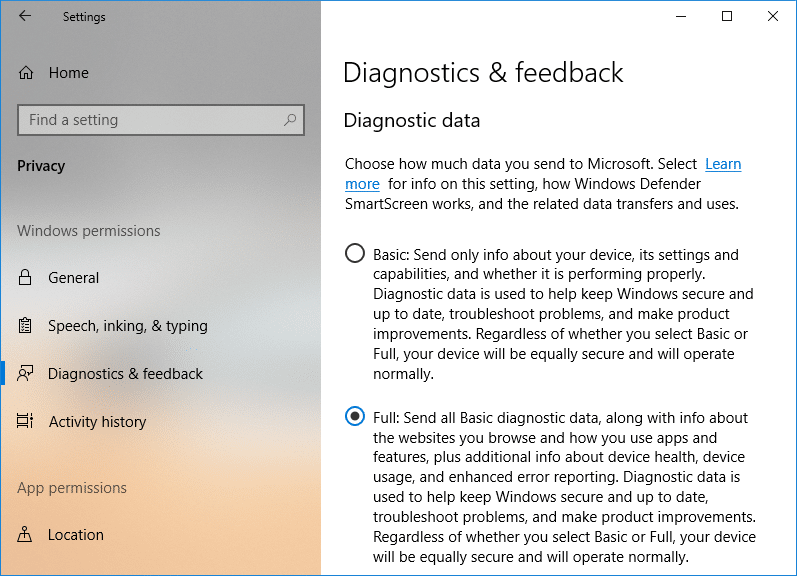
注意: By default, the setting is set to “Full”.
4.Once finished, close the setting and reboot your PC.
相關閱讀: Quest Diagnostics 需要上門服務嗎?
Method 2: Change Diagnostic and Usage Data Settings in Registry Editor
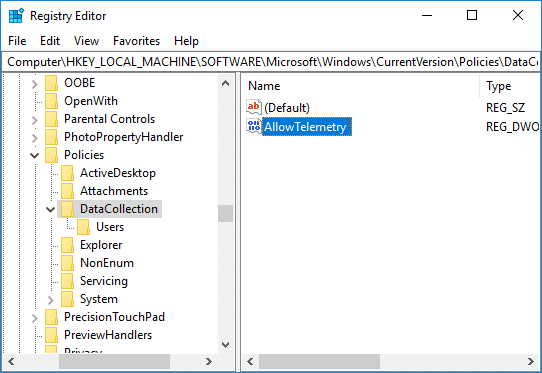
1.按Windows鍵+ R然後輸入 註冊表編輯器 然後按Enter打開 註冊表編輯器。

2.導航到以下註冊表項:
HKEY_LOCAL_MACHINESOFTWAREMicrosoftWindowsCurrentVersionPoliciesDataCollection
3.確保選擇 數據採集 然後在右側窗格中雙擊 AllowTelemetry DWORD.
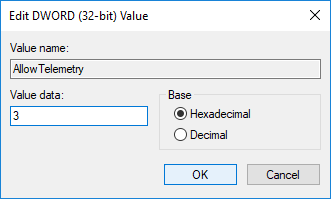
4.Now make sure to change the value of the AllowTelemetry DWORD according to:
0 = Security (Enterprise and Education editions only)
1 = Basic
2 = Enhanced
3 = Full (Recommended)
5.Once done, make sure to click OK and close registry editor.
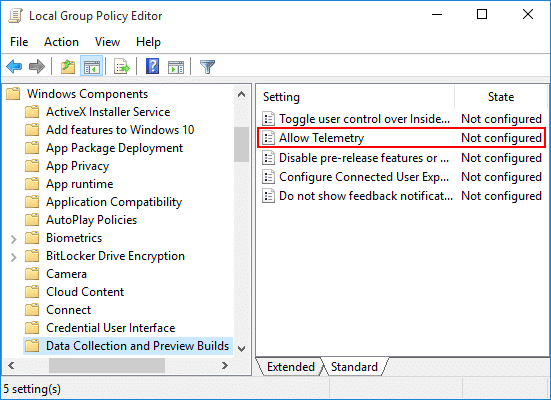
Method 3: Change Diagnostic and Usage Data Settings in Group Policy Editor
1.按Windows鍵+ R然後輸入 輸入gpedit.msc 然後按Enter打開 組策略編輯器。
2.導航至以下路徑:
Computer ConfigurationAdministrative TemplatesWindows ComponentsData Collection and Preview Builds
3.Make sure to select Data Collection and Preview Builds then in right window pane double-click on Allow Telemetry Policy.
4.Now to restore default diagnostic and usage data collection setting simply select Not Configured or Disabled for Allow Telemetry policy and click OK.

5.If you want to force a diagnostic and usage data collection setting then 選擇啟用 for Allow Telemetry policy and then under Options select Security (Enterprise Only), Basic, Enhanced, or Full.
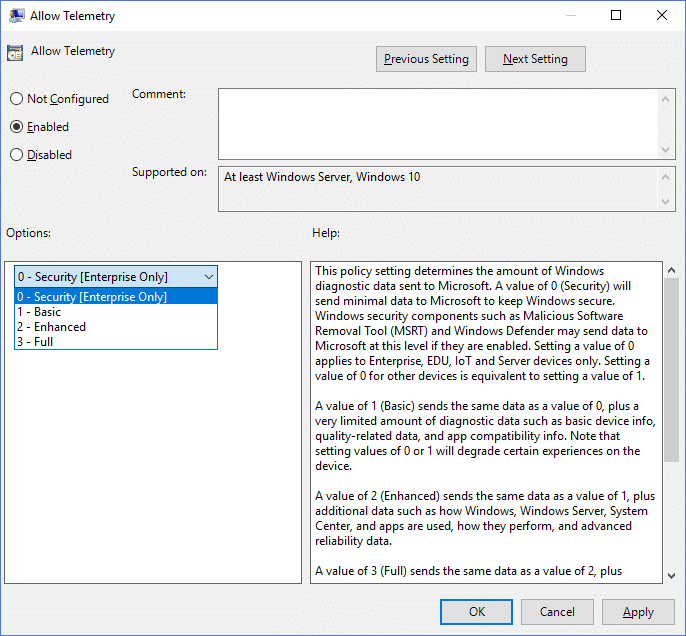
6.單擊應用,然後單擊確定。
7.When finished, reboot your PC to save changes.
推薦:
這樣你就成功學會了 How to Change Diagnostic and Usage Data Settings in Windows 10 但如果您對本教程仍有任何疑問,請隨時在評論部分提問。