All the corrupt files in your system can be analyzed and repaired by several built-in tools in Windows 10 system. One such command-line tool is 部署映像服務和管理 or DISM, which assists in servicing and preparing Windows images on Windows Recovery Environment, Windows Setup, and Windows PE. This tool could also help you in repairing the corrupt files even if System File Checker is not working correctly. Yet, sometimes you may receive Windows 10 DISM Error 87 due to varied reasons. This guide will help you fix DISM Error 87 in Windows 10 PC.
How to Fix DISM Error 87 in Windows 10
What causes DISM Error 87 in Windows 10?
Several reasons contribute to Windows 10 DISM Error 87. A few of them are discussed below.
- Command Line has an Error – Wrongly typed command line can cause the said error. For example, when you have typed an incorrect code or any incorrect spaces exist before the /削減.
- Bug in Windows 10 System – When there is an update pending in your system or if your system has a hidden bug, then you might face DISM Error 87. Installing all the new updates available can fix the issue in your system.
- Running Commands in Regular Command Prompt Window – Few commands are validated only if you have administrative privileges.
- Outdated Version of DISM – If you try to apply or use a Windows 10 image using an old version of DISM in your system, you will face DISM Error 87. In this case, use the correct wofadk.sys filter driver and try applying the Windows 10 image using an apt DISM version.
Now that you have a basic idea about what causes DISM Error 87 in Windows 10, continue reading the article to learn how to fix the said problem. A list of methods is compiled and arranged according to user convenience. So, one by one, implement these until you find a solution for your Windows 10 desktop/laptop.
Method 1: Type Commands with Correct Spelling & Spacing
The most common mistake users make is of either typing an incorrect spelling or leaving an incorrect spacing before or after the / character. To fix this error, type the command correctly.
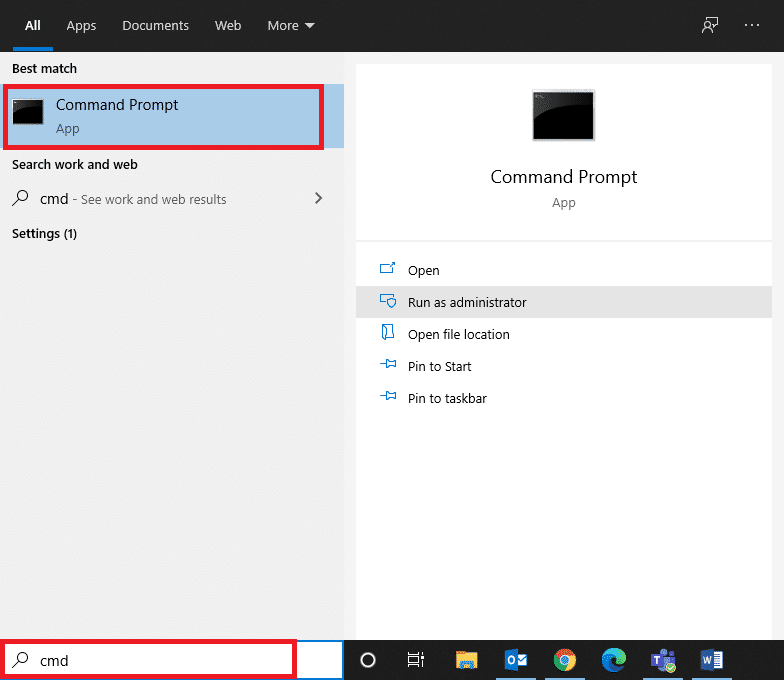
1。 發射 命令提示符 通過 Windows 搜尋列, 如圖所示。
2. Type the following command with spelling and spacing as mentioned:
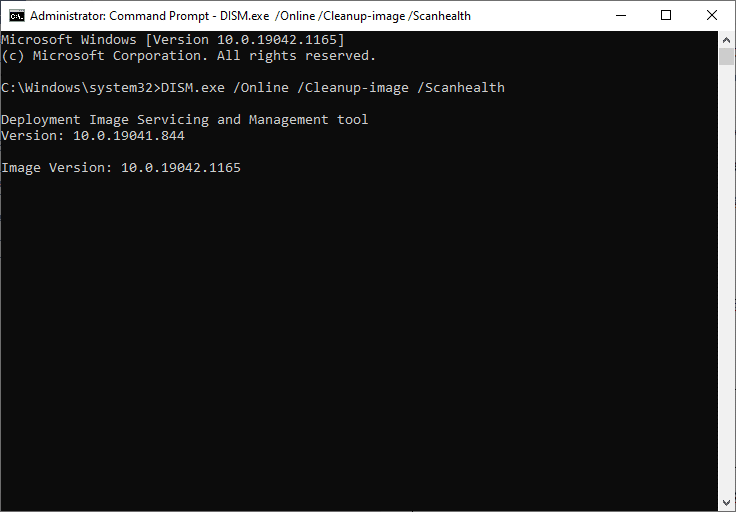
DISM.exe / Online / Cleanup-image / Scanhealth
OR
DISM.exe / Online / Cleanup-image / RestoreHealth
3. Once you hit 回車, you will see some data pertaining to the DISM tool displayed on the screen, as depicted.
4. The said command should get executed and fetch results.
Method 2: Run Command Prompt with Administrative Privileges
Even if you type the command with correct spelling and spacing, you may encounter Windows 10 DISM Error 87 due to lack of administrative privileges. Hence, do as follows:
1。 按 Windows 鍵和類型 CMD 在搜索欄中。
2。 點擊 以管理員身份運行 in the right pane to launch Command Prompt with administrative privileges.

3. 鍵入 命令 as earlier and hit Enter.
Now, your command will be executed and Windows 10 DISM Error 87 will be fixed. If not, try the next solution.
另請閱讀: Fix DISM Error 14098 Component Store has been corrupted
Method 3: Run System File Checker and CHKDSK
Windows 10 users can automatically, scan and repair their system files by running System File Checker (SFC) and Check Disk (CHKDSK) commands. These are built-in tools that let the user delete files and fix Windows 10 DISM Error 87. Steps to run SFC and CHKDSK are given below:
1。 發射 命令提示符為管理員 using the steps explained in 方法2.
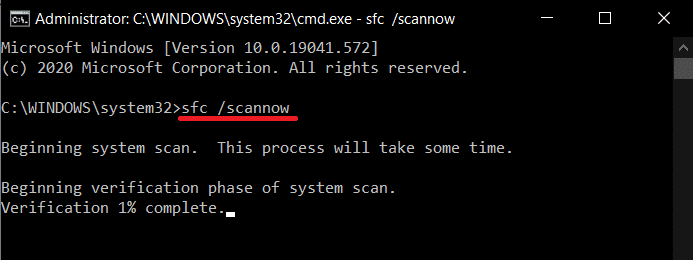
2. 鍵入以下命令: SFC / SCANNOW 並按下 回車鍵。
Now, System File Checker will begin its process. All the programs in your system will be scanned and will be repaired automatically.
3. 等待 驗證100%完成 statement to appear, and once done, 重啟你的電腦.
Check if Windows 10 DISM Error 87 is fixed. If not, follow the steps further.
注意: Before executing the CHKDSK tool, make sure you do not need to recover any deleted files in your system since this tool cannot restore the recoverable data.
4.再次啟動 Command Prompt as an administrator.
5。 類型 CHKDSK C:/r and hit Enter, 如圖所示。
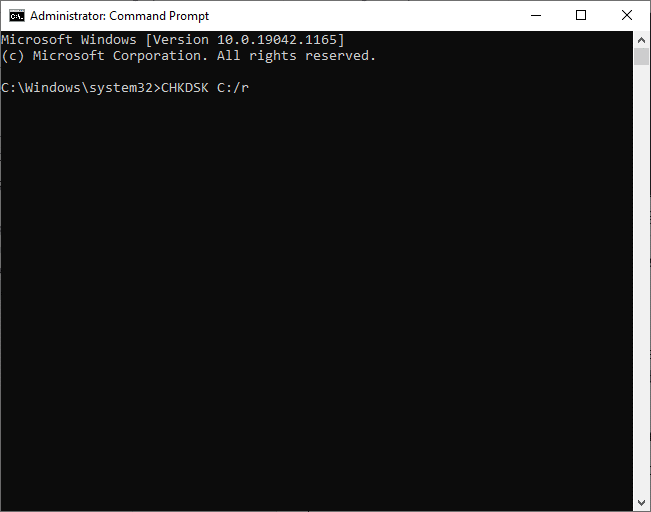
6.最後等待進程運行成功即可 完成交易 窗戶。
另請閱讀: Fix DISM Source Files Could not be Found Error
方法4:更新Windows作業系統
If you did not obtain any results by the above-mentioned methods, then there might be bugs in your system. Microsoft releases updates periodically, to fix the bugs in your system. Therefore, always ensure that you use your system in its updated version. Otherwise, the files in the system will not be compatible with the DISM files leading to DISM Error 87 in Windows 10 computers.
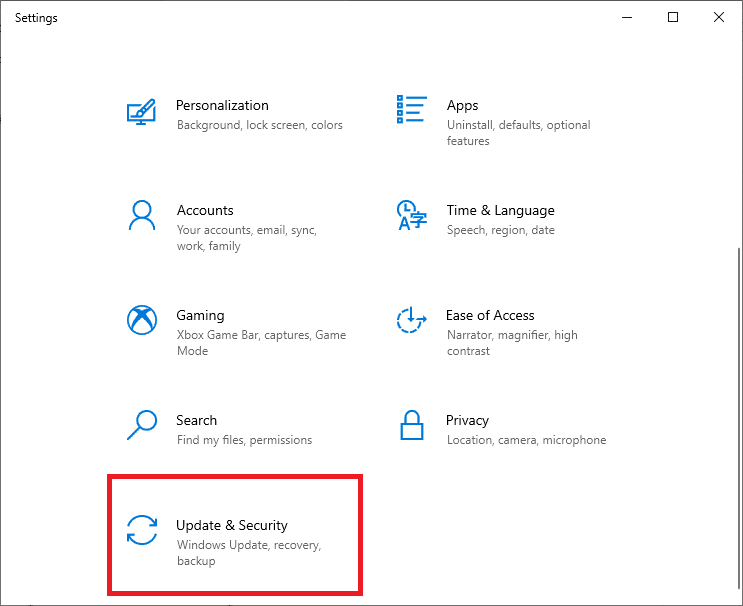
1。 按 的Windows + I 鑰匙一起打開 設定 在你的系統中。
2.現在,選擇 更新與安全, 如圖所示。
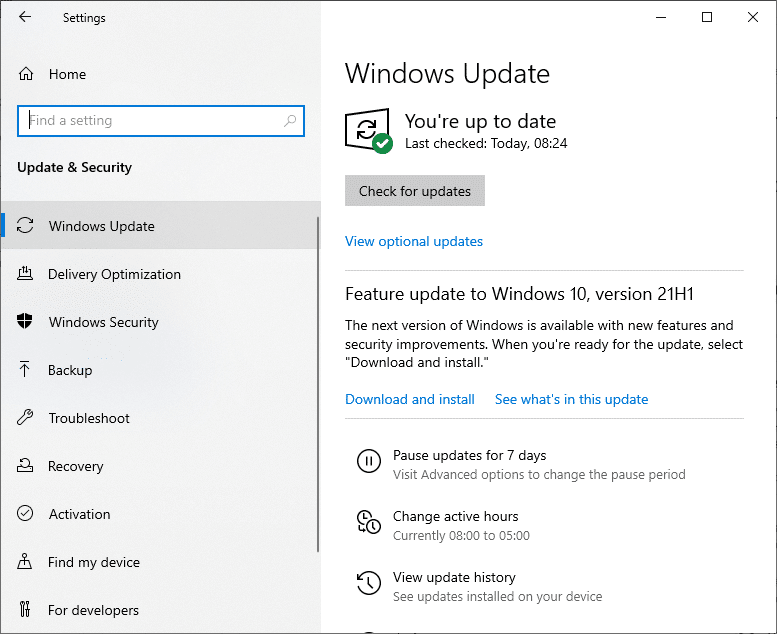
3。 接下來,單擊 檢查更新 按鈕。
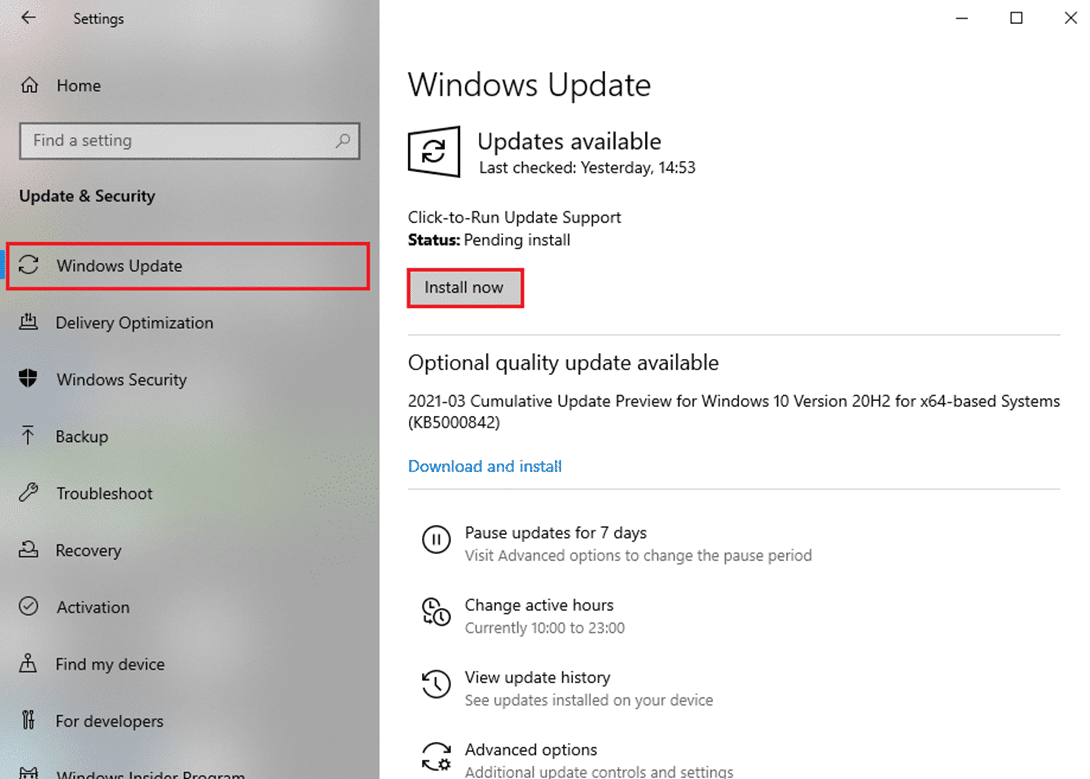
3A。點選 立即安裝 下載並安裝 可用更新.
3B。如果您的系統已經是最新的,那麼它會顯示 你是最新的 message, as depicted.
4. 重新啟動系統 並檢查問題現在是否已解決。
另請閱讀: 修正 Windows 0 中的 DISM 錯誤 800x081f10f
Method 5: Use the Correct Version of DISM
When you execute command lines on older versions of DISM on Windows 8.1 or earlier, you are bound to face Windows 10 DISM Error 87. But this problem can be fixed when you use the correct version of DISM in Windows 10 with the correct Wofadk.sys filter driver. The Operating System used by DISM is the Host deployment environment. The DISM supports the following platforms in several Windows versions, as listed below:
| 主機部署環境 | 目標映像:Windows 11 或 Windows 11 的 WinPE | 目標映像:Windows 10 或 Windows 10 的 WinPE | 目標映像:Windows 8.1、Windows Server 2016、Windows Server 2012 R2 或 WinPE 5.0(x86 或 x64) |
| Windows 11 | 支持 | 支持 | 支持 |
| Windows 10(x86 或 x64) | 支持,使用 Windows 11 版本的 DISM | 支持 | 支持 |
| Windows Server 2016(x86 或 x64) | 支持,使用 Windows 11 版本的 DISM | 支持 | 支持 |
| Windows 8.1(x86 或 x64) | 支持,使用 Windows 11 版本的 DISM | 支持,使用 Windows 10 版本的 DISM | 支持 |
| Windows Server 2012 R2(x86 或 x64) | 支持,使用 Windows 11 版本的 DISM | 支持,使用 Windows 10 版本的 DISM | 支持 |
| Windows 8(x86 或 x64) | 不支持 | 支持,使用 Windows 10 版本的 DISM | 支持,使用 Windows 8.1 版本的 DISM 或更高版本 |
| Windows Server 2012(x86 或 x64) | 支持,使用 Windows 11 版本的 DISM | 支持,使用 Windows 10 版本的 DISM | 支持,使用 Windows 8.1 版本的 DISM 或更高版本 |
| Windows 7(x86 或 x64) | 不支持 | 支持,使用 Windows 10 版本的 DISM | 支持,使用 Windows 8.1 版本的 DISM 或更高版本 |
| Windows Server 2008 R2(x86 或 x64) | 支持,使用 Windows 11 版本的 DISM | 支持,使用 Windows 10 版本的 DISM | 支持,使用 Windows 8.1 版本的 DISM 或更高版本 |
| Windows Server 2008 SP2(x86 或 x64) | 不支持 | 不支持 | 支持,使用 Windows 8.1 版本的 DISM 或更高版本 |
| 適用於 Windows 11 x64 的 WinPE | 支持 | 支持:僅 X64 目標圖像 | 支持:僅 X64 目標圖像 |
| 適用於 Windows 10 x86 的 WinPE | 支持 | 支持 | 支持 |
| 適用於 Windows 10 x64 的 WinPE | 支持,使用 Windows 11 版本的 DISM | 支持:僅 X64 目標圖像 | 支持:僅 X64 目標圖像 |
| WinPE 5.0 x86 | 支持,使用 Windows 11 版本的 DISM | 支持,使用 Windows 10 版本的 DISM | 支持 |
| WinPE 5.0 x64 | 支持,使用 Windows 11 版本的 DISM | 支持,使用 Windows 10 版本的 DISM:僅 X64 目標映像 | 支持:僅 X64 目標圖像 |
| WinPE 4.0 x86 | 不支持 | 支持,使用 Windows 10 版本的 DISM | 支持,使用 Windows 8.1 版本的 DISM 或更高版本 |
| WinPE 4.0 x64 | 不支持 | 支持,使用 Windows 10 版本的 DISM:僅 X64 目標映像 | 支持,使用 Windows 8.1 版本的 DISM 或更高版本:僅 X64 目標映像 |
| WinPE 3.0 x86 | 不支持 | 支持,使用 Windows 10 版本的 DISM | 支持,使用 Windows 8.1 版本的 DISM 或更高版本 |
| WinPE 3.0 x64 | 不支持 | 支持,使用 Windows 10 版本的 DISM:僅 X64 目標映像 | 支持,使用 Windows 8.1 版本的 DISM 或更高版本:僅 X64 目標映像 |
Thus, when you use DISM for an image service, always ensure what version you are using and whether it is compatible with the device or not. Run DISM commands only if you are sure that you are using the correct DISM version.
Method 6: Perform Clean Installation
If none of the methods have helped you solve the issue, you can try to reinstall Windows. Here’s how to fix DISM Error 87 in Windows 10 by performing a clean installation of Windows:
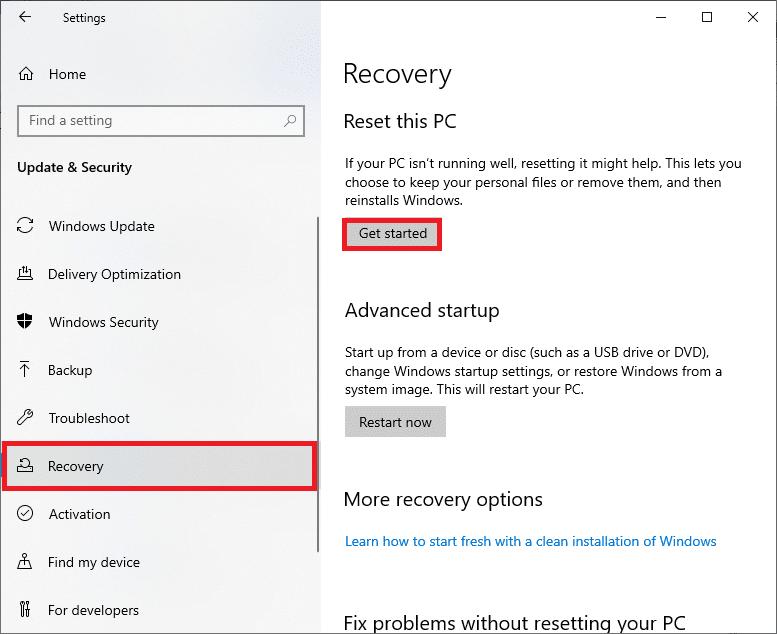
1。 導航 設置>更新和安全性 as instructed in 方法3。
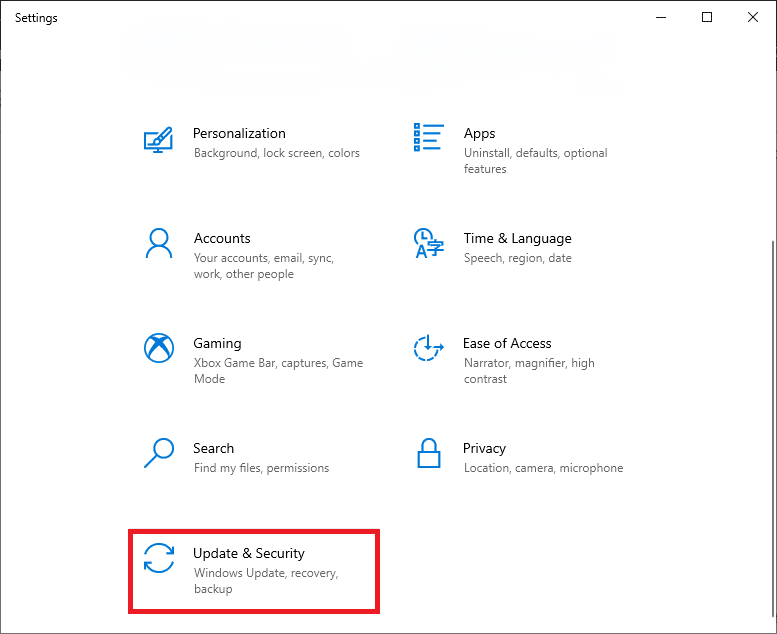
2. 現在,選擇 恢復 option from the left pane and click on 開始 在右側窗格中。
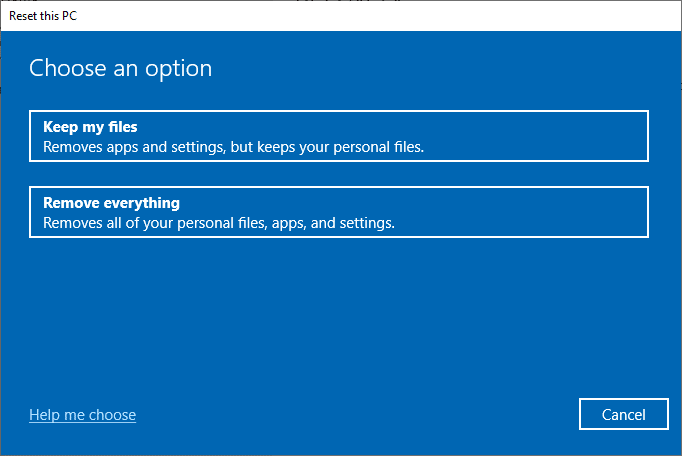
3. Here, choose an option from the 重置此PC 窗口:
- 保存我的文件 option will remove apps and settings but keeps your personal files.
- 刪除一切 option will remove all your personal files, apps, and settings.
4. 最後,按照 屏幕指示 完成重置過程。
推薦的
我們希望本指南對您有所幫助,並且您能夠 fix DISM Error 87 in Windows 10。讓我們知道哪種方法最適合您。另外,如果您對本文有任何疑問/建議,請隨時在評論部分中提出。

