Process and Compressed Memory is a Windows 10 feature responsible for memory compression (also referred to as RAM compression and memory compression). This feature basically utilizes data compression to reduce the size or number of paging request to and from the auxiliary storage. In short, this feature is designed to take less amount of disk space and memory but in this case the System and Compressed Memory process start using 100% Disk and Memory, causing the affected PC to become slow.

In Windows 10, a compressions store is added to the concept of Memory Manager, which is an in-memory collection of compressed pages. So whenever the memory starts to fill up, the System and Compressed Memory process will compress the unused pages instead of writing them to the disk. The benefit of this is the amount of memory used per process is reduced, which allows Windows 10 to maintain more programs or apps in physical memory.
The problem appears to be incorrect Virtual Memory settings. Someone changed the paging file size from automatic to a particular value, virus or malware, Google Chrome or Skype, corrupt system files etc. So without wasting any time let’s see how to actually Fix 100% Disk Usage by System and Compressed Memory with the help of below-listed troubleshooting guide.
[SOLVED] 100% Disk Usage by System and Compressed Memory
確保建立一個還原點,以防出現問題。
方法 1:修復損壞的系統文件
1. 打開命令提示符。 用戶可以通過搜索來執行此步驟 'cmd' 然後按Enter鍵。

2.現在在cmd中輸入以下內容並回車:
Sfc /scannow sfc /scannow /offbootdir=c: /offwindir=c:windows (如果以上失敗,那麼試試這個)
![SFC scan now command prompt | [SOLVED] 100% Disk Usage by System and Compressed Memory](https://lbsite.org/wp-content/uploads/2023/01/SFC-scan-now-command-prompt.png)
3.等待上述過程完成,完成後,重新啟動PC。
4. 再次開啟 cmd 並鍵入以下命令,並在每個命令後按 Enter 鍵:
Dism /Online /Cleanup-Image /CheckHealth Dism /Online /Cleanup-Image /ScanHealth Dism /Online /Cleanup-Image /RestoreHealth

5. 讓 DISM 命令運行並等待它完成。
6. 如果上述命令不起作用,請嘗試以下命令:
Dism /Image:C:offline /Cleanup-Image /RestoreHealth /Source:c:testmountwindows Dism /Online /Cleanup-Image /RestoreHealth /Source:c:testmountwindows /LimitAccess
注意: 將 C:RepairSourceWindows 替換為您的修復源(Windows 安裝或恢復光盤)。
7. 重新啟動您的電腦以儲存變更並查看是否能夠 Fix 100% Disk Usage by System and Compressed Memory Issue.
Method 2: Set Correct Paging File Size
1. 按 Windows 鍵 + R 然後輸入 SYSDM.CPL 然後按Enter打開 系統屬性。

2。 切換到 “高級”選項卡 然後點擊 性能下的設定。

3. Again switch to the Advanced tab and click Change under Virtual Memory.

4. Checkmark “自動管理所有驅動器的頁面文件大小。“
![Checkmark Automatically manage paging file size for all drives | [SOLVED] 100% Disk Usage by System and Compressed Memory](https://lbsite.org/wp-content/uploads/2023/02/Checkmark-Automatically-manage-paging-file-size-for-all-drives.png)
5. Click OK, then click Apply followed by OK.
6. Select Yes to Restart your PC to save changes.
方法一:禁用快速啟動
1. 按 Windows 鍵 + R 然後鍵入 control 並按 Enter 打開 控制面板。

2。 點擊 硬件和聲音 然後點擊 電源選項.

3. 然後,從左側窗格中選擇 “選擇電源按鈕的功能。“

4。 現在點擊 “更改當前不可用的設置。“

5.取消選中“打開快速啟動”,然後點擊 保存更改。
![Uncheck Turn on fast startup | [SOLVED] 100% Disk Usage by System and Compressed Memory](https://lbsite.org/wp-content/uploads/2023/01/Uncheck-Turn-on-fast-startup.png)
6. Restart your PC and see if you’re able to Fix 100% Disk Usage by System and Compressed Memory Issue.
方法4:禁用超級獲取服務
1. 按 Windows 鍵 + R 然後輸入 SERVICES.MSC 並按Enter鍵。

2。 找 SuperFetch的 service from the list then right-click on it and select 屬性。

3. Under Service status, if the service is running, click on 停止。
4. 現在,從 啟動 type drop-down select 禁用。

5. 按一下應用,然後按一下 確定。
6. 重新啟動您的 PC 以保存更改。
If the above method doesn’t disable Superfetch services then you can follow disable Superfetch using Registry:
1. 按 Windows 鍵 + R 然後輸入 註冊表編輯器 並按 Enter 打開註冊表編輯器。

2. 導覽至以下註冊表項:
HKEY_LOCAL_MACHINESYSTEMCurrentControlSetControlSession Manager記憶體管理PrefetchParameters
3. Make sure you have selected 預取參數 然後在右側視窗中雙擊 啟用超級提取 關鍵和 change it’s value to 0 in the Value data field.

4. Click OK and close the Registry Editor.
5. 重新啟動電腦以儲存變更並查看是否能夠 Fix 100% Disk Usage by System and Compressed Memory Issue.
Method 5: Adjust your PC for Best Performance
1. 按 Windows 鍵 + R 然後輸入 SYSDM.CPL 然後按Enter打開 系統屬性。
2。 切換到 高級 選項卡然後單擊 設定 下 性能。
3. Under Visual Effects checkmark “調整為最佳性能“。

4. 按一下應用,然後按一下 確定。
5. Reboot your PC and see if you’re able to Fix 100% Disk Usage by System and Compressed Memory Issue.
Method 6: Kill the Speech Runtime Executable Process
1。 按 按Ctrl + Shift + Esc鍵 啟動任務管理器。
2。 在裡面 進程選項卡, 找 Speech Runtime Executable.
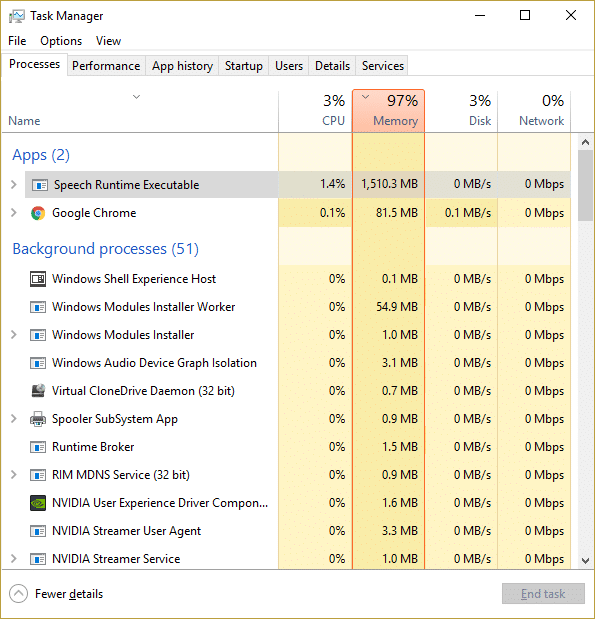
3. 右鍵單擊它並選擇 結束任務。
方法 7:運行 CCleaner 和 Malwarebytes
1。 下載並安裝 CCleaner &惡意軟體位元組。
2. 運行惡意軟件字節 並讓它掃描您的系統以查找有害文件。 如果發現惡意軟件,它將自動刪除它們。

3.現在運行CCleaner並選擇 定制清潔.
4. 在自定義清潔下,選擇 窗口選項卡 並選中默認值並單擊 分析.
![Select Custom Clean then checkmark default in Windows tab | [SOLVED] 100% Disk Usage by System and Compressed Memory](https://lbsite.org/wp-content/uploads/2023/01/Select-Custom-Clean-then-checkmark-default-in-Windows-tab.png)
5. 分析完成後,請確保您確定要刪除要刪除的文件。

6.最後,點擊 運行清潔器 按鈕,讓 CCleaner 運行它。
7.為了進一步清理你的系統, 選擇註冊表選項卡,並確保檢查以下內容:

8。 點擊 檢查問題 按鈕並允許 CCleaner 掃描,然後單擊 解決選定的問題 按鈕。
![Once scan for issues is completed click on Fix selected Issues | [SOLVED] 100% Disk Usage by System and Compressed Memory](https://lbsite.org/wp-content/uploads/2023/01/Once-scan-for-issues-is-completed-click-on-Fix-selected-Issues.png)
9. 當 CCleaner 詢問“您想要對註冊表進行備份更改嗎?“ 選擇是.
10. 備份完成後,單擊 修復所有選定的問題 按鈕。
11. 重新啟動您的 PC 以保存更改。
Method 8: Change configuration of Google Chrome and Skype
對於Google Chrome: Navigate to the following under Chrome: Settings > Show Advanced Settings > Privacy > Use a prediction service to load pages more quickly. Disable the toggle next to “Use a prediction service to load pages.”

Change configuration For Skype
1. Make sure you have exited Skype, if not end task from Task Manager for Skype.
2. Press Windows Key + R then type the following and click OK:
C:Program Files (x86)SkypePhone
3。 右鍵單擊 Skype.exe的 並選擇 屬性。

4.切換到 安全選項卡 並點擊 編輯。

5。 選擇 所有應用程序包 under Group or user names then checkmark Write 下 允許。

6. Click Apply, followed by OK and see if you’re able to Fix 100% Disk Usage by System and Compressed Memory Issue.
Method 9: Set Correct Permission for System and Compressed Memory Process
1. 按 Windows 鍵 + R 然後輸入 任務表 and hit Enter to open Task Scheduler.

2. 導覽至以下路徑:
Task Scheduler Library > Microsoft > Windows > MemoryDiagnostic
![Double click on ProcessMemoryDiagnostic Events | [SOLVED] 100% Disk Usage by System and Compressed Memory](https://lbsite.org/wp-content/uploads/2023/02/Double-click-on-ProcessMemoryDiagnostic-Events.png)
3。 雙擊 ProcessMemoryDiagnostic Events 然後單擊 更改用戶或組 under Security Options.

4。 點擊 高級 然後單擊 Find Now.

5.選擇您的 管理員帳戶 from the list then click OK.

6.再次 單擊確定 to add your administrator account.
7. Checkmark 用最高權限運行 然後單擊確定。

8. Follow the same steps for RunFullMemoryDiagnostic and close everything.
9. 重新啟動您的 PC 以保存更改。
Method 10: Disable System and Compressed Memory Process
1. 按 Windows 鍵 + R 然後輸入 任務表 然後按Enter打開 任務調度程序。
2. 導覽至以下路徑:
Task Scheduler Library > Microsoft > Windows > MemoryDiagnostic
3。 右鍵單擊 運行完整內存診斷 並選擇 禁用。
![Right-click on RunFullMemoryDiagnostic and select Disable | [SOLVED] 100% Disk Usage by System and Compressed Memory](https://lbsite.org/wp-content/uploads/2023/02/Right-click-on-RunFullMemoryDiagnostic-and-select-Disable.png)
4. Close Task Scheduler and restart your PC.
推薦:
這樣你就成功了 Fix 100% Disk Usage by System and Compressed Memory 但如果您對這篇文章仍有任何疑問,請隨時在評論部分提出。

