Fix Can’t Connect to this network issue in Windows 10

You probably can’t connect to your WiFi, and that’s why you see the error “Can’t Connect to this network” in Windows 10. No matter how many times you try, you will always receive this error until you reboot your PC, which becomes very frustrating after a few times. This problem mostly occurs with Windows 10 users who have Intel Wireless card, but it doesn’t mean it’s limited to Intel only.
While there is possible explanation such as corrupted or outdated wireless drivers, conflicting 802.11n Mode, antivirus or firewall possible intrusion, IPv6 issues etc. but there is no single cause as to why this error occurs. It mostly depends on user system configuration, and that’s why we have listed all the possible troubleshooting methods which seem to fix the issue. So without wasting any time, let’s see how actually to fix this error.
Fix Can’t Connect to this network issue in Windows 10
Make sure to create a restore point just in case something goes wrong.
Method 1: Forget WiFi Network
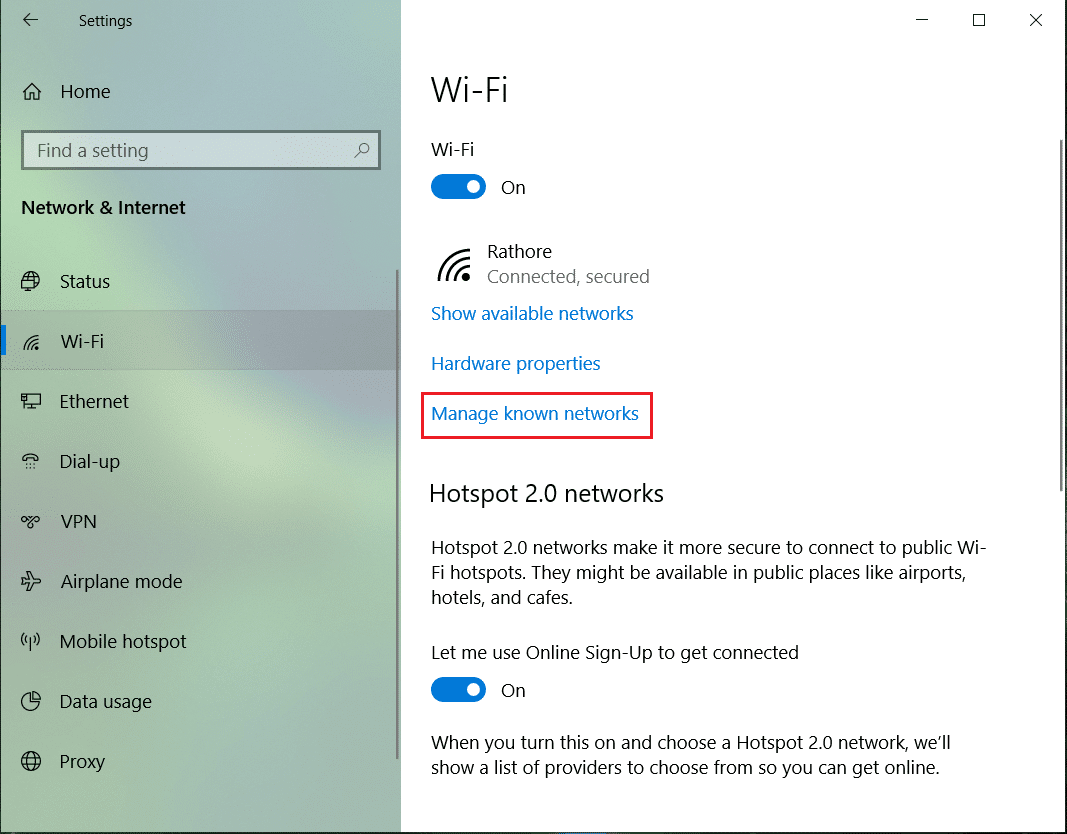
1. Click on the Wireless icon in the system tray and then click Network Settings.
![]()
2. Then click on Manage Known networks to get the list of saved networks.
3.Now select the one which Windows 10 won’t remember the password for and click Forget.

4. Again click the wireless icon in the system tray and connect to your network, it will ask for the password, so make sure you have the Wireless password with you.
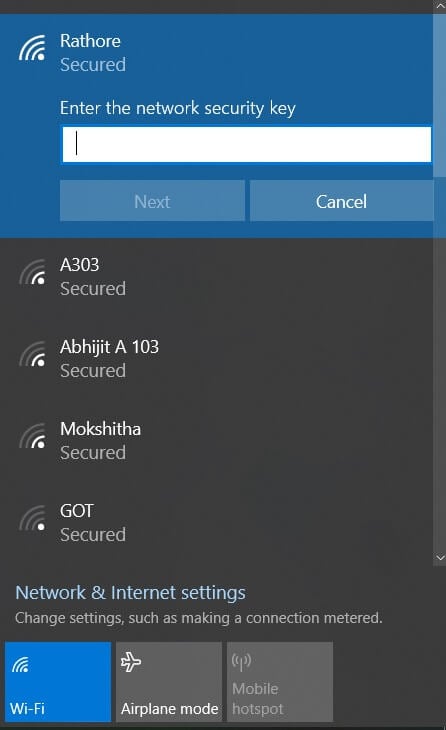
5.Once you have entered the password you will connect to the network and Windows will save this network for you.
6.Reboot your PC and again try to connect to the same network and this time Windows will remember the password of your WiFi. This method seems to Fix Can’t Connect to this network issue in Windows 10.
Method 2: Disable and then Enable your WiFi-adapter
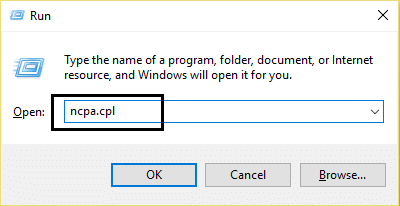
1. Press Windows Key + R then type ncpa.cpl and hit Enter.
2. Right-click on your wireless adapter and select Disable.
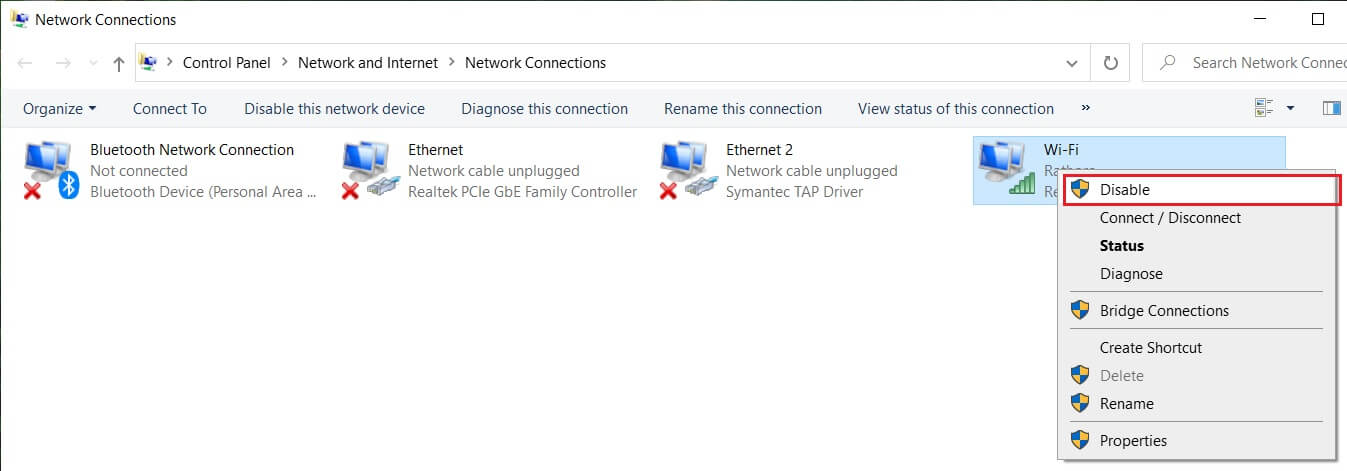
3. Again right-click on the same adapter and this time choose Enable.
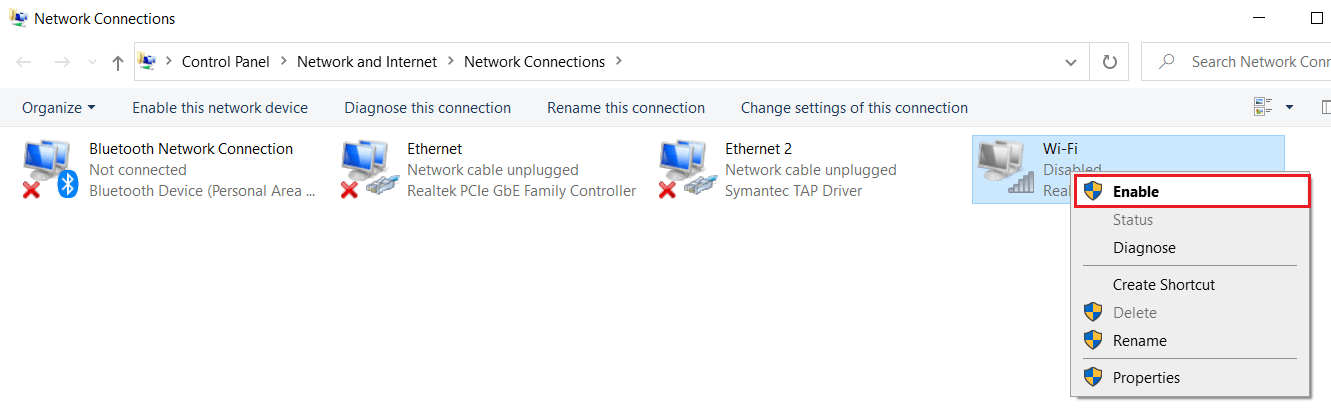
4. Restart your and again try to connect to your wireless network and see if you can Fix Can’t Connect to this network issue.
Method 3: Flush DNS and Reset TCP/IP
1. Right-click on Windows Button and select “Command Prompt(Admin).”

2. Now type the following command and press Enter after each one:
ipconfig /release
ipconfig /flushdns
ipconfig /renew

3. Again, open Admin Command Prompt and type the following and hit enter after each one:
ipconfig /flushdns
nbtstat –r
netsh int ip reset
netsh winsock reset
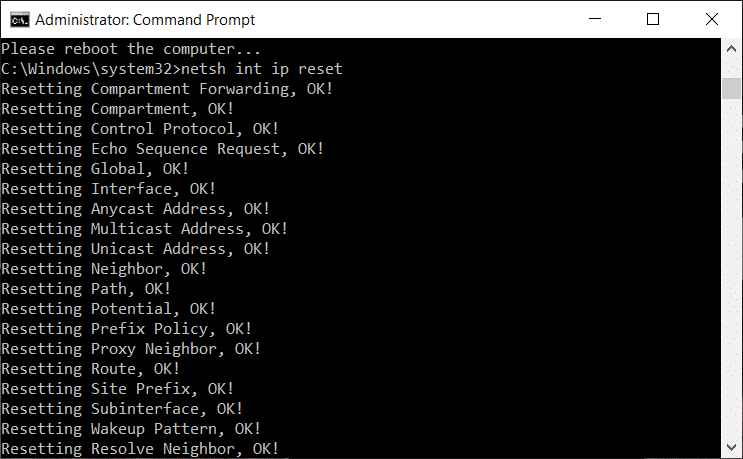
4. Reboot to apply changes. Flushing DNS seems to Fix Can’t Connect to this network issue in Windows 10.
Method 4: Run Network Troubleshooter
1. Press Windows Key + I to open Settings then click on Update & Security.
![]()
2. From the left-hand menu, select Troubleshoot.
3. Under Troubleshoot, click on Internet Connections and then click Run the troubleshooter.

4. Follow further on-screen instructions to run the troubleshooter.
5. Reboot your PC to save changes.
Method 5: Uninstall your Network Adapter
1. Press Windows key + R, then type “devmgmt.msc” and hit Enter to open device manager.

2. Expand Network adapters and right-click on the Wireless network card.
3. Select Uninstall, if asked for confirmation, select yes.
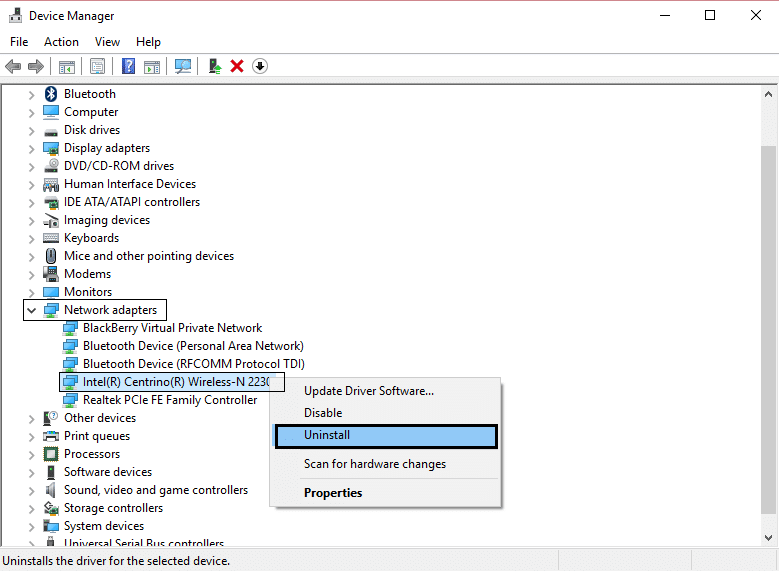
4. Reboot to save changes and then try to reconnect your Wireless.
Method 6: Update WiFi Drivers
- Press Windows Key + R then type devmgmt.msc and hit Enter.
2. Expand Network adapters then right-click on your installed network adapter and select Update Driver Software.

3. Then choose Search automatically for updated driver software.

4. Reboot your PC to save changes. If the problem persists, then follow the next step.
5. Again select Update Driver Software but this time chooses ‘Browse my computer for driver software.‘

6. Next, at the bottom click ‘Let me pick from a list of device drivers on the computer.’

7. Select the latest driver from the list and click Next.
8. Let the Windows install drivers and once complete close everything.
9. Reboot your PC to save changes, and you may be able to Fix Can’t Connect to this network issue in Windows 10.
Method 7: Temporarily Disable Antivirus and Firewall
Sometimes the Antivirus program can cause an error on Chrome and to verify this is not the case here, you need to disable your antivirus for a limited time so that you can check if the error still appears when the antivirus is off.
1. Right-click on the Antivirus Program icon from the system tray and select Disable.

2. Next, select the time frame for which the Antivirus will remain disabled.

Note: Choose the smallest amount of time possible, for example, 15 minutes or 30 minutes.
3. Once done, again try to connect to open Google Chrome and check if the error resolves or not.
4. Search for the control panel from the Start Menu search bar and click on it to open the Control Panel.

5. Next, click on System and Security then click on Windows Firewall.

6. Now from the left window pane click on Turn Windows Firewall on or off.
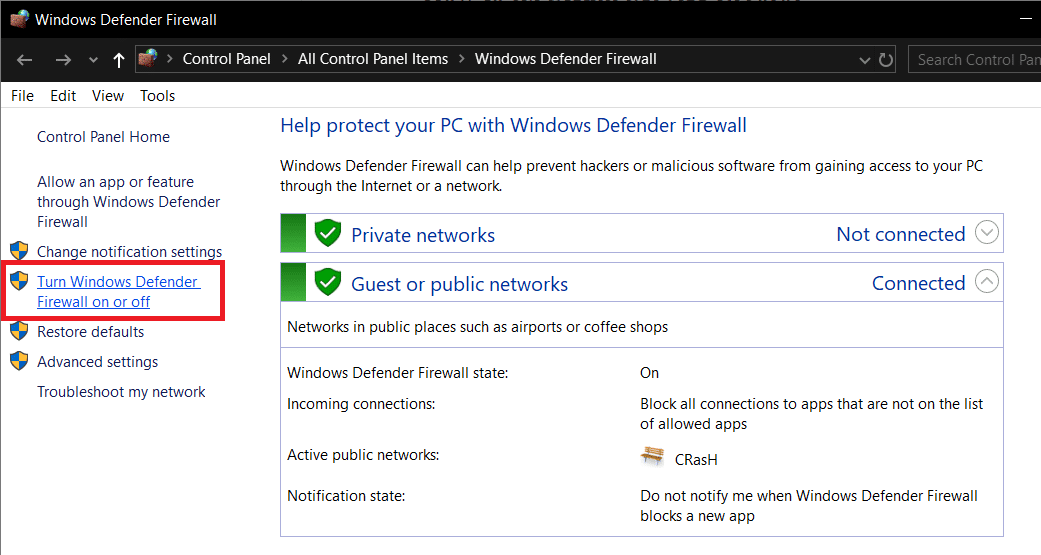
7. Select Turn off Windows Firewall and restart your PC.
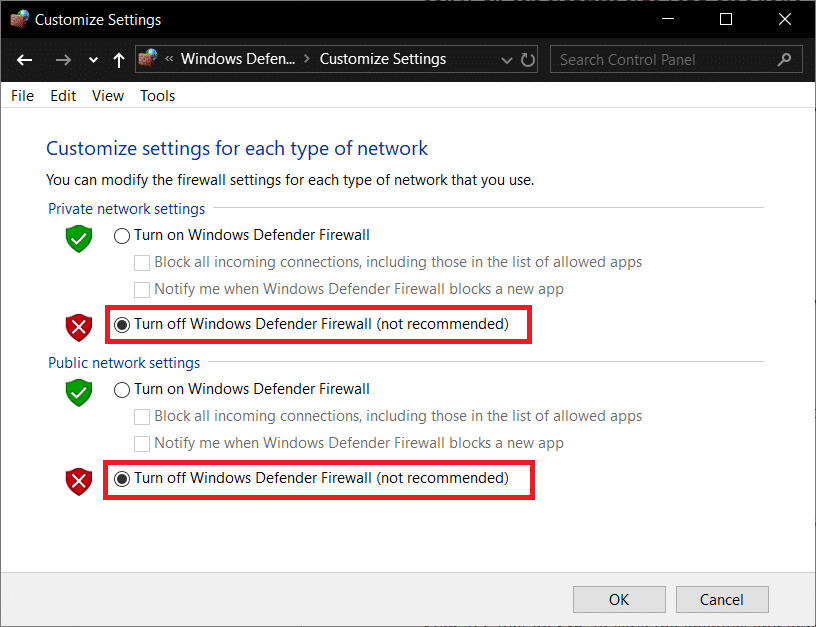
Again try to open Google Chrome and visit the web page, which was earlier showing the error. If the above method doesn’t work, please follow the same steps to turn on your Firewall again.
Method 8: Disable IPv6
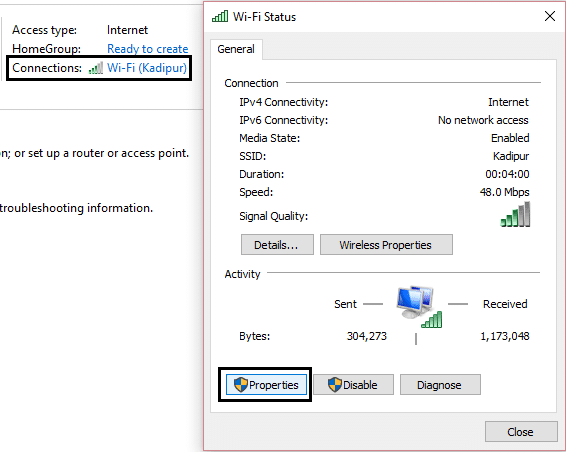
1. Right-click on the WiFi icon on the system tray and then click on “Open Network and Sharing Center.”
![]()
2. Now click on your current connection to open Settings.
Note: If you can’t connect to your network, then use an Ethernet cable to connect and then follow this step.
3. Click the Properties button in the window that just open.
4. Make sure to uncheck Internet Protocol Version 6 (TCP/IP).
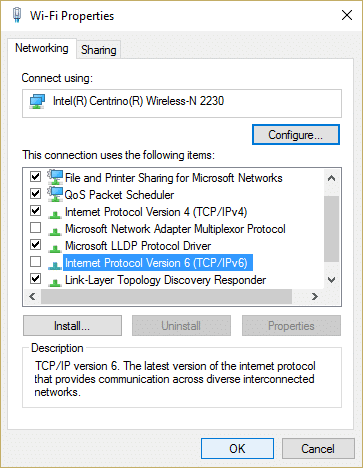
5. Click OK, then click Close. Reboot your PC to save changes.
Method 9: Change 802.11 Channel Width
1. Press Windows Key + R then type ncpa.cpl and hit Enter to open Network Connections.
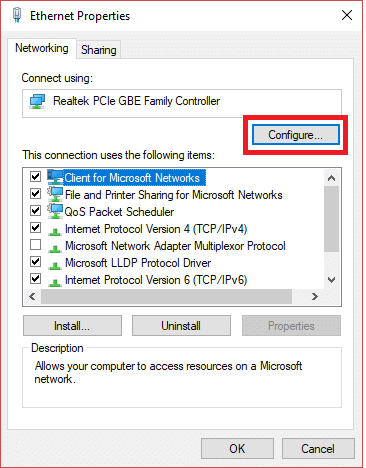
2. Now right-click on your current WiFi connection and select Properties.
3. Click the Configure button in the Wi-Fi properties window.
4. Switch to the Advanced tab and select the 802.11 Channel Width.
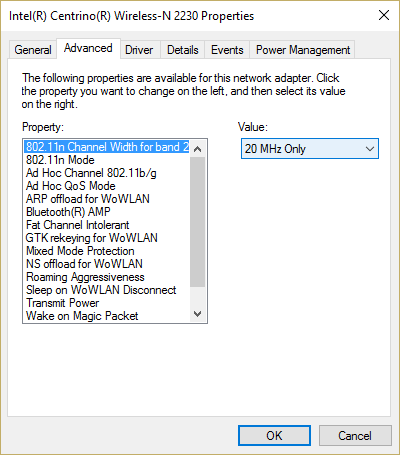
5. Change the value of 802.11 Channel Width to 20 MHz then click OK.
6. Close everything and reboot your PC to save changes. You may be able to fix the error Can’t Connect to this network due to network connection error 0x00028002 in Windows 10 with this method but if for some reason it didn’t work for you then continue.
Method 10: Make sure your Adapter and Router are using the same security settings
1. Open Network and Sharing Center and click on your current WiFi connection.
2. Click Wireless Properties in the new window that just opened.
3. Switch to Security tab and select the same security type that your router is using.
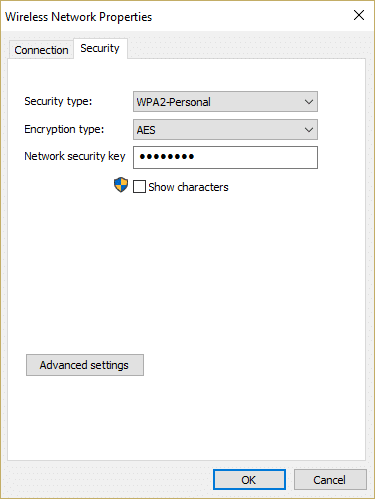
4. You might have to try different options to fix this issue.
5. Restart your PC to save changes.
Method 11: Disable 802.11n Mode
1. Press Windows Key + R then type ncpa.cpl and hit Enter to open Network Connections
2. Now right-click on your current WiFi connection and select Properties.
3. Click the Configure button in the Wi-Fi properties window.
4. Switch to the Advanced tab and select the 802.11n Mode.
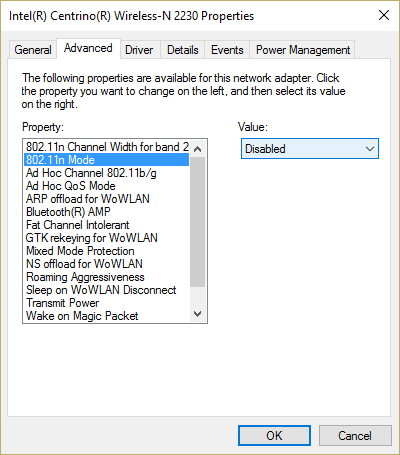
5. Make sure to set it’s value to Disabled then click OK.
6. Close everything and reboot your PC to save changes. This may be able to Fix Can’t Connect to this network issue in Windows 10 but if not then continue.
Method 12: Add the connection manually
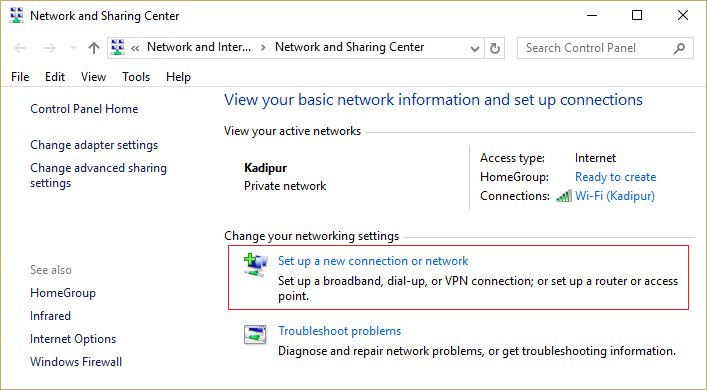
1. Right-click on the WiFi icon in the system tray and select Open Network and Sharing Center.

2. Click Set up a new connection or network in the bottom.
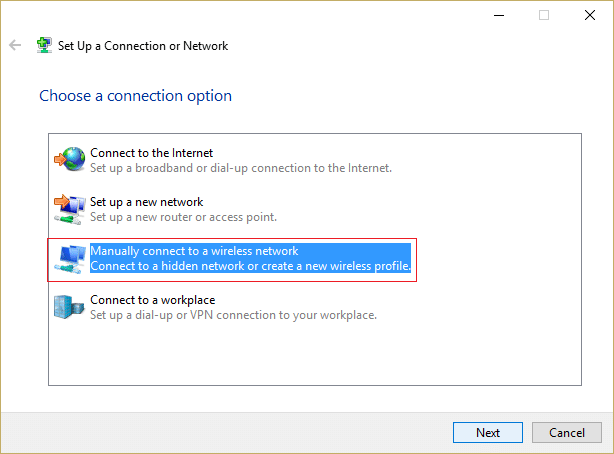
3. Choose “Manually connect to a wireless network” and click Next.
4. Follow on-screen instruction and Enter username & password to configure this new connection.
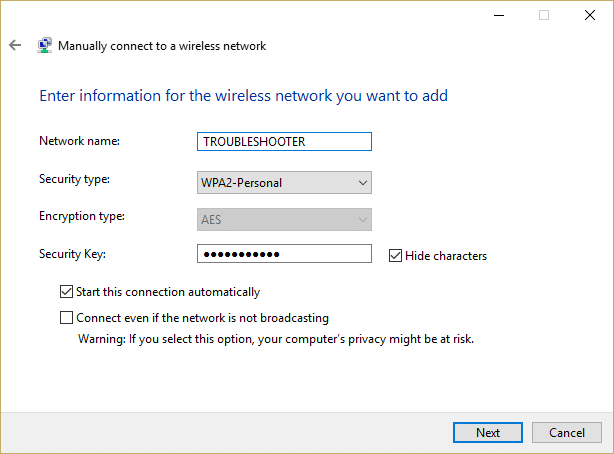
5.Click Next to finish the process and check if you can connect to this network without any problems.
Method 13: Change the Wireless Network Mode to Default
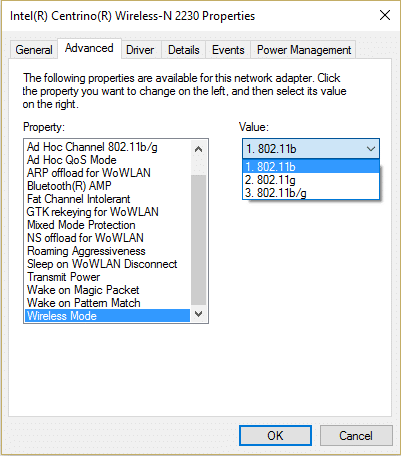
1. Press Windows Key + R then type ncpa.cpl and hit Enter to open Network Connections
2. Now right-click on your current WiFi connection and select Properties.
3. Click the Configure button in the Wi-Fi properties window.
4.S witch to the Advanced tab and select Wireless Mode.
5. Now change the value to 802.11b or 802.11g and click OK.
Note: If the above value doesn’t seem to fix the problem, try different values to fix the issue.
6.Close everything and restart your PC and see if the error Can’t Connect to this network is resolved or not.
Method 14: Use Command Prompt
1. Press Windows Key + X then select Command Prompt (Admin).

2. Type the following command and hit Enter after each one:
reg delete HKCRCLSID{988248f3-a1ad-49bf-9170-676cbbc36ba3} /va /f
netcfg -v -u dni_dne
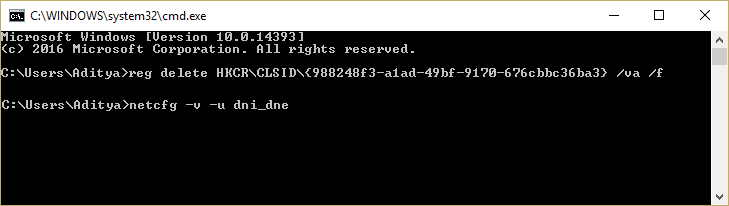
3. Close cmd and reboot your PC.
Method 15: Perform a Clean Boot
Sometimes 3rd party software can conflict with Windows Store and therefore, you should not install any apps from Windows apps store. To Fix Can’t Connect to this network issue in Windows 10, you need to perform a clean boot in your PC and diagnose the issue step by step.

Recommended:
That’s it you have successfully Fix Can’t Connect to this network issue in Windows 10 but if you still have any queries regarding this post feel free to ask them in the comment’s section.