Disable Automatic Restart on System Failure in Windows 10

Disable Automatic Restart on System Failure in Windows 10: Blue Screen of Death (BSOD) error occurs when the system fails to start causing your PC to restart unexpectedly or crashing. In short, after a system failure occurs, Windows 10 automatically restart your PC to recover from the crash. Most of the time a simple restart is able to recover your system but in some cases, your PC might get into a restart loop. That’s why you need to disable automatic restart on system failure in Windows 10 in order to recover from the restart loop.
Also, another problem is that the BSOD error is only displayed for a few fractions of seconds, in which it is impossible to note down the error code or understand the nature of the error. If the automatic restart if disabled it will you give you more time on the BSOD screen. Anyway without wasting any time let’s see How to Disable Automatic Restart on System Failure in Windows 10 with the help of the below-listed tutorial.
Disable Automatic Restart on System Failure in Windows 10
Make sure to create a restore point just in case something goes wrong.
Method 1: Disable Automatic Restart on System Failure using Startup and Recovery Settings
1.Press Windows Key + R then type sysdm.cpl and hit Enter to open System Properties.

2.Now switch to the Advanced tab then click on “Settings” under Startup and Recovery.
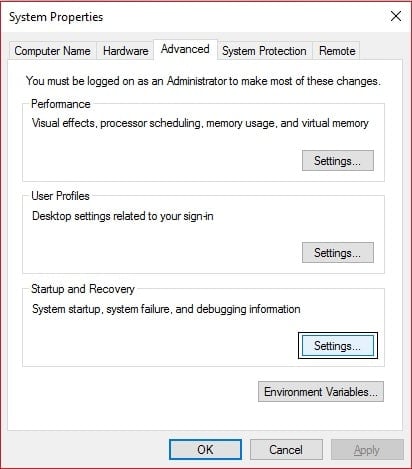
3.Make sure to uncheck “Automatically Restart” under System failure.

4.Click OK then click Apply followed by OK.
5.Reboot your PC to save changes.
Method 2: Disable Automatic Restart on System Failure in Windows 10 using Registry Editor
1.Press Windows Key + R then type regedit and hit Enter.

2.Navigate to the following registry key:
HKEY_LOCAL_MACHINESYSTEMCurrentControlSetControlCrashControl
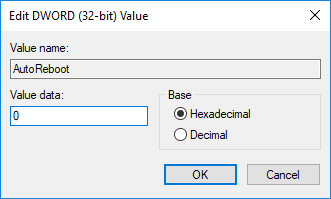
3.Make sure to select CrashControl then in the right window pane double-click on AutoReboot.
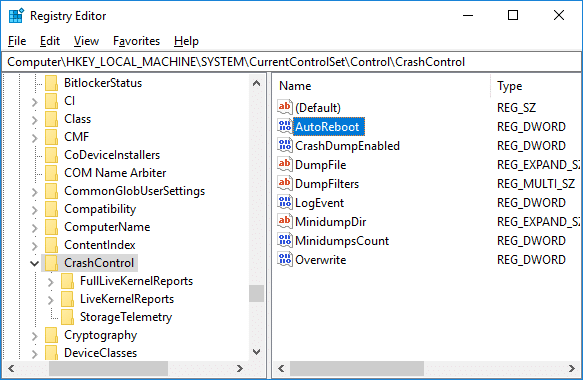
4.Now under AutoReboot Value data field type 0 (zero) and click OK.
5.Close everything and restart your PC.
Method 3: Disable Automatic Restart on System Failure using Command Prompt
1.Press Windows Key + X then select Command Prompt (Admin).

2.Type the following command into cmd and hit Enter:
Disable Automatic Restart on System Failure: wmic recoveros set AutoReboot = False
Enable Automatic Restart on System Failure: wmic Recoveros set AutoReboot = True
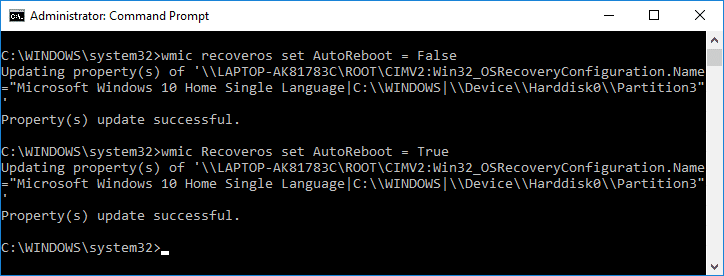
3.Close everything and reboot your PC to save changes.
Method 4: Disable Automatic Restart on System Failure in Windows 10 using Advanced Startup Options
1.Boot to Advanced Startup Options using any one of the listed methods here.
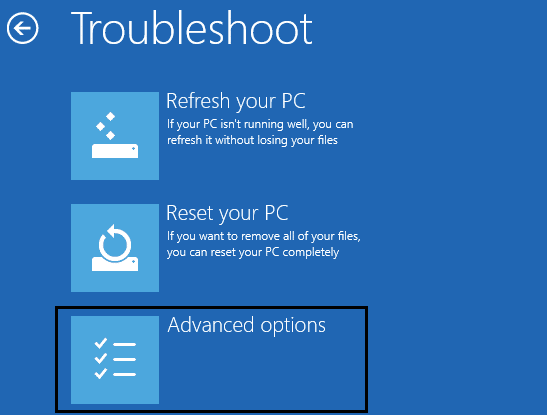
2.Now on Choose an option screen click on Troubleshoot.

3.On Troubleshoot screen click on “Advanced options“.
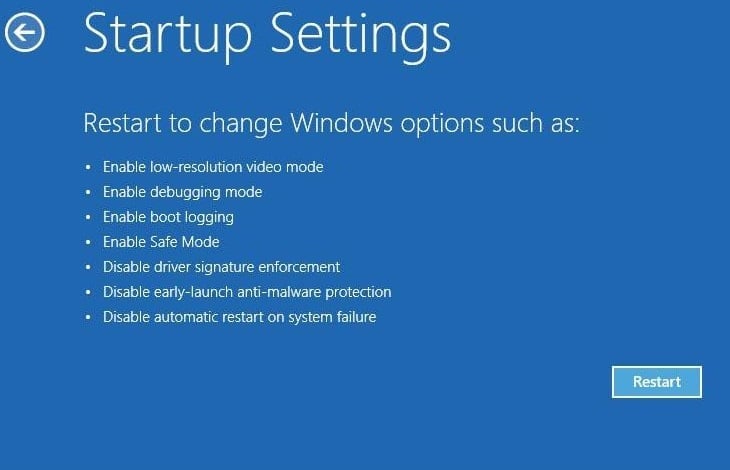
4.Now click “Startup Settings” icon on the Advanced options screen.
![]()
5.Click on Restart button and wait for PC to restart.
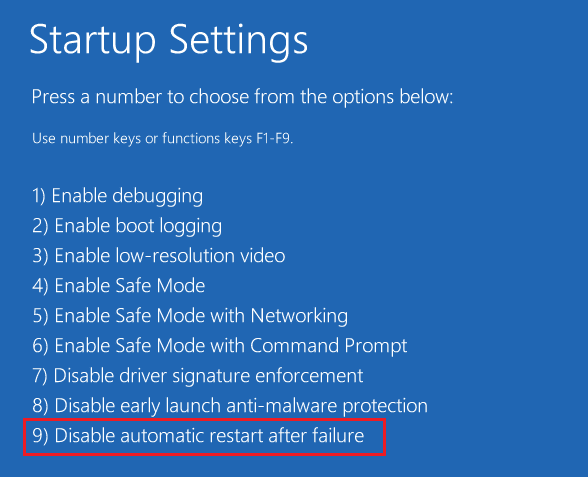
6.The system will boot to Startup Settings after the restart, simply press F9 or 9 key to select Disable automatic restart after failure.
7.Now your PC will restart, saving the above changes.
Recommended:
That’s it, you successfully learned How to Disable Automatic Restart on System Failure in Windows 10 but if you still have any questions regarding this tutorial then feel free to ask them in the comment’s section.