7 Ways to Fix Critical Process Died in Windows 10: Critical Process Died is a Blue Screen of Death Error (BSOD) with an error message Critical_Process_Died and a stop error 0x000000EF. The main cause of this error is that the process which was supposed to run the Windows Operating System ended abruptly and thus the BSOD error. There is no information available on this error on Microsoft website apart from this:
“The CRITICAL_PROCESS_DIED bug check has a value of 0x000000EF. This indicates that a critical system process died.”
The other reason why you could see this BSOD error is that when an unauthorized program tries to modify a data related to the critical component of Windows then the Operating System immediately steps in, causing the Critical Process Died error to stop this unauthorized change.

Now you know all about the Critical Process Died error but what causes this error on your PC? Well, the main culprit seems to be outdated, incompatible or a buggy driver. This error can also be caused because of the bad memory sector. So without wasting any time let’s see How to Fix Critical Process Died in Windows 10 with the help of the below-listed tutorial.
Fix Critical Process Died in Windows 10
Make sure to create a restore point just in case something goes wrong.
If you can’t access your PC then start Windows in Safe Mode using this guide and then try the following fixes.
Method 1: Run CCleaner and Antimalware
1.Download and install CCleaner & Malwarebytes.
2.Run Malwarebytes and let it scan your system for harmful files.
3.If malware is found it will automatically remove them.
4.Now run CCleaner and in the “Cleaner” section, under the Windows tab, we suggest checking the following selections to be cleaned:

5.Once you’ve made certain the proper points are checked, simply click Run Cleaner, and let CCleaner run its course.
6.To clean your system further select the Registry tab and ensure the following are checked:

7.Select Scan for Issue and allow CCleaner to scan, then click Fix Selected Issues.
8.When CCleaner asks “Do you want backup changes to the registry?” select Yes.
9.Once your backup has completed, select Fix All Selected Issues.
10.Restart your PC and see if you’re able to Fix Critical Process Died in Windows 10.
Method 2: Run SFC and DISM Tool
1.Press Windows Key + X then click on Command Prompt(Admin).

2.Now type the following in the cmd and hit enter:
Sfc /scannow
sfc /scannow /offbootdir=c: /offwindir=c:windows (If above fails then try this one)

3.Wait for the above process to finish and once done restart your PC.
4.Again open cmd and type the following command and hit enter after each one:
a) Dism /Online /Cleanup-Image /CheckHealth
b) Dism /Online /Cleanup-Image /ScanHealth
c) Dism /Online /Cleanup-Image /RestoreHealth

5.Let the DISM command run and wait for it to finish.
6. If the above command doesn’t work then try on the below:
Dism /Image:C:offline /Cleanup-Image /RestoreHealth /Source:c:testmountwindows
Dism /Online /Cleanup-Image /RestoreHealth /Source:c:testmountwindows /LimitAccess
Note: Replace the C:RepairSourceWindows with the location of your repair source (Windows Installation or Recovery Disc).
7.Reboot your PC to save changes and see if you’re able to Fix Critical Process Died in Windows 10 Issue.
Method 3: Perform a Clean Boot
Sometimes 3rd party software can conflict with Windows and can cause the issue. In order to Fix Critical Process Died issue, you need to perform a clean boot on your PC and diagnose the issue step by step.

Method 4: Run Driver Verifier
This method is only useful if you can log into your Windows normally not in the safe mode. Next, make sure to create a System Restore point.

Method 5: Update Outdated Drivers
1.Press Windows Key + R then type devmgmt.msc and hit Enter to open Device Manager.

2.Click the arrow on the left side of each category to expand it and see the list of devices in it.
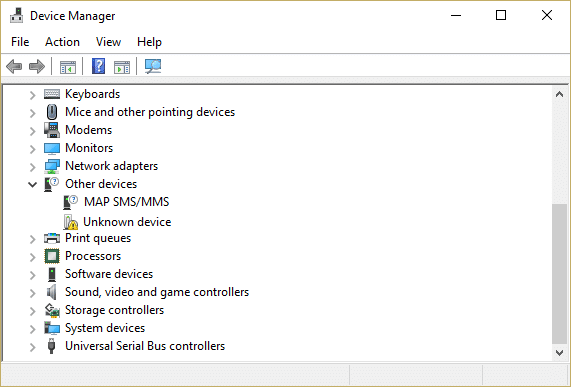
3.Now check if any of the devices have a yellow exclamation mark next to it.
4.If any device has a yellow exclamation mark then this means they have outdated drivers.
5.To fix this, right-click on such device(s) and select Uninstall.
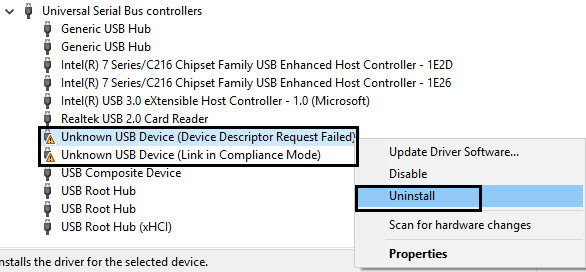
5.Restart your PC to apply changes and Windows will automatically install the default drivers for the above device.
Method 6: Disable Sleep and Hibernate
1.Type control in Windows Search then click on Control Panel from the search result.

2.In Control Panel then type Power options in the search.
2.In Power Options, click change what the power button do.

3.Next, click Change settings that are currently unavailable link.

4.Make sure to Uncheck Sleep and Hibernate.
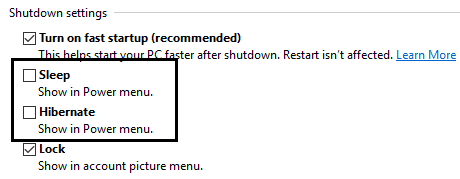
5.Click save changes and restart your PC.
Method 7: Refresh or Reset Windows 10
Note: If you can’t access your PC then restart your PC a few times until you start Automatic Repair. Then navigate to Troubleshoot > Reset this PC > Remove everything.
1.Press Windows Key + I to open Settings then click on Update & Security icon.
![]()
2.From the left-hand menu select Recovery.
3.Under Reset this PC click on the “Get Started” button.

4.Select the option to Keep my files.

5.For the next step you might be asked to insert Windows 10 installation media, so ensure you have it ready.
6.Now, select your version of Windows and click on only the drive where Windows is installed > Just remove my files.

5.Click on the Reset button.
6.Follow the instructions on the screen to complete the reset or refresh.
Recommended:
That’s it you have successfully Fix Critical Process Died in Windows 10 but if you still have any queries regarding this post then feel free to ask them in the comments section.