Fix Computer Won’t Go to Sleep Mode In Windows 10

Sleep mode is one of the important features which is provided by the Windows Operating System. When you put your system in sleep mode, this employs very slight power usage, and also your system starts up faster. This also helps you to get back to where you left off instantly.

The issues with Sleep mode feature of Windows 10:
The computer not going into sleep mode is one of the common issues faced by Windows users. Following are the situations in Windows 10 when your system may repudiate to go to sleep mode or the switch or toggle of sleep mode turning on/off randomly.
- Your system wakes up instantly when the sleep button is pressed.
- Your system wakes up randomly when you have put it in sleep mode and suddenly goes to sleep.
- Your system does not have any action on pressing the Sleep button.
You may face such situation and issues because of misconfiguration of your power options. For this, you have to configure your power options’ settings based on your requirements so that your system goes to sleep mode without encountering any issues mentioned above.
Fix Computer Won’t Go to Sleep Mode In Windows 10
Make sure to create a restore point just in case something goes wrong.
Method 1: Fix Computer Sleep issues using Power Option
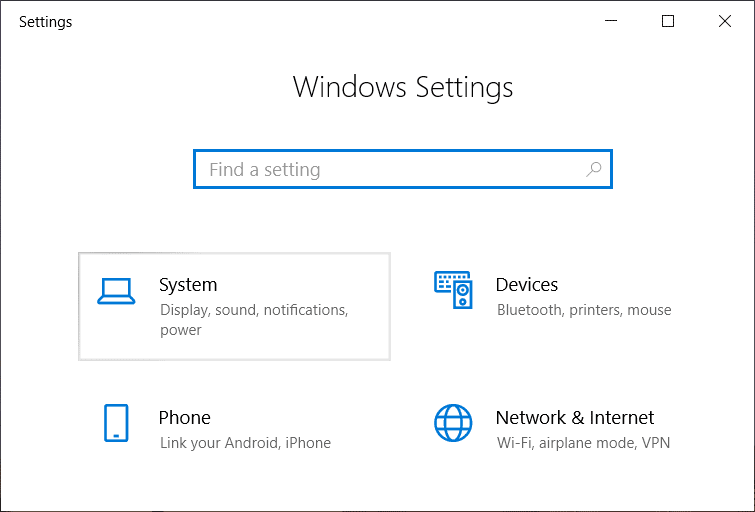
1. Go to the “Start” button now click on the Settings button (Gear icon).

2. Click on System icon then select “Power & sleep”, or you can directly search for it from the Settings Search.

3. Make sure that your system’s “Sleep” setting is set accordingly.

4. Click on “Additional power settings” link from the right window pane.

5. Then click on “Change Plan Settings” option next to your currently selected power plan.

6. Next, click on “Change advanced power settings” link from the bottom.

7. From the “Power Options” window, expand all the settings to make sure that your system is configured properly to allow the system to go to sleep mode.
8. If you don’t know or don’t want to create a mess by changing the above settings, click on the “Restore plan defaults” button which will eventually bring all your settings to a default one.

Reboot your PC to save changes and see if you’re able to Fix Computer Won’t Go to Sleep Mode In Windows 10, if not then continue to the next method.
Method 2: Fix Computer Sleep issues with Sensitive Mouse
1. Click on the “Start” button, and search for “device”.

2. Choose “Device Manager” & click on it to open the utility.
3. Now, expand the hierarchical structure of “Mice and other pointing devices” option.

4. Right-click on the mouse you are using and select “Properties” from the context menu.

5. Switch to the “Power Management” tab.
6. Then Uncheck “Allow this device to wake the computer” box and click OK to save changes.

Method 3: Fix Computer Won’t Go to Sleep with Network Adapters
The steps for solving using Network adapters are the same as Method 2, and only you have to check it under “Network adapters” option.
1. Press Windows Key + R then type devmgmt.msc and hit Enter to open Device Manager.

2. Now look for the “Network adapters” option and click on it to expand.

3. Take a quick look under each of the sub-options. For this, you have to right-click on each device and choose “Properties“.
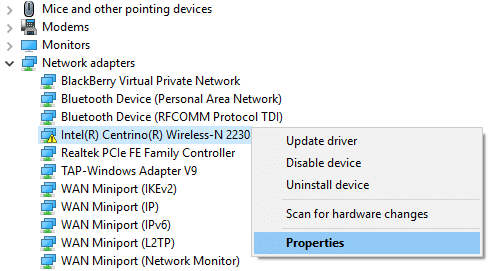
4. Now uncheck “Allow this device to wake the computer” and then click OK to save changes for each of your existing network adapter showing under the list.
If there is still a problem residing in your Windows 10 system regarding the sleep mode, then there may be any script or program constantly running on your system which keeps your system awake, or there may be a virus that is not letting your system go to sleep mode and utilizing your CPU usage. To fix this issue run a full system virus scan and then run Malwarebytes Anti-Malware.
Recommended:
I hope this article was helpful and you have easily Fix Computer Won’t Go to Sleep Mode In Windows 10 issue, but if you still have any questions regarding this guide then feel free to ask them in the comment’s section.