How To Clear Print Queue In Windows 10?

Are you in dire need of printing a document but can’t do so because of a stuck print job in Windows 10? Here are some ways to clear the print queue in Windows 10 easily.
Printers may appear easy to use but can be very flimsy at times. Handling print Queue when you urgently want to use a printer can be quite frustrating. The print queue not only prevents the present document but all future documents from printing. The problem is not hard to detect either. If the message ‘Printing’ remains indefinitely even though the paper is not stuck and the ink is right, then certainly there is a Print queue issue. There are certain ways that can be used to clear the print queue in Windows 10.
Why does a print job gets stuck in Windows 10?
The answer lies in the fact that the printing document isn’t directly sent for printing. The document is first received at the spooler, i.e., a program used to manage and queue the print jobs. This spooler is particularly helpful while rearranging the order of print jobs or deleting them entirely. A stuck print job prevents the documents in the queue from printing, which affects all the documents further down the queue.
Often you can solve the error by deleting the print job from the queue. To delete a stuck print job in Windows 10, go to ‘Printers’ in the setting and click on ‘Open Queue.’ Cancel the print job causing a problem, and you are good to go. If you can’t delete a particular print job, then try deleting the entire print queue. If this doesn’t work either, then try restarting all your devices. Unplug all your connections and plug them to reboot your device completely. This is the first approach that you should have for a stuck print job. If these traditional methods don’t work, then here are some other detailed methods for clearing a print job in Windows 10.
How To Clear Print Queue In Windows 10?
There are a few methods that can be employed to clear a print job in Windows 10. Clearing and restarting the Print Spooler is one of the best methods to use for fixing the stuck print job. It doesn’t delete your documents but creates an illusion that the documents are being sent for the first time to the printer. The process is done by stopping the Print Spooler until you clear the entire temporary cache used by the spooler and then starting it again. This can be accomplished by using a manual method or by making a batch file.
Method 1: Manually Clearing and Restarting the Print Spooler
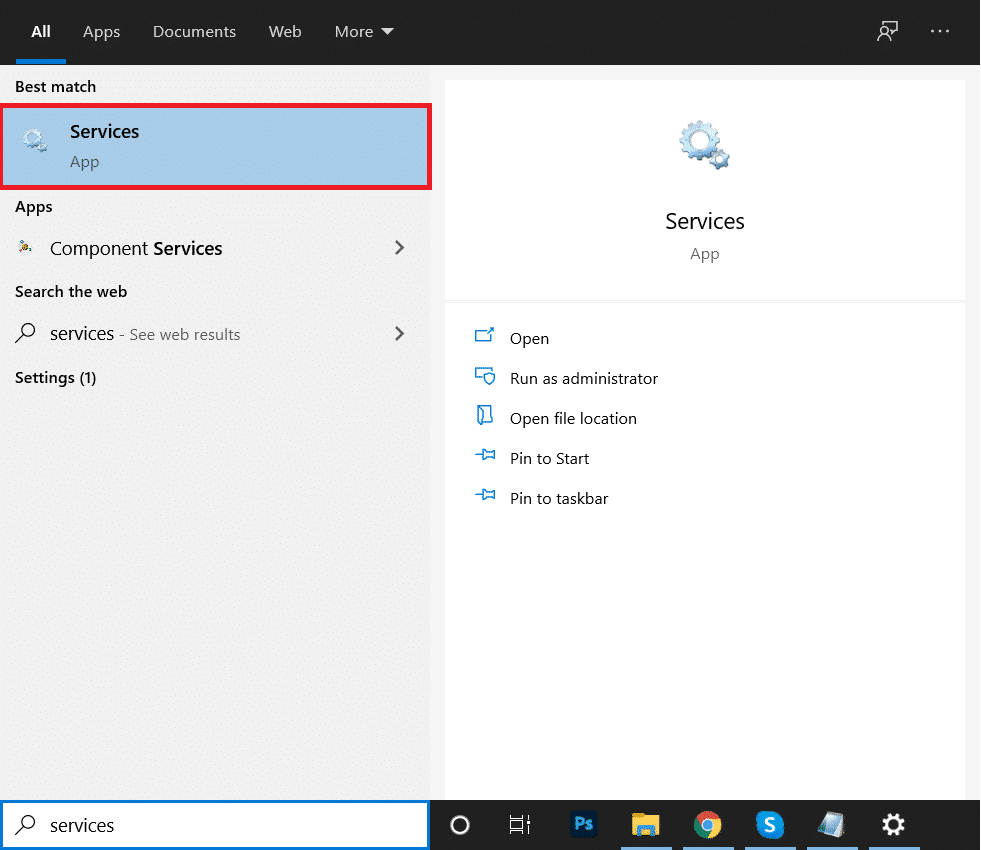
1. Type ‘Services.’ in the Windows search bar and open the ‘Services’ app.
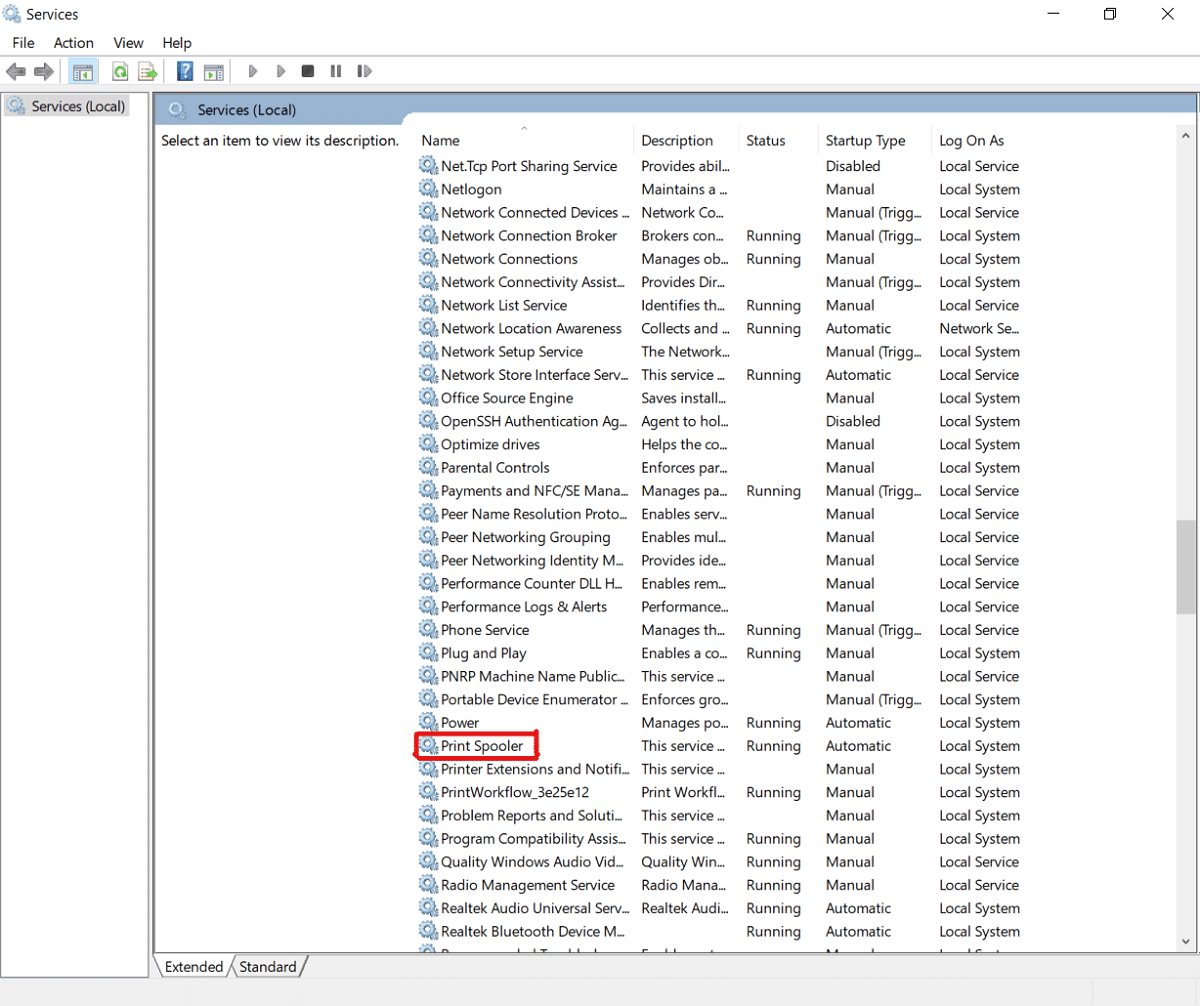
2. Find ‘Print Spooler’ in the menu and double-click to open the Properties.
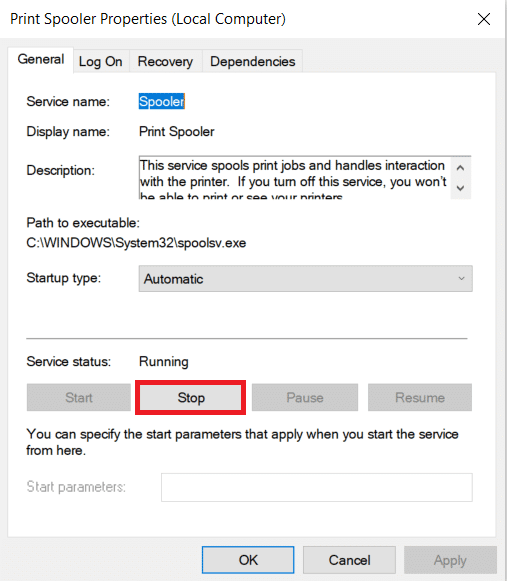
3. Click on ‘Stop’ in the Properties tab and minimize the window to use it again later.
4. Open ‘File Explorer’ and go to the below address location:
C:WindowsSystem 32spoolPRINTERS
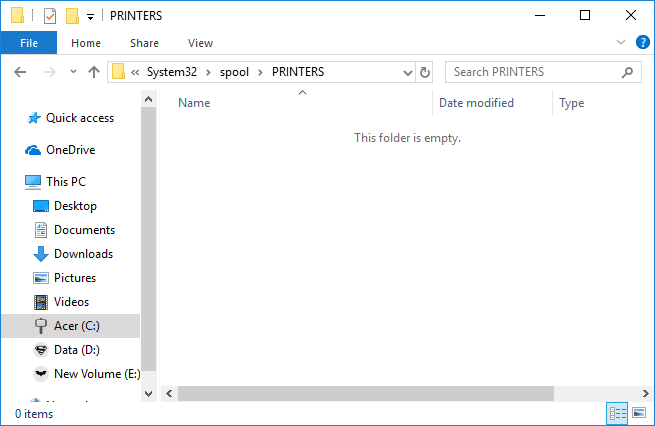
5. You may be asked for permission to access the location. Click on ‘Continue’ to move forward.
6. Once you reach the destination, select all the files and press Delete on your keyboard.
7. Now go back to the Spooler properties window and click on ‘Start.’
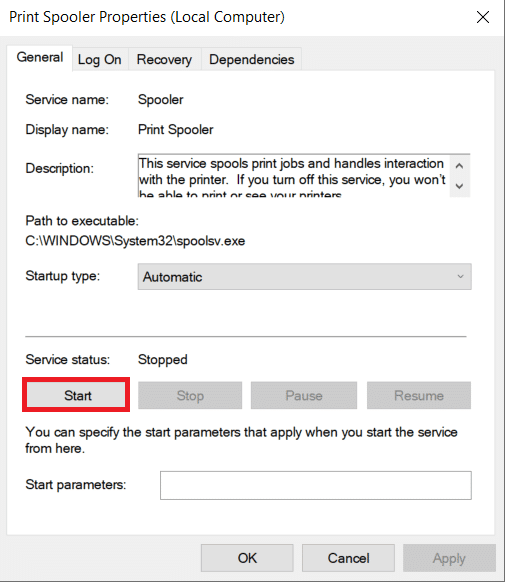
8. Click on ‘Ok’ and close the ‘Services’ app.
9. This will restart the spooler, and all the documents would be sent to the printer for printing.
Method 2: Clear Print Queue using a Batch File for the Print Spooler
Creating a batch file is a viable option if your print jobs frequently get stuck. Using the Services app every now and then can be a hassle that can be solved by a batch file.
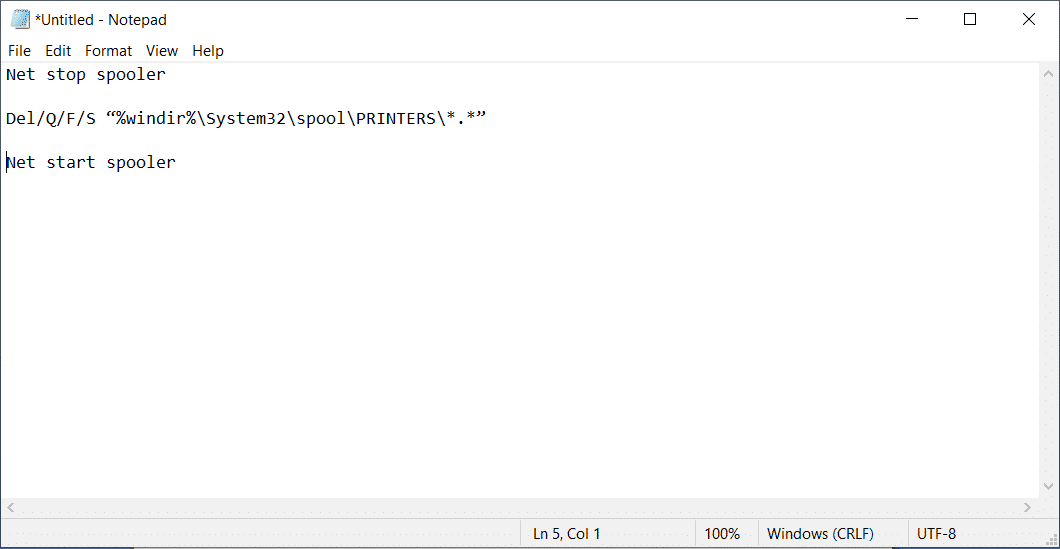
1. Open a text editor like Notepad on your computer.
2. Paste the commands below as separate lines.
Net stop spooler
Del/Q/F/S “%windir%System32spoolPRINTERS*.*”
Net start spooler
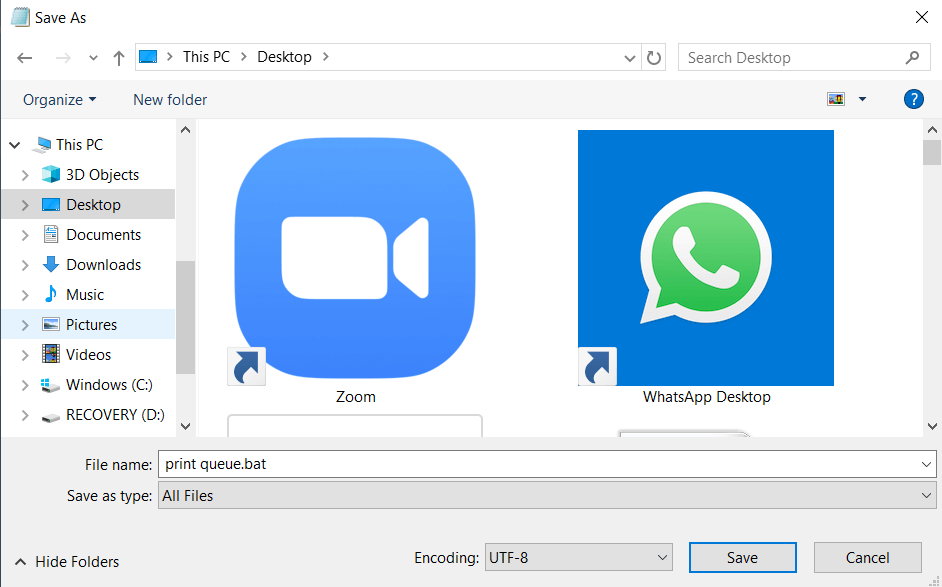
3. Click on ‘File’ and choose ‘Save as.’ Name the file with the extension ‘.bat’ at the end and choose ‘All files (*.*)’ in the ‘Save as type’ menu. Click on Save, and you are good to go.
4. Simply double-click on the batch file, and the work will be done. You can place it at the most accessible place on your desktop for easy access.
Also Read: How to Get Your Printer Back Online in Windows 10
Method 3: Clear Print Queue Using Command Prompt
You can delete a stuck print job in Windows 10 by using Command Prompt as well. Using the method will stop and start the print spooler again.
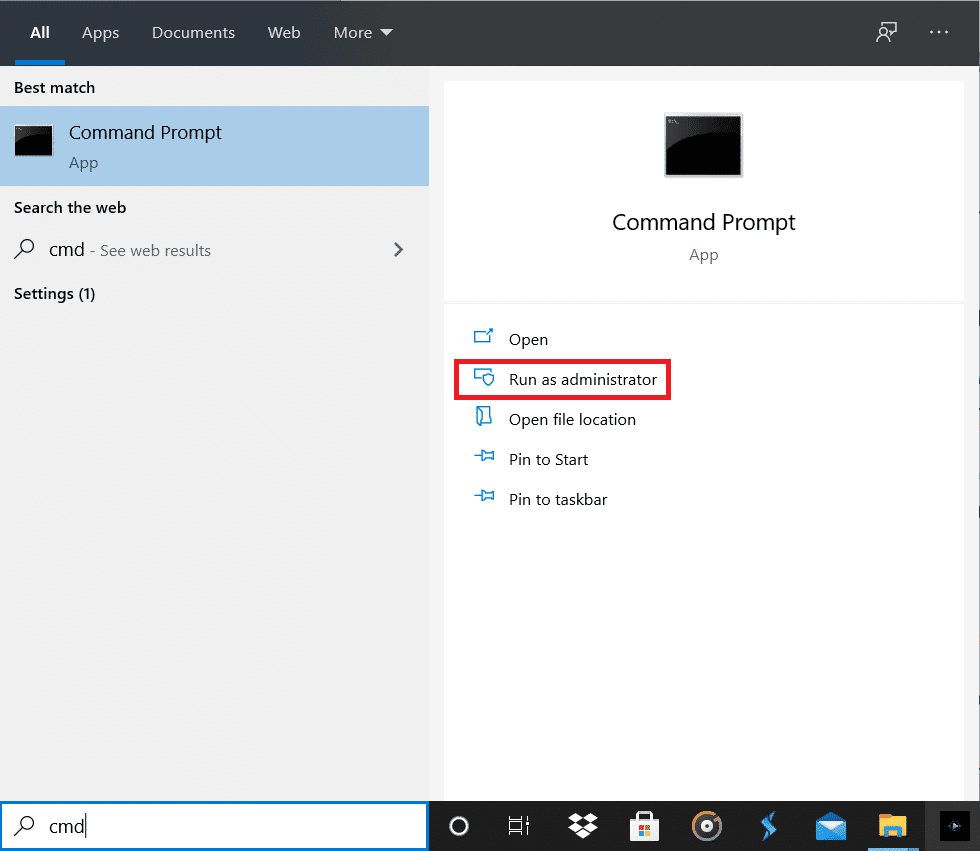
1. Type ‘cmd’ in the search bar. Right-click on the ‘Command Prompt’ app and choose the run as administrator option.
2. Type the command ‘net stop spooler’, which will stop the spooler.
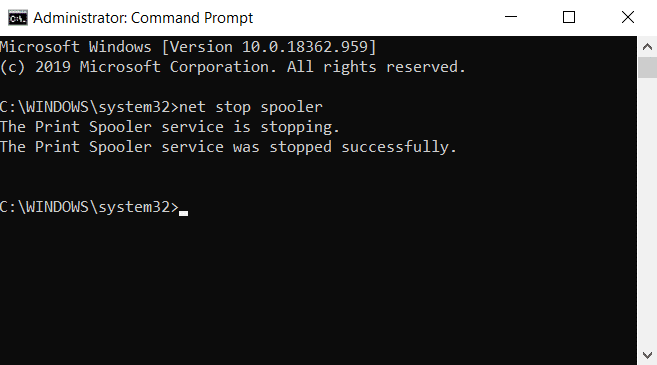
3. Again type the following command and hit Enter:
Del %systemroot%system32spoolprinters*/Q
4. This will do the same task as the methods above.
5. Start the spooler again by typing the command ‘net start spooler’ and press enter.
Method 4: Use the Management Console
You can use the service.msc, shortcut in the management console to clear the print queue in Windows 10. This method will stop the spooler and clear it to delete a stuck print job:
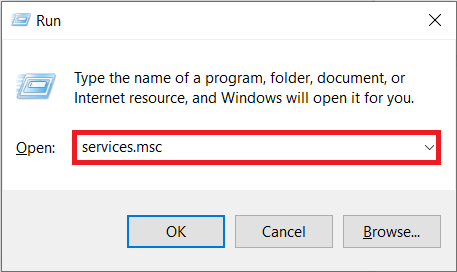
1. Press the Windows Key + R key together to open the run window.
2. Type ‘Services.msc’ and hit Enter.
Note: You can also access the ‘Services’ window via Windows Management. Right-click the Windows icon and choose Computer Management. Choose Services and Application then double-click on Services.
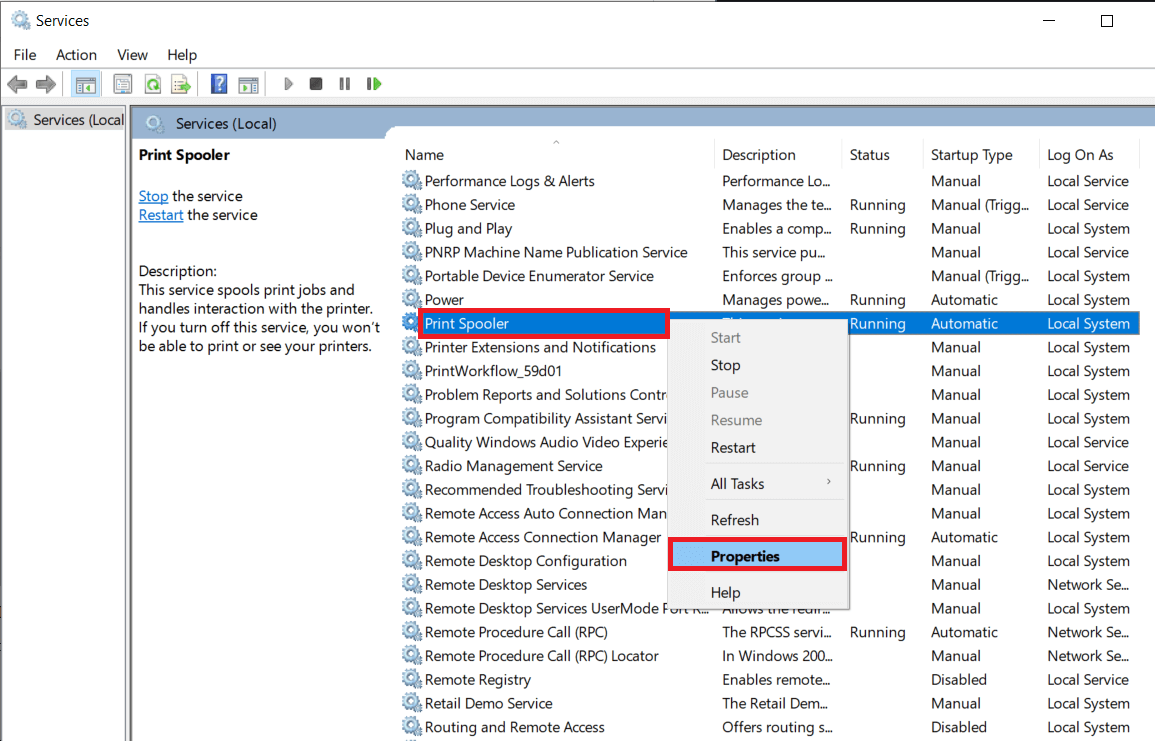
3. In the Services window, right-click on Print Spooler and select Properties.
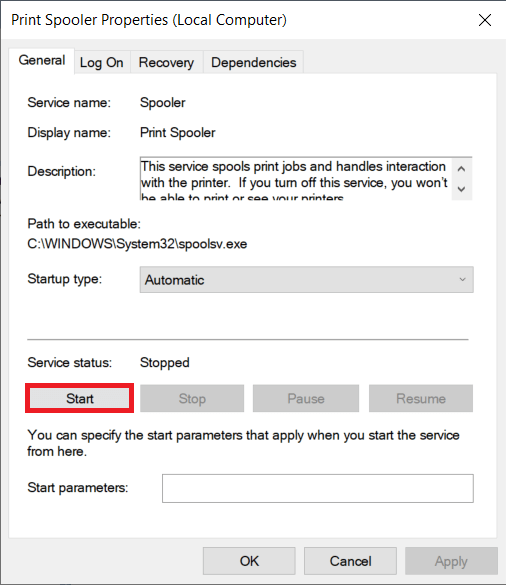
4. Click on the ‘Stop’ button to stop the Print Spooler service.

5. Minimize the window and open file explorer. Type the address ‘C: Windows System32 Spool Printers’ or navigate to the address manually.
6. Select all the files in the folder and delete them. They were the files that were in the print queue at the instance.
7. Go back to the Services window and click on the ‘Start’ button.
Recommended:
We hope the above guide was helpful and you were able to successfully clear the print queue in Windows 10. If you’re still stuck, then there may be compatibility issues with the printer and the data to be printed. Outdated printer drivers can also be an issue. You can also run the Windows Printer Troubleshooter to identify the correct problem. It will help you fix the errors in the print jobs. Follow the methods above to delete a stuck print job and clear the print queue in Windows 10, and you shouldn’t have any problems.