How to Fix Error 0x80070002 Windows 10

Did you come across any errors while downloading Windows 10 update? This is a fairly common problem in Windows 7 also. Today, we will fix update error 0x80070002 on Windows 10 with the help of tried and tested methods. Error Code 0x80070002 Windows 7 & 10 occurs especially when the Windows update file goes missing from the database or the said file on the device mismatches with the database instructions. The following messages may appear on your screen if your face this error:
- Windows could not search for new updates.
- An error occurred while checking for new updates for your PC.
- Error(s) found: code 80070002.
- Windows Update encountered an unknown error. Error code 0x80070002
How To Fix Error 0x80070002 Windows 10
Here are the root causes for 0x80070002 error:
- Faulty drivers
- Missing Windows update files
- Issues with Windows update
- Corrupt applications
There are other error codes such as 80244001, 80244022, and a few more, indicating Windows update issue. The said code may vary, but the solutions to resolve it are almost identical. Follow any of the methods listed below to fix this issue.
Method 1: Run Windows Update Troubleshooter
Windows offers an in-built troubleshooter to rectify minor issues. It is advisable to run the Windows troubleshooter first to fix Windows 10 update error code 0x80070002 as follows:
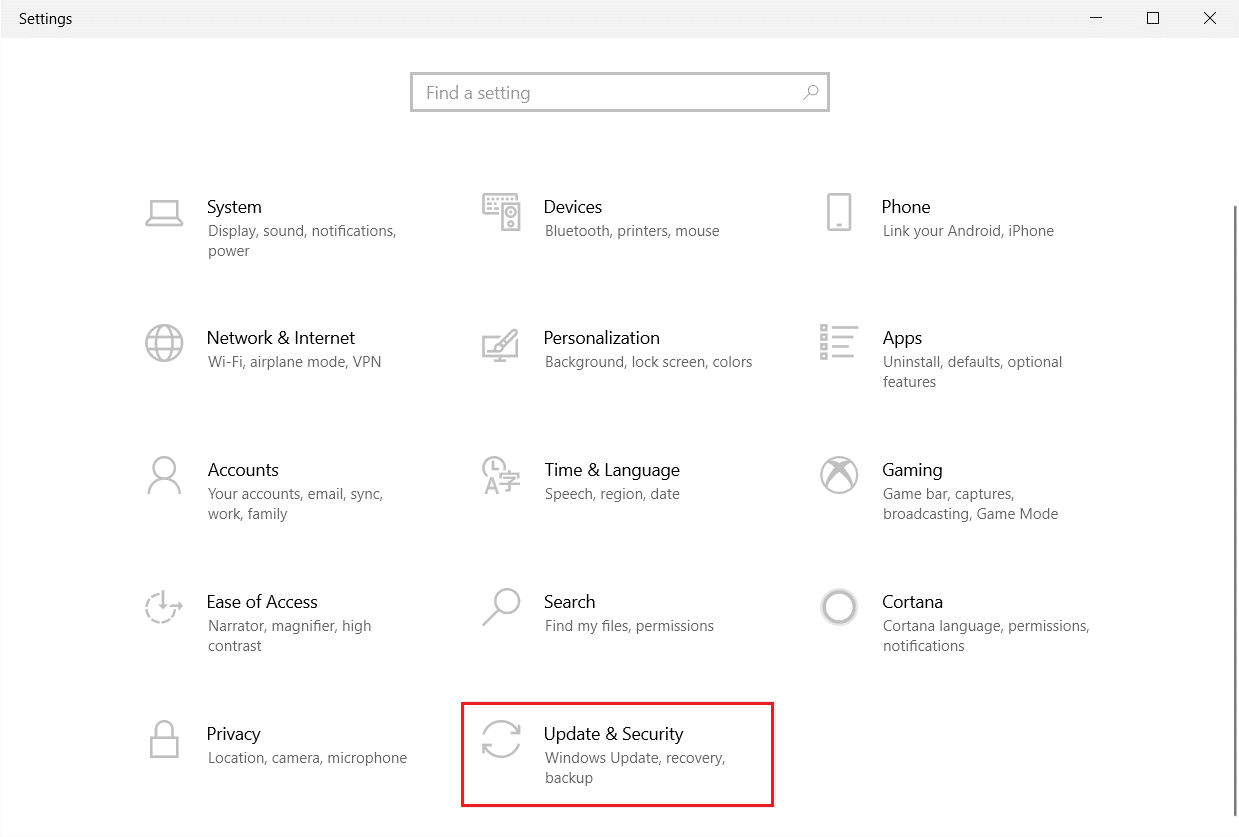
1. Press Windows + I keys simultaneously to launch Settings.
2. Click on the Update & Security tile, as shown.
3. Go to Troubleshoot menu in the left pane.
4. Select Windows Update troubleshooter and click on Run the troubleshooter button shown highlighted below.

5. Wait for the troubleshooter to detect and fix the problem. Once the process is complete, restart your PC.
Also Read: How to Set Alarms in Windows 10
Method 2: Synchronize Date and Time Settings
You might wonder why we should synchronize time and date for this issue. But, many users said that this solution worked, and hence, it is advised to do the same.
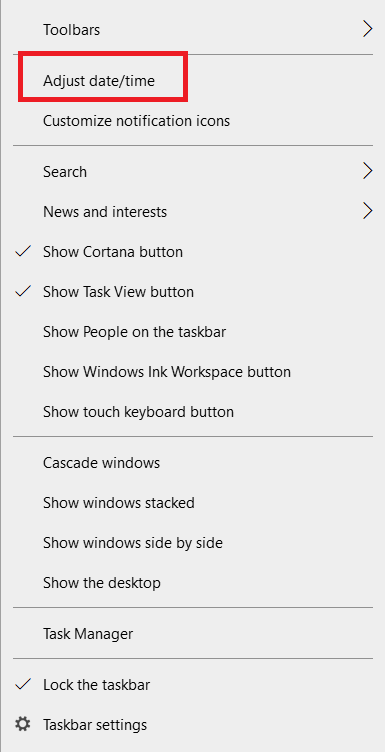
1. Right-click on the time and date from the right-end of the Taskbar.

2. Select the Adjust date/time option from the list.
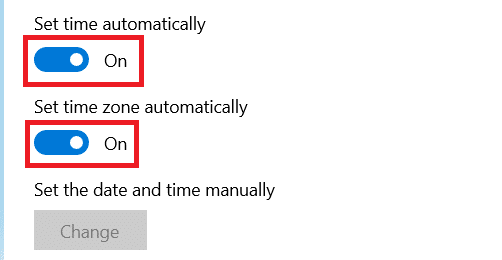
3. Switch On the toggle for the given options:
- Set time automatically
- Set time zone automatically
Now, try updating Windows again.
Also Read: Fix Windows Update Error 0x800704c7
Method 3: Modify Registry Editor
Follow the given instructions carefully since any changes made by modifying Registry Editor will be permanent.
Note: Before processing the method, ensure that the device language is set to English (United States).
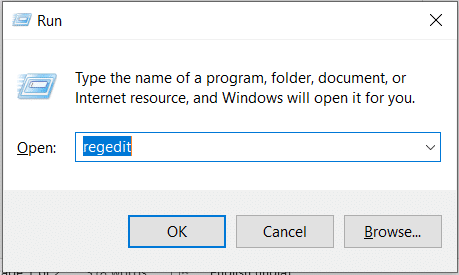
1. Press Windows + R keys simultaneously to launch Run dialog box.
2. Type regedit and hit Enter key to open Registry Editor.
3. Click Yes to confirm the User Account Control prompt.
4. Navigate to the following path.
HKEY_LOCAL_MACHINESOFTWAREMicrosoftWindowsCurrentVersionWindowsUpdateOSUpgrade.
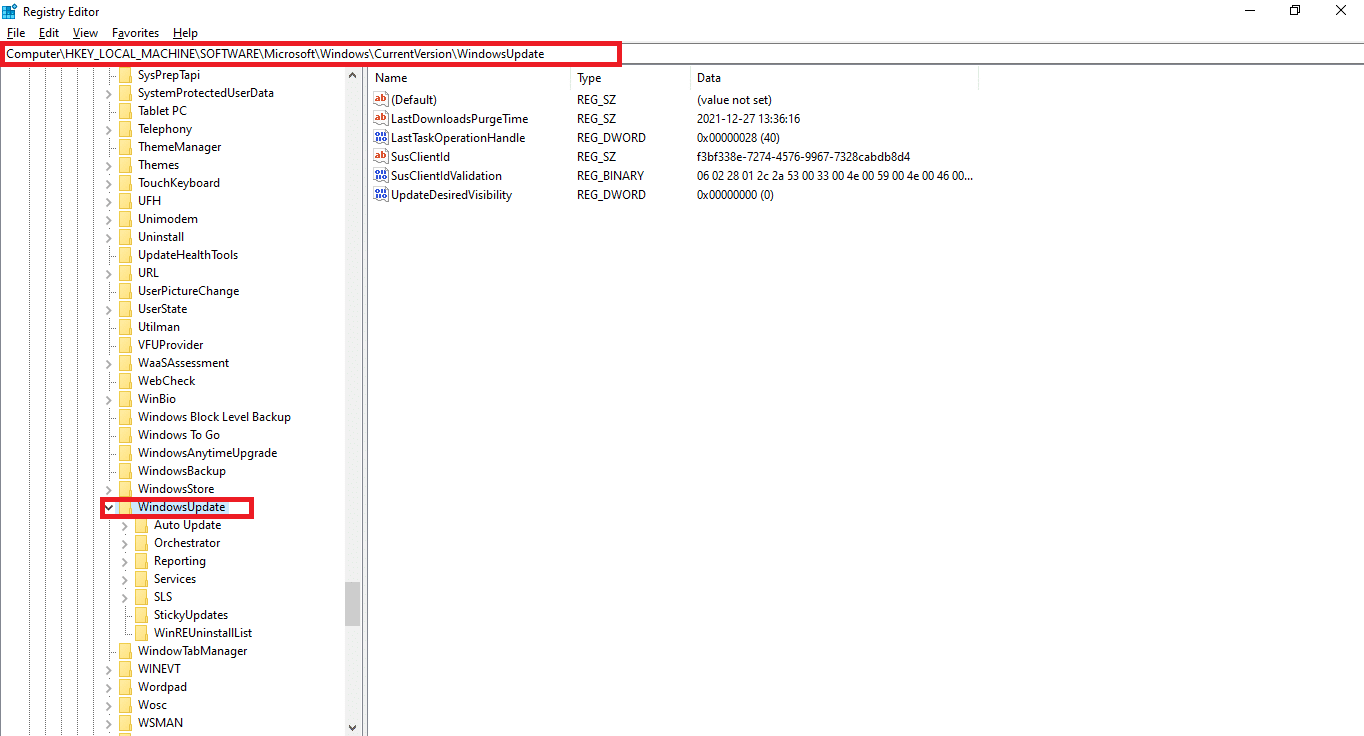
Note: If the OSUpgrade folder is not present follow given steps. Else, you can skip to Step 5 to edit OSUpgrade key.
4A. Right-click on WindowsUpdate. Choose New > DWORD (32-bit) value as depicted below.
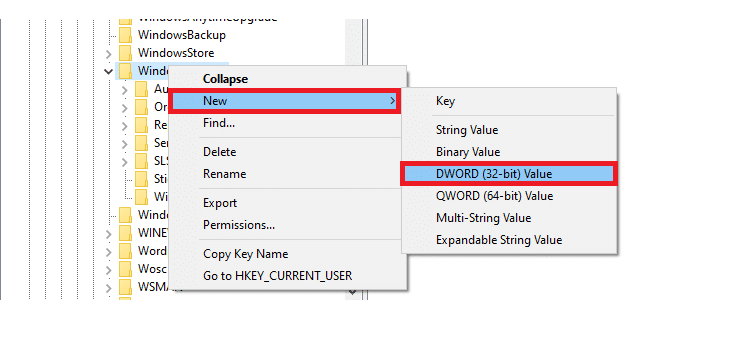
4B. Type the values with Value name: as AllowOSUpgrade and set Value data: as 1.
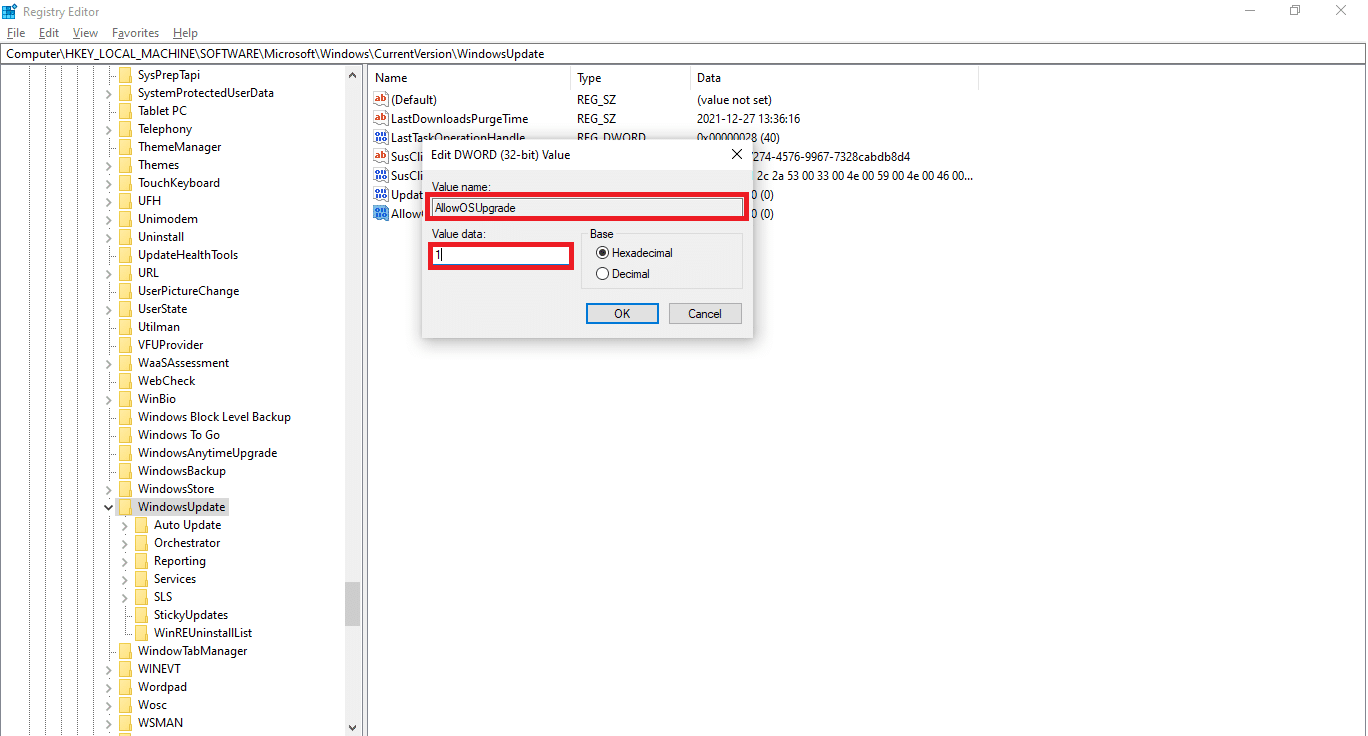
4C. Choose Hexadecimal under Base and click on OK
5. Or, Choose the OSUpgrade key.
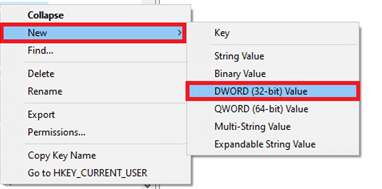
6. Right-click on the empty area and click New > DWORD (32-bit) Value as illustrated below.
7. Right-click on the newly created value and choose Modify… option, as shown.
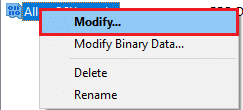
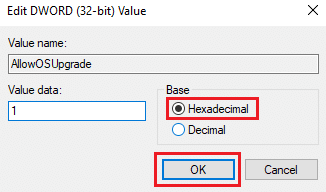
8. Set the Value name as AllowOSUpgrade and Value data as 1.

9. Choose Hexadecimal in Base and click OK.

10. Lastly, restart your PC.
Method 4: Disable Windows Defender Firewall (Not Recommended)
Windows Defender or third-party antivirus software running in the background may also cause this issue. Follow the below steps to fix to disable Windows Defender temporarily to fix Error Code 0x80070002 on Windows 7 & 10 :
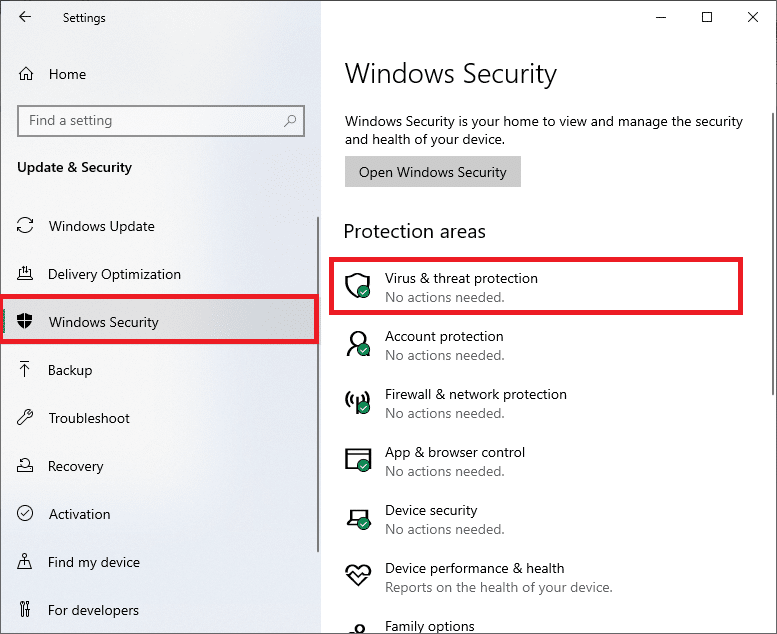
1. Go to the Settings > Update & Security as shown in Method 1.
2. Select Windows Security from the left pane and Virus & threat protection on the right pane.
3. In the Windows Security window, click on Manage settings under Virus & threat protection settings
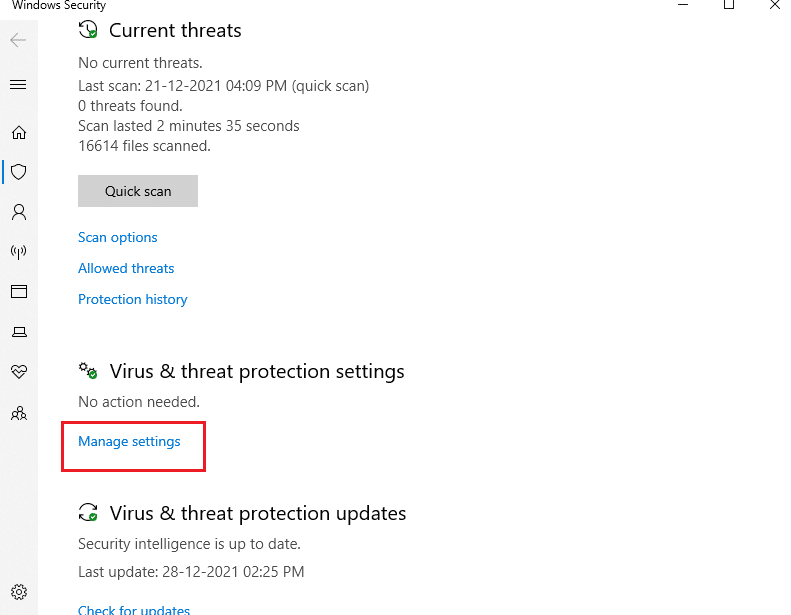
4. Switch Off the toggle bar for Real-time protection.
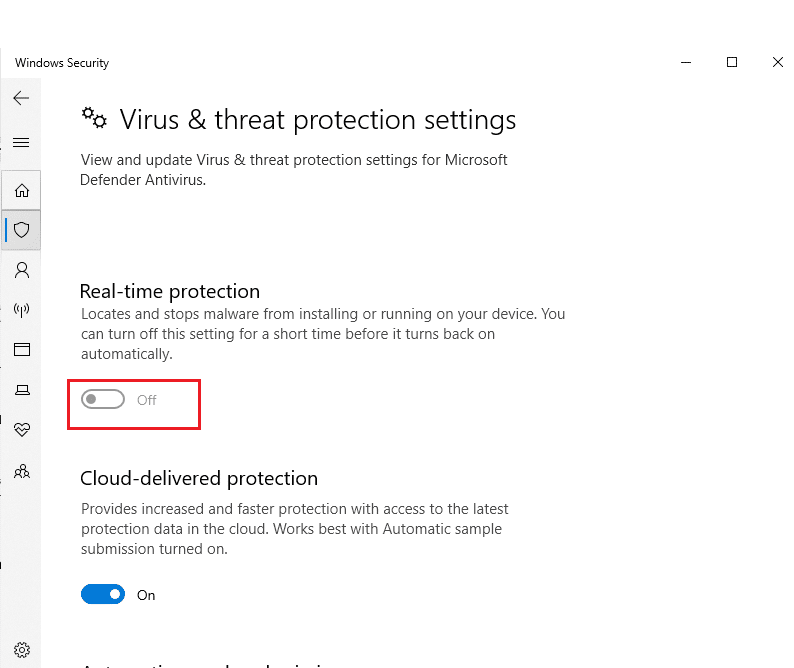
5. Click Yes to confirm.
Also Read: How to Block or Unblock Programs In Windows Defender Firewall
Method 5: Rollback Windows Update
Sometimes, Windows might fail to extract the updated files successfully. To fix update error 0x80070002 Windows 10, it is advised to roll back Windows update as follows:
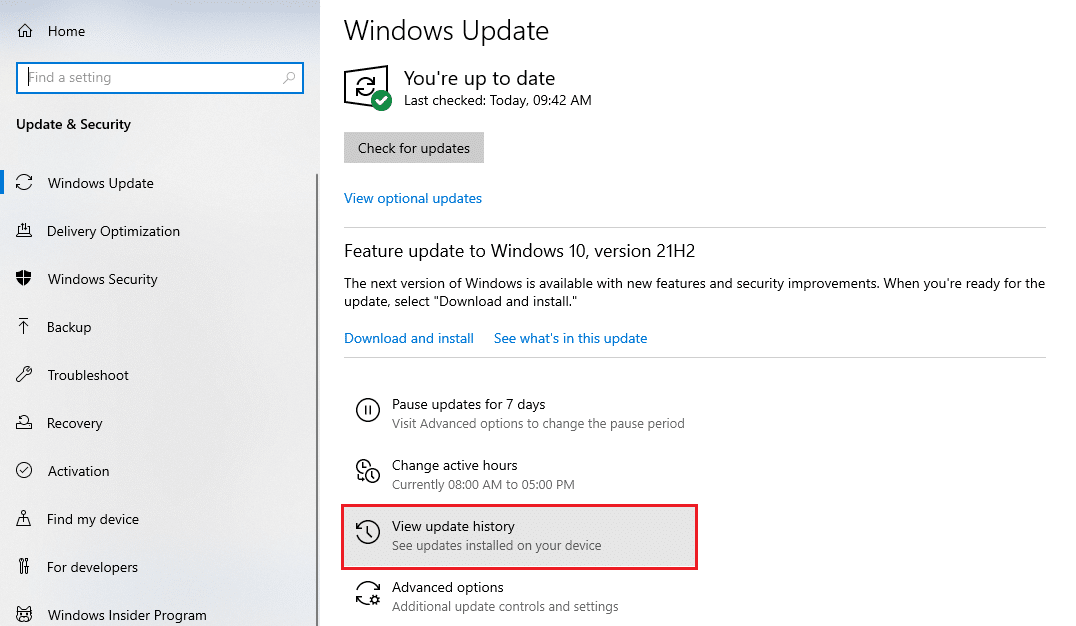
1. Navigate to Settings > Update & Security as shown previously.
2. In Windows Update, click on View update history, as depicted below.
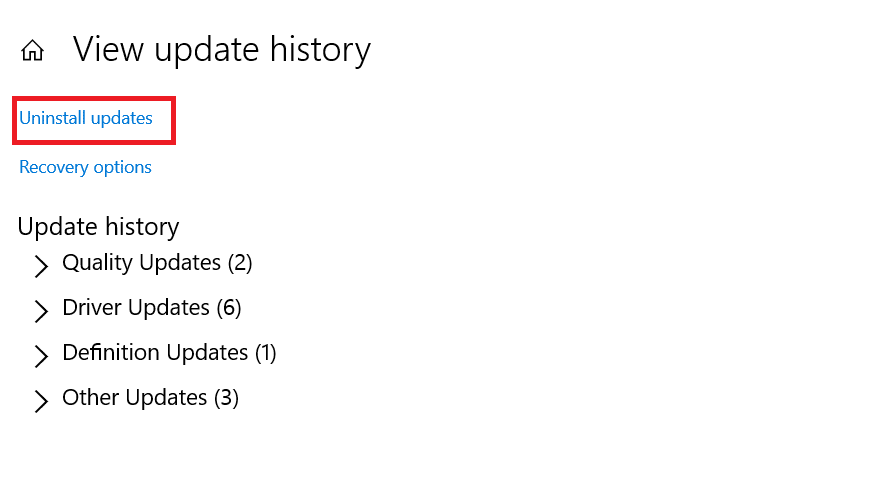
3. Click on Uninstall updates option as shown.
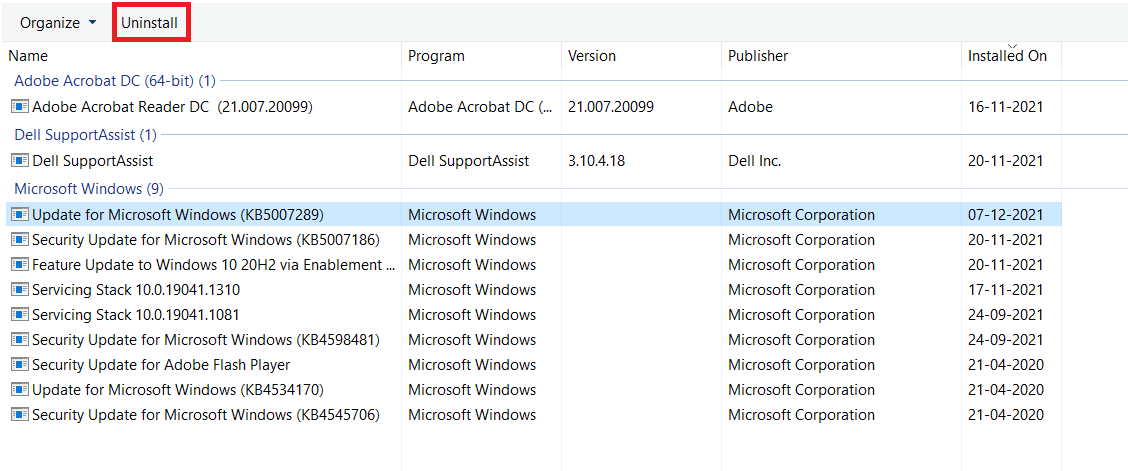
4. Choose the latest update of Microsoft Windows (For example, KB5007289) and click on Uninstall button shown highlighted.
5. Finally, restart your Windows PC.
Method 6: Run SFC and DISM Scans
Damaged system files may also affect the Windows Update on your Windows 7 or 10 desktop/laptop. Follow the below steps to detect, repair, and restore system files and solve the update error 0x80070002 Windows 10 using in-built repair tools:
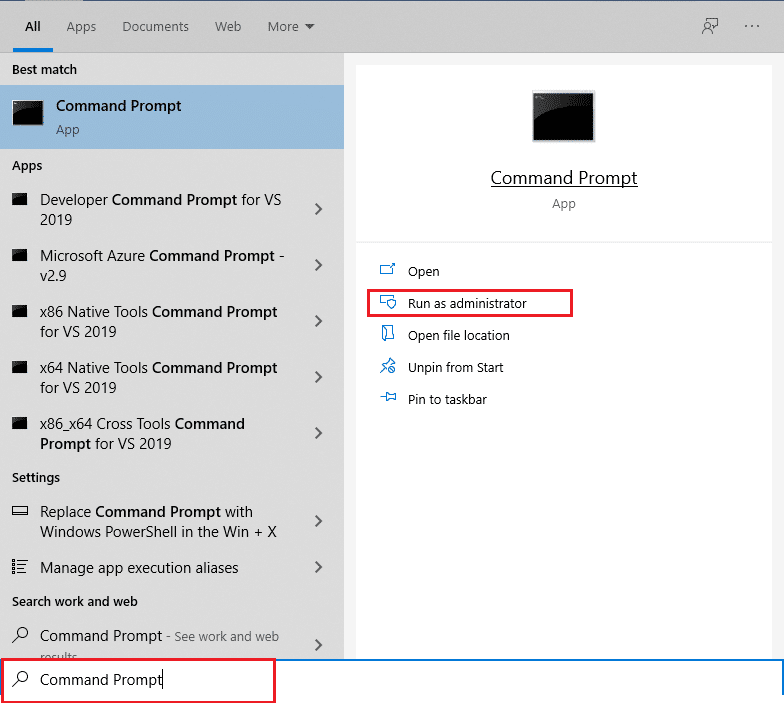
1. Hit the Windows key, type Command Prompt and click on Run as administrator.
2. Click on Yes in the User Account Control prompt.
3. Type sfc /scannow and press Enter key to run System File Checker scan.
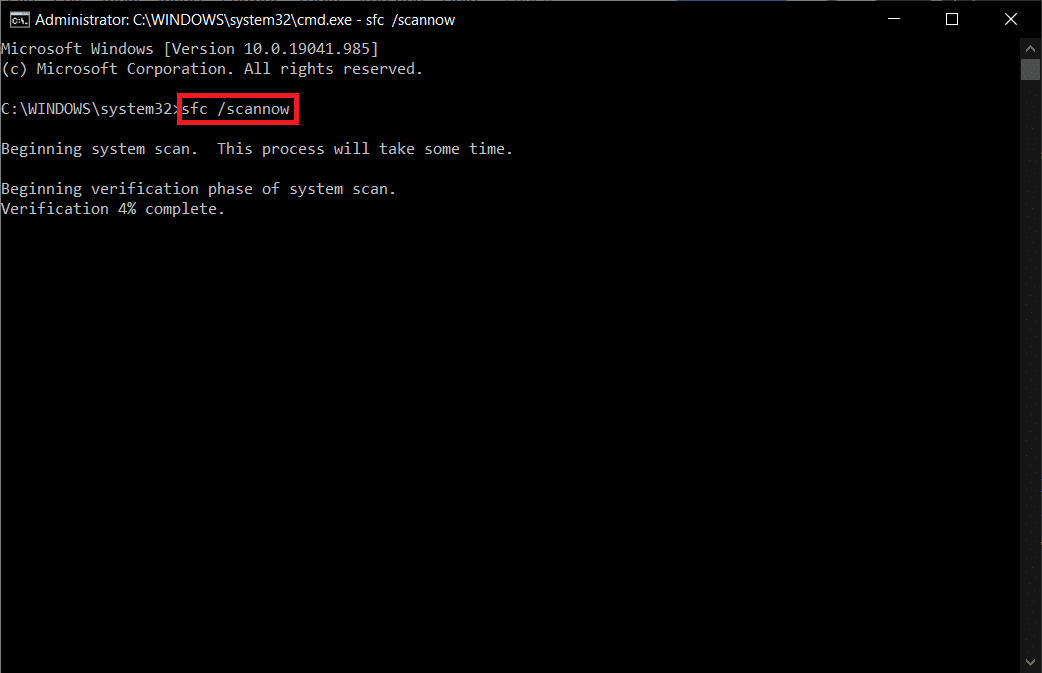
Note: A system scan will be initiated and it will take a couple of minutes to finish. Meanwhile, you can continue performing other activities but be mindful of not accidentally closing the window.
After completing the scan, it will show either of these messages:
- Windows Resource Protection did not find any integrity violations.
- Windows Resource Protection could not perform the requested operation.
- Windows Resource Protection found corrupt files and successfully repaired them.
- Windows Resource Protection found corrupt files but was unable to fix some of them.
4. Once the scan is finished, restart your PC.
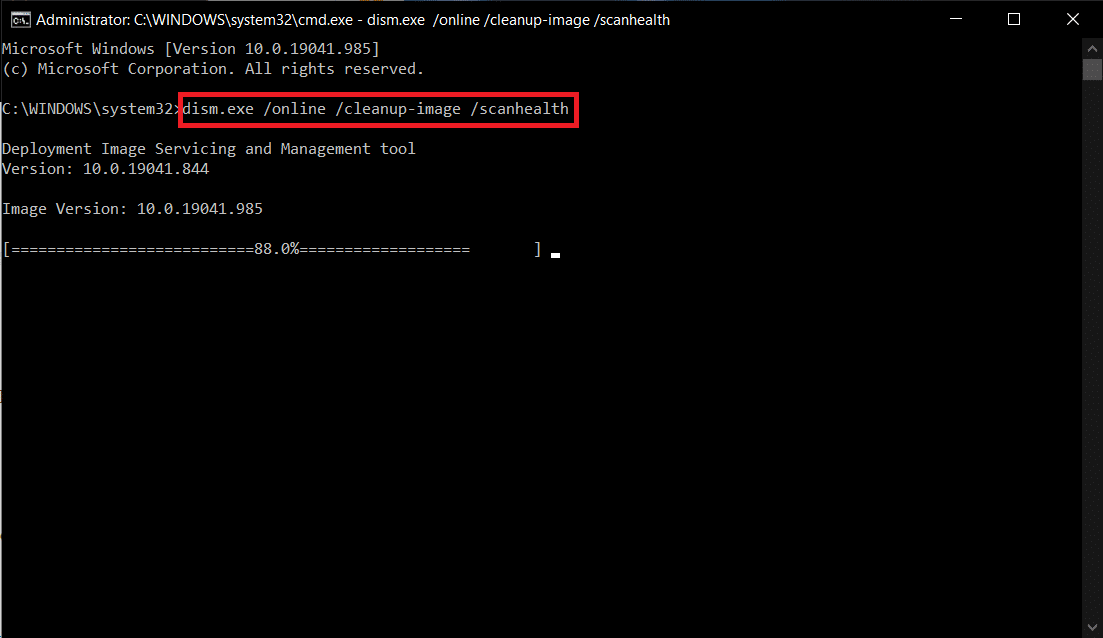
5. Again, launch Command Prompt as administrator and execute the given commands one after the other:
dism.exe /Online /cleanup-image /scanhealth
dism.exe /Online /cleanup-image /restorehealth
dism.exe /Online /cleanup-image /startcomponentcleanup
Note: You must have a working internet connection to execute DISM commands properly.
Also Read: How to Fix Windows Update Error 80072ee2
Method 7: Modify Windows Update Service
Often, the update might fail and miss out on a few files. In such scenarios, you have to delete or rename these installation files to resolve Windows 10 update error 0x80070002.
Note: The update service must be disabled from running in the background to modify these files.
Step I: Disable Windows Update Service
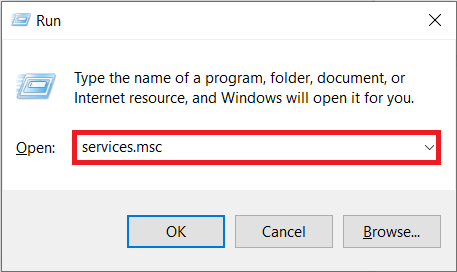
1. Launch Run dialog box by pressing Windows + R keys.
2. Type services.msc and hit Enter to launch Services window.
3. Scroll down to locate the Windows Update service. Right-click on it and choose Properties from the context menu, as depicted below.
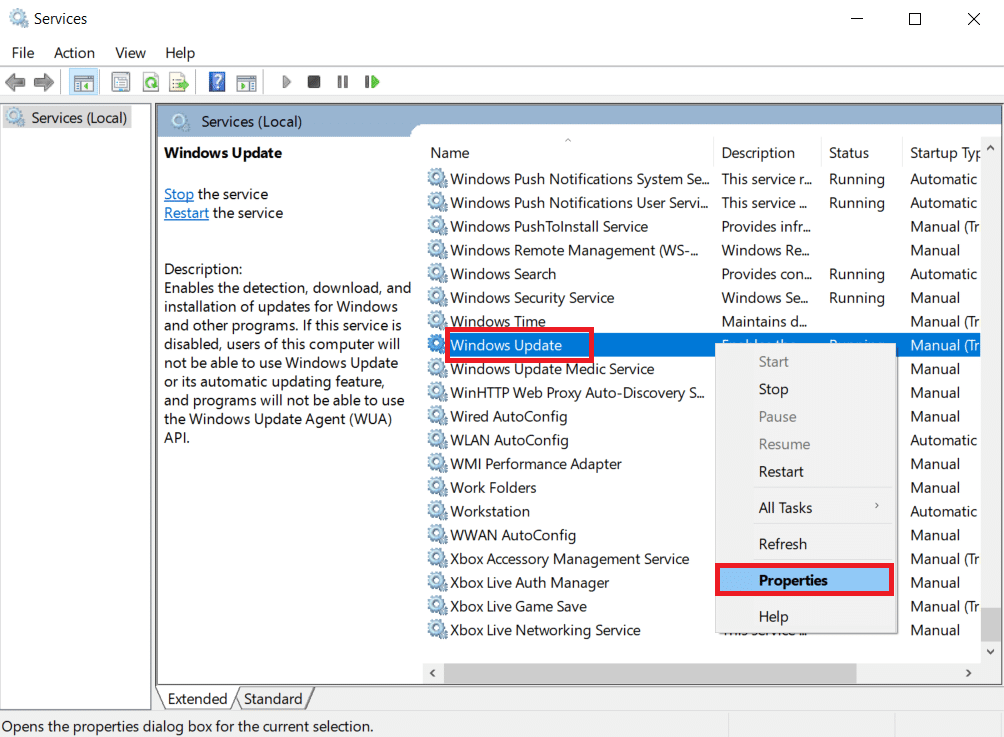
4. In the General tab, select Startup type: to Automatic.

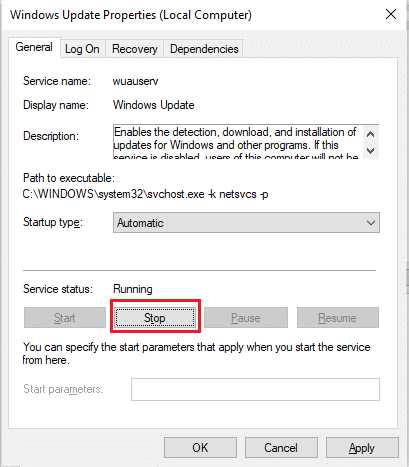
5. Click on Stop if the Service status is Running.
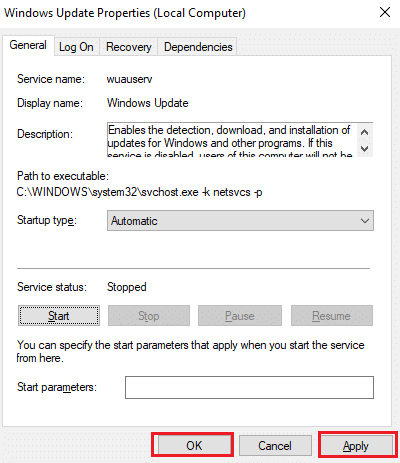
6. Click Apply to save changes and then OK to exit.
Step II: Delete Software Distribution Folder
1. Press Windows + E keys simultaneously to open File Explorer.
2. Go to C:Windows viz directory where Windows OS is installed.
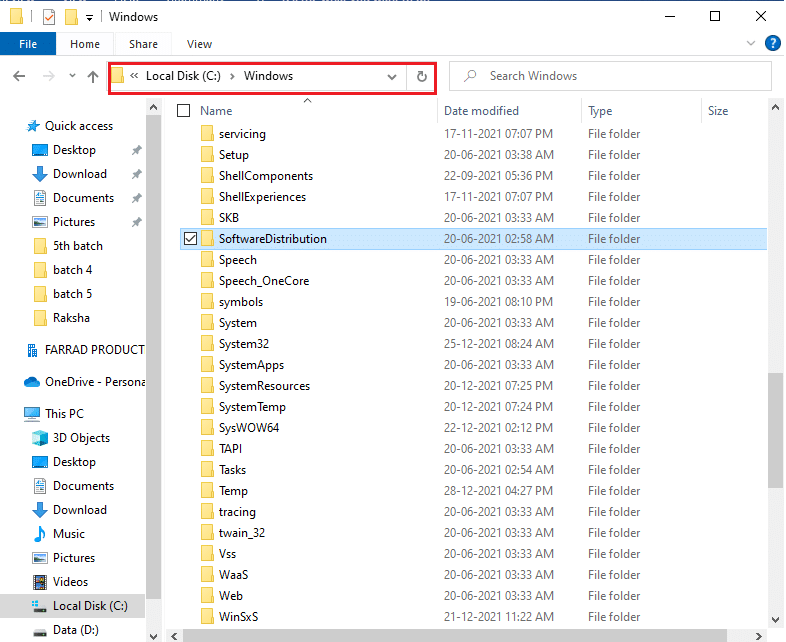
3A. Choose the SoftwareDistribution folder and press the Del key to delete the folder.
Note: If prompted to edit as an administrator, then enter the password and hit Enter.
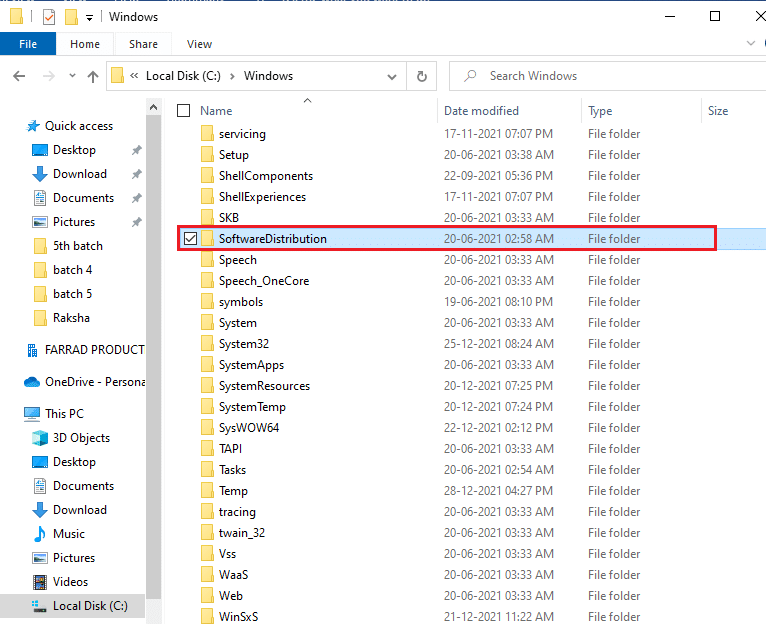
3B. Alternatively, Rename it by pressing F2 key and proceed further.
Step III: Re-enable Windows Update Service
1. Open Services window as instructed in Step I.
2. Right-click on Windows Update service and choose Start as illustrated below.
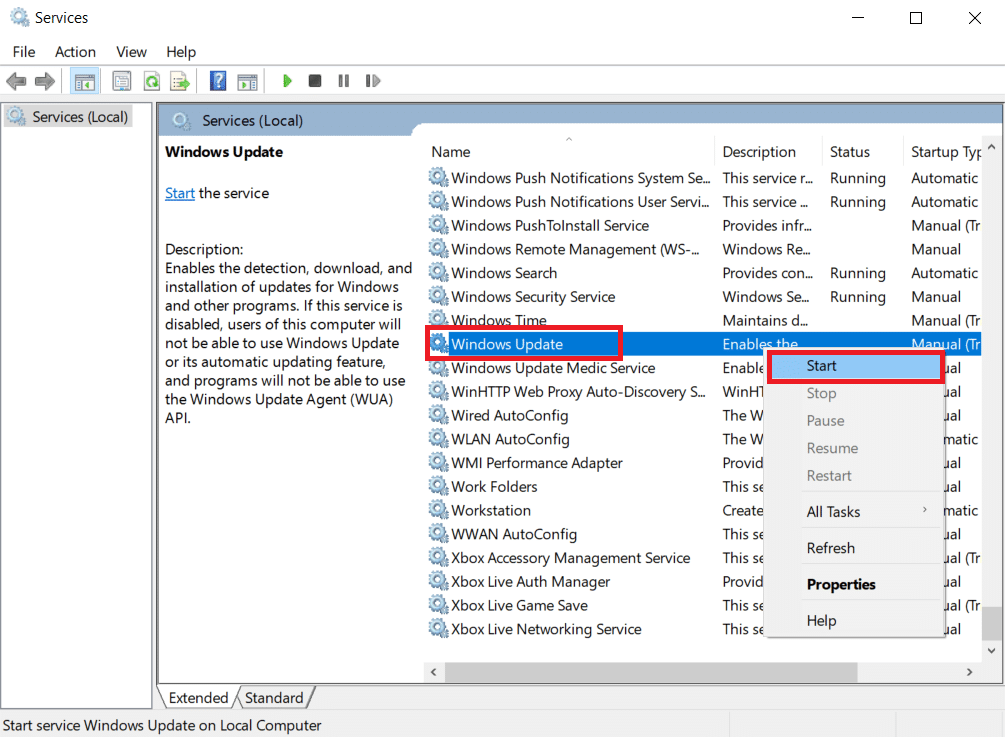
3. Restart your device and try updating Windows again.
Also Read: How to Fix Access is Denied Windows 10
Method 8: Reset Winsock Catalog
Winsock Catalog is an interface to communicate between Windows network software and network services. Resetting this interface would help in fixing update error code 0XC1900200 and 0x80070002 on Windows 7 & 10.
1. Launch Command Prompt as administrator as ealier.
2. Type netsh winsock reset and hit the Enter key to execute to reset Windows Sockets Catalog.

3. Restart your PC once the process is complete.
Frequently Asked Questions (FAQs)
Q1. Will updating my device driver help in resolving the update issue?
Ans. Yes, updating your device drivers could help in resolving the update error 0x80070002 issue in Windows 10. Read our guide on How to Update Device Drivers on Windows 10 to do so.
Q2. Will power cycling my PC resolve the update issue?
Ans. Yes, power cycling might resolve the update error code 0x80070002 in Windows 7 and 10. You can power cycle your computer through these simple steps:
- Turn off the PC and the router.
- Disconnect the power source by unplugging it.
- For a few minutes, press – hold the Power button.
- Reconnect the power supply.
- Switch on the computer after 5-6 minutes.
Recommended:
We hope this guide helped you fix Windows 10 update error code 0x80070002 effectively. Feel free to reach out to us with your queries and suggestions via comments section below.