3 Ways to Set Up Voicemail On Android (2023)

Voicemail isn’t something new. It is an essential service provided by network carriers, and it has been around for over two decades. A voicemail is a recorded message that the caller can leave for you in case you weren’t able to pick up the phone. This allows you to carry on with your work as you know that even if you are not able to answer a call, you will still be getting the message.
Even before the advent of smartphones, people made extensive use of the Voicemail service. People had separate answering machines attached to their phones to record and store their voicemails. In the age of landline phones, it was impossible to attend to calls if you are outside, and thus Voicemail prevented you from missing out on important messages and calls.
Now, in the present times receiving or making calls on the move isn’t an issue, but still, Voicemail is a crucial service. Imagine you are in the middle of an important meeting, and you are getting calls that you won’t be able to pick. Having a Voicemail setup will allow the caller to leave a message that you can check once the meeting is over.
How to Set Up Voicemail On Android
Setting up a Voicemail is pretty easy on an Android device. There are multiple ways and options to chose from. You can either go with the voicemail service provided by your carrier or use Google Voice. In addition to that, other third-party apps offer Voicemail services. In this article, we will discuss in detail the various Voicemail options and how to set them up.
Method 1: How to Set Up Carrier Voicemail
The easiest and the most traditional way is to use the voicemail service provided by your carrier. Before you can begin with the set-up process, you need to make sure that it is enabled for your device. You need to call your carrier company and inquire about this service. In most cases, it is a value-added service meaning you will have to pay certain remuneration to activate Voicemail on your number.
See Also:
What is Shadow Ban on TikTok? 5 Ways to Get Unshadowbanned
What is Background App Refresh on Android?
How to Set a Custom Playing Status on Discord
9 Ways to Fix Windows Update Error 0X80070003
11 Ways to Fix Error Code 523 on Roblox
If you are satisfied with their terms and conditions, then you can ask them to activate the Voicemail service on your number. They will now provide you with a separate voicemail number and a security PIN. This is to make sure that no one else can access your messages. Once everything is set up from the Carrier end, follow the steps given below to set up Voicemail on your device.
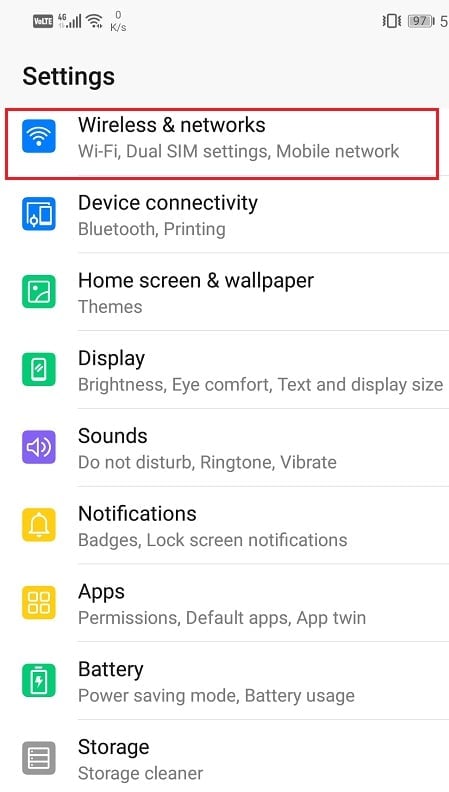
1. The first thing that you need to do is open Settings on your device.

2. Now tap on the Wireless and Networks option.
3. Here, under Additional Settings, you will find the Call Settings option.
4. Alternately, you can also access Call settings by opening the Dialer, tapping on the three-dot menu, and selecting the Settings option from the drop-down menu.

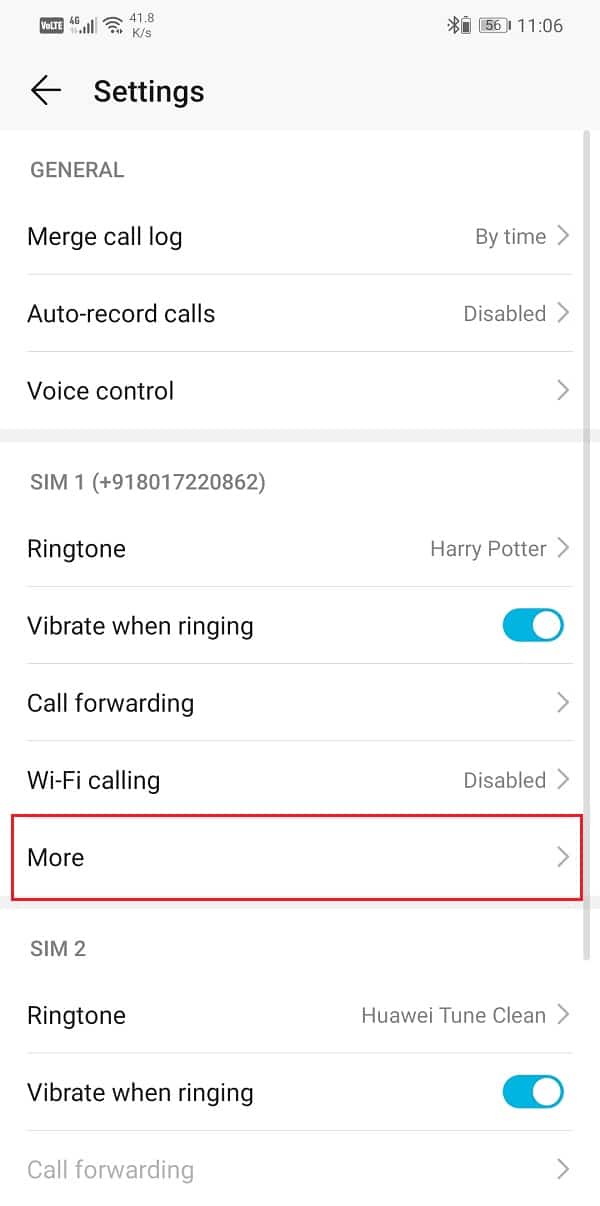
5. Now, tap on the More option. In case you have multiple SIM cards then there will be separate tabs for each of them. Go to the SIM card settings for which you wish to activate Voicemail.
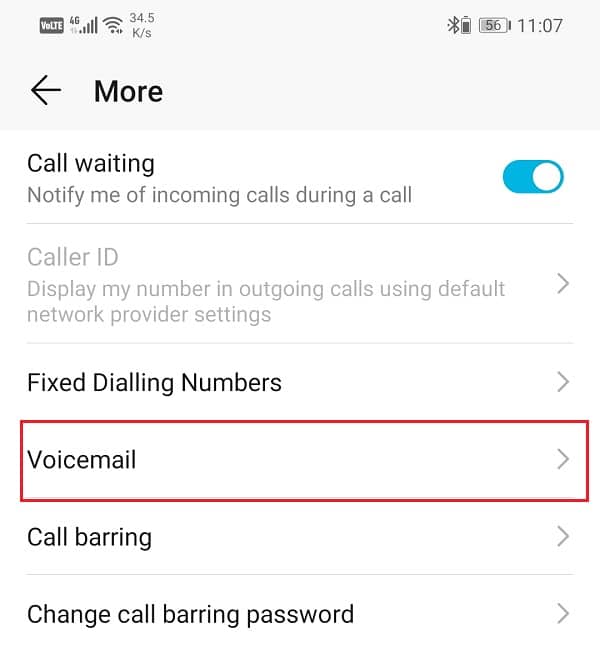
6. After that, select the Voicemail option.
7. Here, tap on the Service provider option and make sure that the “My network provider” option is selected.
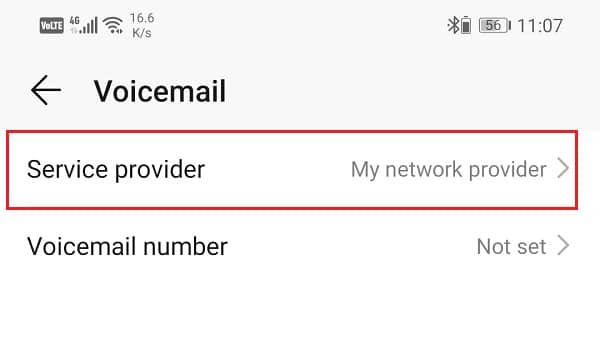

8. Now tap on the Voicemail number option and enter the voicemail number provided to you by your carrier.
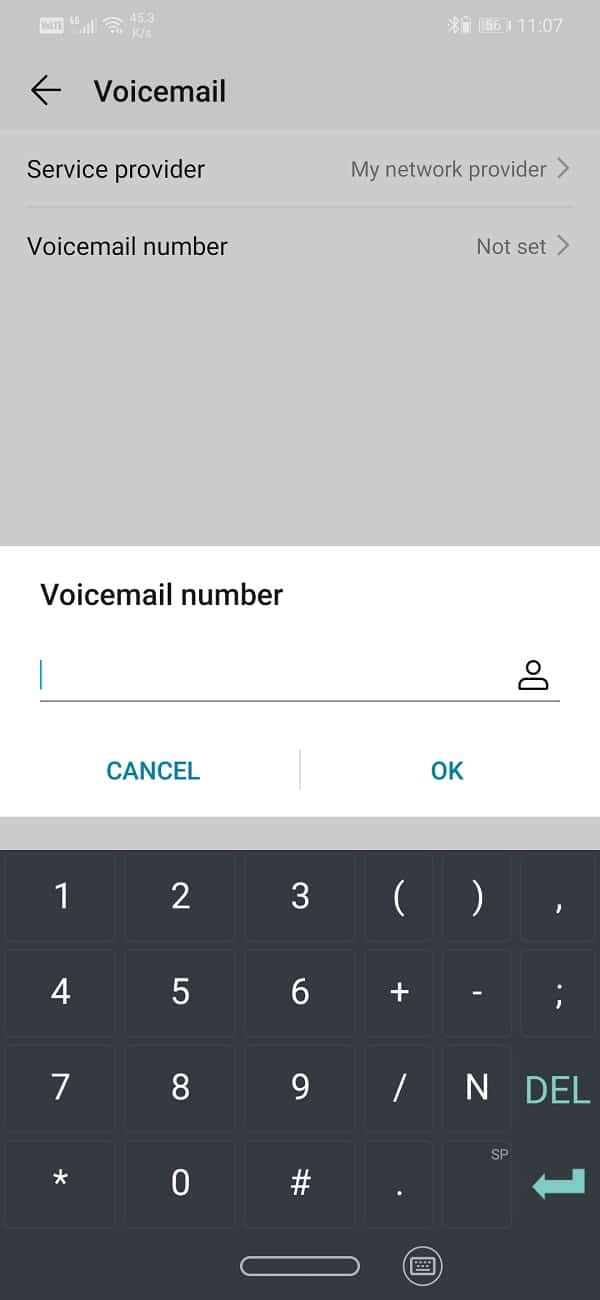
9. Your voicemail number will be updated and activated.
10. Now exit settings and open your Phone app or dialer on your device.
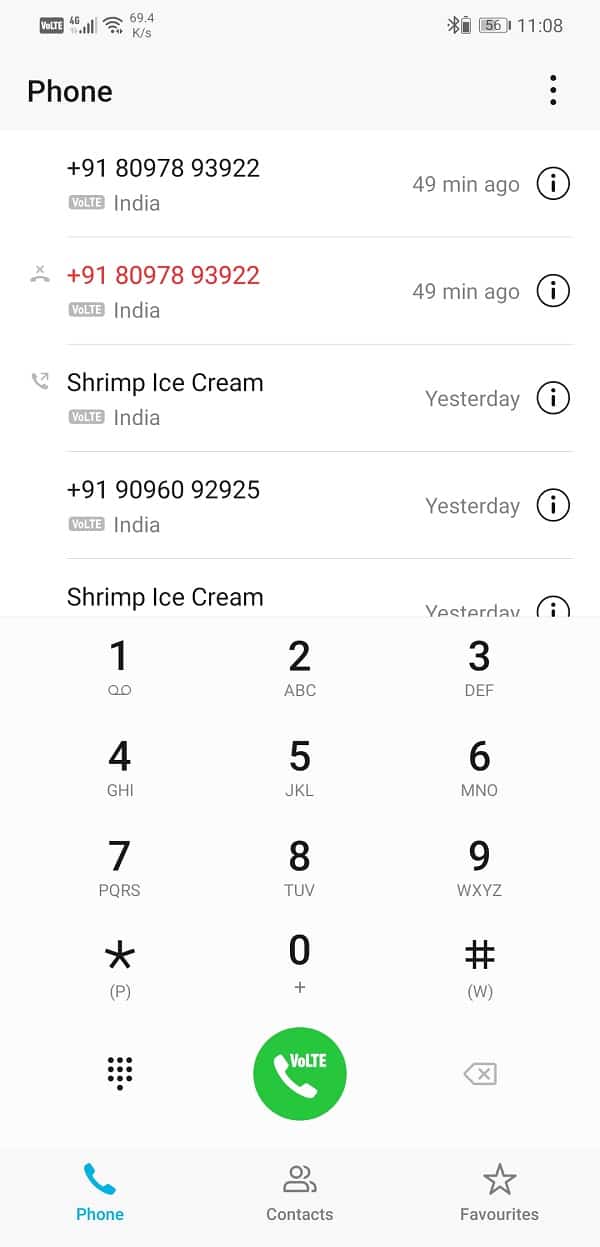
11. Tap and hold the One key, and your phone will automatically call your voicemail number.
12. You will now have to provide a PIN or password provided by your carrier company.
13. This will initiate the final phase of setting up your Voicemail. The first thing that you need to do is speak out your name when prompted. This will get recorded and saved.
14. After that, you need to set a greeting message. You can use any of the default ones or even record a custom message for your voicemail.
15. The final editing steps might differ for different carrier companies. Follow the instructions, and then your Voicemail will be configured and activated on your Android device.
Also Read: How to Fix Auto-Rotate Not Working on Android
Method 2: How to Set Up Google Voice
Google also offers voicemail services. You can get an official Google number that can be used for receiving or making calls. This service is not available in all countries at the moment. However, in countries where this option is available, it can be used as an alternative to carrier voicemail.
Google Voice is better than the voicemail service provided by your carrier company in multiple aspects. It offers more storage space and also is more secure. In addition to that, several other interesting features make Google Voice a popular choice. It allows you to access your voicemails via SMS, email, and also the official website for Google Voice. This means that you can access your messages even if you do not have your mobile with you. Another interesting feature of Google Voice is that you can set-up different customized greeting messages for separate contacts. The first thing that you need for this is a Google number along with an active Google Account.
How to Get a Google Number
To use Google Voice, you need to have a Google number. The process is quite simple and takes just a couple of minutes to get a new number. The only pre-requisite is that the service should be available in your country. If not, then you can try using a VPN and see if that works. Follow the steps given below to get a new Google Number.
1. The first thing that you need to do open this link on a web browser, and it will take you to the official website of Google Voice.
2. Now login to your Google account and follow the on-screen instructions to get a new Google number.
3. After that, click on the “I want a new number” option.
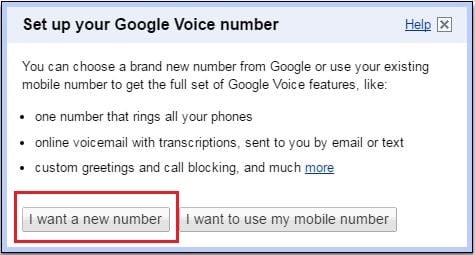
4. The next dialog box will present you with a list of available Google numbers. You can enter your area code or ZIP code for the optimized search results.

5. Select a number that you like and tap on the Continue button.
6. After that, you will have to set up a 4-digit security PIN code. Enter the PIN code of your choice and then click on the Continue button. Make sure to tap on the checkbox next to “I accept Google Voice’s Terms and Privacy Policy” before that.
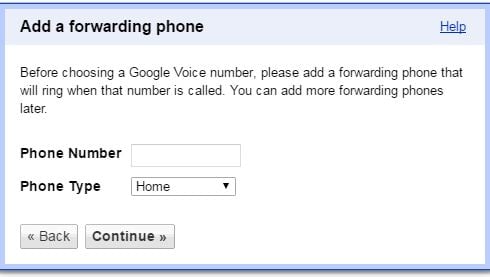
7. Now, Google will ask you to provide a Forwarding number. Anyone who calls your Google Number will be redirected to this number. Enter to present the phone number as your Forwarding number and tap on the Continue button.
8. The final verification step involves an automatic call to your Google number to check if it works or not.
9. Tap on the Call Me Now button, and you will receive a call on your Android device. Accept it and enter the code that is displayed on your screen when prompted.
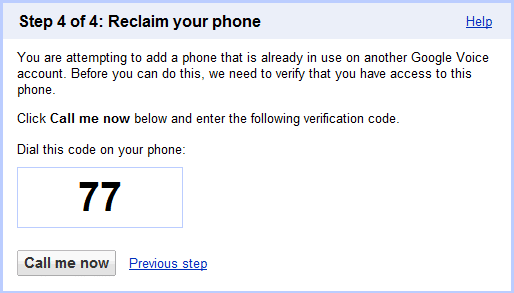
10. Your call will then automatically disconnect, and your Voicemail number will be verified.
Also Read: Fix Unable to open Contacts on Android Phone
How to Set-up Google Voice and Voicemail on your Android Device
Once you have acquired and activated a new Google Number, it is time to set up Google Voice and Voicemail service on your Android device. Given below is a step-wise guide to setting up Google Voice service on your phone.
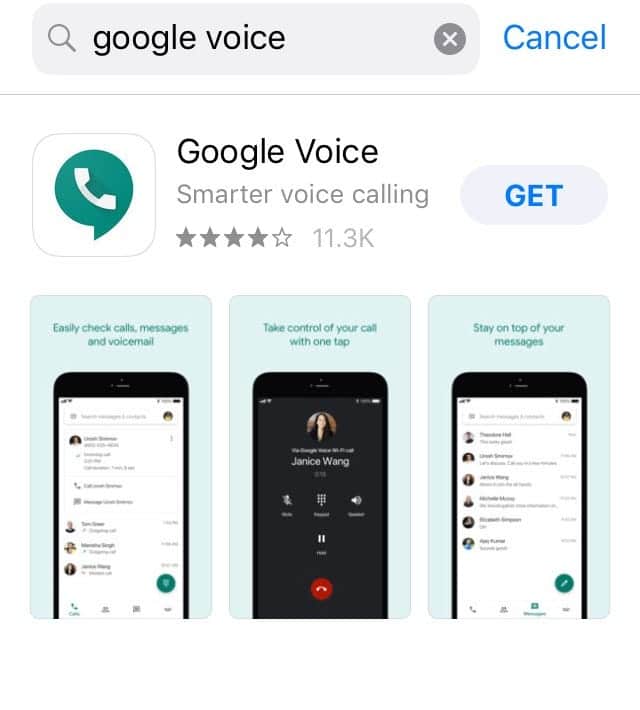
1. The first thing you need to do is open Google Playstore and install the Google Voice app on your device.
2. After that, open the app and tap on the Next button to go to the login page.
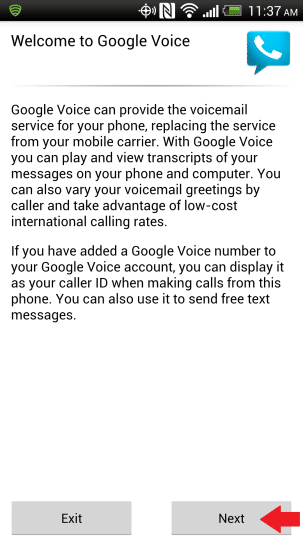
3. Here, sign in to your Google Account and continue to follow the on-screen instructions Voice. Keep tapping on the Next button as and when prompted.
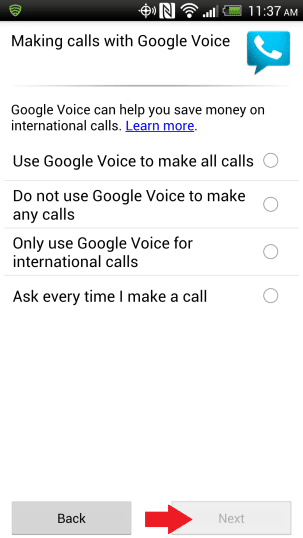
4. Now, you will be asked to choose how you would like to use Google Voice in making calls. You have the option to make all calls, no calls, only international calls, or have a choice every time you make a call.
5. Select whichever option is suitable for you and click on the Next button.
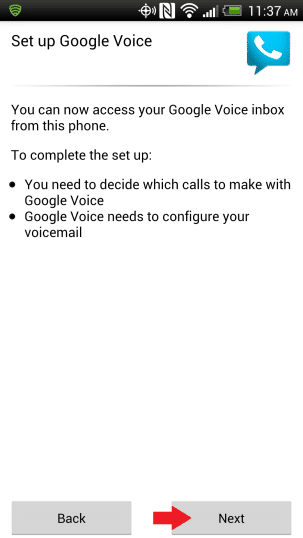
6. The next section is where you set up your voice mail. Click on the Next button to begin the process.
7. In the Setup Voicemail screen, tap on the Configure option. A pop-up menu will appear on the screen, asking you to change the preferred Voicemail service from your carrier to Google voice.
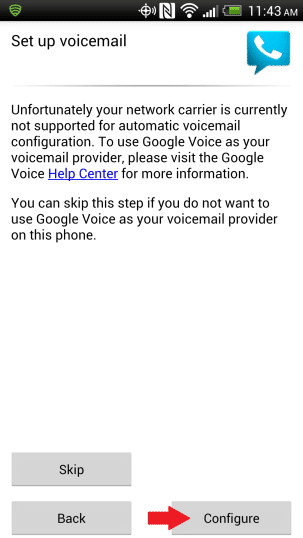
8. Do that, and your Google Voice set up will be complete.
9. Your inbox will now show all your voicemails, and you can listen to them by simply tapping on any individual message.
10. The last part involves configuring and customizing Google Voice settings, and this will be discussed in the next section.
How to Configure Google Voice
Configuring Google Voice means finalizing different settings and customizing your Voicemail service. It mainly involves setting up a new greeting message for your callers. Since this is your first time, we will take you through the entire process, one step at a time.
1. Firstly, open your browser on a computer and go to the official website of Google Voice.
2. Here, sign in to your Google Account.
3. After that, click on the Settings button on the top right-hand side of the screen.
4. Now go to the Voicemail and Text tab.
5. Here, click on the Record new greeting button.
6. Enter a name to save this recorded audio message and click on the Continue button. This shall be the title of your Greeting file.
7. After that, you will receive an automated call on your Android device. Please pick it up and speak out your greeting message when prompted.
8. This greeting message will get saved and will be updated in the Voicemail Greeting row. You can play and listen to it and re-record if you are not happy with the result.
9. Google Voice also allows you to edit other settings like PIN, call forwarding, notifications, transcripts, etc. Feel free to explore the various customization features available in the Google Voice settings.
10. Once you are done, exit the Settings, and your Voicemail service would be up and running.
Method 3: Set up Voicemail using Android third-party apps
To listen to the messages that are saved on your carrier voicemail, you need to call a number, and it will play all your messages one by one. This could be inconvenient, especially when you are trying to look for a specific message, and you have to go through the entire list to listen to it.
A better alternative to this is to use a third-party app that offers Visual Voicemail services. A visual voicemail app has a separate inbox where are the voicemails can be seen. You can scroll through the list of messages and play only those that you are interested in. Some Android devices even have a built-in Visual voicemail app. Google Voice is itself a visual voicemail service. However, if your device does not have one and Google Voice isn’t supported in your region, you can use any one of the Visual mail apps listed below.
1. HulloMail
HulloMail is an excellent Visual Voicemail app that is available for both Android and iPhone users. Once you sign up and set up HulloMail, it will start taking your messages and storing it on the app’s database. It provides a neat and simple interface to access all your Voicemails. Open the Inbox, and you will see all your messages sorted in order of date and time. You can scroll down the list and select any message that you would like to play.
The app is originally free and allows you to access and play your Voicemails. However, a paid premium version exists that brings a variety of cool additional features to the table. You get unlimited cloud storage space for your messages for starters, and you also get full-text transcriptions. You can also search for a specific message using keywords that the app runs against the text transcripts. This makes it easier to look for the message that you were looking for. Not to mention, the premium version also eliminates all ads and significantly improve user experience.
2. YouMail
YouMail is another useful and interesting third-party voicemail app that allows you to access your voicemails from multiple devices. In case your device does not support Voicemail, you can still access your recorded messages from a computer. Similar to HulloMail, it is available for both Android and iOS.
All that you need to do is download the install the app on your device and create a new account. Now set YouMail as your default Voicemail app or service, and it will begin taking messages for you. You can access these messages from the app’s inbox or a computer.
Visit the official website of YouMail and sign in to your account. Here, under Recent Messages, you will find your recent Voicemails. You can play any of them by simply tapping on the Play button next to the messages. There is also a separate Inbox section, where you will find all your Voicemails. YouMail allows you to forward, Save, Delete, take notes, Block, and Relay your messages if you want to from the Inbox.
In addition to providing Voicemail services, it also helps you block telemarketers, robocalls, and spam callers. It automatically weeds out unwanted callers and rejects incoming calls from them. It has a separate junk folder for spam calls, messages, and voicemails. This, too, has a paid professional version that provides features like a unified voicemail for multiple phones, recording messages, setting up customized greeting messages, automatic replies, and call routing.
3. InstaVoice
The best thing about InstaVoice is its interface, which is very similar to your messaging app. It allows you to organize and sort your incoming voicemails easily. You can choose how to reply to any particular voicemail. You can either send a simple text message, a recorded voice note, a media file or attachment or give them a call. The app automatically prioritizes messages and missed calls from important contacts. It also allows you to send reply messages to your contacts via your device’s native SMS app.
The app is free to use and provides unlimited storage to save messages and voicemails. You are free to access your voicemails from any device that you want. A copy of these messages is also made available on your email. Additionally, a paid premium version is also available. It allows you to use a single account for multiple phone numbers. Text transcripts of voice messages is another additional feature that you can find in the Premium version.
Recommended: How to Unblock a Phone Number on Android
We hope that you find this information helpful and you were able to set up voicemail on your Android phone. Voicemail has been an important part of your lives for a very long time. Even in the age of smartphones and mobile phones, Voicemails are very much relevant.
At times when answering a call is not possible, a voicemail can help us get the message at a later, more convenient time. You can use either use the default carrier provided Voicemail service or choose from many visual voicemail apps and services. Try multiple options and see which one suits you the best. If you are too reliant on Voicemail then you can even consider the paid premium services of some third-party visual voicemail apps.