Antimalware Service Executable is a background process which is used by Windows Defender to run its services. The process which is causing the High CPU Usage is MsMpEng.exe (Antimalware Service Executable) which you may have already checked via Task Manager. Now the problem is caused by Real-time protection, which keeps on scanning your files continuously whenever the system wakes up or is left idle. Now an antivirus is supposed to do real-time protection, but it shouldn’t scan all of the system files continuously; instead, it should only do full system scan once in a while.
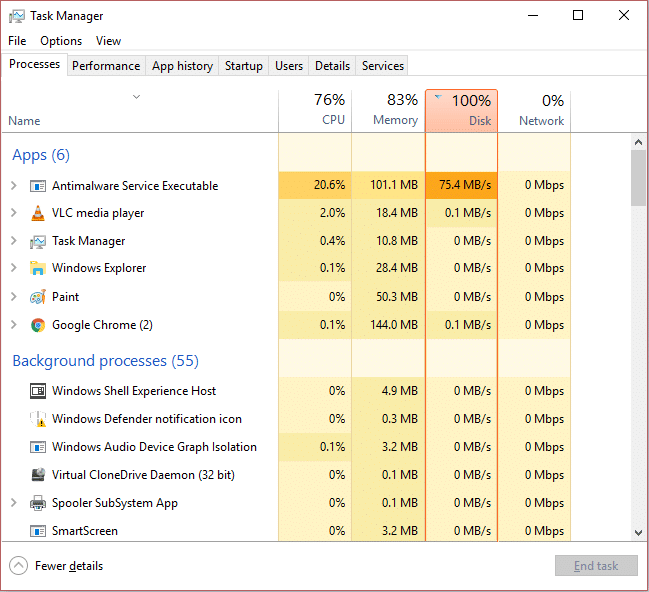
This problem can be addressed by disabling the full system scan, and it should be set to scan the whole system only once in a while. It won’t affect real-time protection such as whenever you download a file or put up a pen drive in the system; Windows Defender will scan all of the new files before allowing you to access the files. This will be a win-win for both of you, as real-time protection will be as it is and you can run the full system scan whenever necessary hence, leaving your system resources idle. Enough of this, let’s see how to actually fix the MsMpEng.exe high CPU usage.
Antimalware Service Executable High CPU Usage [SOLVED]
Make sure to create a restore point just in case something goes wrong.
Method 1: Disable Windows Defender Full System Scan Triggers
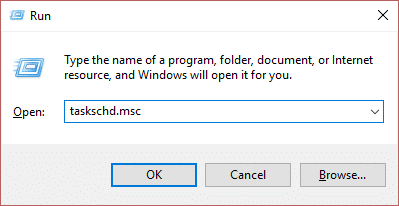
1. Press Windows Key + R then type “taskschd.msc” and hit enter to open Task Scheduler.
Note: If you experience MMC not creating the snap-in error when opening Task Scheduler, you could try this fix.
2. Double Click on Task Scheduler (Local) in the left window pane to expand it then again double click on Task Scheduler Library > Microsoft > Windows.
![On the left side of Task Scheduler, click on Task Scheduler Library / Antimalware Service Executable High CPU Usage [SOLVED]](https://lbsite.org/wp-content/uploads/2023/01/On-the-left-side-of-Task-Scheduler-click-on-Task-Scheduler-Library.jpeg)
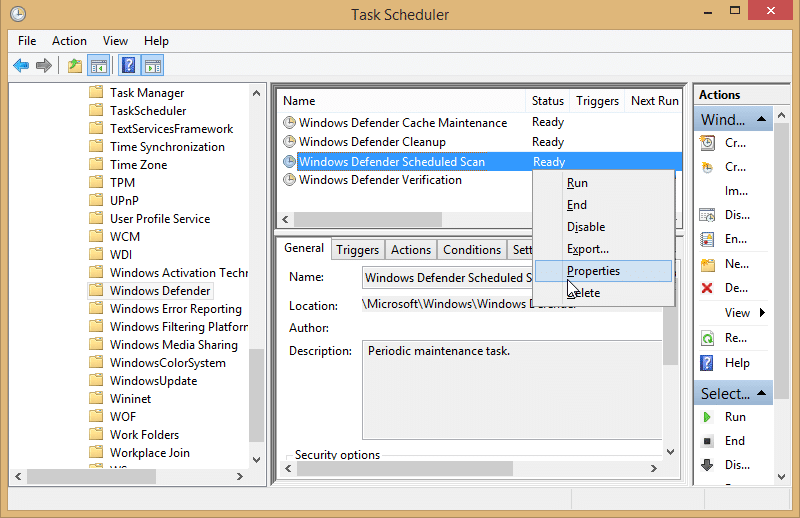
3. Scroll down till you find Windows Defender then double click to open it’s setting.
4. Now right-click on Windows Defender Scheduled Scan in the right window pane and select Properties.
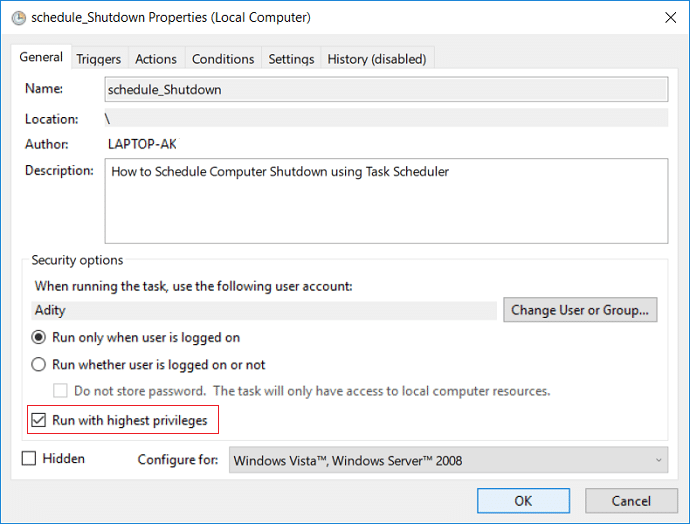
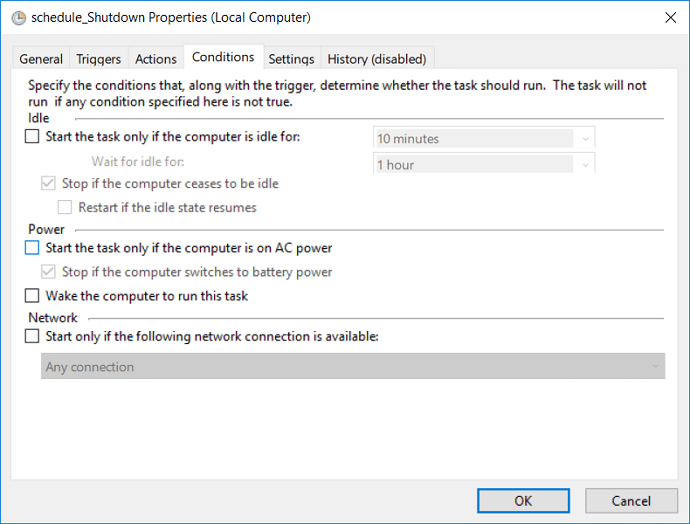
5. On General pane of the pop-up window, uncheck Run with highest privileges.
6. Next, switch to the Conditions tab and make sure to uncheck all items in this window, then click OK.
7. Reboot your PC, which may be able to Fix Antimalware Service Executable High CPU Usage.
Method 2: Add MsMpEng.exe (Antimalware Service Executable) to Windows Defender exclusion list
1. Press Ctrl + Shift + Esc to open Task Manager and then look for MsMpEng.exe (Antimalware Service Executable) in the process list.
![Look for MsMpEng.exe (Antimalware Service Executable) / Antimalware Service Executable High CPU Usage [SOLVED]](https://lbsite.org/wp-content/uploads/2023/01/Look-for-MsMpEng.exe-Antimalware-Service-Executable.png)
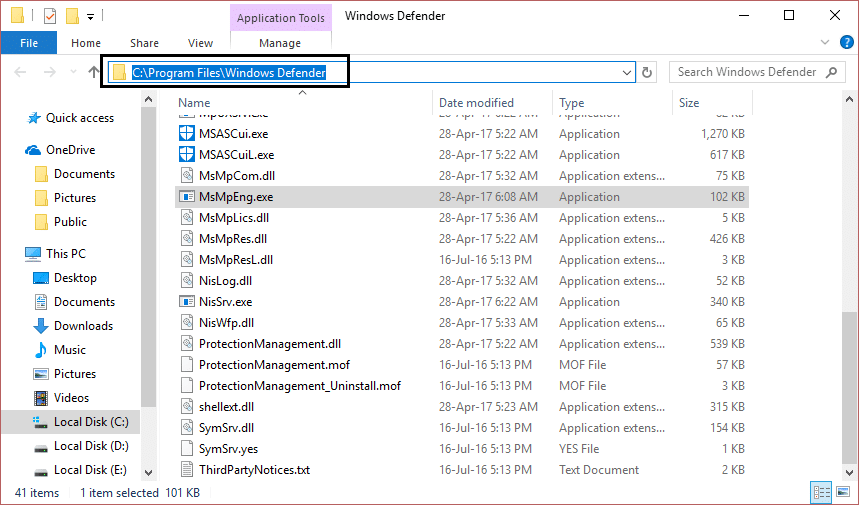
2. Right-click on it and select Open File Location. Once you click it, you will see the file MsMpEng.exe, and it’s a location in the address bar. Make sure to copy the location of the file.
3. Now press Windows Key + I then select Update & security.
![]()
4. Next, select Windows Defender from the left window pane and scroll down till you find Add an exclusion.
![windows defender add an exclusion / Antimalware Service Executable High CPU Usage [SOLVED]](https://lbsite.org/wp-content/uploads/2023/01/windows-defender-add-an-exclusion.png)
5. Click on Add an exclusion and then scroll down to click “Exclude a .exe, .com or .scr process.”
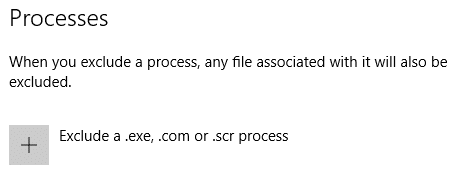
6. A pop window will come up in which you have to type MsMpEng.exe and click OK.

7. Now you have added MsMpEng.exe (Antimalware Service Executable) to the Windows Defender exclusion list. This should Fix Antimalware Service Executable High CPU Usage on Windows 10 not then continue.
Method 3: Disable Windows Defender
There is another method to turn off Windows Defender in Windows 10. If you do not have access to local group policy editor, you can choose this method to disable the default antivirus permanently.
Note: Changing the registry is risky, which can cause irreversible damages. Therefore, it is highly recommended to have a backup of your Registry before starting this method.
1. Press Windows key + R to open the Run dialog box.
2. Here you need to type regedit and click OK, which will open the Registry.

3. You need to browse to the following path:
HKEY_LOCAL_MACHINESOFTWAREPoliciesMicrosoftWindows Defender
4. If you do not find DisableAntiSpyware DWORD, you need to right-click Windows Defender (folder) key, select New, and click on DWORD (32-bit) Value.

5. You need to give it a new name DisableAntiSpyware and press Enter.
6. Double-click on this newly formed DWORD where you need to set the value from 0 to 1.
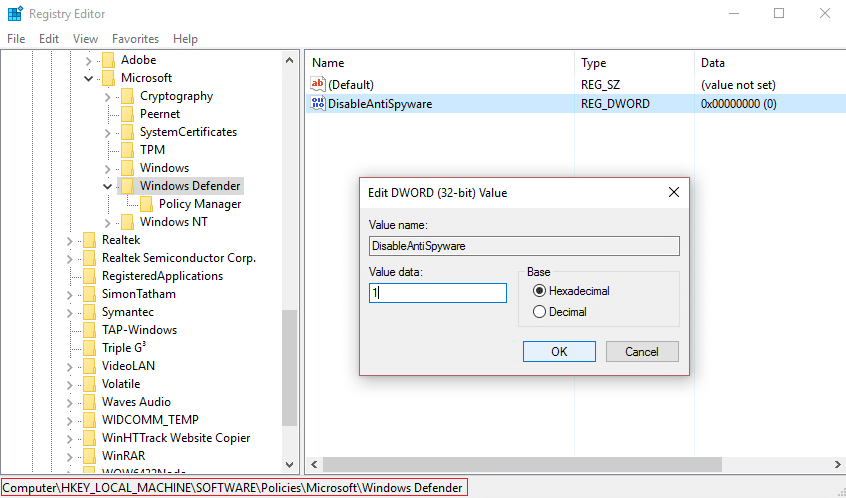
7. Finally, you need to click on the OK button to save all settings.
Once you are done with these steps, you need to reboot your device to apply all these settings. After restarting your device, you will find that Windows Defender antivirus is now disabled.
Method 4: Run CCleaner and Malwarebytes
1. Download and install CCleaner & Malwarebytes.
2. Run Malwarebytes and let it scan your system for harmful files. If malware is found, it will automatically remove them.
![Click on Scan Now once you run the Malwarebytes Anti-Malware / Antimalware Service Executable High CPU Usage [SOLVED]](https://lbsite.org/wp-content/uploads/2023/01/Click-on-Scan-Now-once-you-run-the-Malwarebytes-Anti-Malware.png)
3. Now run CCleaner and select Custom Clean.
4. Under Custom Clean, select the Windows tab and checkmark defaults and click Analyze.
![Select Custom Clean then checkmark default in Windows tab | Antimalware Service Executable High CPU Usage [SOLVED]](https://lbsite.org/wp-content/uploads/2023/01/Select-Custom-Clean-then-checkmark-default-in-Windows-tab.png)
5. Once Analyze is complete, make sure you’re certain to remove the files to be deleted.

6. Finally, click on the Run Cleaner button and let CCleaner run its course.
7. To further clean your system, select the Registry tab, and ensure the following are checked:

8. Click on the Scan for Issues button and allow CCleaner to scan, then click on the Fix Selected Issues button.
![Once scan for issues is completed click on Fix selected Issues | Antimalware Service Executable High CPU Usage [SOLVED]](https://lbsite.org/wp-content/uploads/2023/01/Once-scan-for-issues-is-completed-click-on-Fix-selected-Issues.png)
9. When CCleaner asks “Do you want backup changes to the registry?” select Yes.
10. Once your backup has completed, click on the Fix All Selected Issues button.
11. Restart your PC to save changes.
Recommended for you:
That’s it you have successfully Fix Antimalware Service Executable High CPU Usage on Windows 10 but if you still have any questions regarding this post feel free to ask them in the comment’s section.