How to Add Music to Kodi

Ever heard of Kodi software? If not, then you are missing the smartest application that could fill the void of making your digital life easier. Most people feel lazy to organize, especially keeping your media apps in order is something we never do. Here, Kodi will save you from it and put you in control of pre-installed and third-party media applications in one go. Formerly known as XBMC, it is an open-source and free platform that enables users to view videos, photos, movies, podcasts, streams, and so forth. Overall, it is a one-stop digital entertainment hub. We bring to you a helpful guide that will teach you how to download music on Kodi and add them.

How to Add Music to Kodi
Are you a music lover? Then Kodi hub is your best option. So, add a music section and download music from Kodi. You don’t have to worry about accessing music files as Kodi will play it regardless of the file format. Additionally, you can customize the music section as per your use and comfort.
Sometimes there is a possibility of not being able to find the Music option on the Kodi main menu. This is because Kodi is open source, and you can customize anything. You may wonder how? It is because while customization, some themes remove music from the home menu. Here is how you can add it back. It might also interest you to read Top 5 Best Kodi Add-ons for Fitness and Workout.
Step I: Change to Kodi Default Skin
Kodi’s default theme is Estuary. If your Kodi application is different from the default theme, there might be a different way to add music. Therefore, ensure to change Kodi with the default skin theme by following the steps given as it is not feasible to provide instructions for each Kodi skin.
Note: If you are using the default skin, please feel free to skip this procedure.
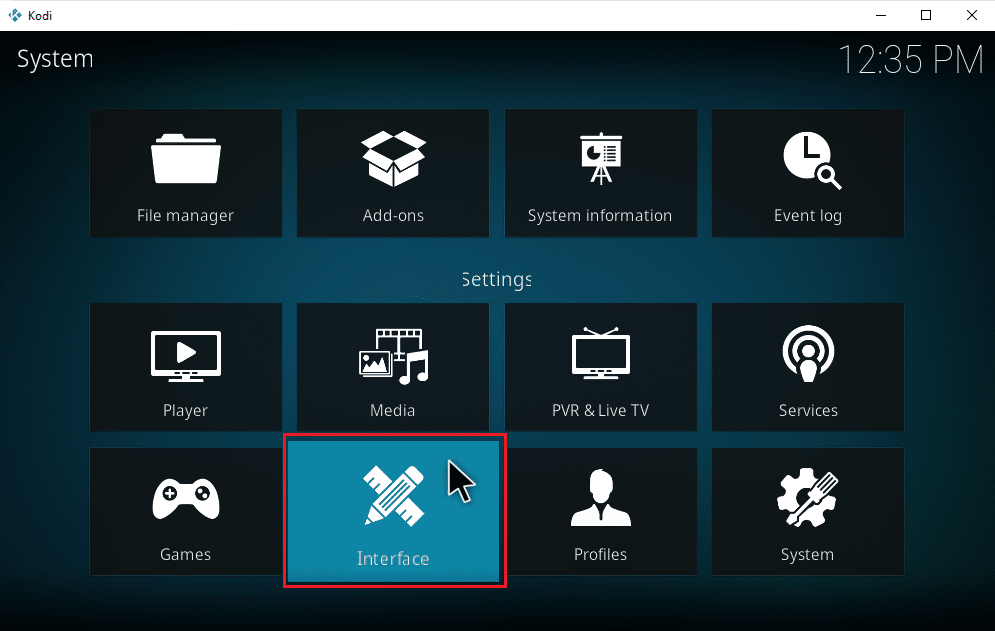
1. Launch the Kodi application and select the Settings icon.
![]()
2. Select the Interface settings.
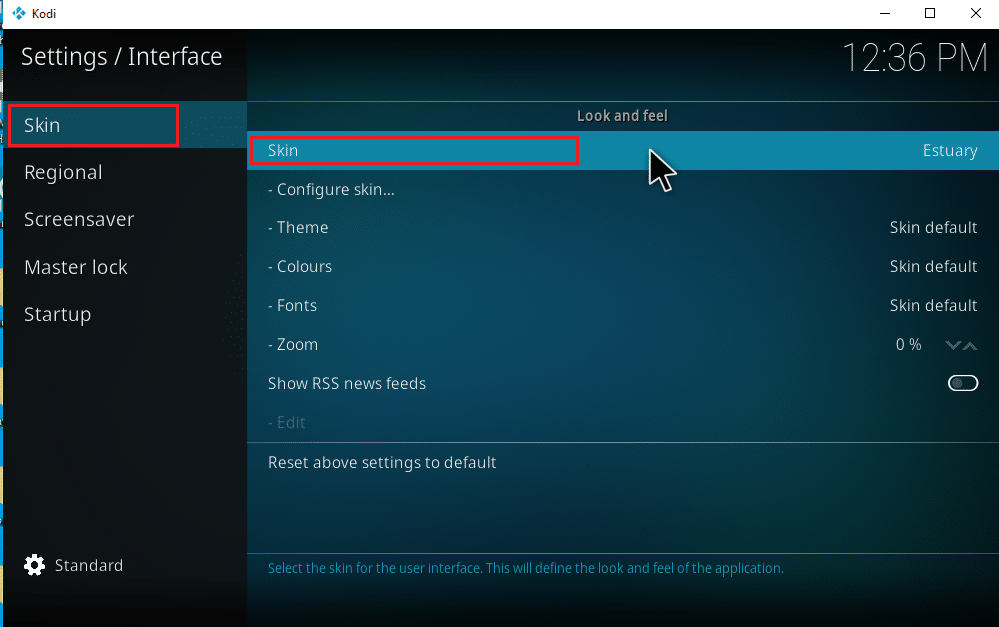
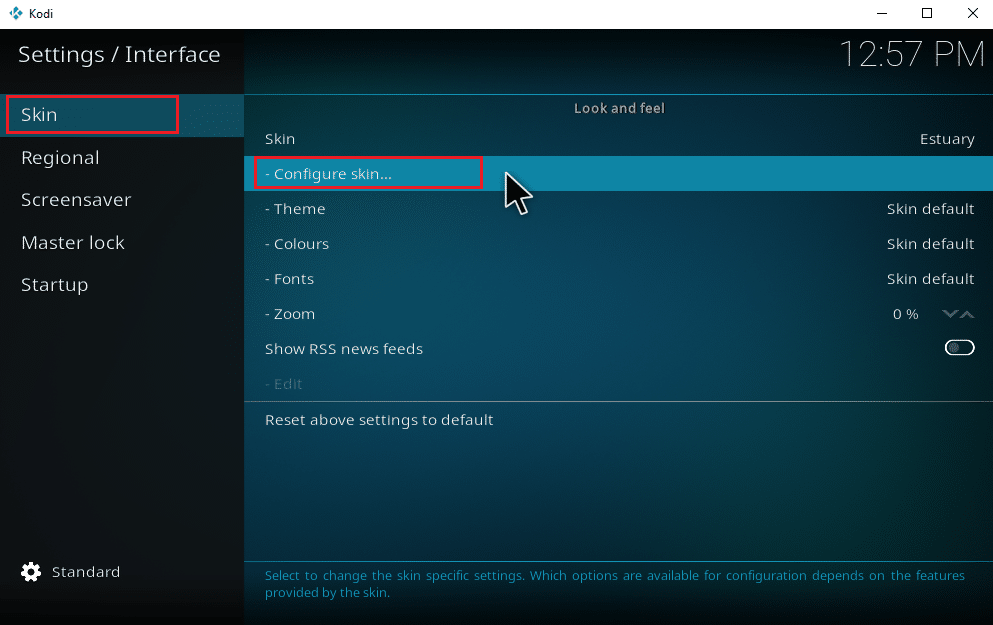
3. Select the Skin tab and again click on the Skin.
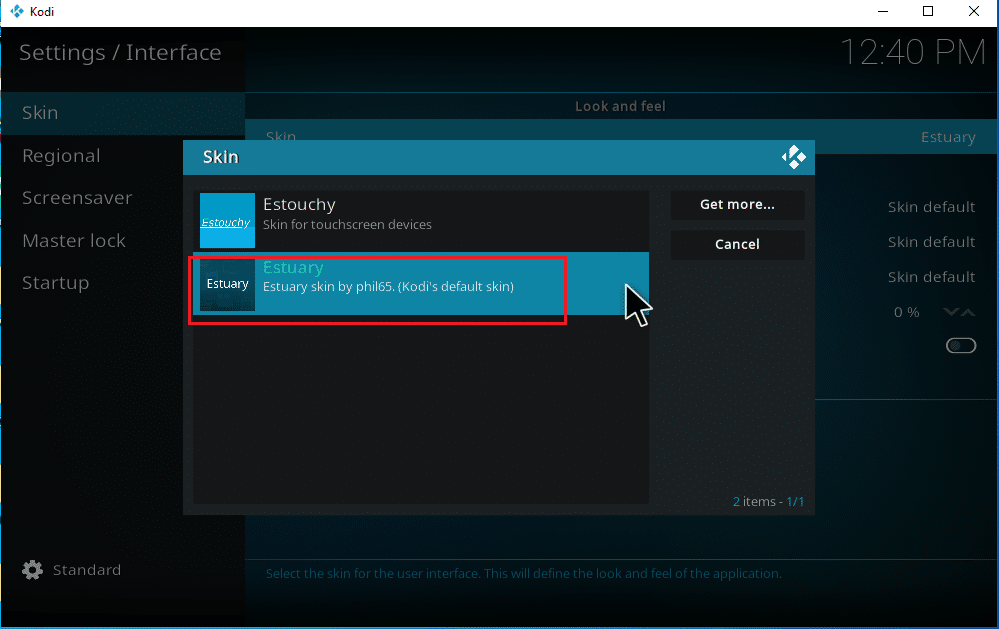
4. Select the default theme Estuary.
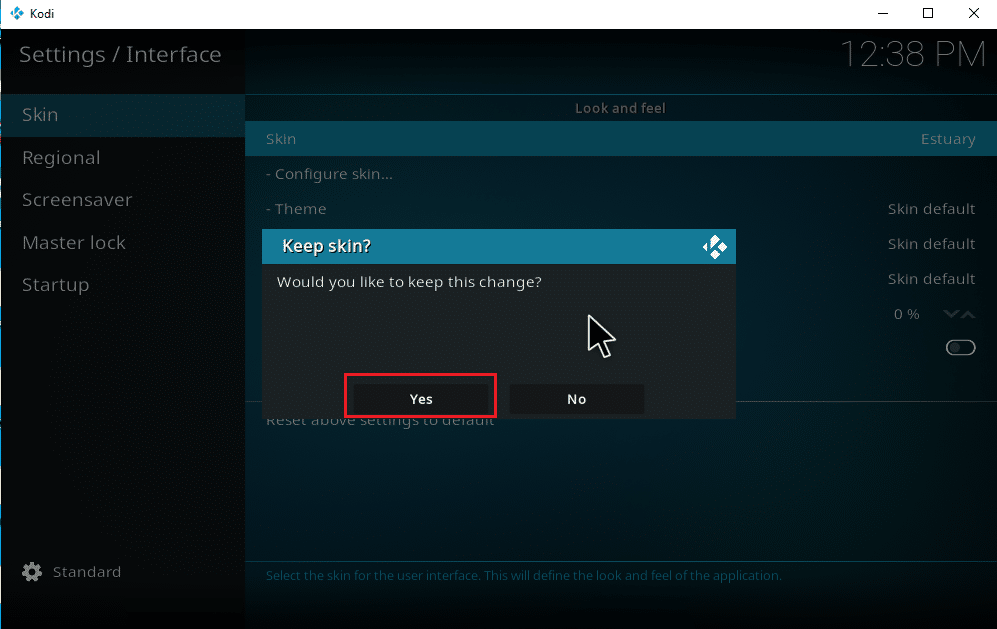
5. To confirm the default Skin changes, click Yes.
6. Once the theme in Kodi is set to default, restart the application.
Also Read: How to Add Favorites in Kodi
Even after changing the Kodi theme to default, some may not find the Music option on the main menu page. Are you facing this? There is nothing to worry about. A simple toggle on the menu option on settings will rectify it. To do the same, follow the steps given below:
Note: If you can access the Music option from Kodi’s main menu page, then skip this instruction and proceed to add music to Kodi.
1. Launch Kodi and select the Settings icon.
![]()
2. Select the Interface option.

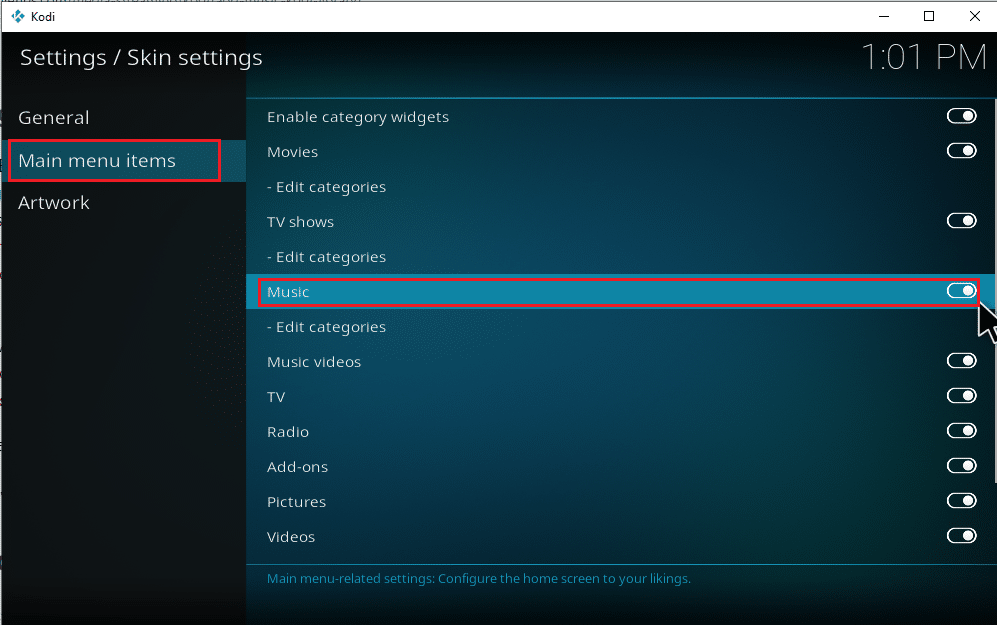
3. Navigate to the Skin tab and select the Configure skin option.
4. Click the Main menu items. Toggle on the Music option.
5. Press the Esc key a few times to go back to the main homepage. You will find Music as the third option, below Movies and TV shows.
Follow the steps below to start to add music to Kodi and explore more options relevant to it.
Step III: Setup Your Music
Adding music to Kodi is an easy process. It’s okay if you have not done it before. If you are looking to add music to Kodi for the first time, follow the steps one by one given below.
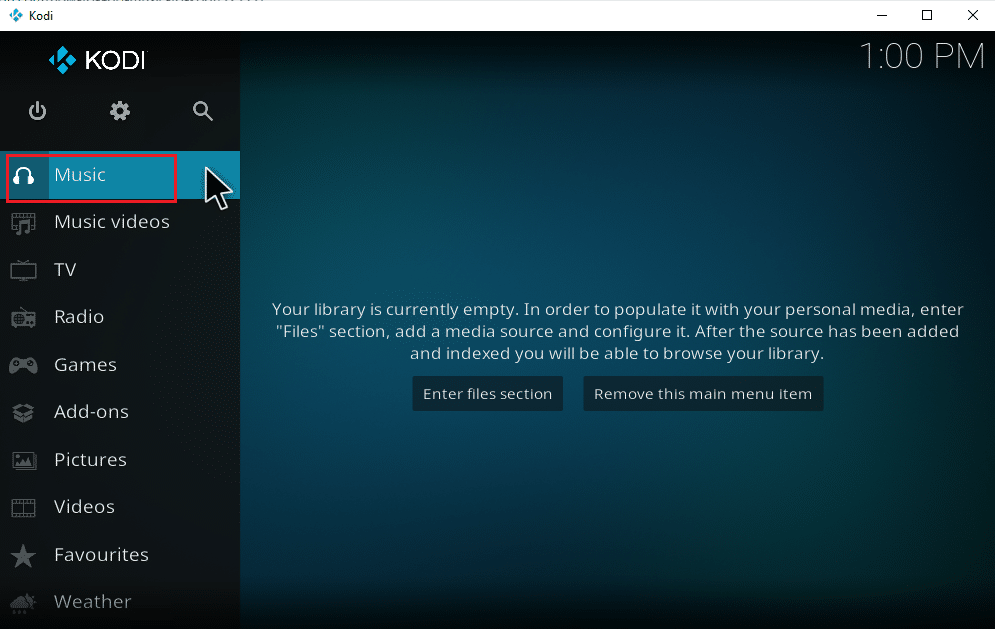
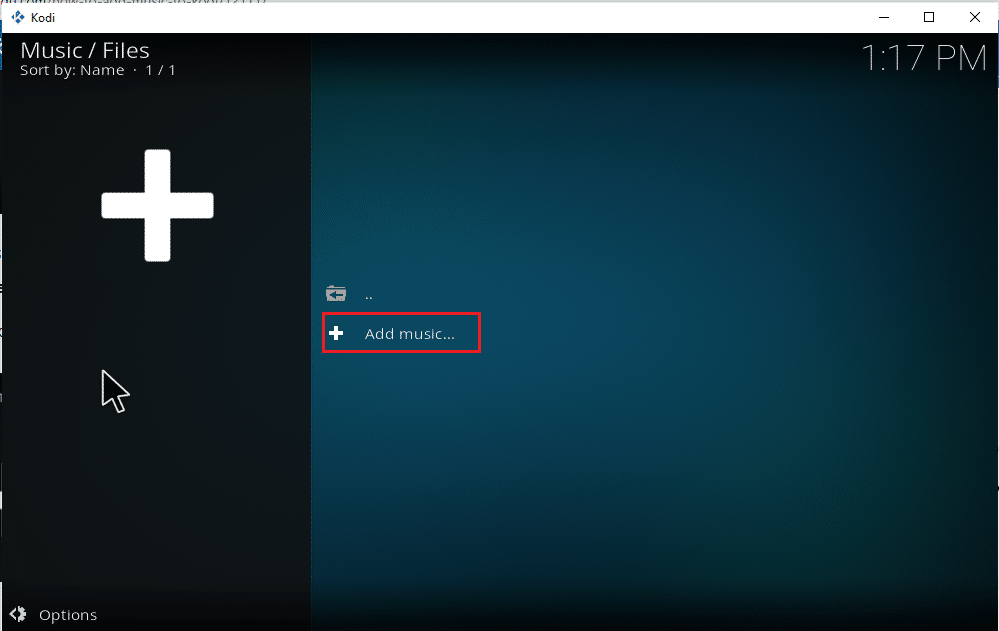
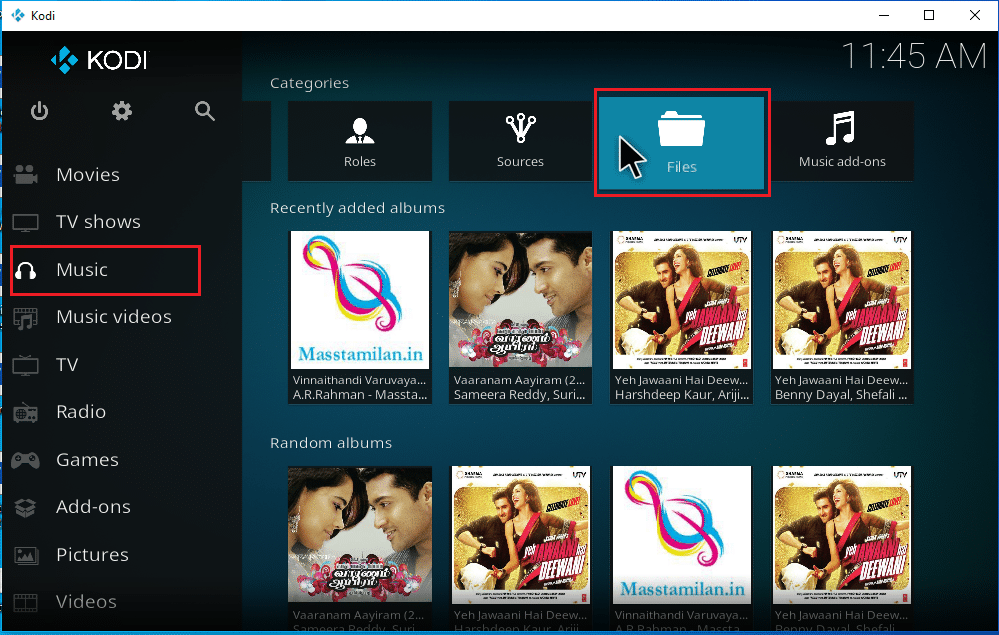
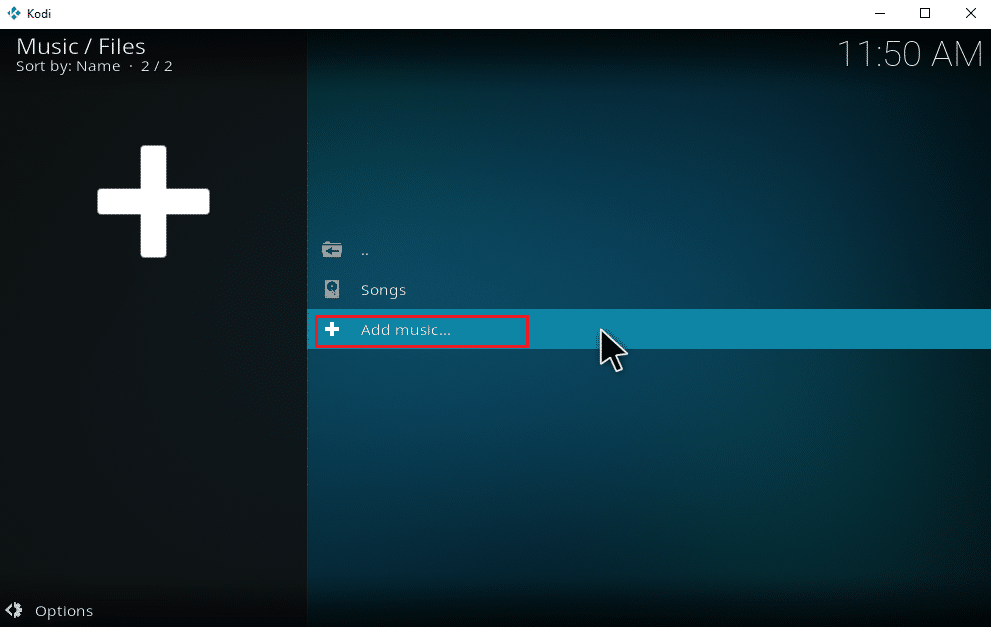
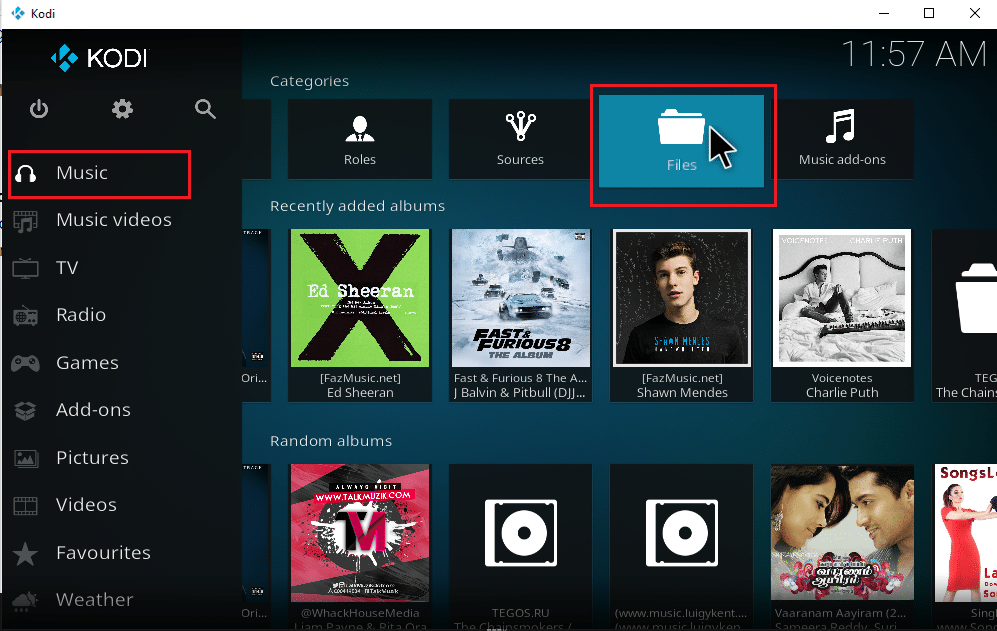
1. Launch the Kodi application and select the Music category.
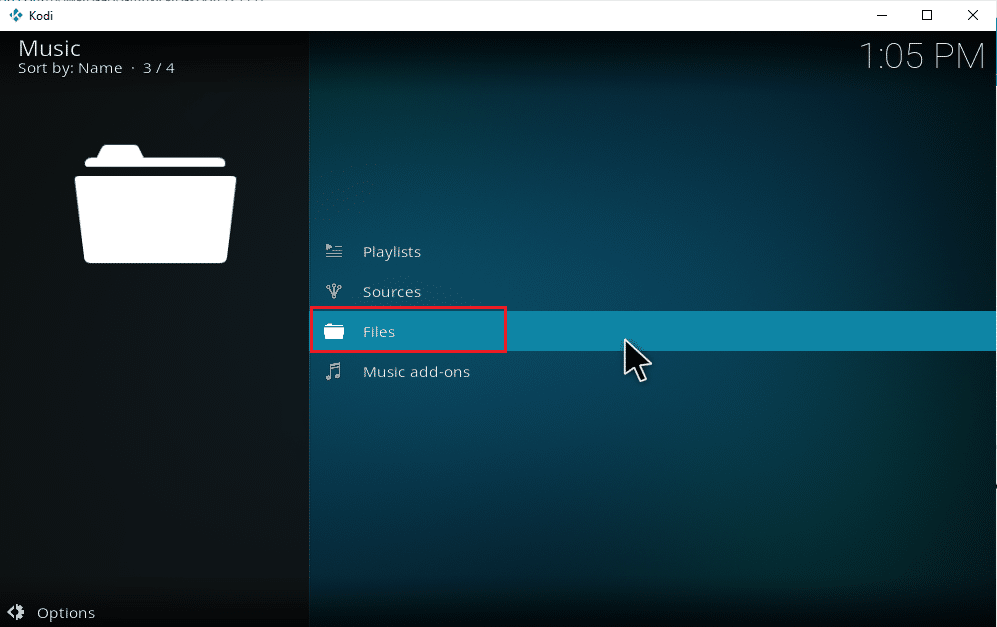
2. Select the Files option.
3. Click on the Add music button.
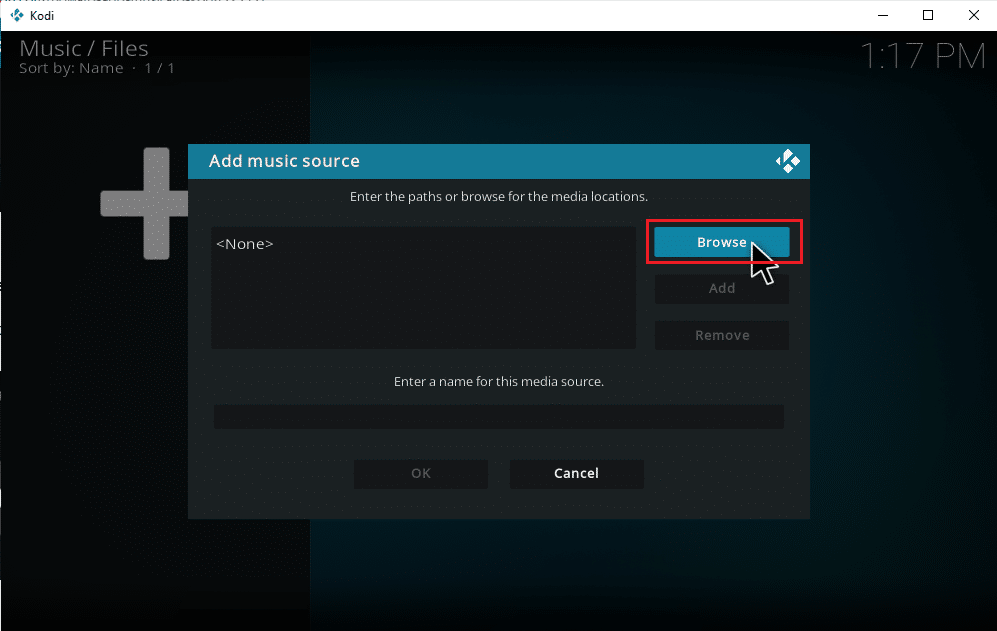
4. Select the Browse option to find the desired music folder already present on your PC.
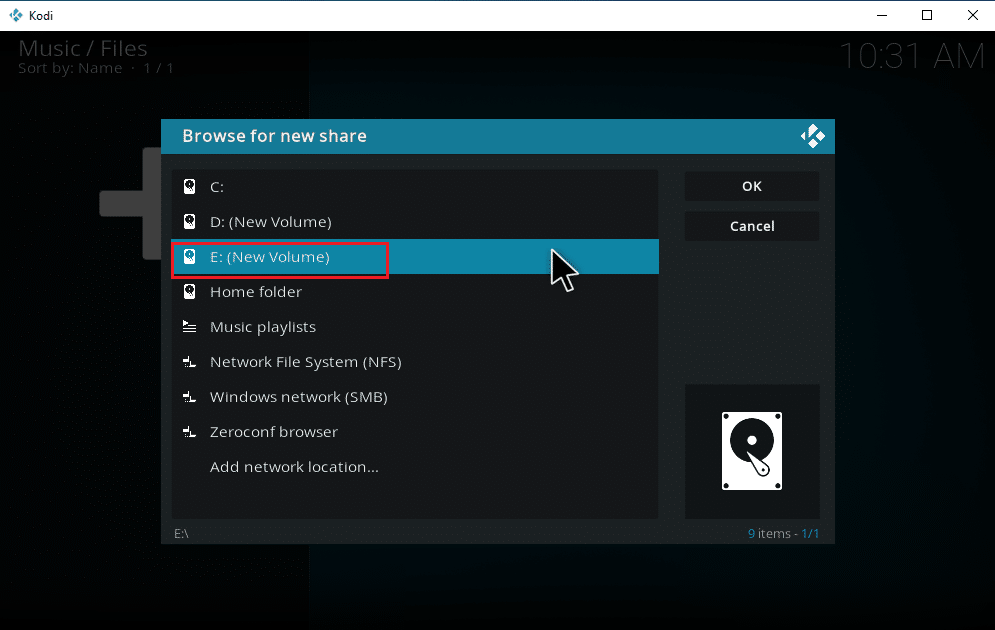
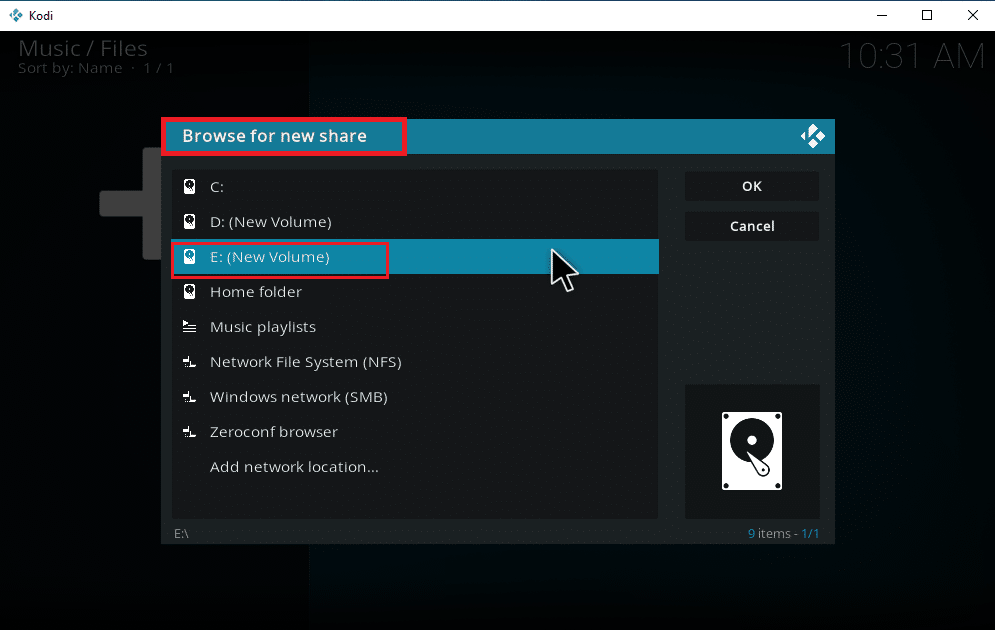
5. Navigate to the destination folder on the Browse for new share tab. Here, the E: (New Volume) option is selected as an example. Therefore, choose your relevant location path.
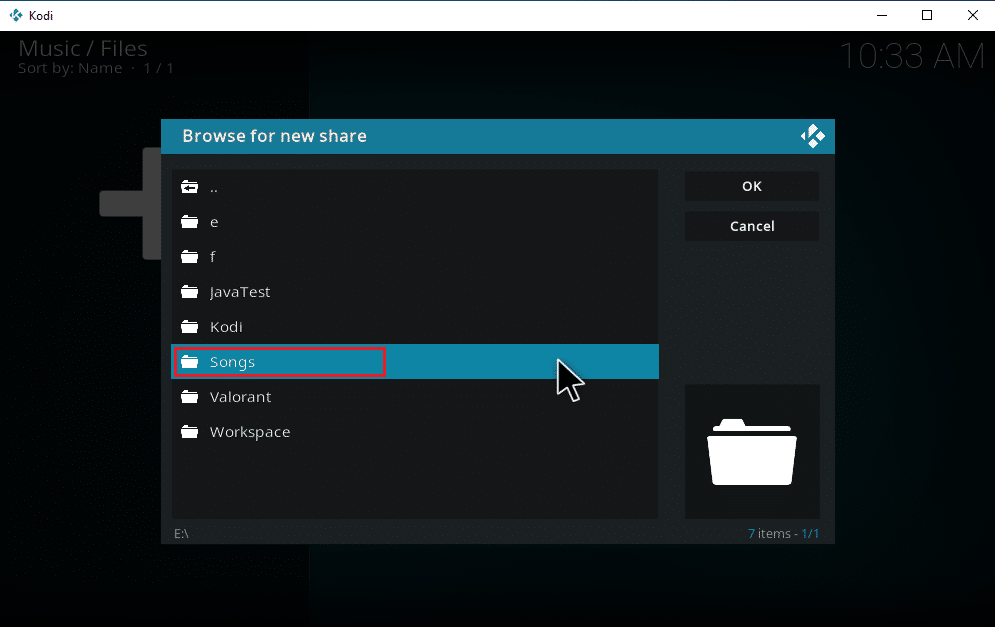
6. Select the desired folder where you have your music saved. Here, the Songs folder is selected as an example.
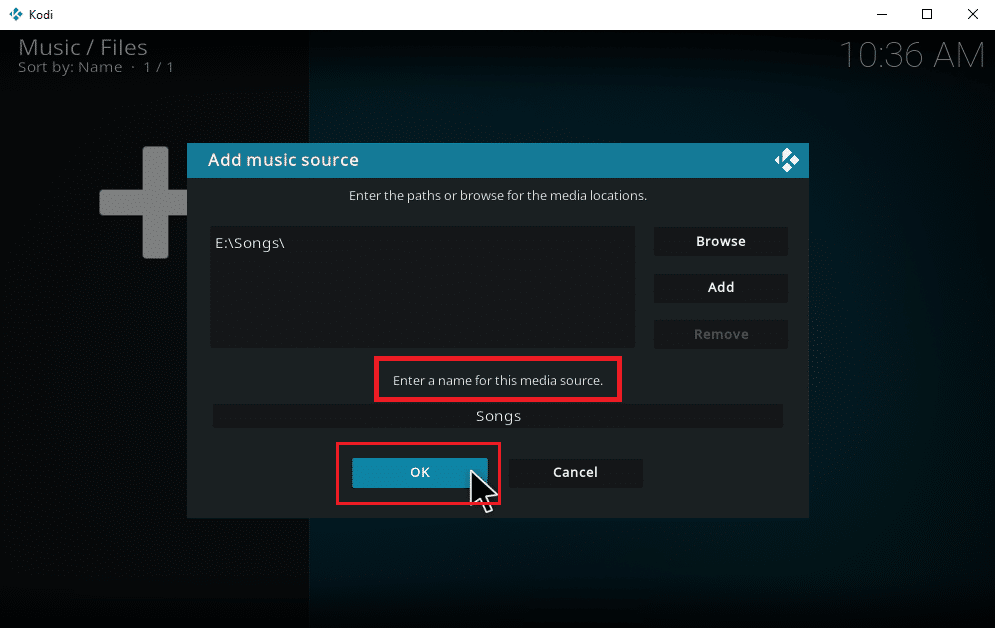
7. Once the path is selected, click OK on the Add music source popup window.
Note: If you want to change the name of the folder, click the Enter a name for this media source and rename it.
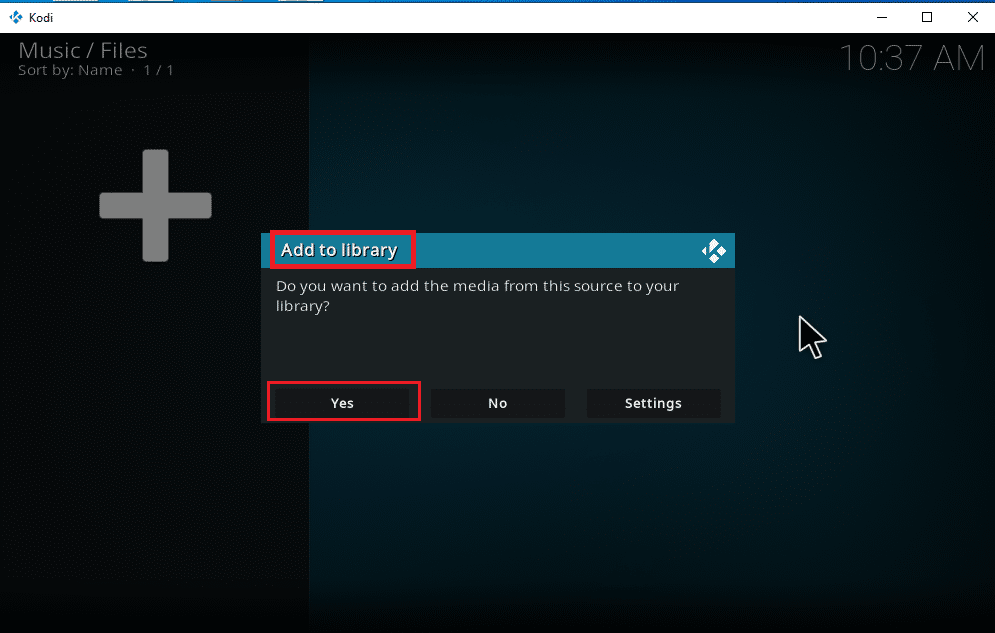
8. Select Yes on the Add to library prompt.
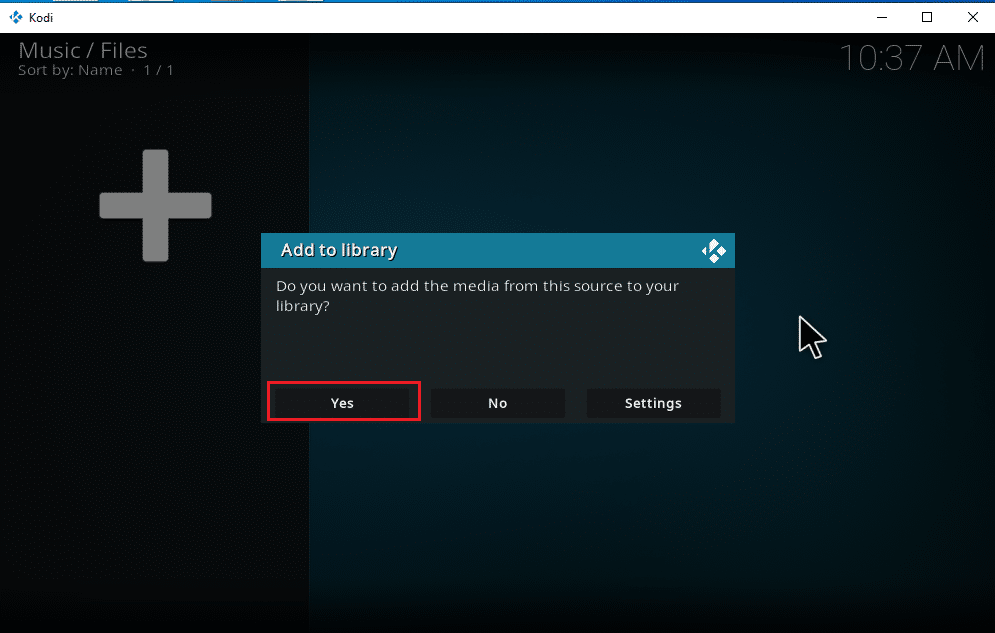
9. Wait some time for Kodi to complete the scanning process. Then, go back to the Kodi homepage and select the Music option.
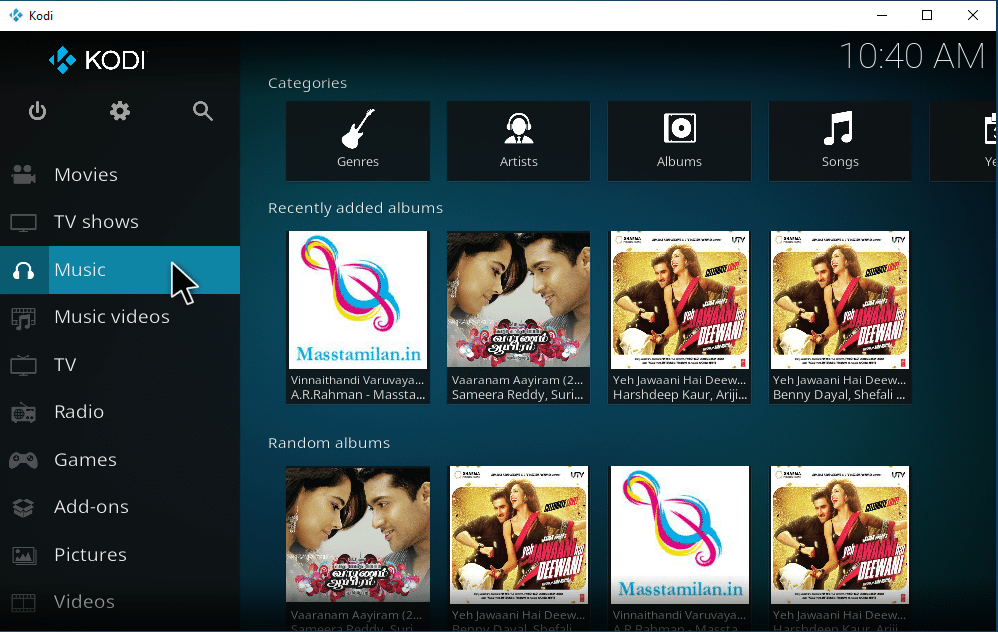
Finally, your songs are now uploaded to Kodi for the first time. Now, start playing songs and enjoy them. In this way, you can download music on Kodi.
Also Read: How to Install Kodi on Smart TV
How to Add a New Music Source to Kodi
If you already have a music setup in Kodi and now trying to add a new music source, here is how you can do it.
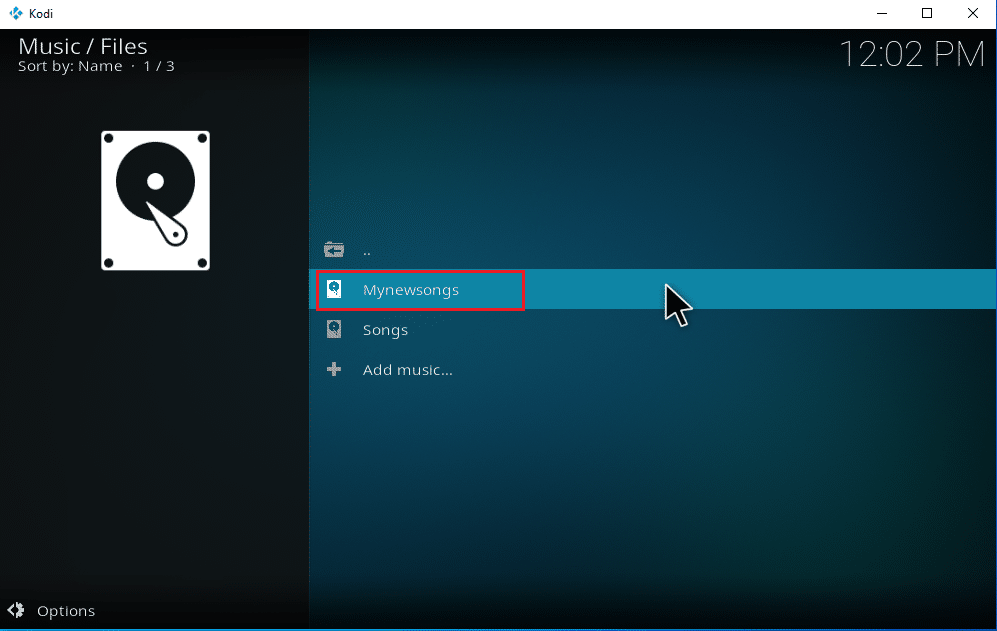
1. Launch Kodi and click on the Music. Scroll to the right and select the Files icon.
2. Click the Add music… option.
3. Select the Browse button.
Note: You can also manually enter the directory of the song folder in the prompt, yet it is advisable to browse the folder path.

4. Navigate to the destination folder on the Browse for new share tab. Here, the E: (New Volume) option is selected as an example. Therefore, choose your relevant location path.
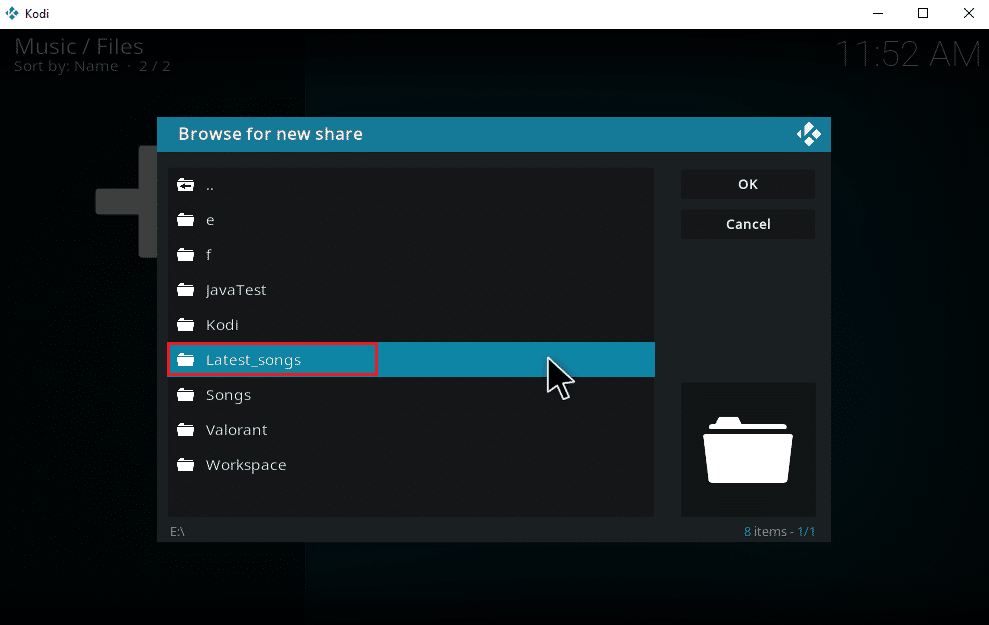
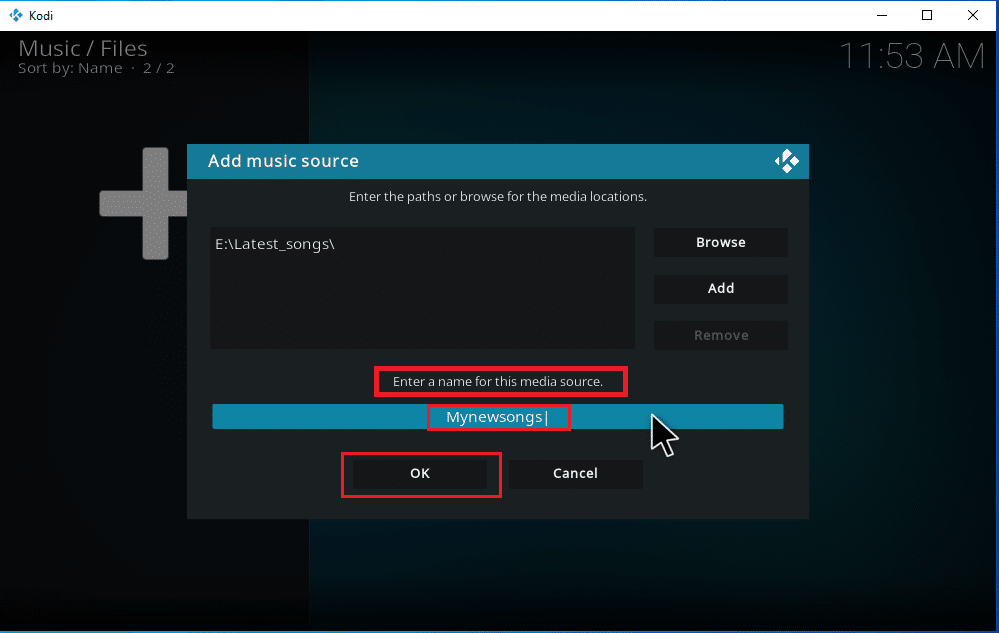
5. Select the desired folder where you have your music saved. Here, the Latest_songs folder is selected as an example.
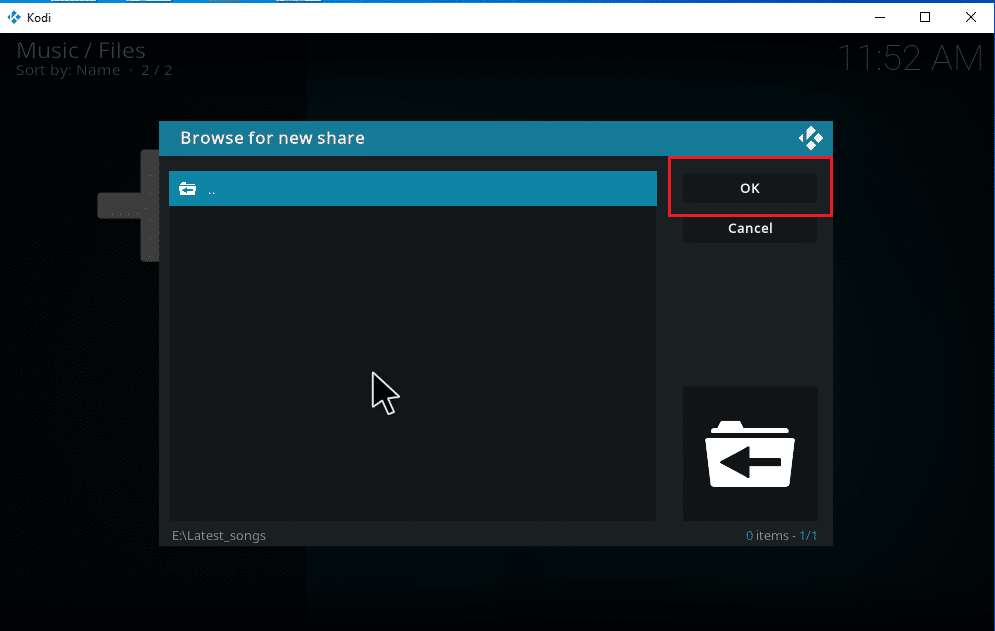
6. Click OK on the import files present on the navigated path.
7. Rename the selected folder under the Enter a name for this media source text box, if needed, and click the OK button to save the changes.
8. Select Yes on the Add to library windows.
9. If you have a large collection of songs, it may also take a while to complete scanning. So, sit back and relax till Kodi scans your new music content. Once done, go back to the music home menu, and start listening.
Once all your albums are included in Kodi, the real work starts here. Kodi offers a wide variety of options and tools to add, delete, modify, and download songs. There are some sought-after tasks that Kodi users do often.
Also Read: Top 10 Best Kodi Indian Channels Add-ons
How to Install Music Add-ons
The fact that official Kodi does not provide any content is well known by now. Installing addons via official Kodi will allow you to explore them to the fullest. You can pull any media sources freely from online streams and enjoy them offline, you can also download music or watch EPL on Kodi via addons. To do so, the Kodi repository is your best option. They are legal and safe. Also, the addons installed to the Kodi repository get updated automatically if a new version of it is released. This is good right? These are the reasons behind their massive hit.
Note: Beware and install only legal add-ons as there are add-ons present with pirated contents.
1. Launch Kodi and select the Settings icon as shown.
![]()
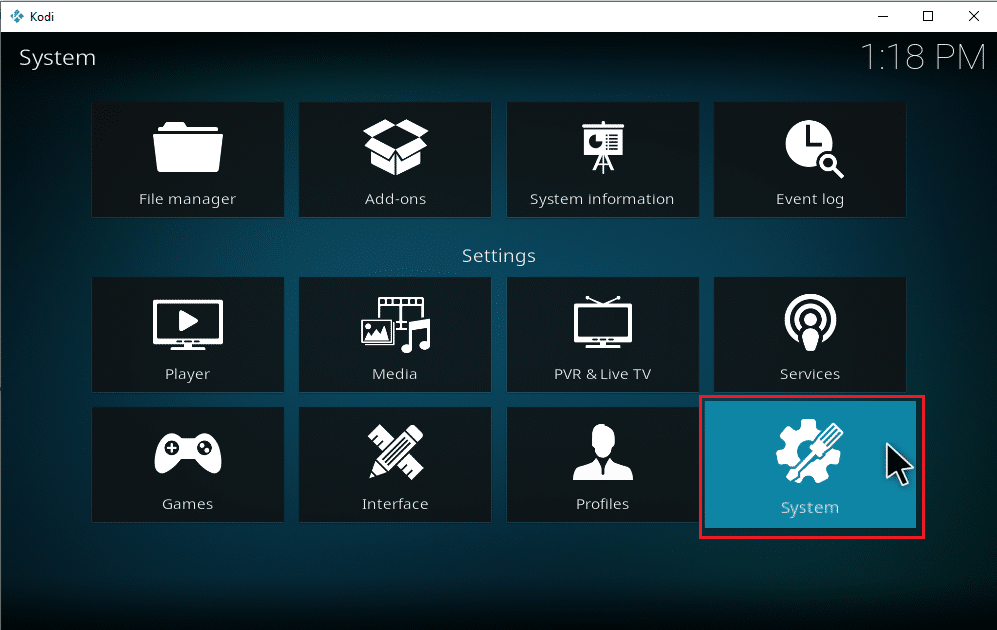
2. Locate the System setting and click on it.
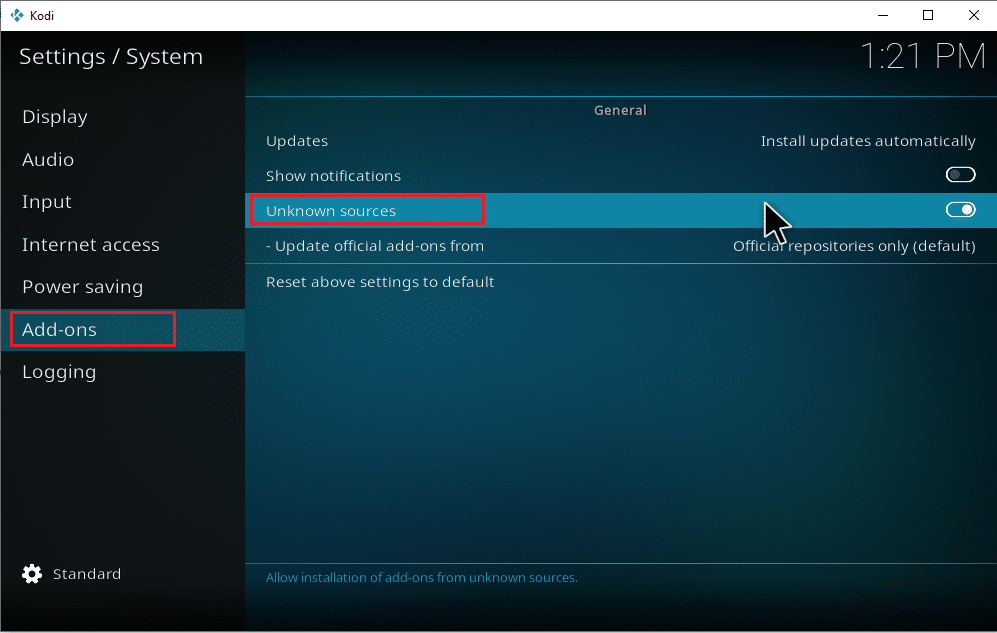
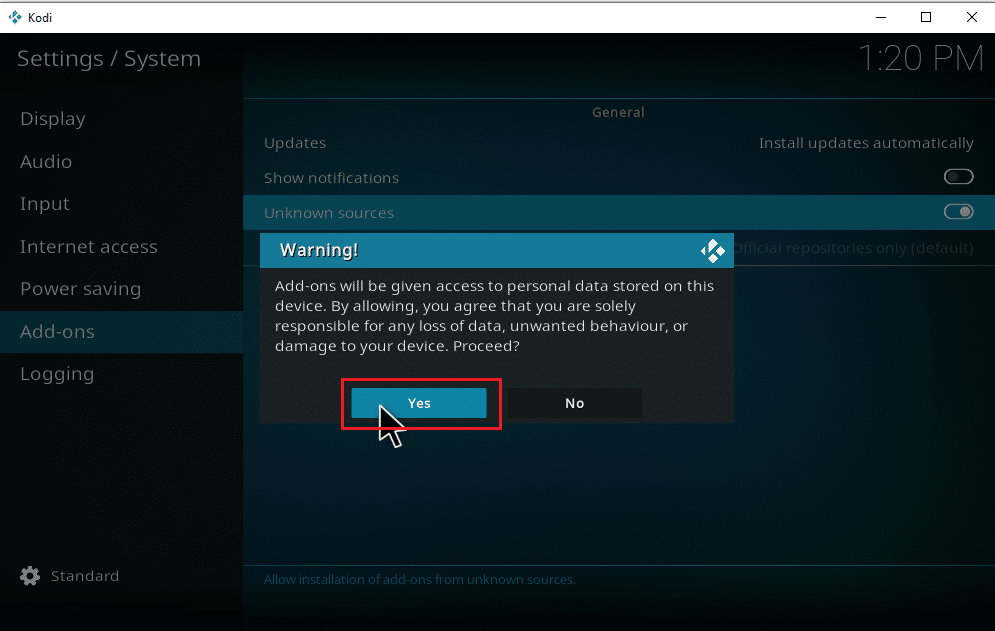
3. Select the Add-ons tab and toggle on the Unknown sources to install third-party music add-ons.
4. Select Yes to accept the Warning popup as shown.
Once the unknown sources system setting option is enabled, you can hassle freely proceed with the Add-ons installation and download music on Kodi.
5. Relaunch the Kodi application. Select the Settings icon.
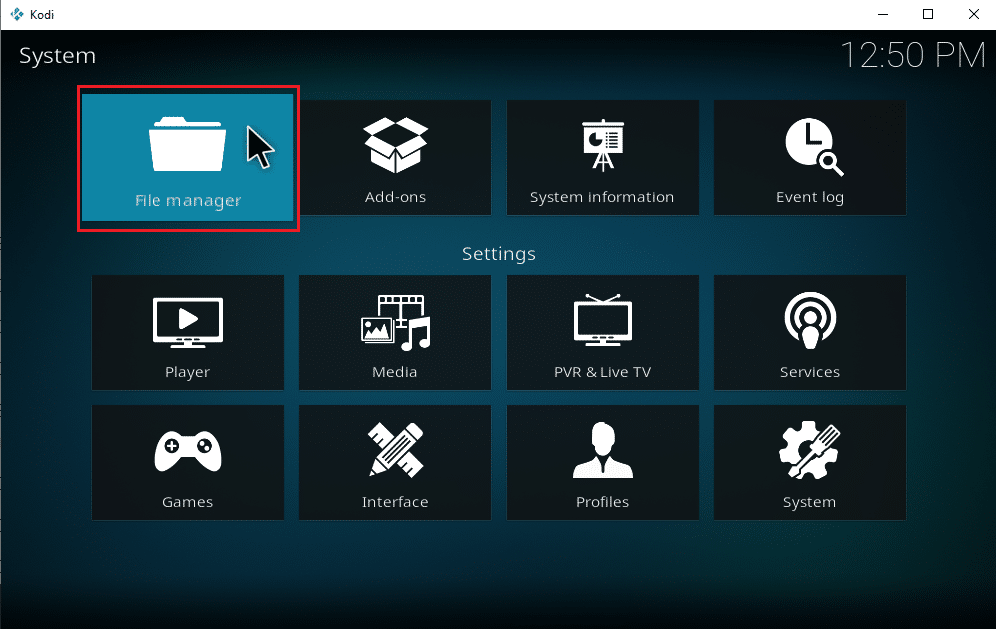
6. Locate and select the File Manager option.
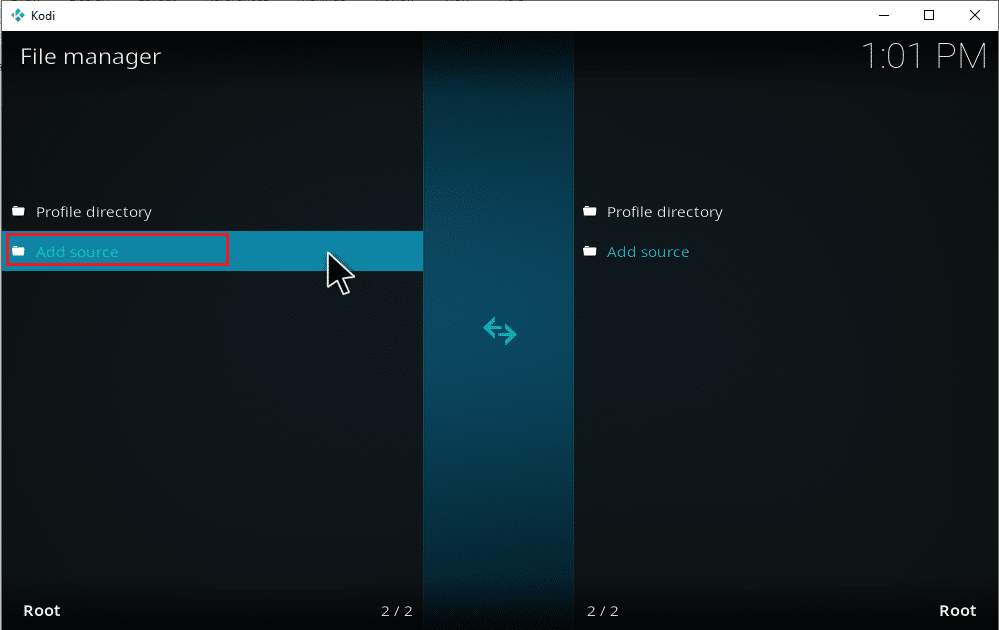
7. Double-click the Add source folder as shown on the left pane.
8. Click on None on the Add file source window.
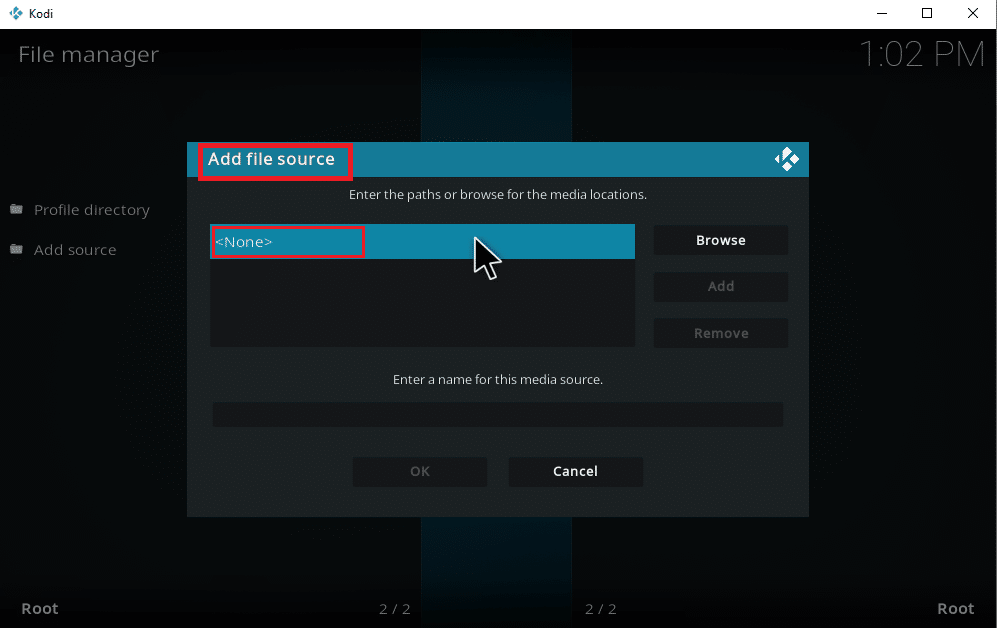
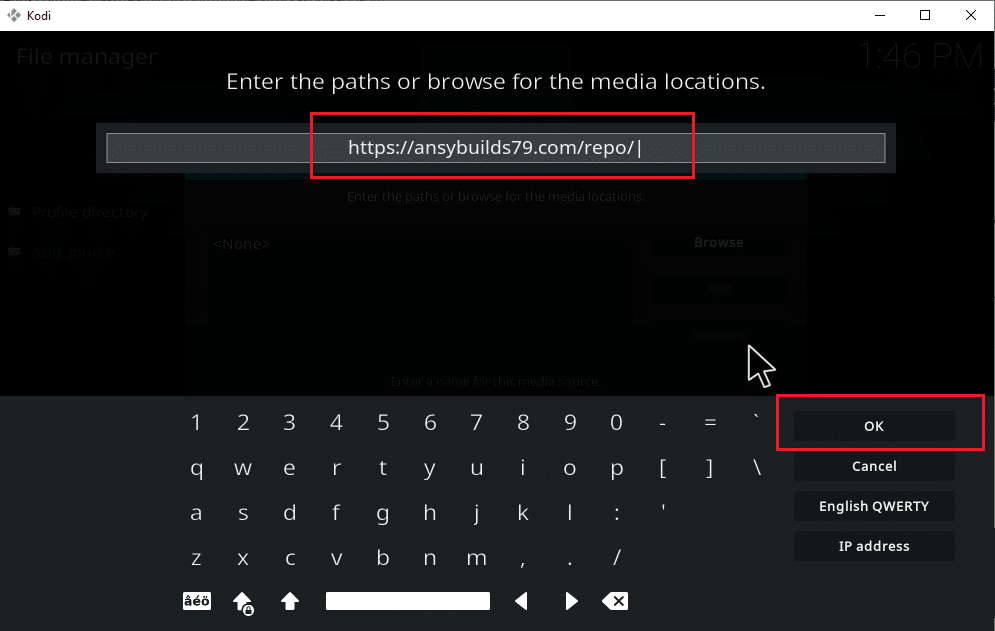
9. Copy and paste or type the Media Source URL and click OK.
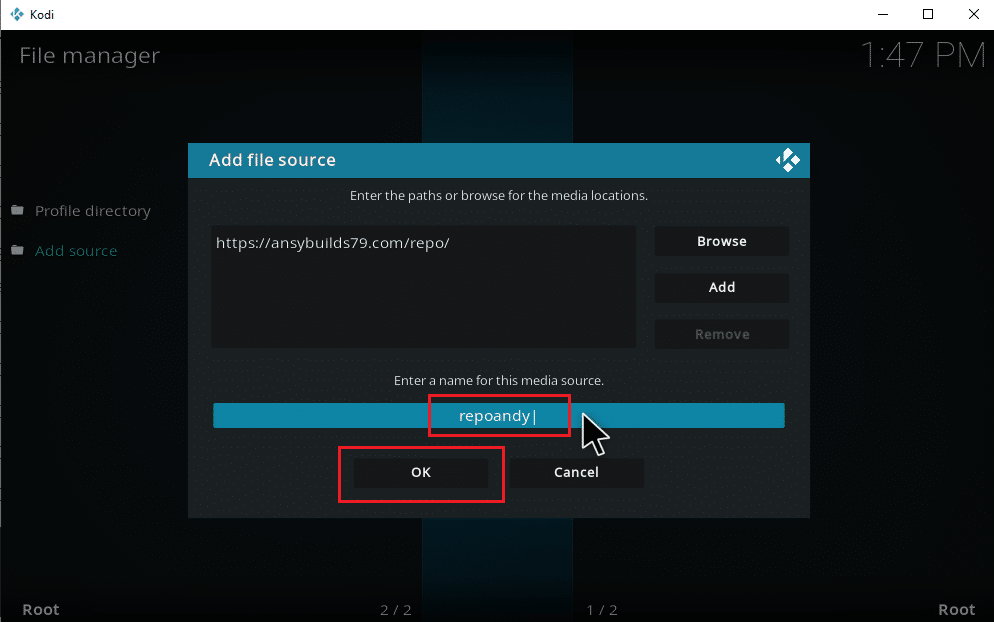
10. Rename the added media source, if required, and click the OK button.
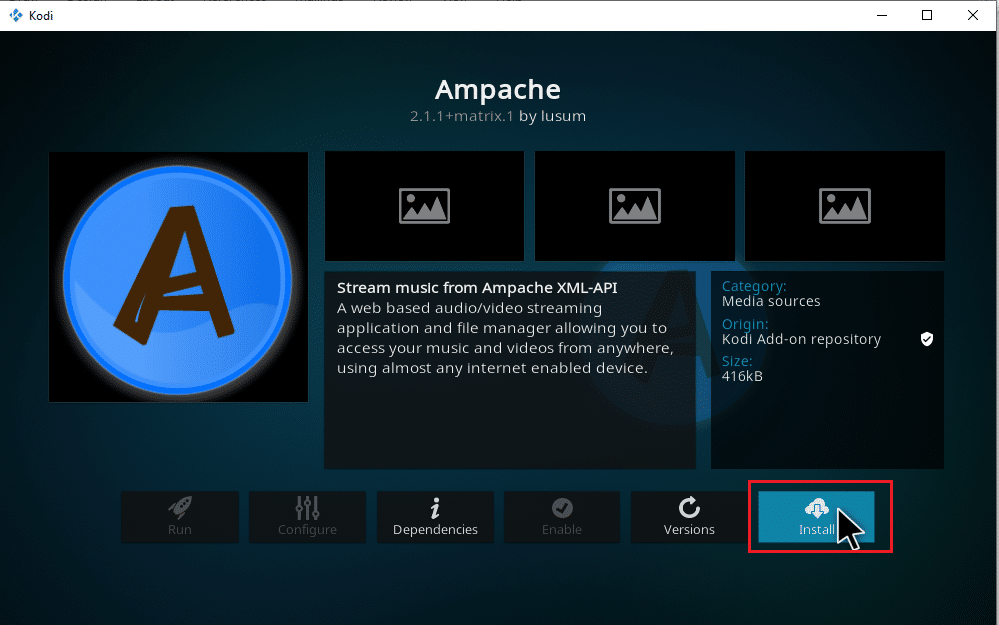
11. Press the Esc key till you reach the Kodi main menu. Scroll down and select the Add-ons option.

12. Click on the open box icon.
![]()
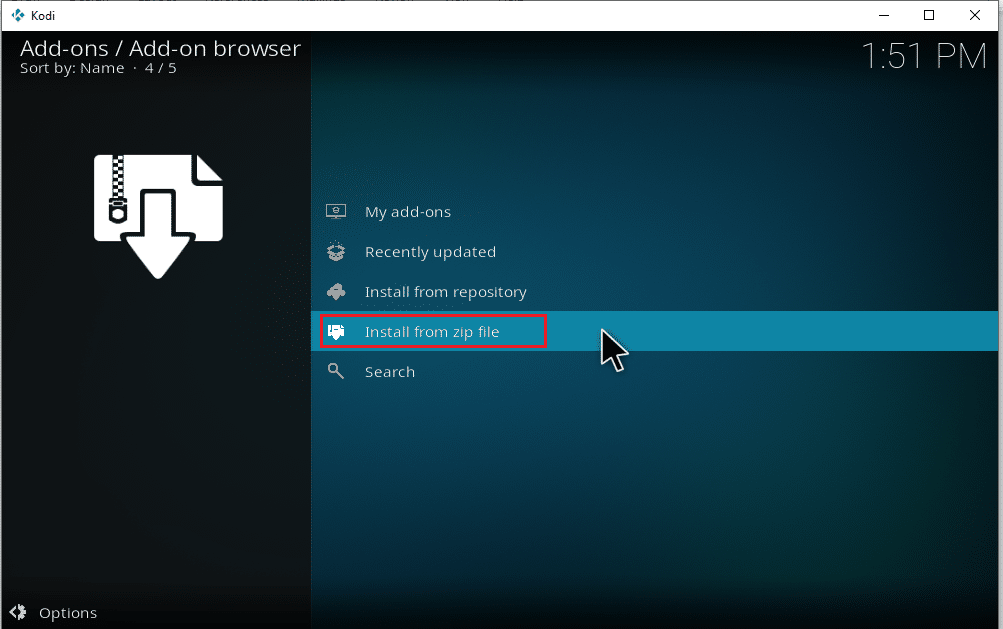
13. Select the Install from zip file
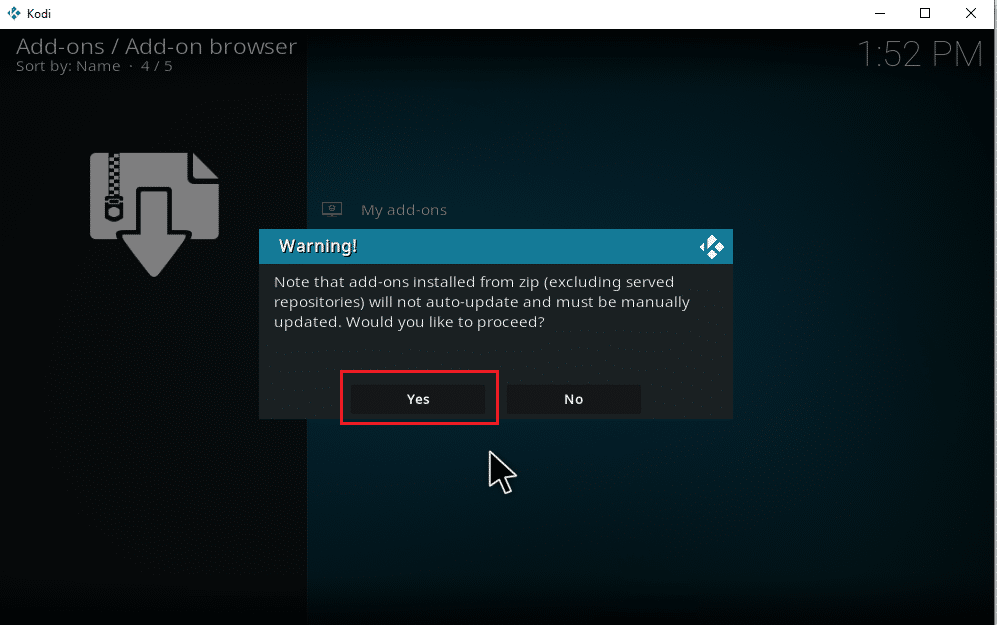
14. Click Yes on the warning popup.
15. Select the media source you just added to Kodi. Then, choose the folder and click Ok to install the Add-on to the music repository.

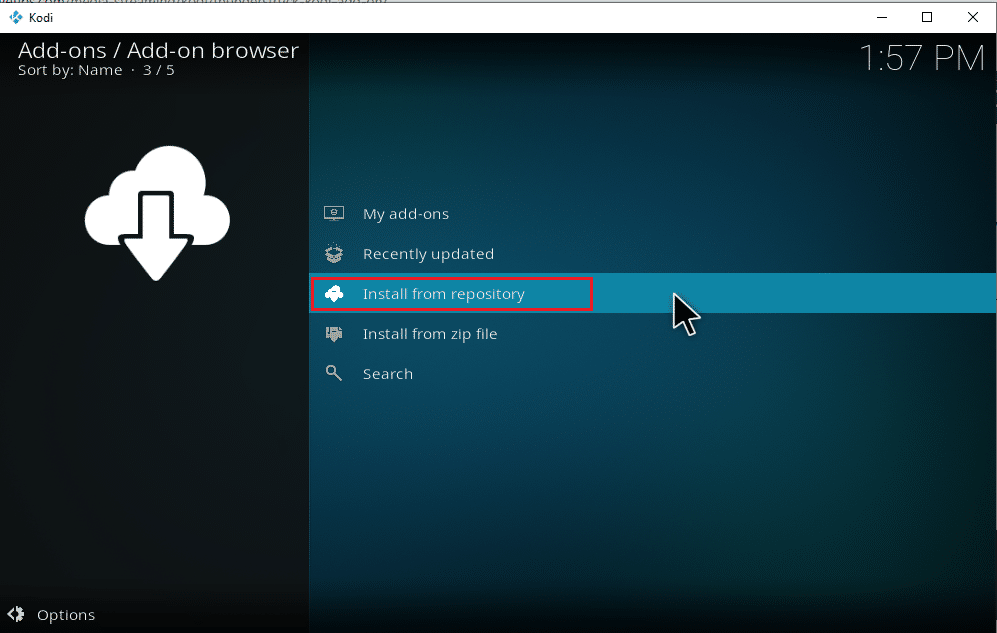
16. Once Add-on is installed message popup appears, click the Install from repository.
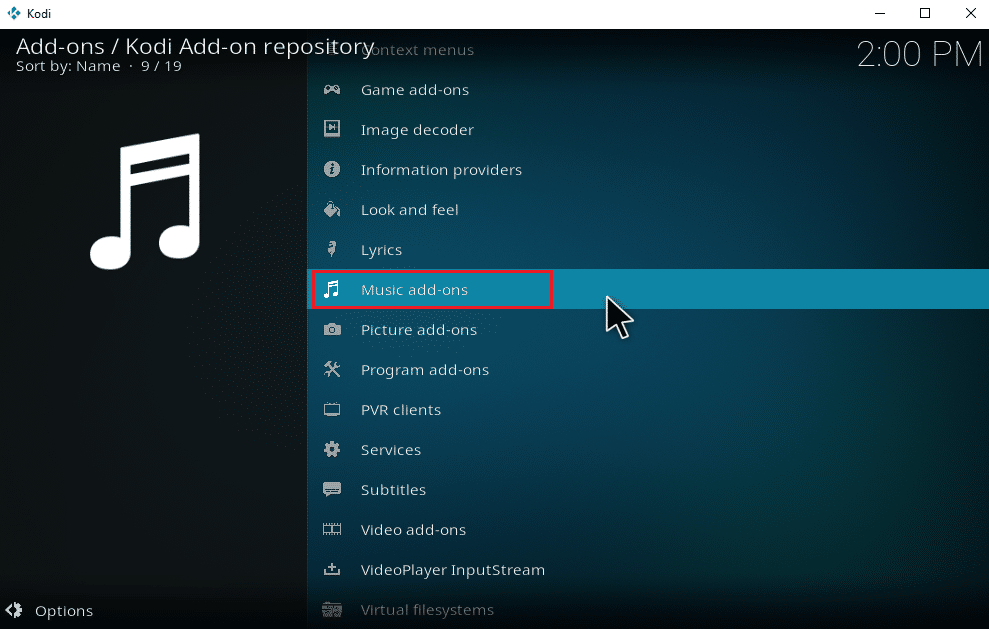
17. Select the Music add-ons.
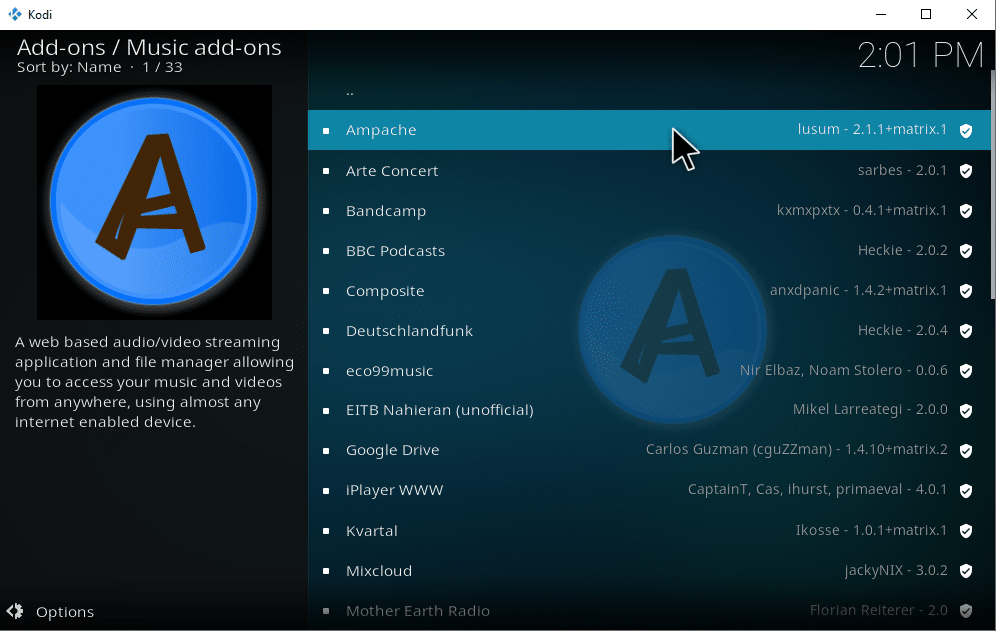
18. Select the desired music Add-ons.
19. Click on the Install button to install the needed music add-on.
Wait till the installation process to complete. Once completed, you will find a notification popup with the installation completed message on the upper-right side. Finally, you can download music from Kodi. You can start listening to music via Add-ons.
Also Read: How to Fix Kodi Keeps Crashing on Startup
How to Remove Added Music Sources from Kodi
You can remove the music source from Kodi by following the steps given below:
Note: This process completely removes all the songs present in the source folder.
1. Launch Kodi and click on the Music. Scroll to the right and select the Files icon.

2. Select the desired folder you want to delete. Right-click on it.
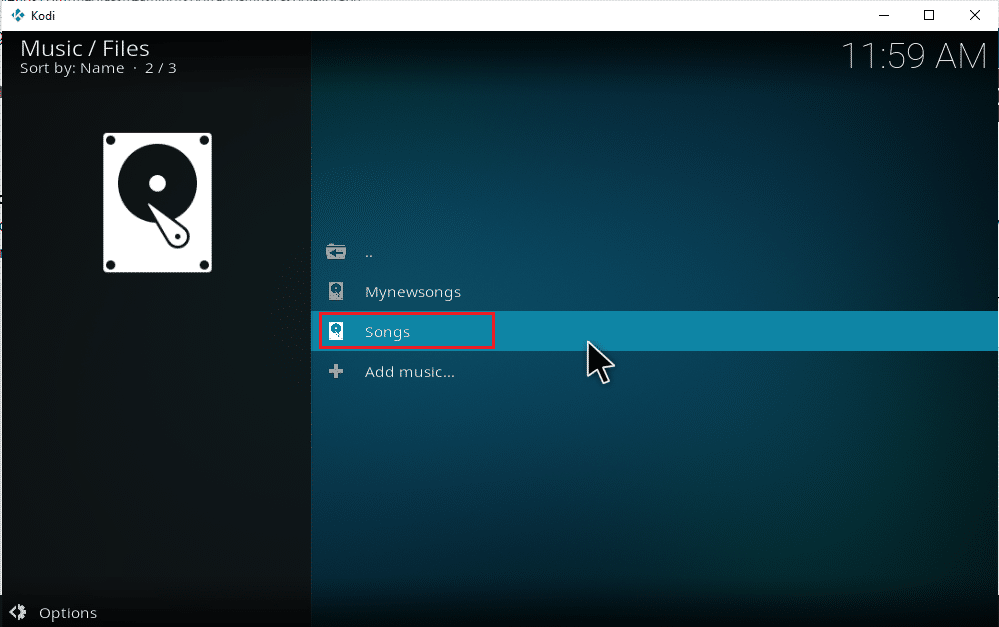
3. Select the Remove Source option.
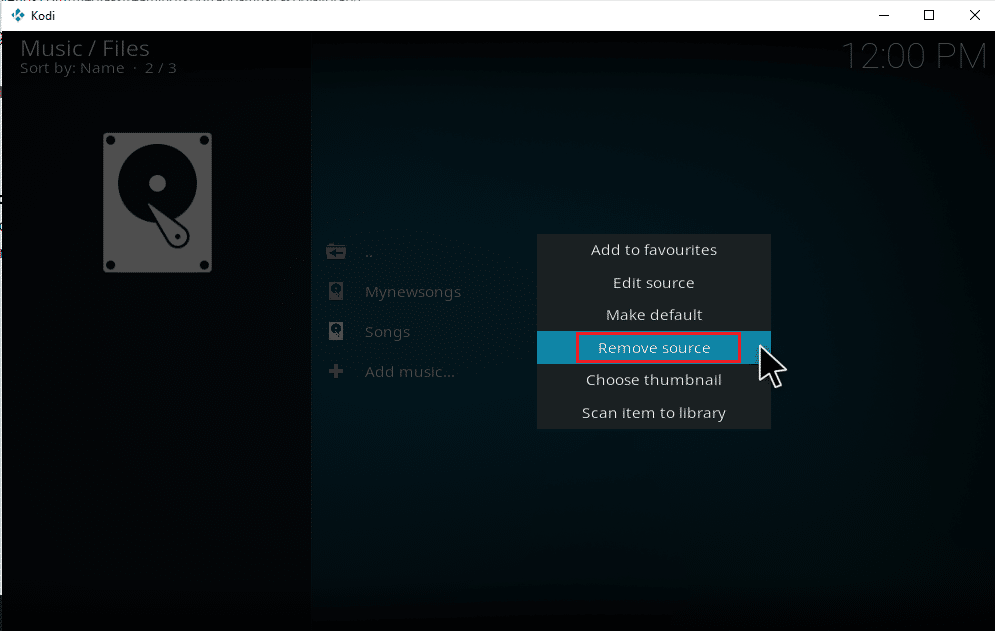
4. Select the Yes button to confirm the selected folder deletion process.
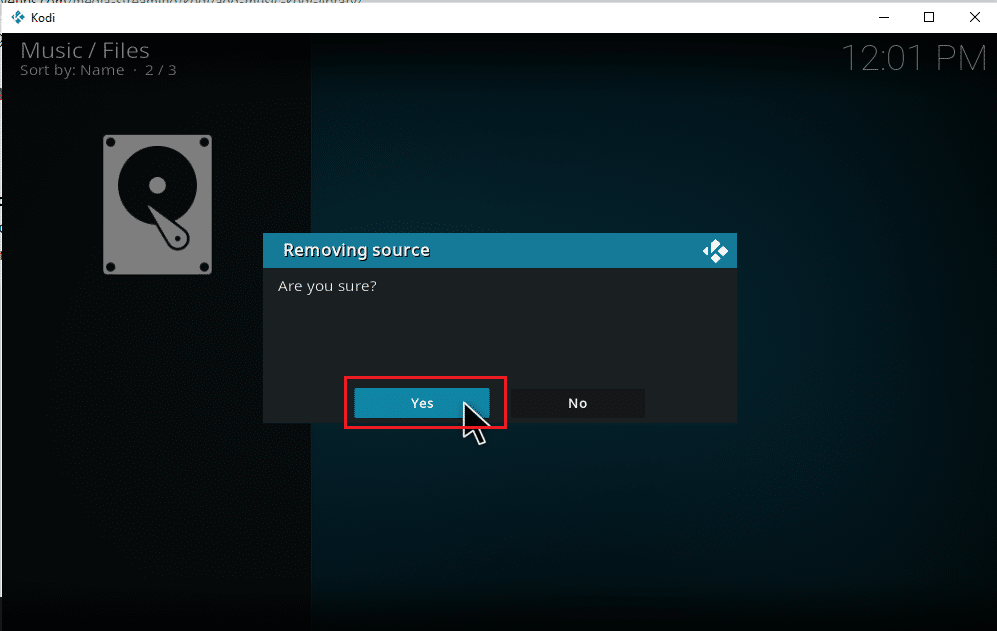
5. Go back to the Kodi home music menu. Once the removal process is completed, you will not find the albums and songs related to the deleted folder.
Also Read: Top 10 Best Kodi Linux Distro
How to Re-scan Music into Kodi
Once you trap local music sources to your Kodi library, it gets expanded when you add music within the sources. Whenever you launch the Kodi application, it automatically updates those changes in the background. But it is also possible for Kodi to miss these listings sometimes. If it happens, you need to interfere manually to activate it. Follow the steps given below to do re-scanning.
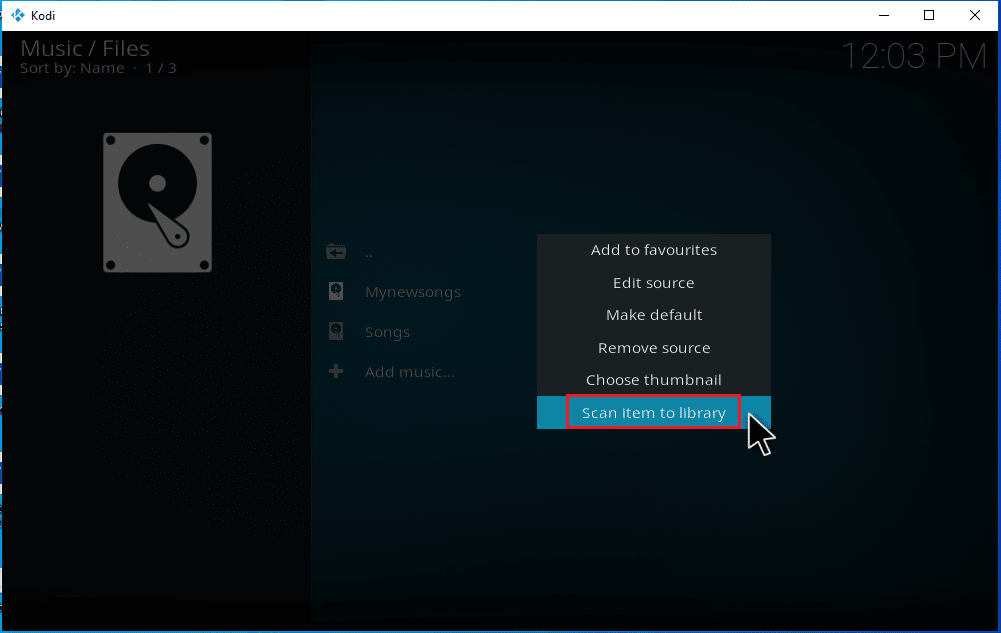
1. Launch Kodi and click on the Music. Scroll to the right and select the Files.
2. Choose the desired directory you want to re-scan on the Kodi current music source files.
3. Right-click on the highlighted folder and select the Scan item to Library option.
4. Click on the Yes button to scan the music files.
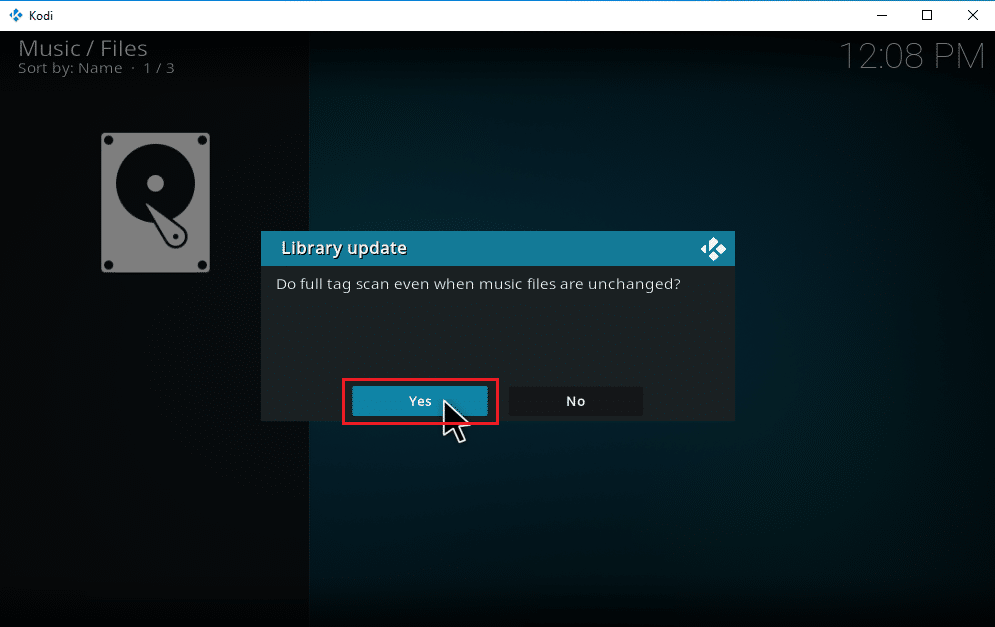
5. The Kodi library will start the scanning process. It will take some time to complete it. Once done, you are free to hear your music.
Pro Tip: How to Keep Kodi Secure
You all know by now that Kodi can handle any media tasks you pitch at them. However, you cannot keep Kodi safe online all the time. This is because the uncertainty on data privacy and security is a concern that emerged in recent years. Yet, there is a solution for this concerning fact, where you can protect yourself by using a trusted and reliable VPN. The virtual private network creates an exclusive network from an internet connection anonymously. It camouflages all your online activity and makes your identity untraceable. Some other additional features of VPN that keep you undercover are listed below.
- Enables you to watch any region-locked movies online regardless of your location.
- Provides safe internet access for all your devices, especially via public Wi-Fi.
- Protects your IP address and makes your device untraceable.
- Hides your browsing history.
- Acts as an alternative route to cross censorship firewalls.
All the features mentioned above are useful and allow you to access the internet without any privacy concerns. It also secures Kodi add-ons. Therefore, it is recommended to install VPN if you don’t have one. To install VPN, follow the steps given.
Note: We have explained steps for IPNVanish VPN as an example here.
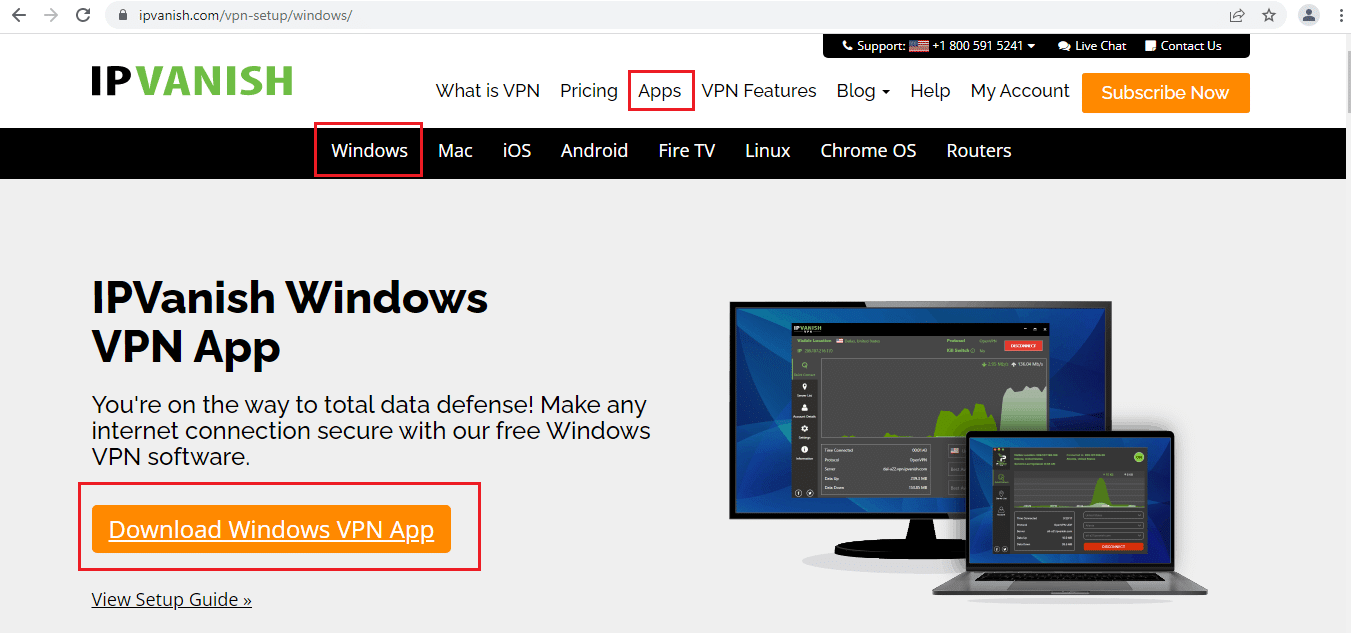
1. Download the IPVANISH Windows VPN app.
2. Right-click on the ipvanish-setup.exe and select Open to run the setup.

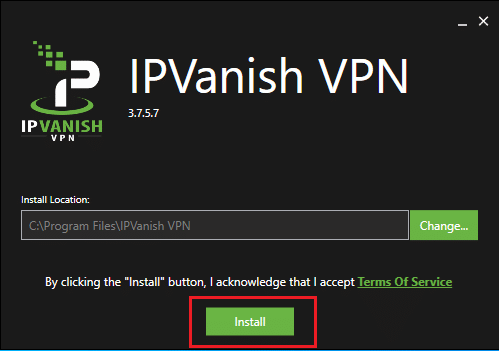
3. Select the Install button to start the installation process.
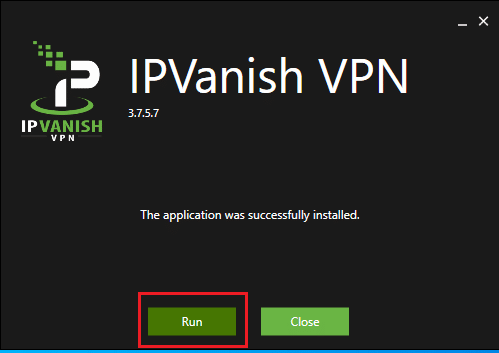
4. Select the Run button to launch the IPVanish VPN app.
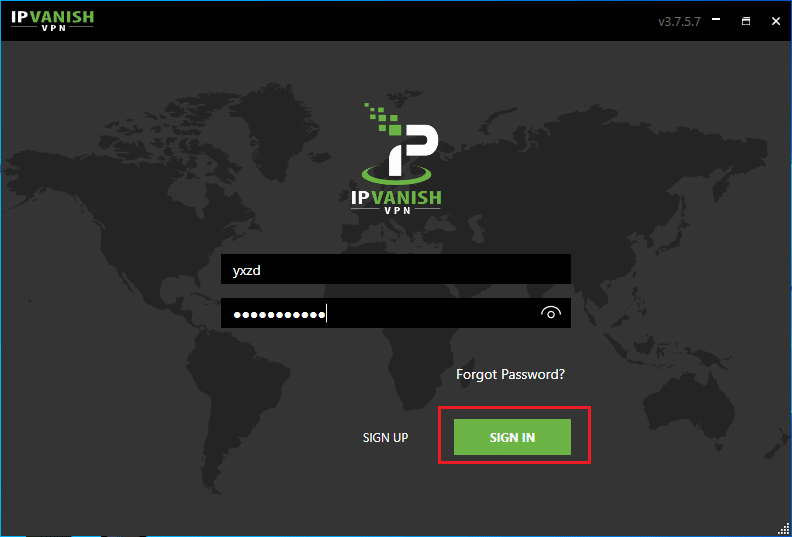
5. Type your login credentials and click on the SIGN IN button.
Recommended:
We hope that this guide was helpful, and you were able to learn how to add music to Kodi with or without add-ons. If you have any queries or, suggestions then feel free to drop them in the comments section.