Fix Halo Infinite Customization Not Loading in Windows 11
Halo Infinite multiplayer beta is hitting the gaming platforms and is available for free on PC and Xbox. It is making gamers all excited to play it with their friends globally. It is a great deal to grab if you and your boys want to hit it off in the latest successor of the beloved Halo series. However, the open beta phase comes with a bumpy ride. One of the many obstructions which are haunting the dedicated fanbase of the series is Halo Infinite Customization not loading error. This is quite frustrating and players voiced their displeasure quite openly on the internet. So, we took matters into our own hands and compiled this guide on how to fix Halo Infinite Customization not loading in Windows 11.
How to Fix Halo Infinite Customization Not Loading in Windows 11
In this article, we have explained tried and tested methods to fix Halo Infinite Customization not loading error. But firstly, let us learn about the causes of this error. Well as of now, the reason behind the error is still unknown and quite frankly, it is understandable. The game is still in the open beta phase. It is not news for a game being full of bugs in these early stages. Although, culprits could be:
- Faulty or incompatible Internet Protocol Version 6 (IPv6) configuration.
- The outage from the game service providers end.
Method 1: Perform Clean Boot
First, you should clean boot your PC to fix Halo Infinite Customization not loading on Windows 11. This will help to get rid of bugs and might fix the said error. Read our guide on How to Perform Clean boot in Windows 10 here to do so.
Method 2: Close Unnecessary Background Processes
If there are any unwanted processes running in the background which are taking up lot of memory & CPU resources, then you should close those processes, as follows:
1. Press Ctrl + Shift +Esc keys together to launch Task Manager.
2. In the Processes tab, you can see the applications and processes that are consuming a lot of memory resources by the Memory column.
3. Right-click on the unwanted processes (e.g. Microsoft Teams) and click on End task, as depicted below.
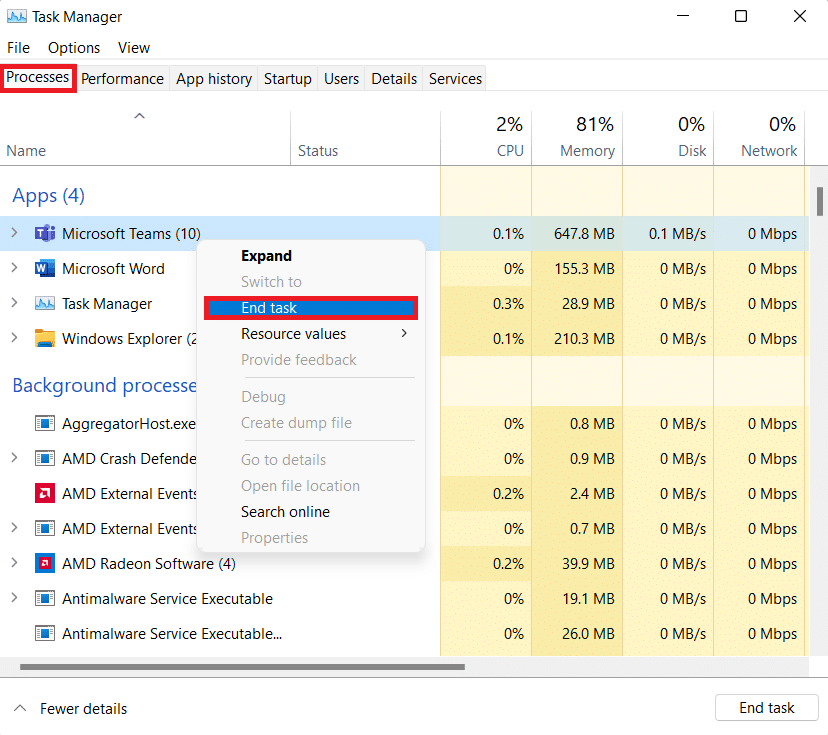
4. Repeat the same for other tasks that are not required currently and then, launch Halo Infinite.
Method 3: Disable IPv6 Network
Here are the steps to fix Halo Infinite Customization not loading on Windows 11 by disabling the Internet Protocol Version 6 (IPv6) networking:
1. Click on the Search icon, type View Network Connections, and click on Open.
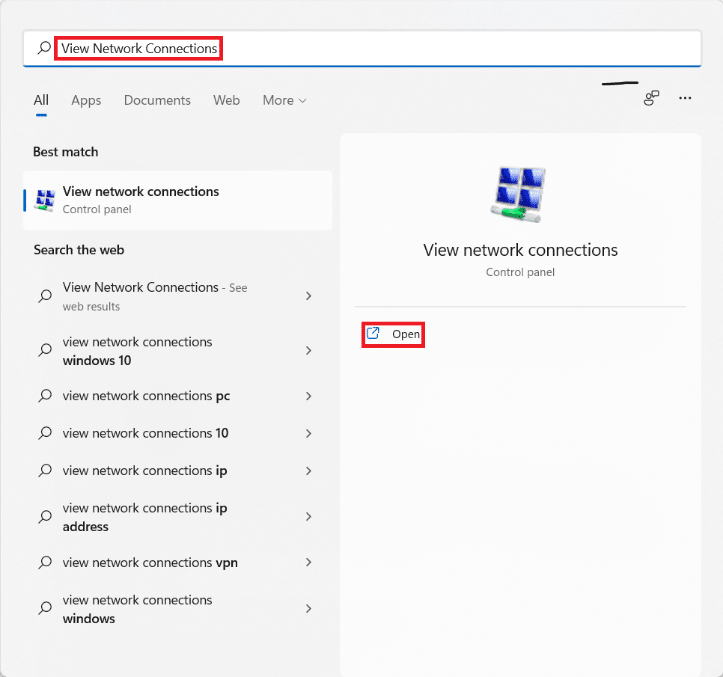
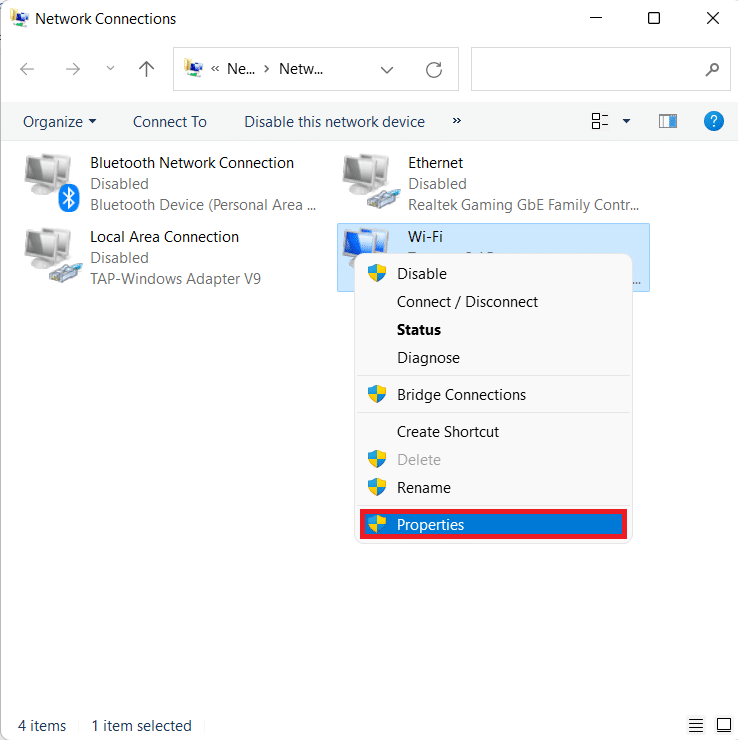
2. In the Network Connections window, right-click on the network adapter (e.g. Wi-Fi) you are connected to.
3. Select Properties from the context menu, as shown.
4. In the Wi-Fi Properties window, scroll down in the Networking tab.
5. Here, locate the Internet Protocol Version 6 (TCP/IPv6) option and uncheck it.
Note: Make sure that Internet Protocol Version 4 (TCP/IPv4) is checked.
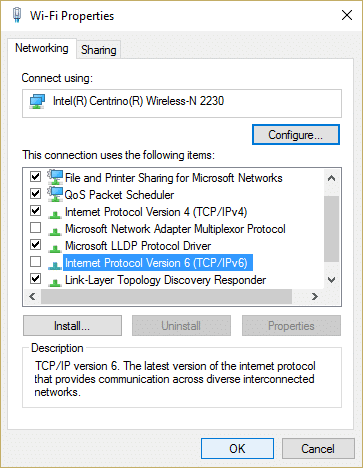
6. Finally, click on OK to save the changes.
Now, try restarting Halo Infinite once again to see if the error still exists.
Also Read: How to View Running Processes in Windows 11
Method 4: Enable Teredo State
Another alternative to fix Halo Infinite Customization not loading issue on Windows 11 is by enabling Teredo State, as discussed below:
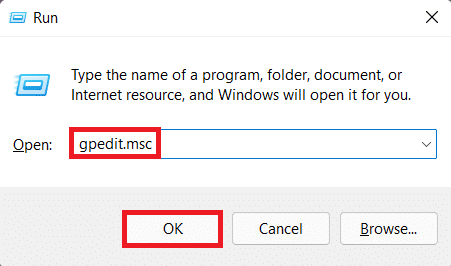
1. Press Windows + R keys together to open Run dialog box.
2. Type gpedit.msc and click on OK to open Local Group Policy Editor.
Note: If you are unable to access it, read How to Enable Group Policy Editor in Windows 11 Home Edition here.
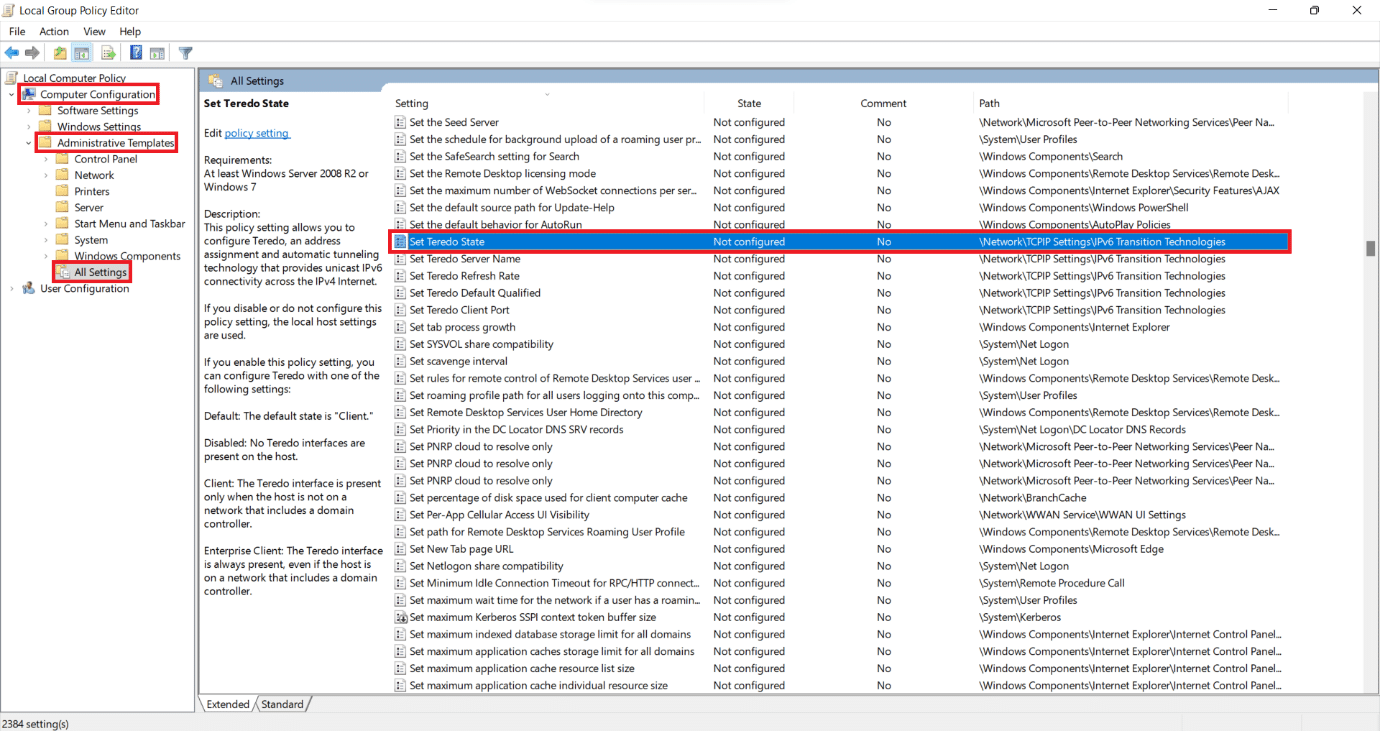
3. Navigate to Computer Configuration > Administrative Templates > All Settings from the left pane.
4. Then, locate and double-click on Set Teredo State, shown highlighted.
5. Here, click on Enabled and select Enterprise Client from the Select from the following states drop-down list.
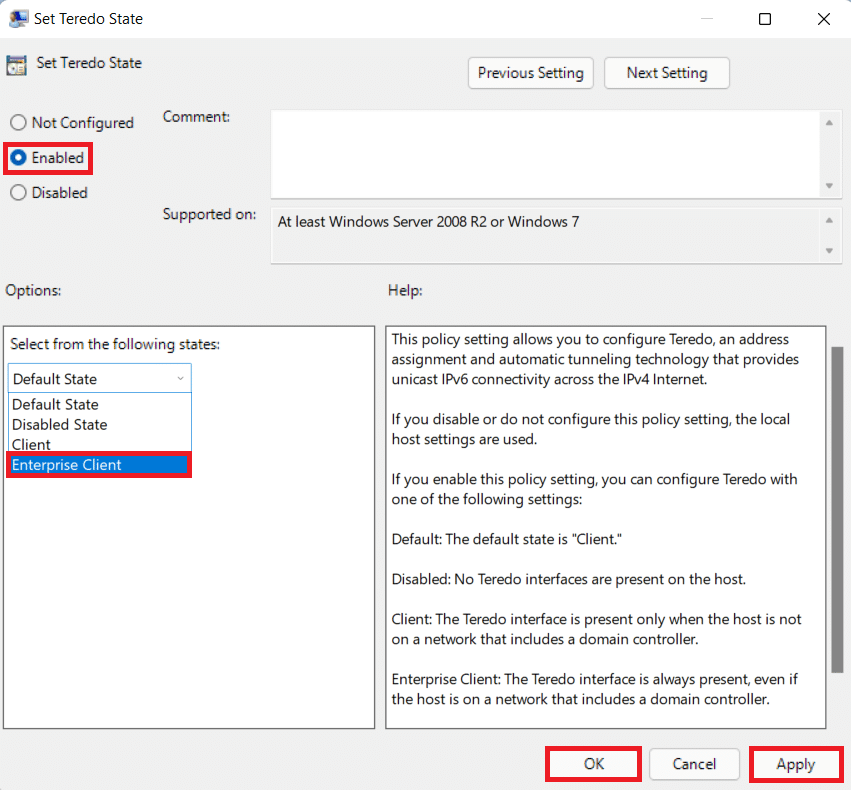
6. Click on Apply > OK to save the changes and try playing the game in multiplayer mode.
Method 5: Increase Virtual RAM
You can also increase virtual RAM to fix Halo Infinite Customization not loading in Windows 11, as follows:
1. Open Run dialog box , type sysdm.cpl and click on OK.
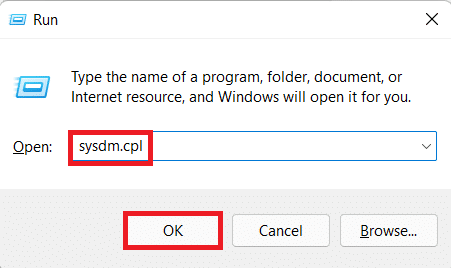
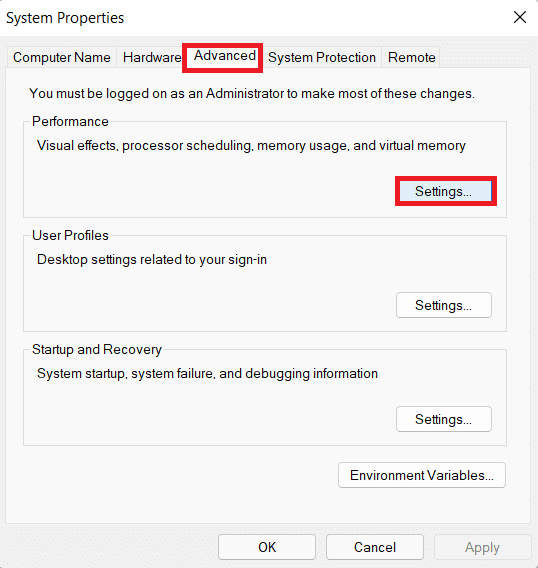
2. Go to the Advanced tab in System Properties window.
3. Click on Settings… button under the Performance section, as shown.
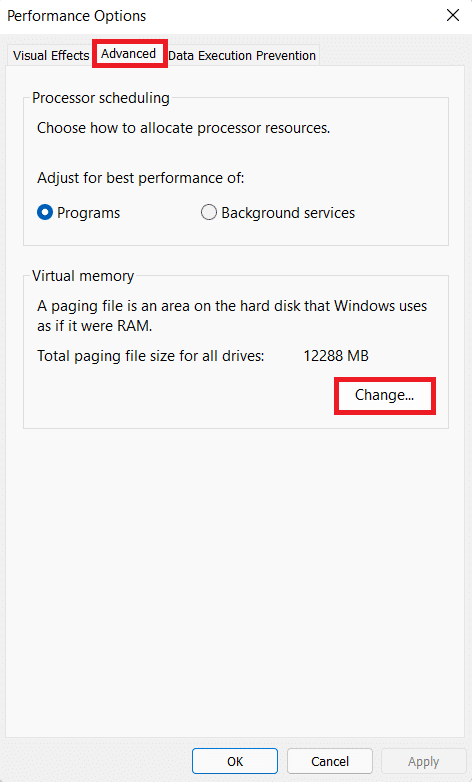
4. In the Performance Options window, navigate to the Advanced tab.
5. Click on Change… button under the Virtual memory section, as shown.
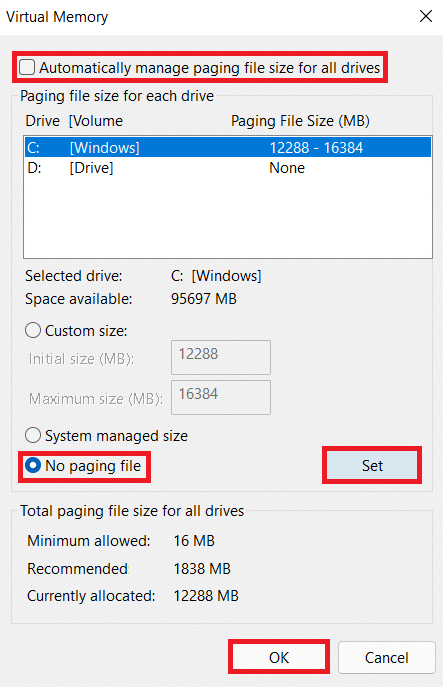
6. Uncheck the box for Automatically manage paging file size for all drives.
7. Select the primary drive from the list viz C: and click on No paging file.
8. Then, click on Set > OK, as depicted below.
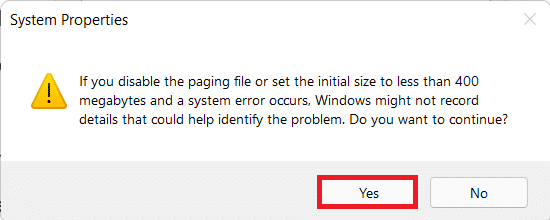
9. Select Yes in the System Properties confirmation prompt that appears.
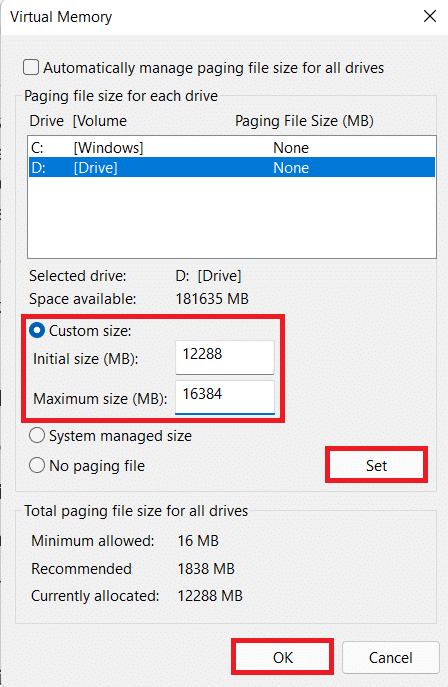
10. Click on non-primary volume in the list of drives and select Custom size.
11. Enter the paging size for both Initial and Maximum size in MegaBytes (MB).
Note: The paging size is ideally twice the size of your physical memory (RAM).
12. Click on Set and confirm any prompt that appears.
13. Finally, click on OK and restart your PC.
Also Read: How to Enable or Disable Quick Access in Windows 11
Method 6: Disable Game Overlays
Another method to fix Halo Infinite Customization not loading in Windows 11 is to disable the game overlays. This will reduce the high memory usage and resolve lags & glitches as well. We have explained the process for Discord app, NVIDIA GeForce and Xbox Game Bar in Windows 11.
Option 1: Disable Discord Overlay
1. Open Discord PC Client and click on the Settings icon next to your Discord username.
![]()
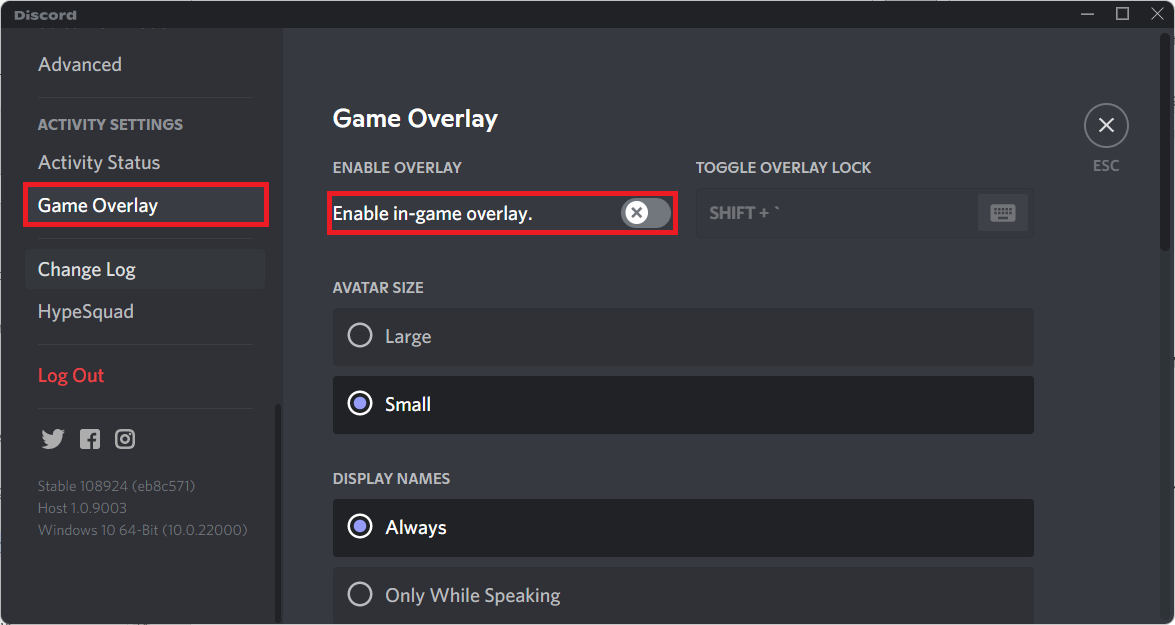
2. Scroll down the left navigation pane and click on Game Overlay under the ACTIVITY SETTINGS section.
3. Switch Off the toggle for Enable in-game overlay to disable it, as shown.
Also Read: How to Delete Discord
Option 2: Disable NVIDIA GeForce Experience Overlay
1. Open the GeForce Experience app and click on the Setting icon as highlighted below.
![]()
2. In the General tab, Switch Off the toggle for IN-GAME OVERLAY to disable it.
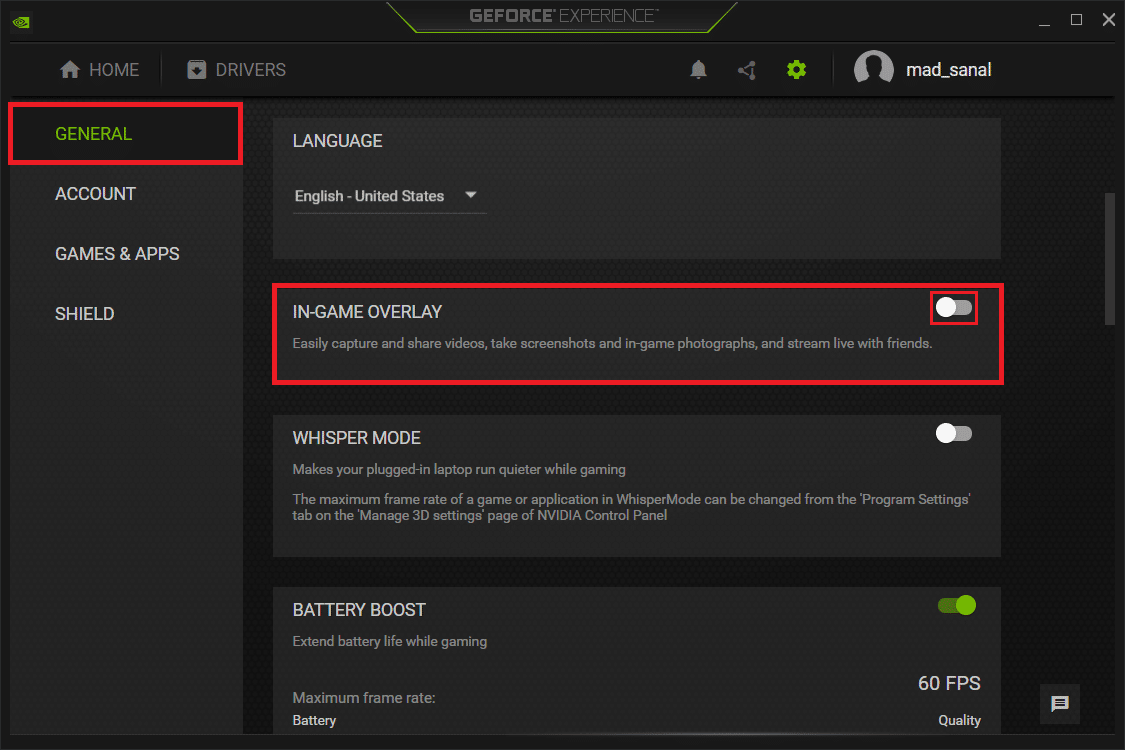
3. Restart your PC to let the changes take effect.
Also Read: What is NVIDIA Virtual Audio Device Wave Extensible?
Option 3: Disable Xbox Game Bar Overlay
1. Press Windows + I keys together to open Settings.
2. Click on Gaming settings in the left pane and Xbox Game bar in the right pane.
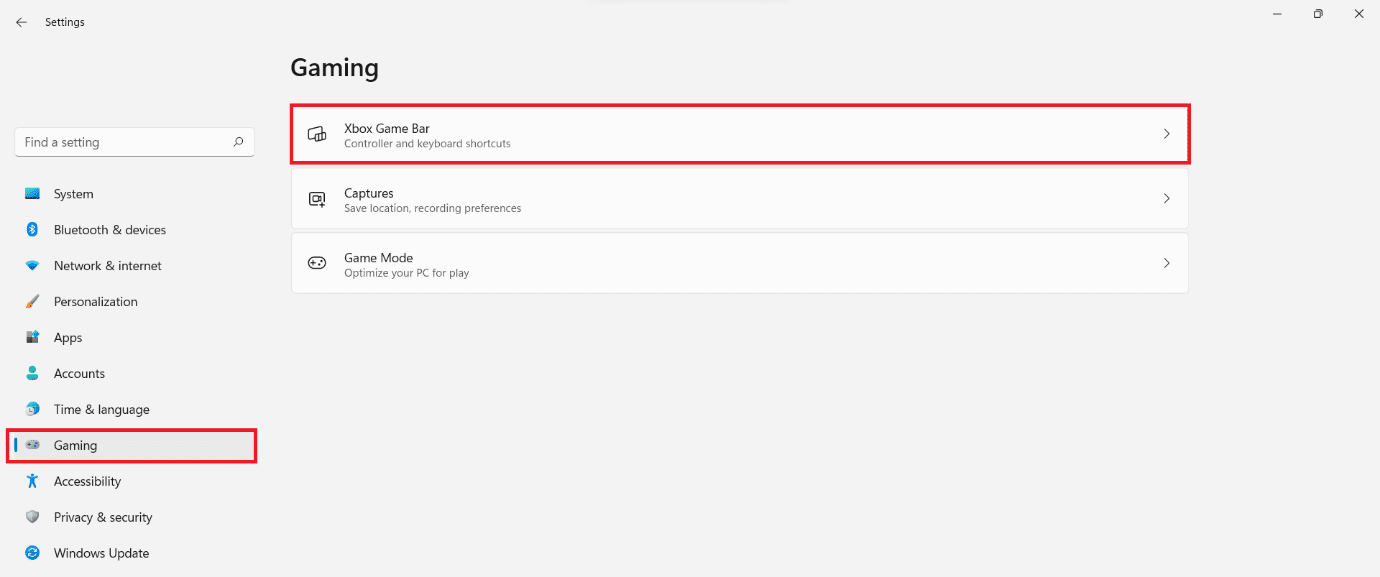
3. Switch Off the toggle to turn off the Xbox Game Bar.

Method 7: Verify Integrity of Game Files (For Steam Users)
Now, if you use Steam then, you can verify integrity of game files to fix Halo Infinite Customization not loading error in Windows 11.
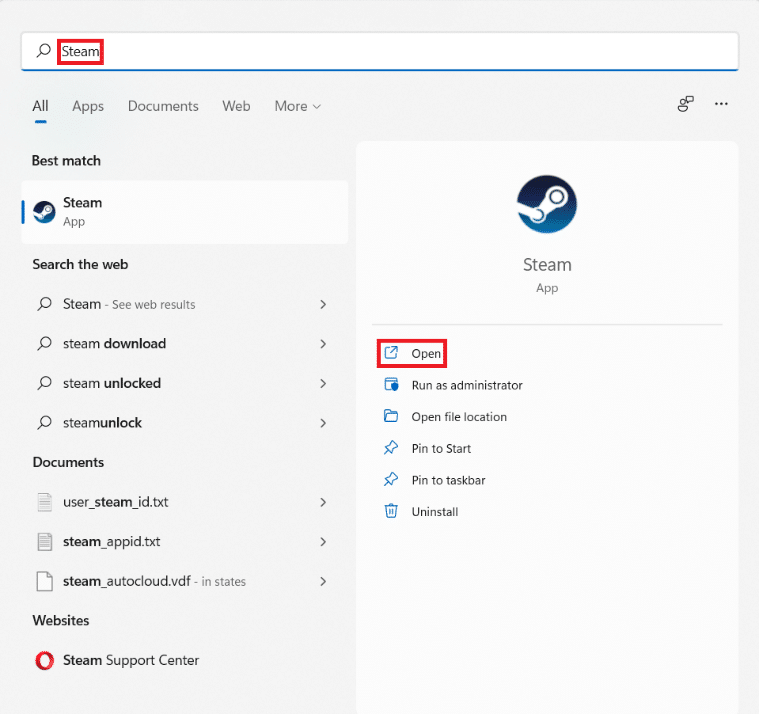
1. Click on the Search icon and type Steam, then click on Open.
2. In the Steam PC client, click on LIBRARY tab as shown.
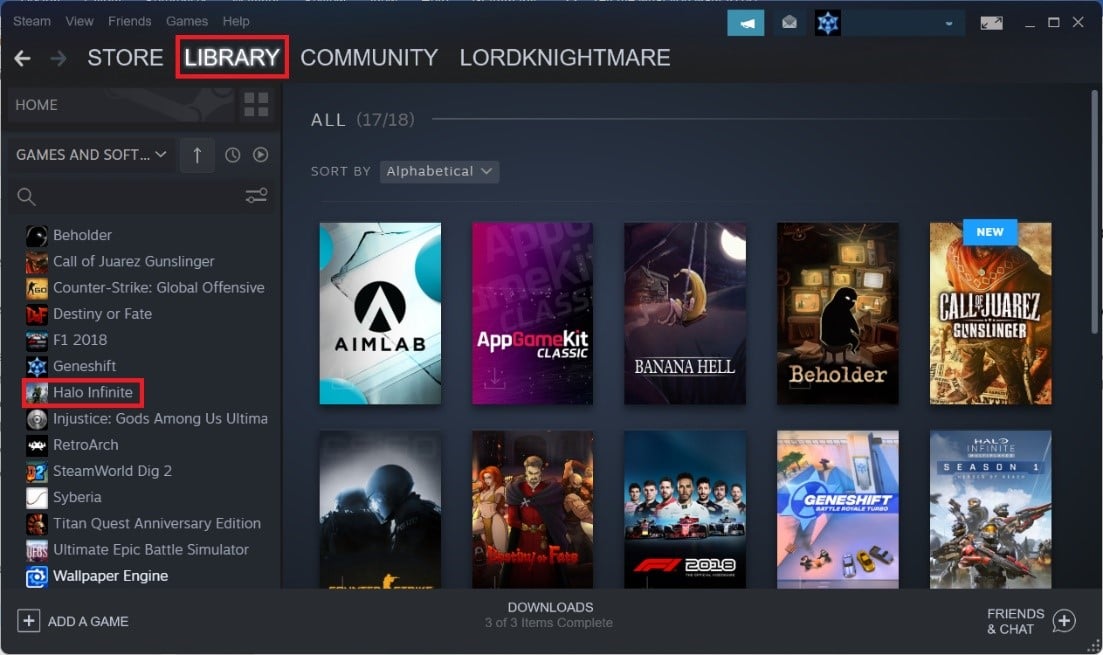
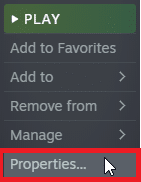
3. Search for Halo Infinite in the left pane and right-click on it to open the context menu. Click on Properties.
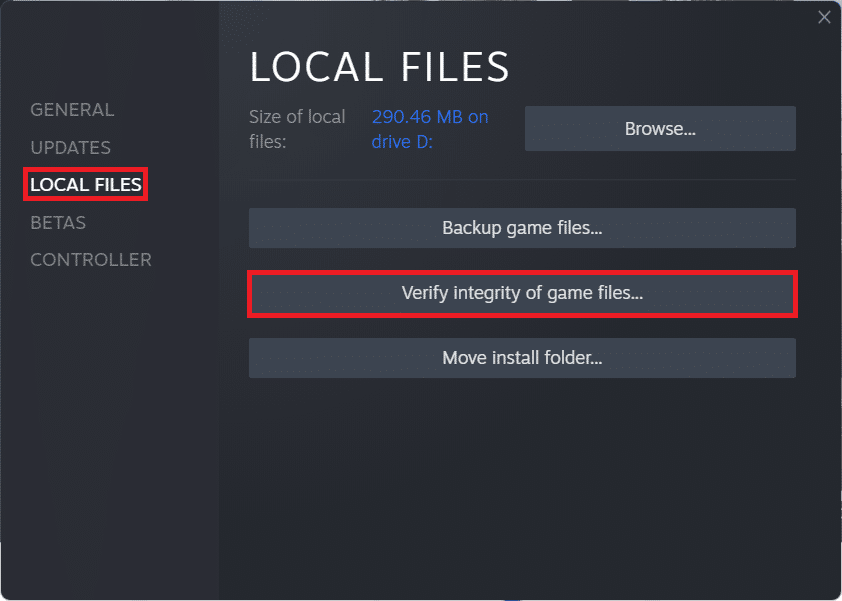
4. In the Properties window, click on LOCAL FILES in the left pane and click on Verify Integrity of game files… shown highlighted.
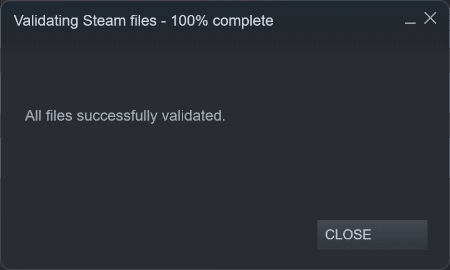
5. Steam will find discrepancies and if found, they will be replaced & rectified.
Also Read: How to Change Steam Profile Picture
Method 8: Update Halo Infinite (For Steam Users)
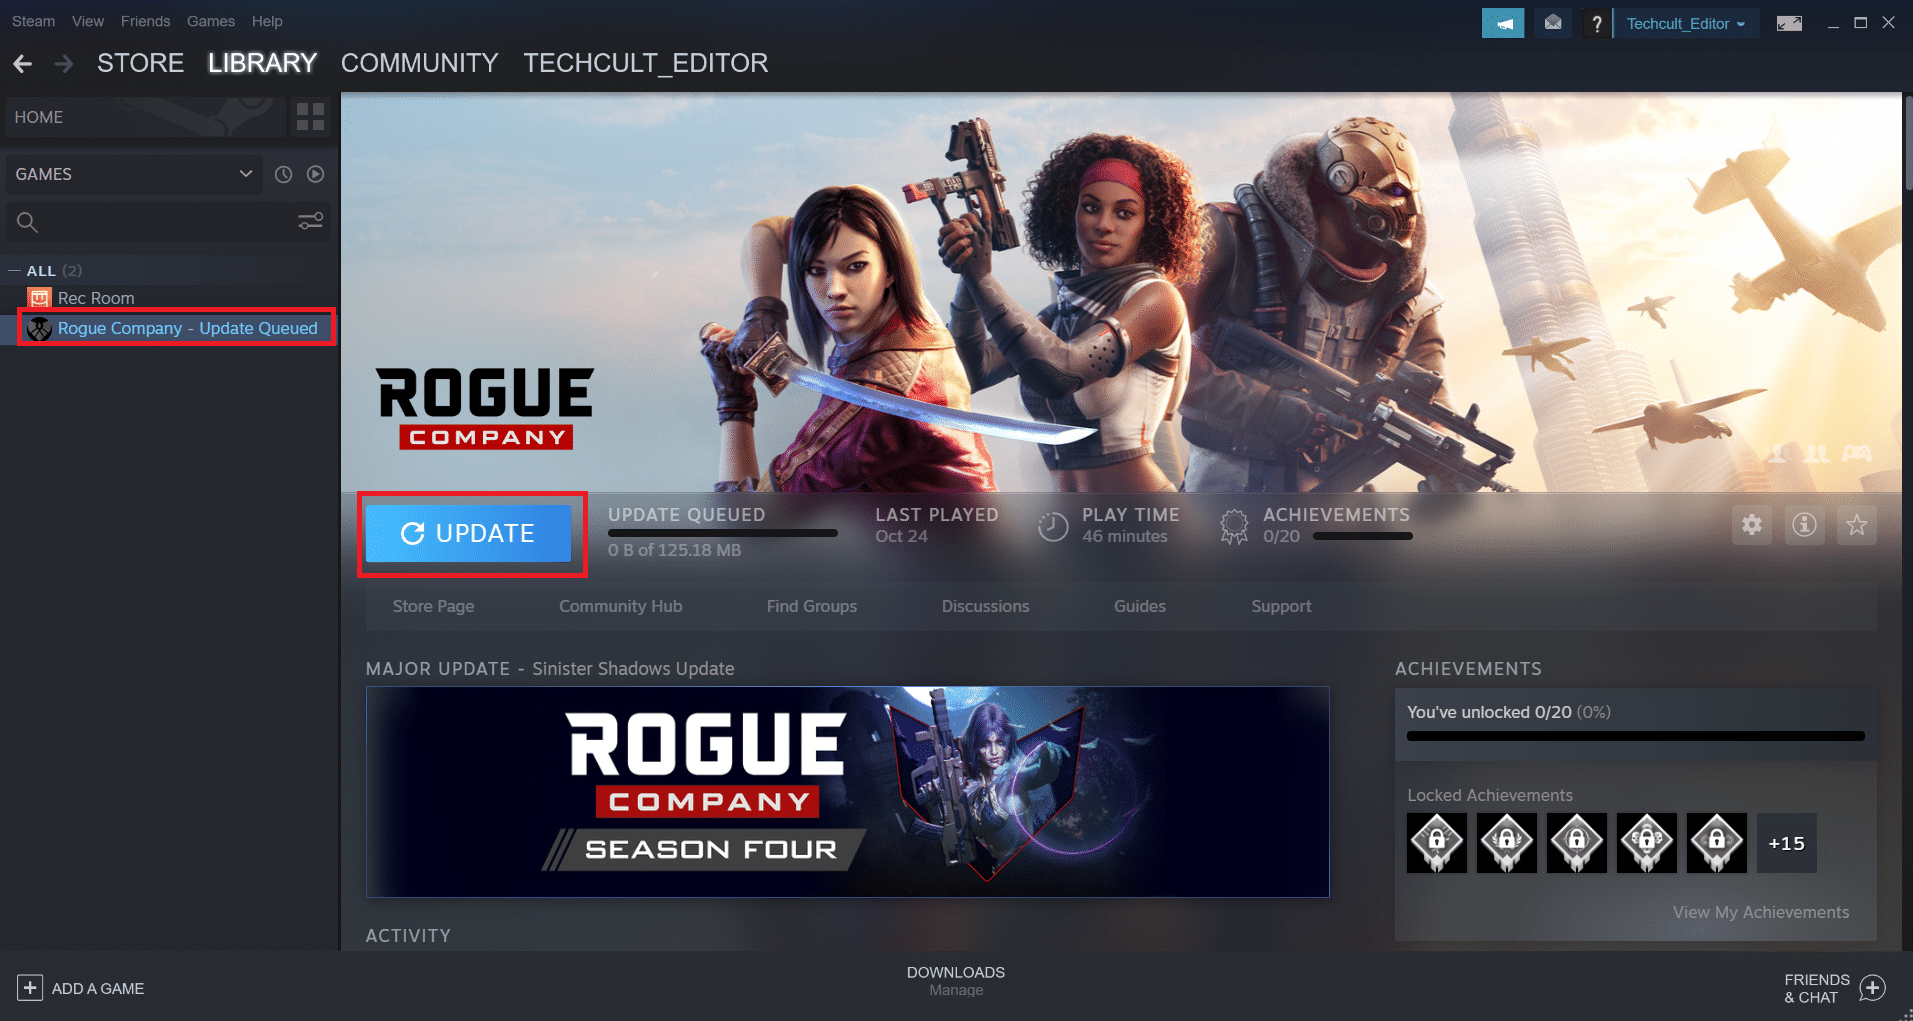
Often, there may be bugs in the game, so you should update your game to fix Halo Infinite Customization not loading in Windows 11 problem.
1. Launch the Steam client and switch to the LIBRARY tab as shown in Method 7.
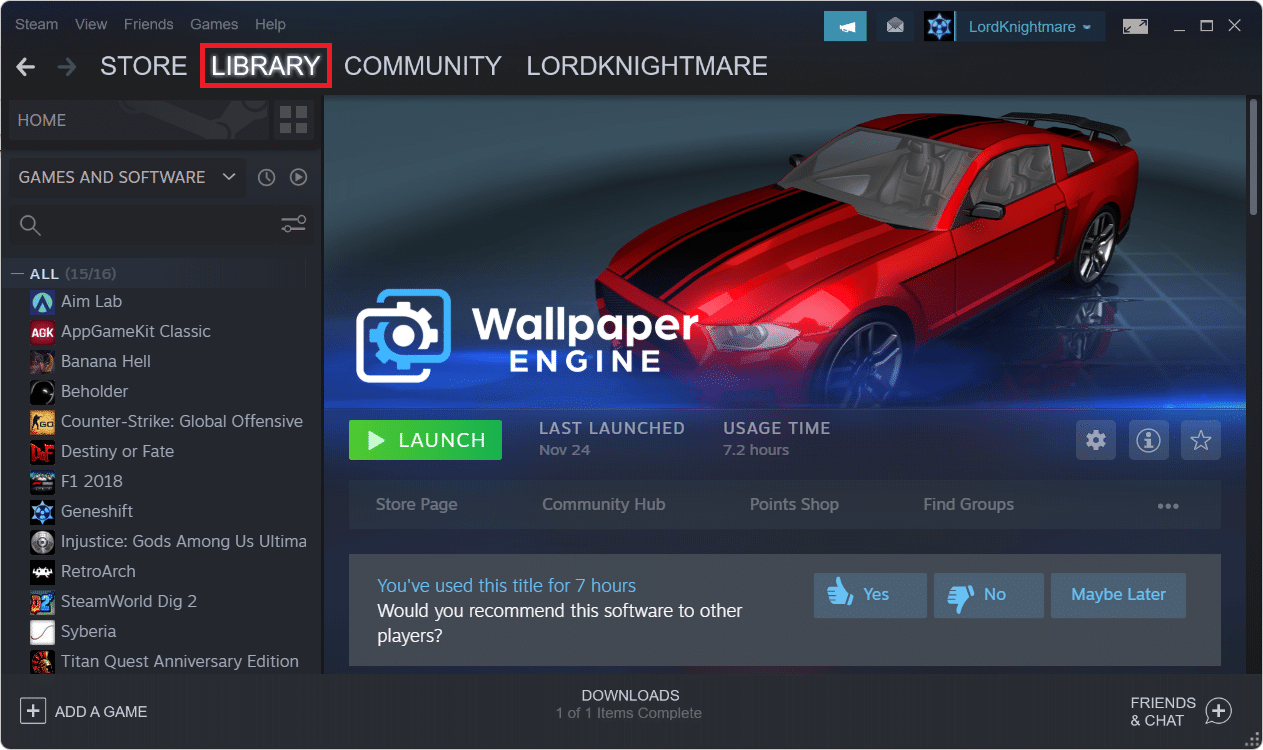
2. Then, click on Halo Infinite in the left pane.
3. If there is any update available, you will see the UPDATE option on the game page itself. Click on it.
Note: We have shown Update option for Rogue company for illustration purposes only.
Method 9: Use Xbox App Instead of Steam
Many of us use Steam as our primary client since it serves as a hub for the most popular PC games. Halo Infinite multiplayer is also accessible on Steam, though it may not be as bug-free as the Xbox app. As a result, we recommend downloading Halo Infinite multiplayer beta through the Xbox app instead.
Also Read: Fix Xbox One Headset Not Working
Method 10: Update Windows
If none of the above methods work, then update your Windows OS to fix Halo Infinite Customization not loading on Windows 11 issue.
1. Press Windows + I keys together to open Settings app.
2. Here, click on Windows Update in the left pane.
3. Then, click on Check for updates.
4. If there is any update available, click on Download & install button shown highlighted.
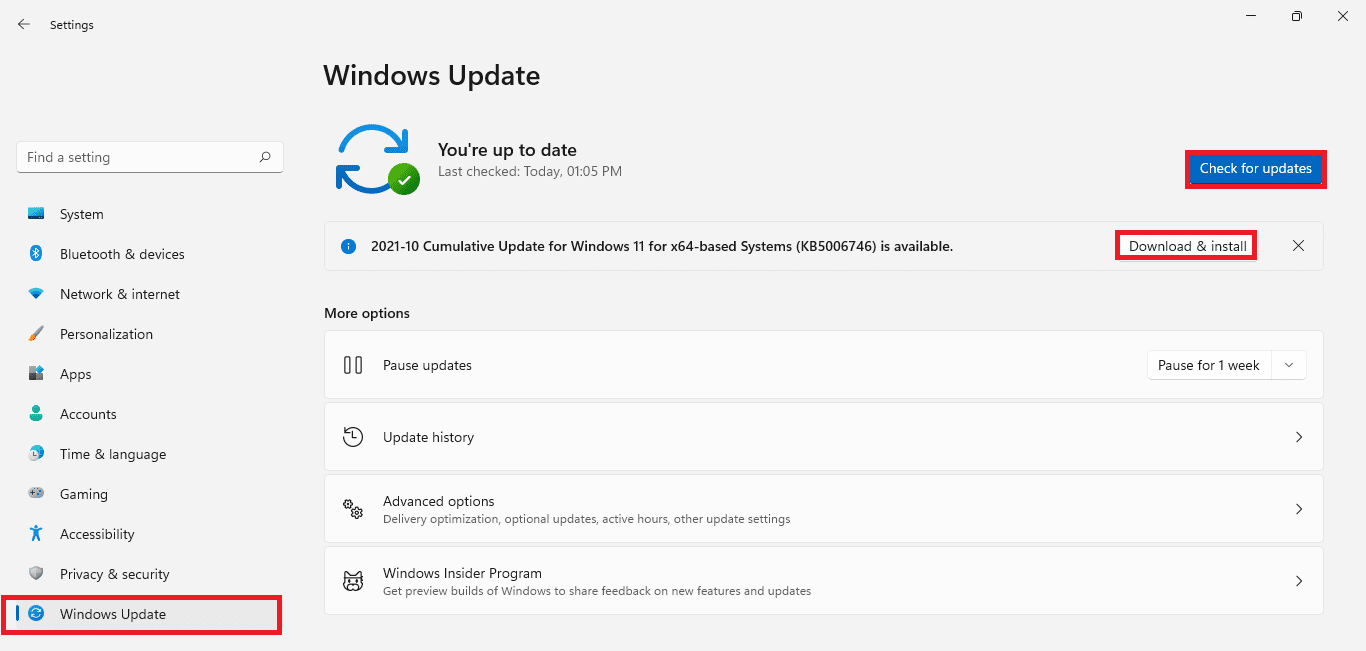
5. Wait for Windows to download and install the updates. Finally, restart your PC.
Pro Tip: System Requirements for Halo Infinite
Minimum System Requirements
| Requires a 64-bit processor and operating system | |
| Operating System | Windows 10 RS5 x64 |
| Processor | AMD Ryzen 5 1600 or Intel i5-4440 |
| Memory | 8 GB RAM |
| Graphics | AMD RX 570 or NVIDIA GTX 1050 Ti |
| DirectX | Version 12 |
| Storage Space | 50 GB available space |
Recommended System Requirements
| Requires a 64-bit processor and operating system | |
| Operating System | Windows 10 19H2 x64 |
| Processor | AMD Ryzen 7 3700X or Intel i7-9700k |
| Memory | 16 GB RAM |
| Graphics | Radeon RX 5700 XT or NVIDIA RTX 2070 |
| DirectX | Version 12 |
| Storage Space | 50 GB available space |
Recommended:
We hope the article proved to be useful on how to fix Halo Infinite Customization not loading in Windows 11. We welcome all your suggestions and queries so please write to us in the comment box down below. We would also love to hear from you about the next topic that you want us to explore next.