Fix Ntoskrnl.exe High Disk Usage

Several processes may automatically run in the background, contributing to the high disk usage issue whenever you turn on your system. In this case, your system will be very slow in performance, and you may be annoyed by some hidden System processes like Ntoskrnl.exe. Ntoskrnl.exe is an essential component of the Windows Operating System, and due to some reasons like outdated drivers, malware, corrupt Ntoskrnl.exe files, etc., this executable consumes excessive CPU or disk resources. If you are facing the same issue, then this guide will help you to resolve it. Continue reading the article to learn what is Ntoskrnl.exe and how to fix Ntoskrnl.exe high disk usage.
How to Fix Ntoskrnl.exe High Disk Usage on Windows 10
In this article, we have shown all the possible methods to fix Ntoskrnl.exe & Sedlauncher.exe high disk usage on Windows 10. But before going through the troubleshooting methods let us know what is Ntoskrnl.exe
What is Ntoskrnl.exe?
There are several system processes responsible for the proper functionality of your Operating System. The most vital integral component is Ntoskrnl.exe. It is abbreviated as Windows NT operating system kernel executable. Following are some features of Ntoskrnl.exe
- Ntoskrnl.exe controls all the memory and process-related functions.
- It adds the kernel and executive layers of the Windows NT kernel space, making it an essential component of your system.
- It is a system-protected file, and thus it might not be quickly deleted or corrupt.
- A code-named kernel provides the link between the software and hardware of your device, and Ntoskrnl.exe sends the loaded data to the processing unit like CPU to execute the task.
Hence, without Ntoskrnl.exe, you cannot perform any operations in your system. The primary functions include;
- software integrity for smooth access with the hardware
- controlling the memory usage
- providing adequate data to the components and peripherals connected to the network, and more.
Without Ntoskrnl.exe, you cannot boot up your system and will face BSOD errors. Thus, if you think of removing Ntoskrnl.exe from your system due to this issue, you will ruin your system at your own cost. Yet, there are a few troubleshooting steps to help you fix the problem, as discussed here.
This section has compiled a list of troubleshooting methods that would help you fix the issue. The troubleshooting steps are arranged according to the severity and extreme of causes. Follow them to attain the best results.
Method 1: End Outlook Processes
Sometimes, Outlook 2013 causes Ntoskrnl.exe high disk usage issues. Therefore, it is recommended to close the Outlook processes to fix the problem. If you are using another version of Outlook, try this solution to check if it is fixing the problem.
1. Launch Task Manager by hitting Ctrl + Shift + Esc keys together.
2. In the Task Manager window, click on the Processes tab.
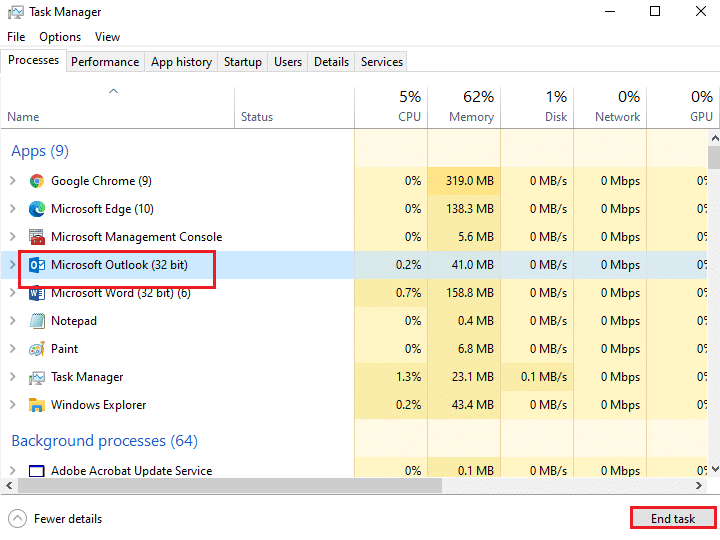
3. Now, search and select the Outlook tasks that are unnecessarily running in the background.
4. Finally, select End Task as depicted in the above picture and reboot the system.
Method 2: Remove Incompatible Programs
If you wish to permanently delete the program or face issues during uninstallation, using Program Install and Uninstall troubleshooter software will help. The software checks the registry for Patch related problems. Here are a few steps to uninstall them from your system completely by using software rather than deleting them by normal Control Panel/Settings steps.
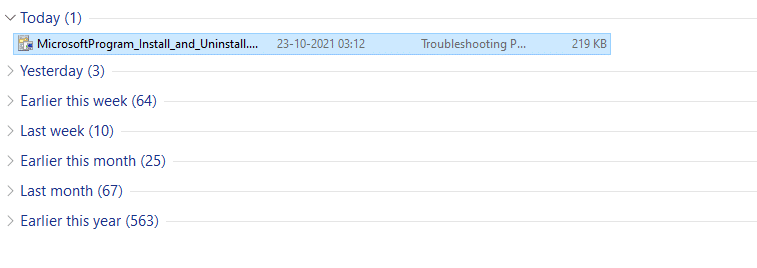
1. Download the Microsoft Program Install and Uninstall Troubleshooter program.
2. Now, navigate to My downloads and double-click on the installed file.
Program Install and Uninstall troubleshooter software will solve all the difficulties you face while uninstalling a program.
3. Now, click on Next and follow the onscreen instructions to install the downloaded file.
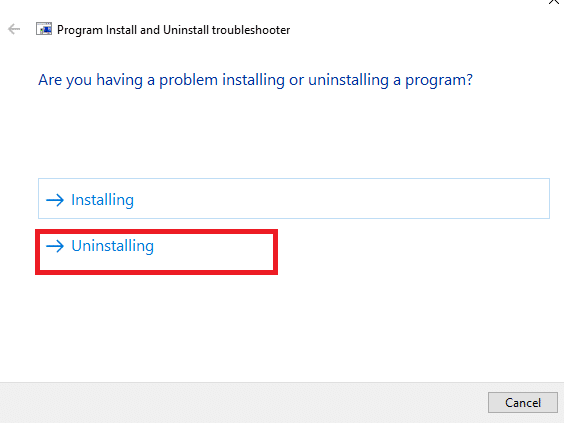
4. Here, select Uninstalling under the prompt, Are you having a problem installing or uninstalling a program?
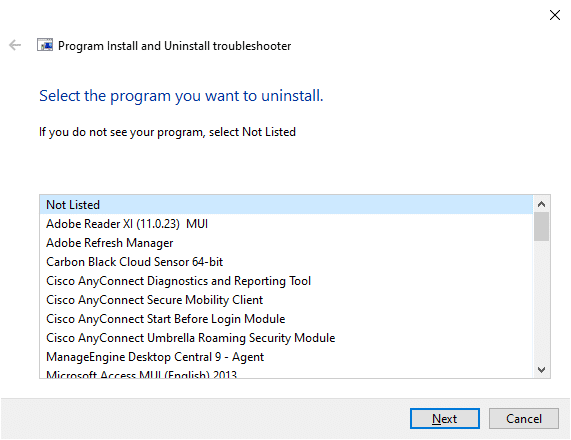
6. Next, select the program you want to uninstall. If you do not see your program, select Not Listed and click Next. Refer to the pic.
7A. If you can find your program now, follow the onscreen instructions to uninstall the software.
7B. Still, if you cannot find your program, you will be asked for the product code. You can find your product code in the property table of the MSI file. Access the code and follow the onscreen instructions to uninstall the software. Once done, check if you have fixed the issue.
Also Read: Fix WSAPPX High Disk Usage in Windows 10
Method 3: Disable Browser Hardware Acceleration
Sometimes, web browsers may run in the background, and this will consume the CPU resources. Hence, it is better to disable the hardware acceleration in the browser and check for the issue. Here, Google Chrome is taken as an example for demonstration.
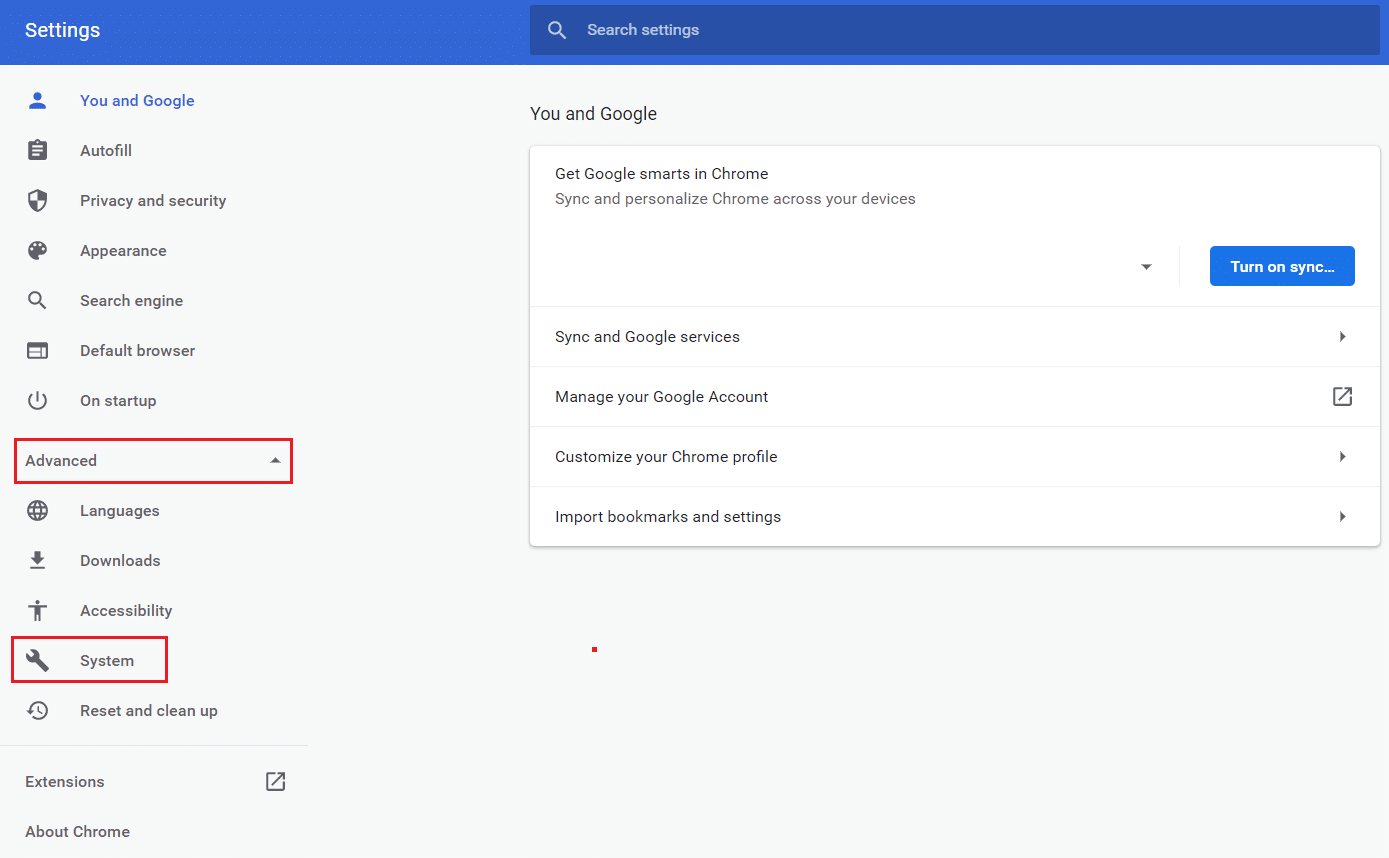
1. Launch your web browser (e.g. Google Chrome)and click on the three-dotted icon present at the top right corner.
2. Now, click on Settings as depicted in the below picture.
![]()
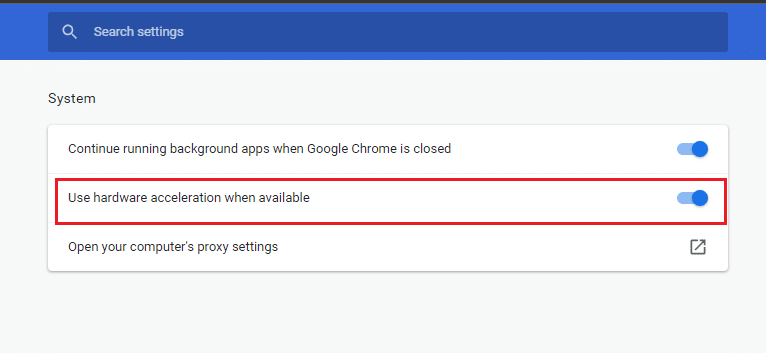
3. Now, expand the Advanced section in the left pane and click on System, as shown.
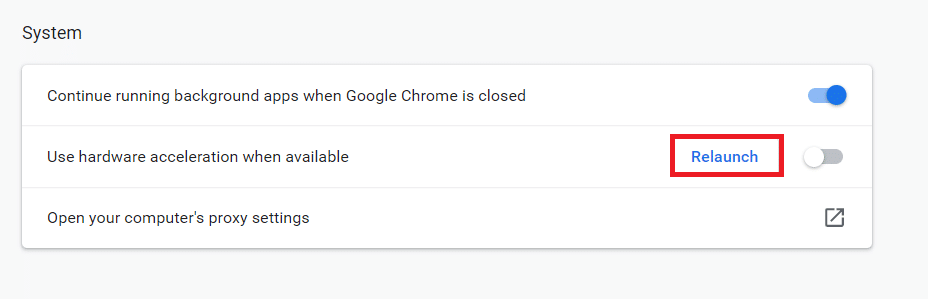
4. Here, switch Off the toggle for Use hardware acceleration when available option.
5. Then, click on the Relaunch option.
Method 4: Minimize Processor Power Management
Sometimes, you can fix the Ntoskrnl.exe high disk usage issue by disabling the minimizing Processor power management power option as discussed below.
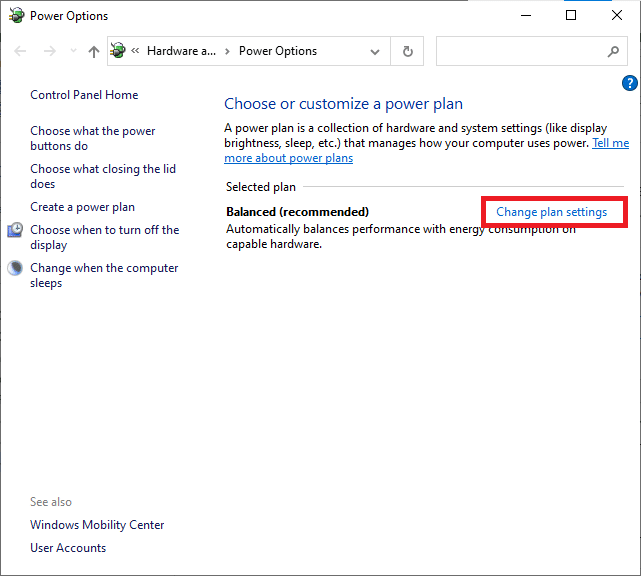
1. Press Windows + R keys together and type powercfg.cpl then hit enter.

2. In the Power Options window, select the Change plan settings option under your current action plan, as highlighted below.
Note: You can also type edit power plan in the search bar to open the Edit Plan Settings window.
Note: If you have multiple power plans active in your system, repeat the same procedure for all the multiple active plans.
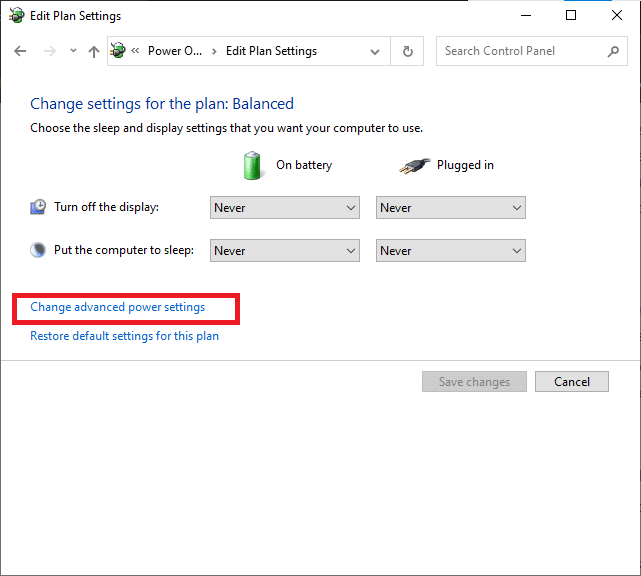
3. In the Edit Plan Settings window, click on Change advanced power settings. Refer to the pic.
4. Here, in the Advanced settings menu, expand the Processor power management option by clicking on the + icon.
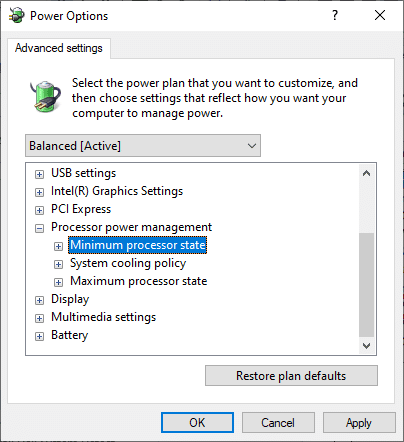
5. Now, again, expand the Minimum processor state by clicking on the + icon as you did in the previous step.
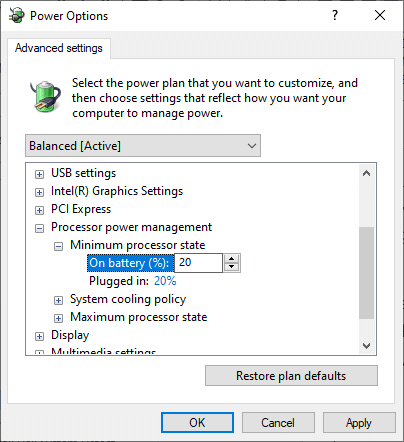
6. Here, click on On battery and change the % value between 20% to 30%. Refer to the above picture.
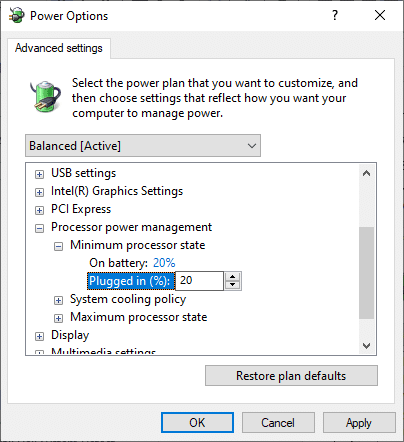
7. Now, click on Plugged in and change the % value between 20% to 30%. List as shown below.
8. Finally, click on Apply and OK to save the changes.
Restart your system and check if the issue is solved now.
Also Read: Fix .NET Runtime Optimization Service High CPU Usage
Method 5: Disable Windows Search Service
The Windows Search Service will index faster search results when enabled in your system. You can quickly search for any files, folders, applications, or programs by their name and filter them by results. But it may contribute to the slow performance of your CPU, and it is recommended to be turned off when needed. Turning off the feature will not affect the OS in any way. Here is how to do it.
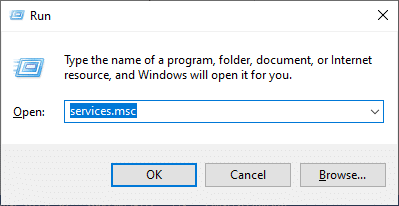
1. Launch the Run dialog box by hitting Windows + R keys together.
2. Type services.msc as follows and click OK to open the Services window.

3. Now, scroll down the screen and right-click on Windows Search Service, and select Properties.
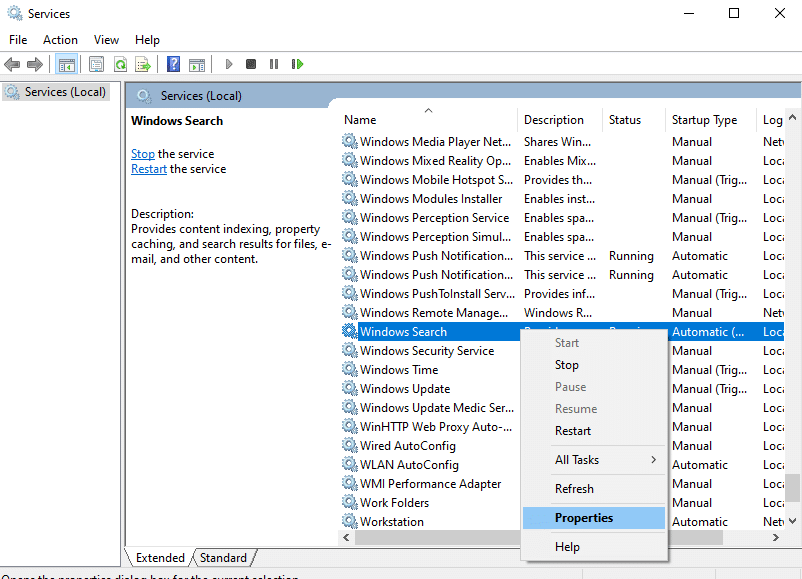
4. Here, in the General tab, set the Startup type to Disabled from the drop-down menu as highlighted below.
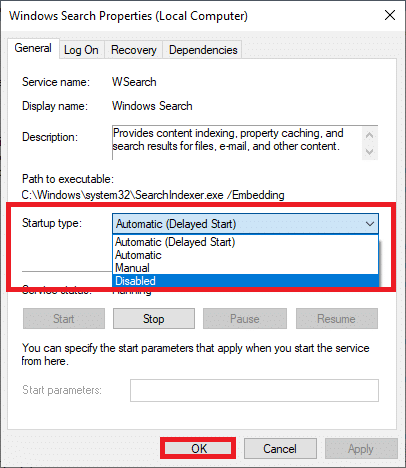
5. Finally, click OK to save the changes.
Now, the Ntoskrnl.exe high disk usage issue will be fixed.
Method 6: Disable Background Intelligent Transfer Service
The Background Intelligent Transfer Service enables a smoother transfer of files between systems. They are responsible for system assistance during background downloads or uploads. Yet, they consume high CPU resources contributing to the issue. Disable them manually by following the below-mentioned steps.
1. Open the Run dialog box.
2. Type services.msc and hit the Enter key.
3. Now, scroll down the screen, right-click on Background Intelligent Transfer Service, and select Properties.
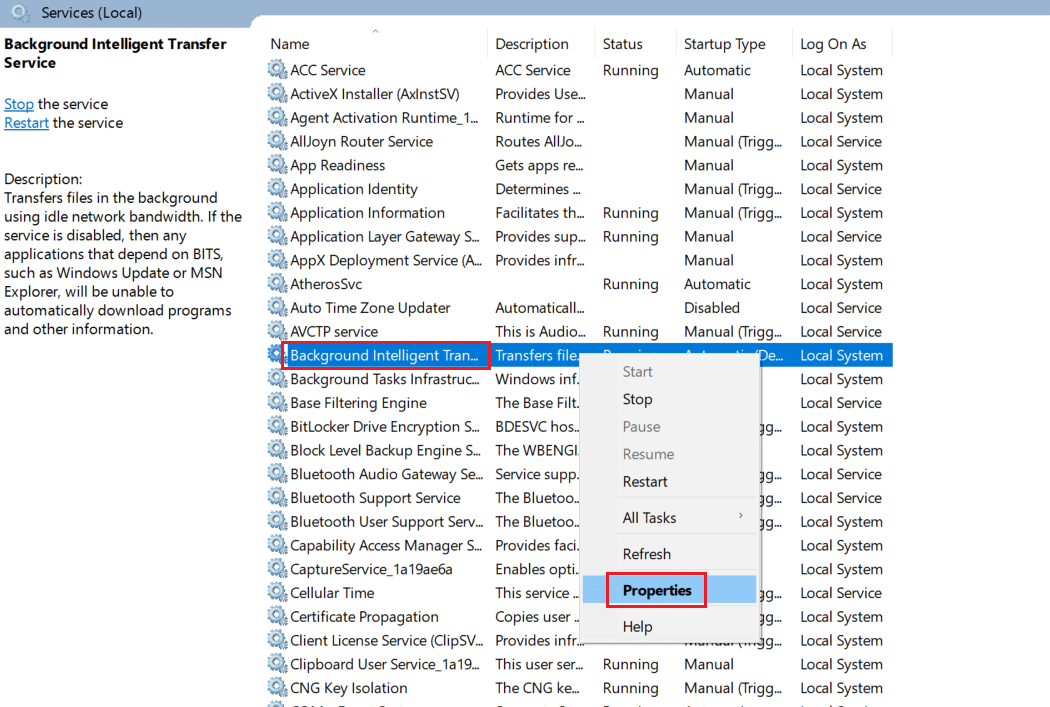
4. Here, in the General tab, set the Startup type to Disabled from the drop-down menu as highlighted below.
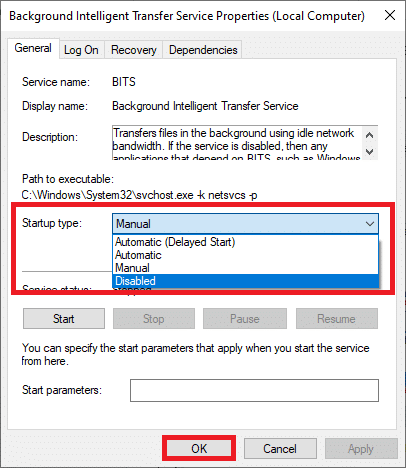
5. Finally, click OK to save the changes.
Now check if the issue is fixed or not.
Also Read: Fix DISM Host Servicing Process High CPU Usage
Method 7: Disable Runtime Broker Process
The runtime Broker process helps to manage permissions for applications from Microsoft Store. It consumes only Megabytes of memory, yet it consumes Gigabytes of energy for a few incompatible applications, thus causing the disk usage issue. You can disable the Runtime Broker process by following any one of the methods discussed below.
Option 1: Through Settings
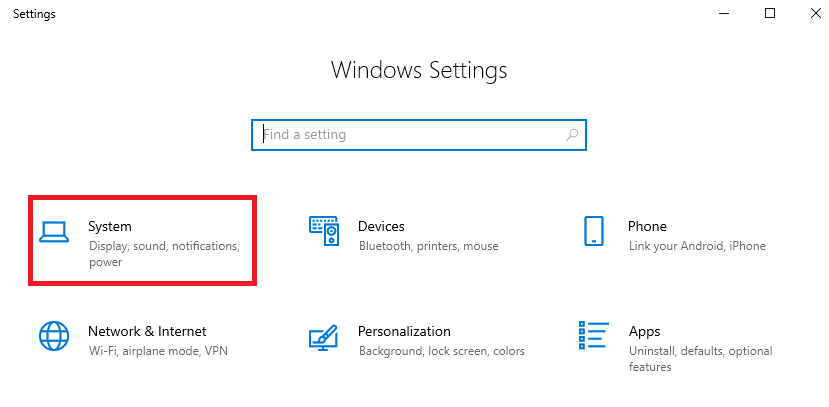
1. Press and hold Windows + I key together to open Settings.
2. Now, click on System as shown.
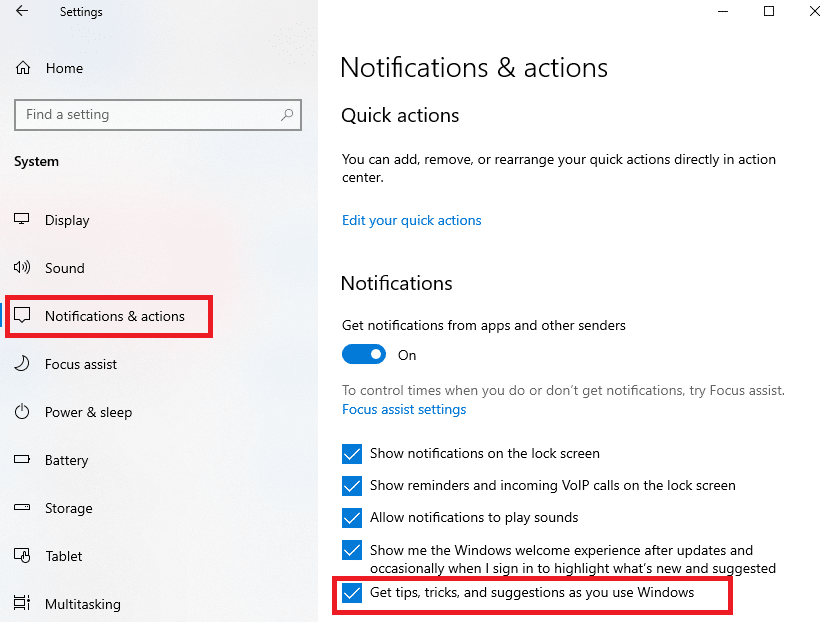
3. Now, select the Notifications & actions menu and uncheck the following options, if any.
- Show me tips about Windows
- Get tips, tricks, and suggestions as you use Windows
4. Finally, restart your PC and check if you have fixed the issue.
Option 2: Through Registry Changes
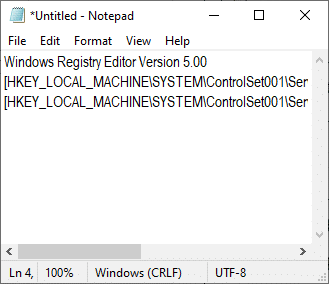
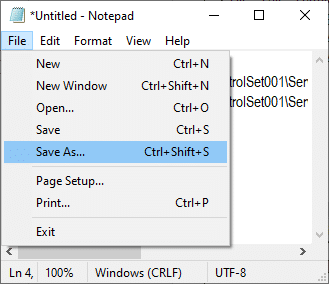
1. Open Notepad and paste the following keys into it.
Windows Registry Editor Version 5.00
[HKEY_LOCAL_MACHINESYSTEMControlSet001ServicesTimeBroker]
“Start”=dword:00000003
[HKEY_LOCAL_MACHINESYSTEMControlSet001ServicesSysMain]
“DisplayName”=”Superfetch”
“Start”=dword:00000003
2. Now, go to File and save the file as (name_you_like).reg
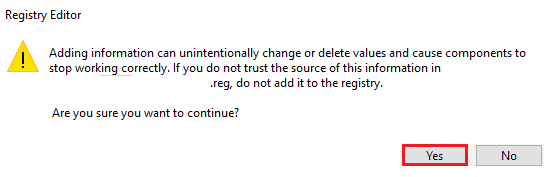
3. Now, navigate to the location where you have saved the file right-click on it, and choose Run as administrator.
4. Now, confirm the registry changes by clicking on Yes and rebooting your system.
Method 8: Update Device Drivers
If the current drivers in your system are incompatible/outdated with Ntoskrnl.exe files, then you will face the issue. Therefore, you are advised to update your device and drivers to prevent the said problem.
Note: In this guide, we have compiled steps to update a common Display Driver. You are advised to update all the drivers that are out of date.
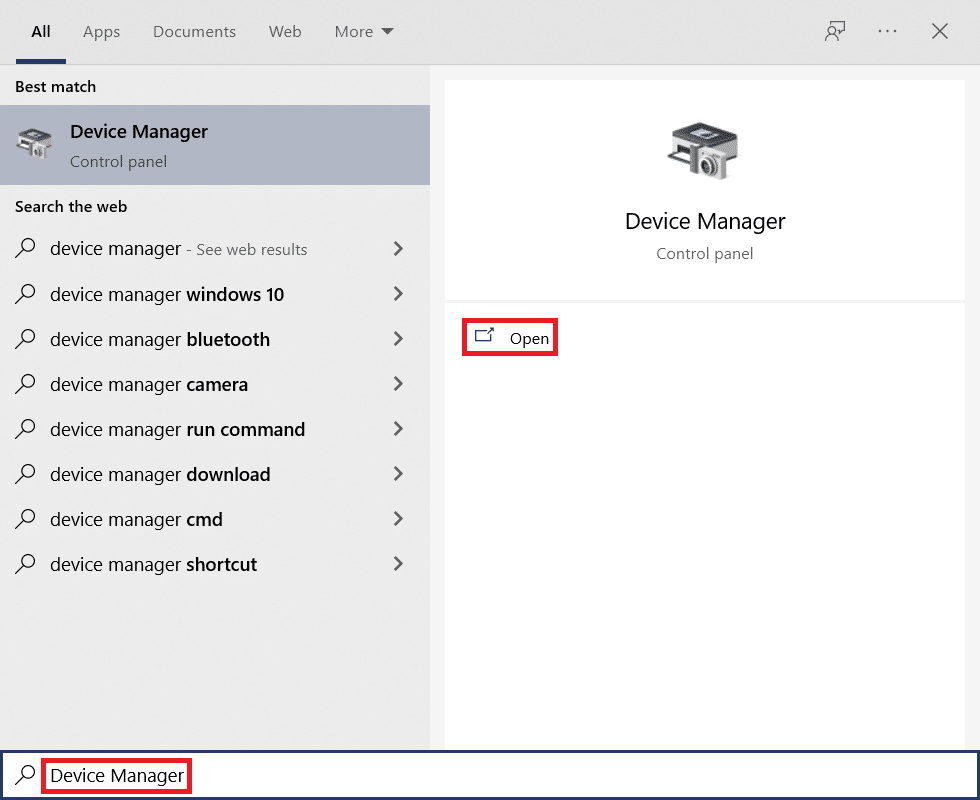
1. Type Device Manager in the Windows 10 search menu.
2. You will see the Display adapters on the main panel; double click on it to expand it. Check the screenshot for reference.
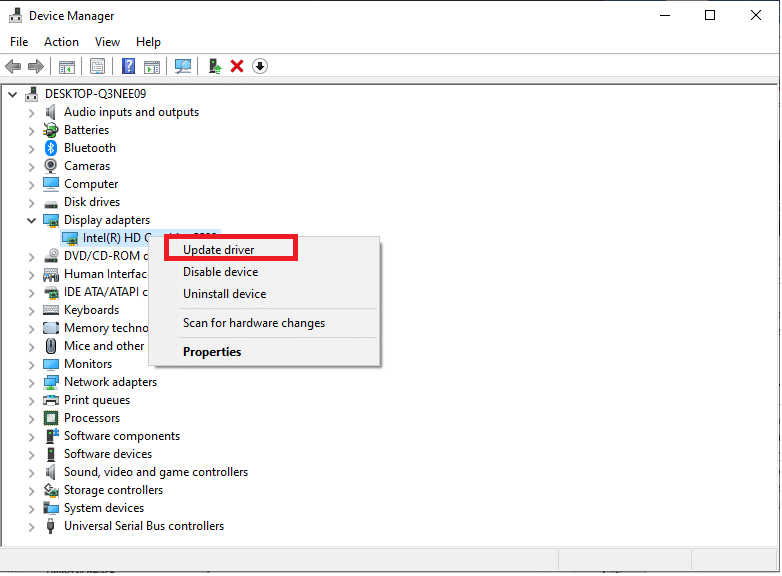
3. Now, right-click on your video card driver (say Intel(R) HD Graphics 620) and click Update driver. Refer to the above picture.
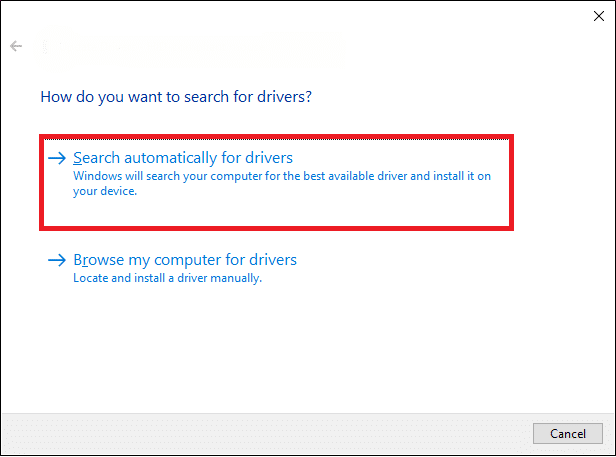
4. Now, click on Search automatically for drivers options to locate and install a driver automatically.
5A. Now, the drivers will be updated to the latest version if they are not updated.
5B. If they are already in an updated stage, the screen displays the following message, The best drivers for your device are already installed.
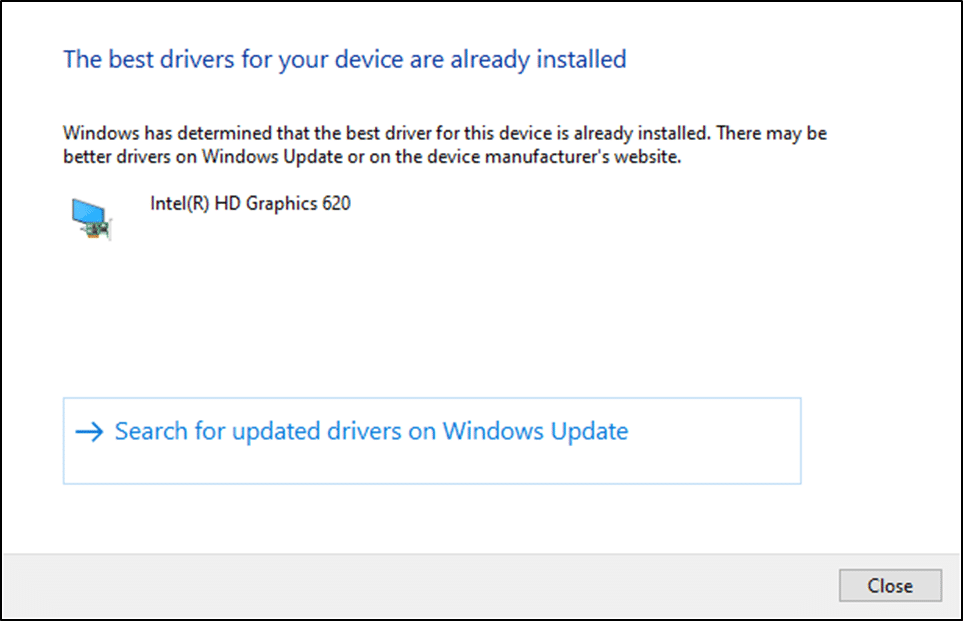
6. Click on Close to exit the window.
Restart the computer, and check if you have fixed the issue on your system.
Also Read: How to Fix hkcmd High CPU Usage
Method 9: Disable Disk Drive (If Applicable)
If updating drivers does not fix, you can disable the disk drivers (DVD) since they consume high resources. Then, follow the below-mentioned steps to implement the same.
1. Launch the Device Manager using the steps mentioned above and expand Disk drives by double-clicking on it.
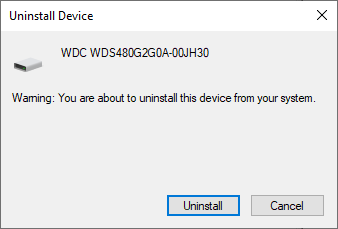
2. Now, right-click on the DVD driver and select Uninstall device.

3. Now, a warning prompt will be displayed on the screen. Confirm the prompt by clicking Uninstall.
Finally, reboot your system and check if the issue is resolved.
Now, here are some additional fixes to solve Ntoskrnl.exe high CPU usage issue. First, try the below troubleshooting methods to fix the problem.
Method 10: Delete Incompatible Windows Updates
Few problematic recent updates in your system might cause Ntoskrnl.exe high disk usage. You can manually turn them off by following the below-mentioned steps.
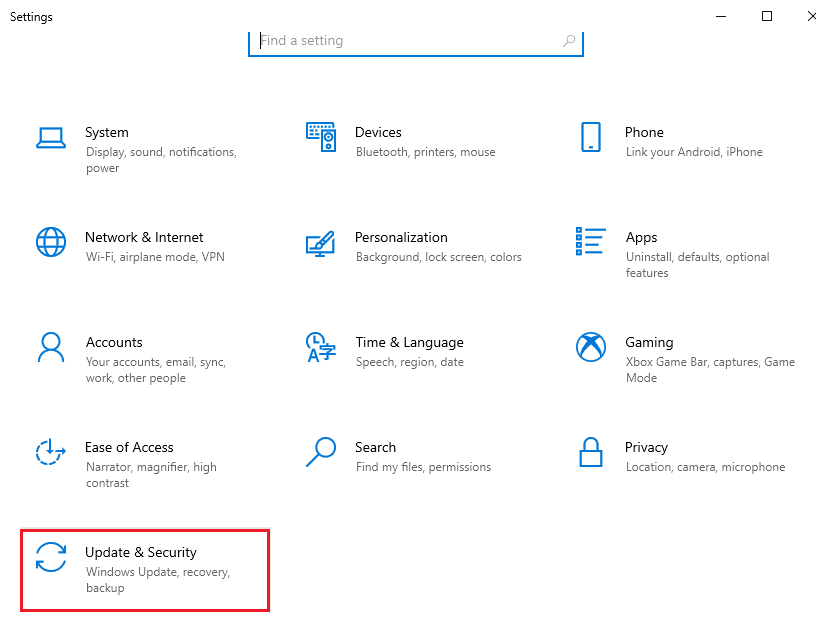
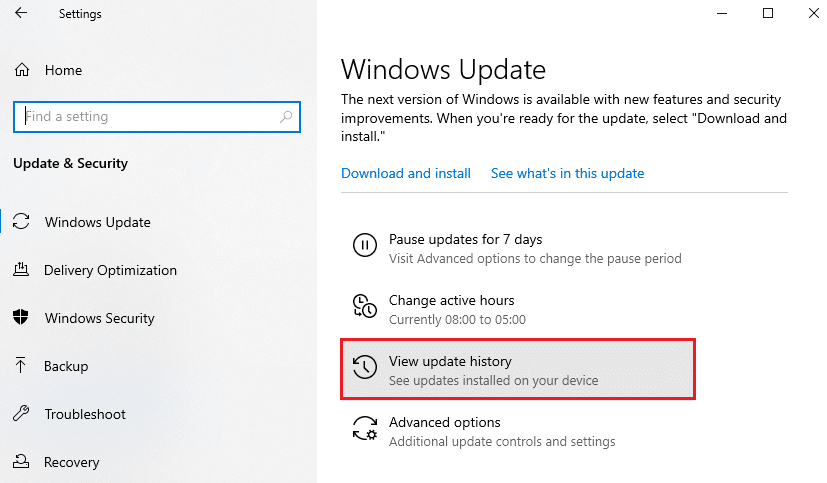
1. Open Settings by pressing Windows + I key together.
2. Now, click on Update & security as shown.
3. Now, click on View update history in the right pane.
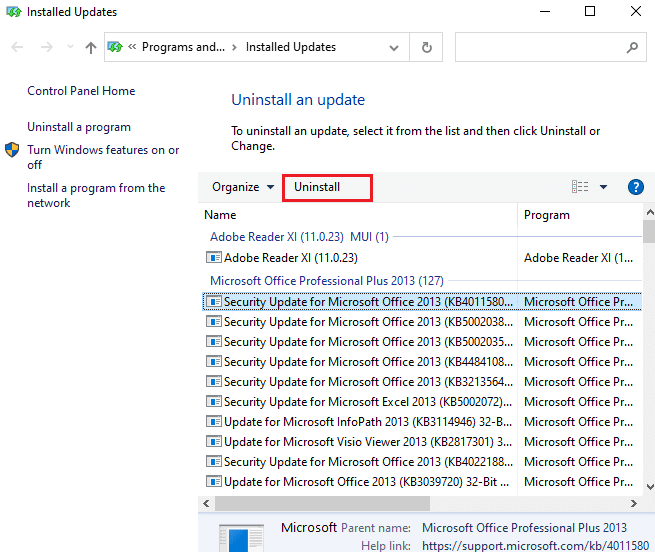
4. Here, click on Uninstall updates as depicted.

5. Here, select the most recent update and click on Uninstall option as highlighted.
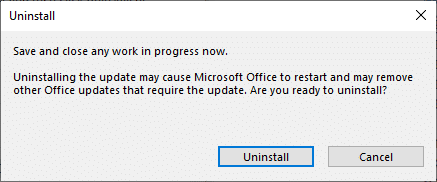
6. Here, click on Uninstall to confirm the prompt as shown.
7. Finally, wait for the process to be completed and reboot your system.
Also Read: How to Fix High CPU Usage on Windows 10
Method 11: Disable Automatic Defragmentation
Defragmentation will rearrange your data on the hard disk for quicker access. It is enabled by default in Windows 10 and may cause this high disk usage issue. Disable them manually by following the below-mentioned steps. In addition, users are advised to follow any one of the following options to disable automatic defragmentation to fix Ntoskrnl.exe high disk usage.
Option 1: Use Defragment and Optimize Drives
Follow these steps to use defragment and optimize drives app.
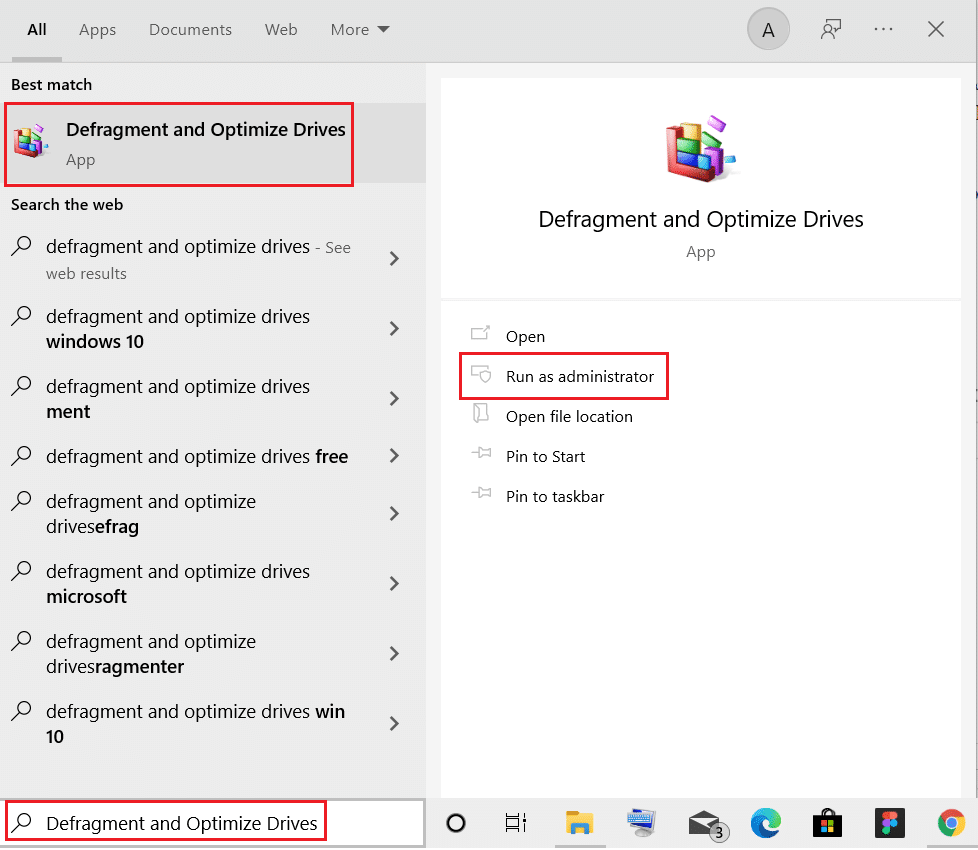
1. Type Defragment and Optimize Drives in the Search menu and open the best results.
2. Now, click on Change settings as highlighted below.
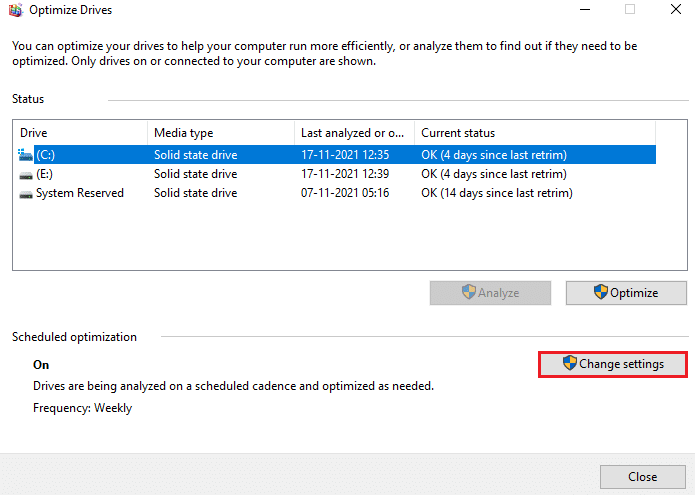
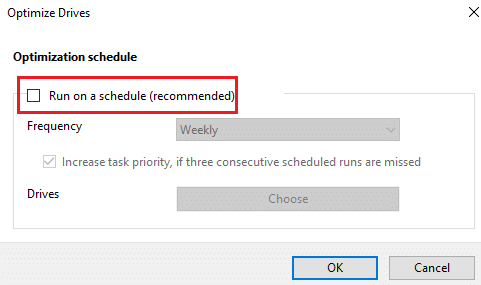
3. Here, uncheck the option, Run on a schedule (recommended), and click on OK to save the changes.
Option 2: Use Task Scheduler
You can also disable automatic defragmentation using Task Scheduler to fix Ntoskrnl.exe high disk usage as follows.
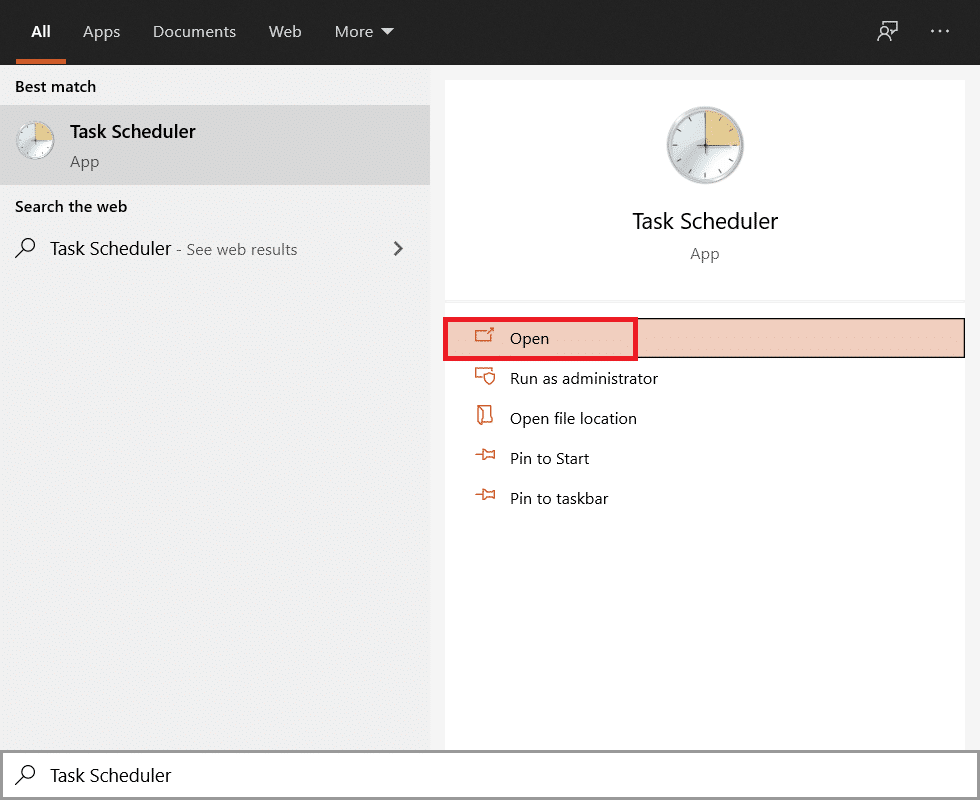
1. Type Task Scheduler in the search menu and open the best results.
2. Now, expand Task Scheduler Library in the left pane and navigate to the Microsoft >Windows > Defrag folder.
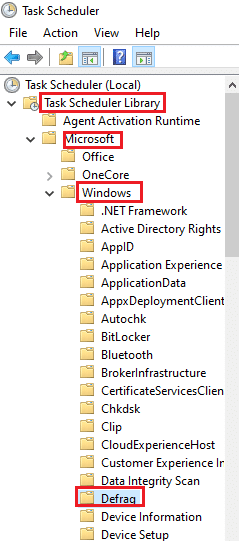
3. Now, in the middle pane, right-click on ScheduledDefrag and select the option Disable as shown.
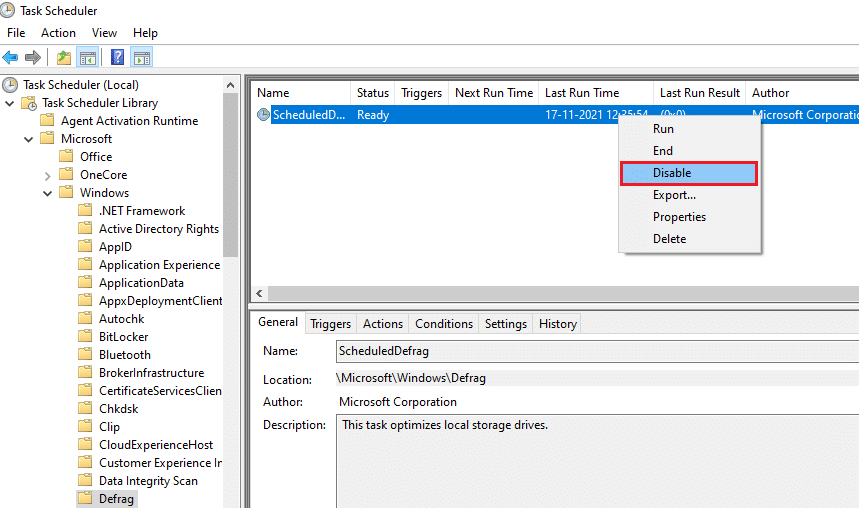
Reboot your system and check if you have fixed the issue.
Option 3: Use Command Prompt
You can also disable automatic defragmentation by using command lines, as explained below.
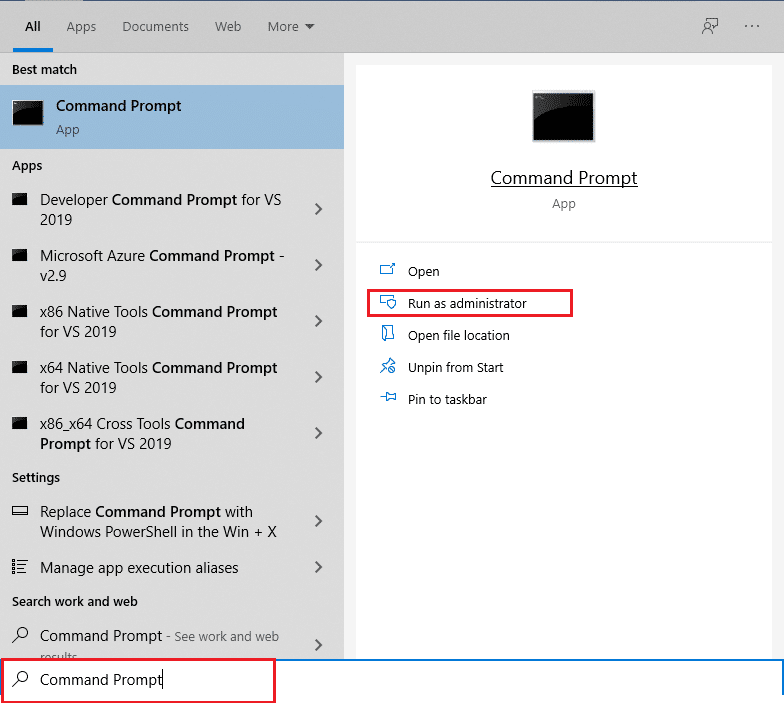
1. Hit the Windows key, type Command Prompt and click on Run as administrator.
2. Now, type the following command in the command window and hit Enter.
schtasks /Delete /TN “MicrosoftWindowsDefragScheduledDefrag” /F
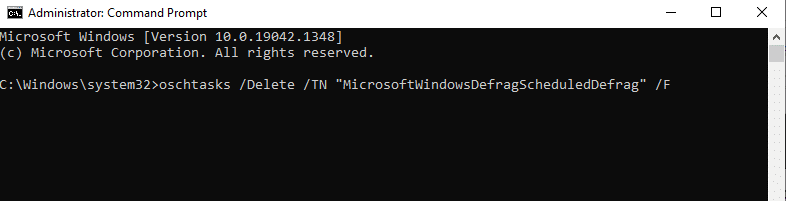
Now, your system will not perform any automatic defragmentation anymore.
Method 12: Disable Antivirus Temporarily (Not Recommended)
Follow the given steps to disable your antivirus temporarily to fix Ntoskrnl.exe high disk usage.
Note: We do not recommend keeping your antivirus disabled as antivirus protects your PC from malware.
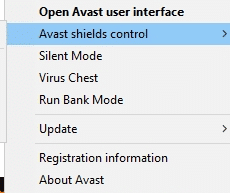
1. Navigate to the Antivirus icon in the Taskbar and right-click on it.
![]()
2. Now, select the Avast shields control option.
3. Choose any one of the given options according to your convenience:
- Disable for 10 minutes
- Disable for 1 hour
- Disable until computer is restarted
- Disable permanently
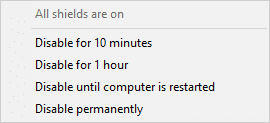
4. Confirm the prompt displayed on the screen and reboot your PC.
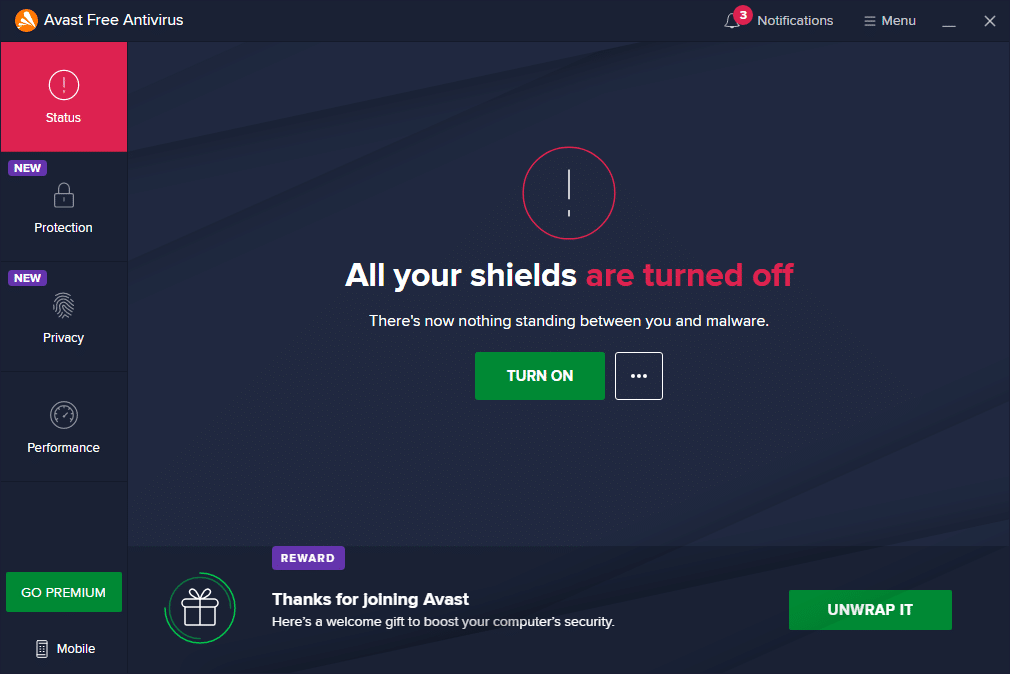
Note: You can go to the Antivirus menu and click on TURN ON to reactivate the shield.
Also Read: How Much RAM Is Enough
Method 13: Uninstall Dell System Detect Software (For Dell PC)
Many users have reported that Dell System Detect software interferes with ntoskrnl.exe files causing the issue. Uninstall them by following the below-mentioned steps to fix Ntoskrnl.exe high disk usage problem.
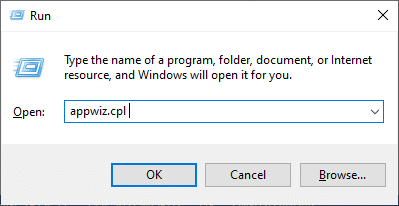
1. You can launch the Run dialog box by going to the search menu and typing Run.
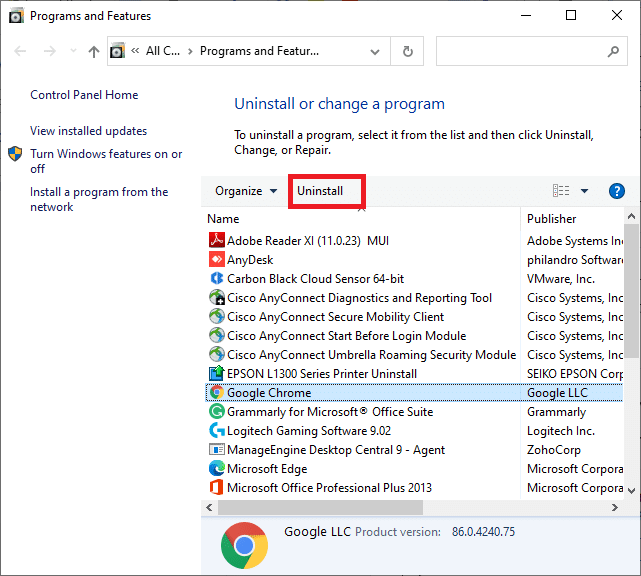
2. Type appwiz.cpl as follows and click OK.
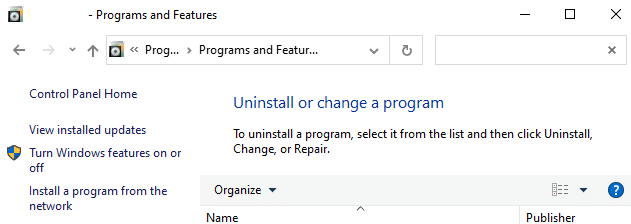
3. The Programs and Features utility will be opened up and now search for Dell System Detect.
4. Now, click on Dell System Detect and select Uninstall option.
Note: We have shown Google Chrome as an example.
5. Now, confirm the prompt Are you sure want to uninstall Dell System Detect? by clicking Yes.
6. Restart the computer once you complete all the steps mentioned above. Check if you have fixed the issue.
Recommended:
We hope that this guide was helpful, and you could fix Ntoskrnl.exe high disk usage issue. Let us know which method worked for you the best. Also, if you have any queries/suggestions regarding this article, then feel free to drop them in the comments section.