Many users are reporting an issue where Windows 10 will not shut down completely; instead, they have to use the power button to shut down their PC completely. This seems to another crucial issue with Windows 10 as the user who has recently upgraded from an earlier version of OS to Windows 10 seems to be facing this issue.
So users who recently upgraded to Windows 10 are not able to shut down their computer properly as if they try to shut down, only the screen goes blank. However, the system is still ON as the keyboard lights are still visible, Wifi lights are also ON, and in short, the computer isn’t shut down properly. The only way to shut down is to press the power button for 5-10 seconds to force shut down the system and then turn it ON again.
The main cause of this issue seems to be a feature of Windows 10 called Fast Startup. Fast Startup helps your computer start faster than the normal startup. It basically combines the hibernation and shutdown properties to give you a faster boot-up experience. Fast startup saves some of your computer’s system files to a hibernation file (hiberfil.sys) when you shut down your PC, and when you turn ON your system, Windows will use these saved files from hibernation file to boot extremely fast.
In case you are suffering from the issue of not being able to shut down your computer completely. It seems like Fast Startup uses up resources such as RAM and processor to save files in the hibernation file and is not letting go of these resources even after the computer has been shut down. So without wasting any time let’s see how to actually Fix Windows 10 will not shut down completely issue with the below-listed troubleshooting guide.
Fix Windows 10 will not shut down completely
Make sure to create a restore point just in case something goes wrong.
Method 1: Disable Fast Startup
1. Press Windows Key + R then type powercfg.cpl and hit enter to open Power Options.
2. Click on Choose what the power buttons do in the top-left column.

3. Next, click on Change settings that are currently unavailable.
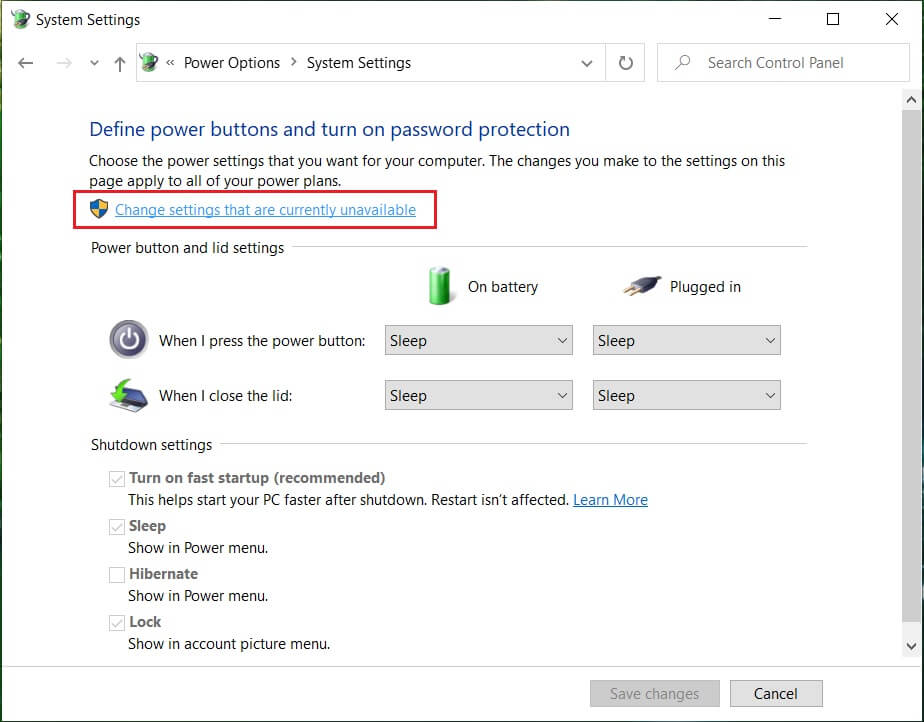
4. Uncheck Turn on Fast startup under Shutdown settings.
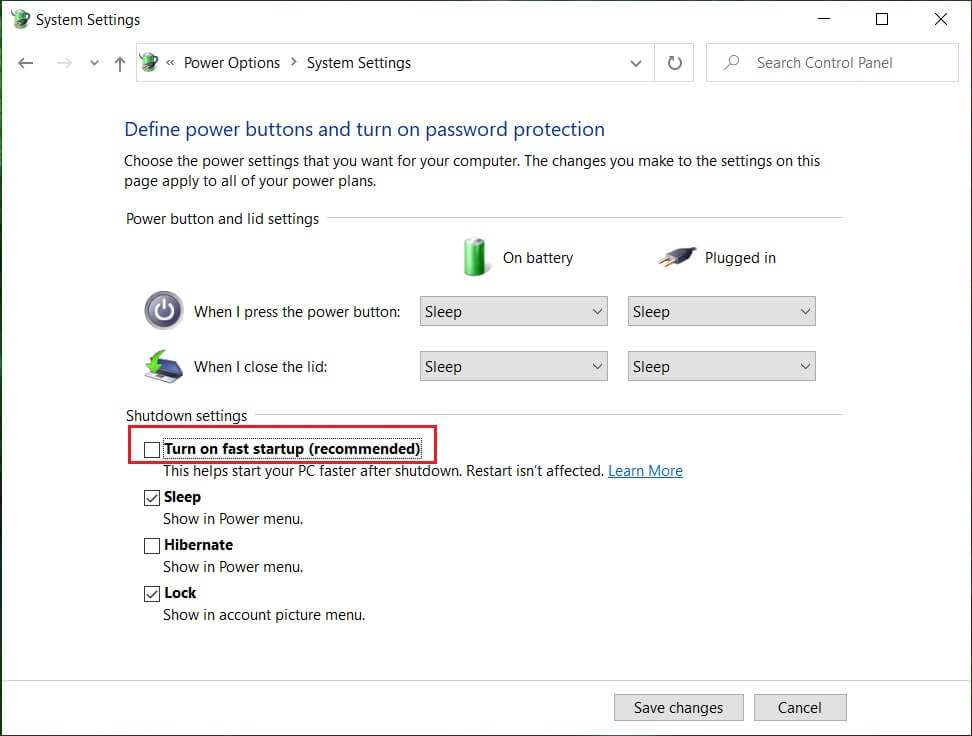
5. Now click Save Changes and Restart your PC.
If the above fails to disable fast startup, then try this:
1. Press Windows Key + X then click Command Prompt (Admin).

2. Type the following command in cmd and hit Enter:
powercfg -h off
3. Reboot to save changes.
This should definitely Fix Windows 10 will not shut down completely issue but then continue to the next method.
Method 2: Perform a Clean Boot
Sometimes 3rd party software can conflict with System, and therefore the System might not shut down completely. In order Fix Windows 10 will not shut down completely, you need to perform a clean boot in your PC and diagnose the issue step by step.

Method 3: Rollback Intel Management Engine Interface Drivers
1. Press Windows Key + R then type devmgmt.msc and hit Enter to open Device Manager.

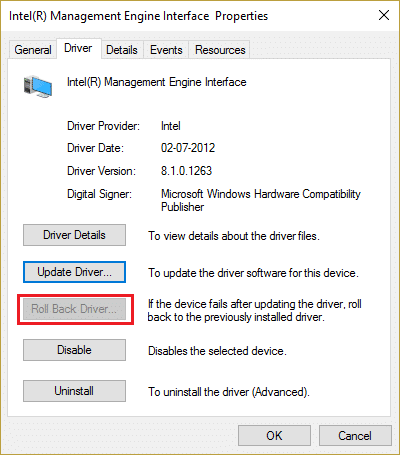
2. Now expand System device then right-click on Intel Management Engine Interface and select Properties.

3. Now switch to Driver tab and click Roll Back Driver.
4. Reboot your PC to save changes.
5. If the issue is not resolved, then again go to Intel Management Engine Interface Properties from Device Manager.
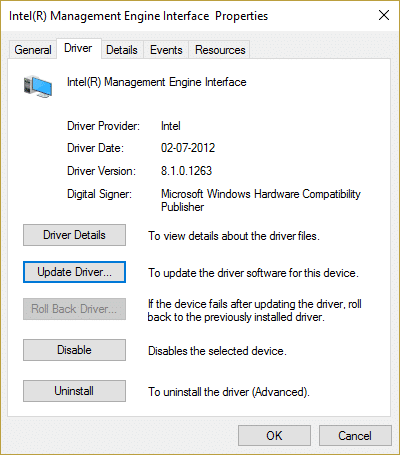
6. Switch to Driver tab and click Update driver and select Search automatically for updated driver software and then click Next.

7. This will automatically update Intel Management Engine to latest drivers.
8. Reboot your PC and see if you can completely shut down your computer or not.
9. If you’re still stuck then uninstall Intel Management Engine Interface drivers from device manager.
10. Reboot your PC and Windows will automatically install the default drivers.
Method 4: Uncheck Intel Management Engine Interface to turn off the device to save power
1. Press Windows Key + R then type devmgmt.msc and hit Enter to open Device Manager.
2. Now expand System device then right-click on Intel Management Engine Interface and select Properties.
3. Switch to Power Management tab and uncheck “Allow the computer to turn off this device to save power.”
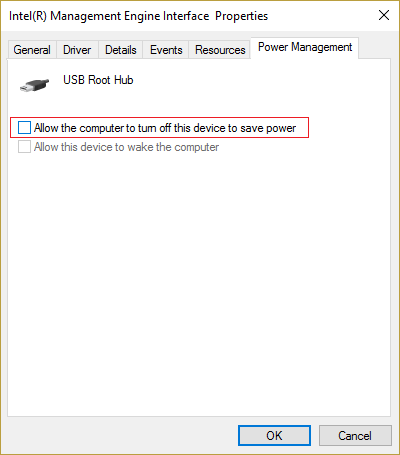
4. Click Apply, followed by OK.
5. Reboot your PC to save changes.
Method 5: Disable Intel Management Engine Interface
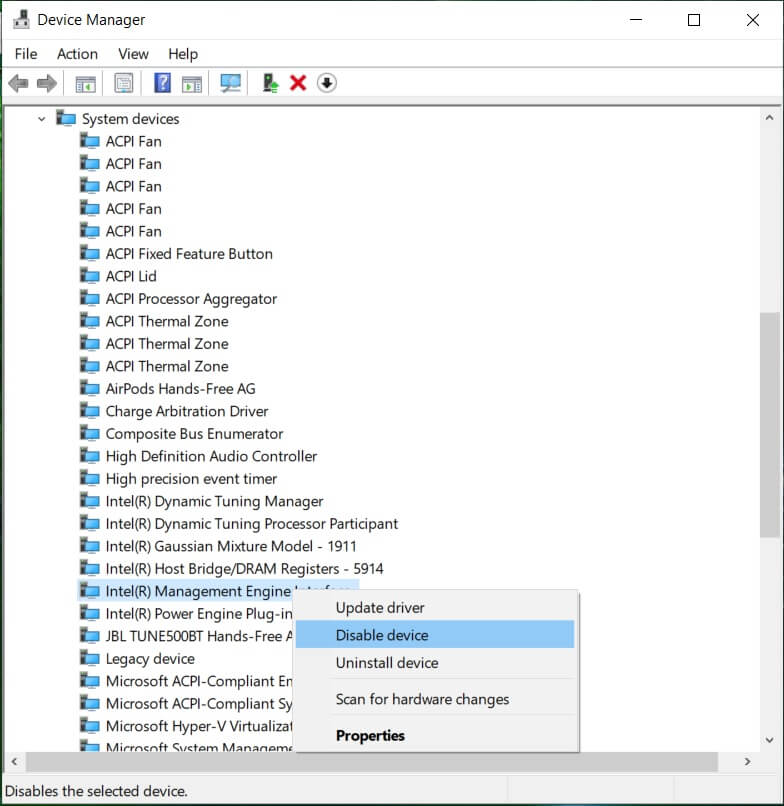
1. Press Windows Key + R then type devmgmt.msc and hit Enter to open Device Manager.
2. Now expand System device then right-click on Intel Management Engine Interface and select Disable.
3. If asked for confirmation, select Yes/OK.
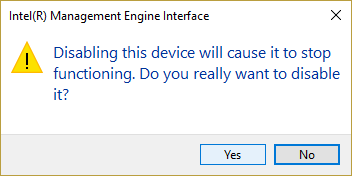
4. Reboot your PC to save changes.
Method 6: Run Windows Update
1. Press Windows Key + I to open Settings then click on Update & Security.
![]()
2. From the left-hand side, menu clicks on Windows Update.
3. Now click on the “Check for updates” button to check for any available updates.

4. If any updates are pending, then click on Download & Install updates.

5. Once the updates are downloaded, install them, and your Windows will become up-to-date.
Method 7: Run Windows Update Troubleshooter
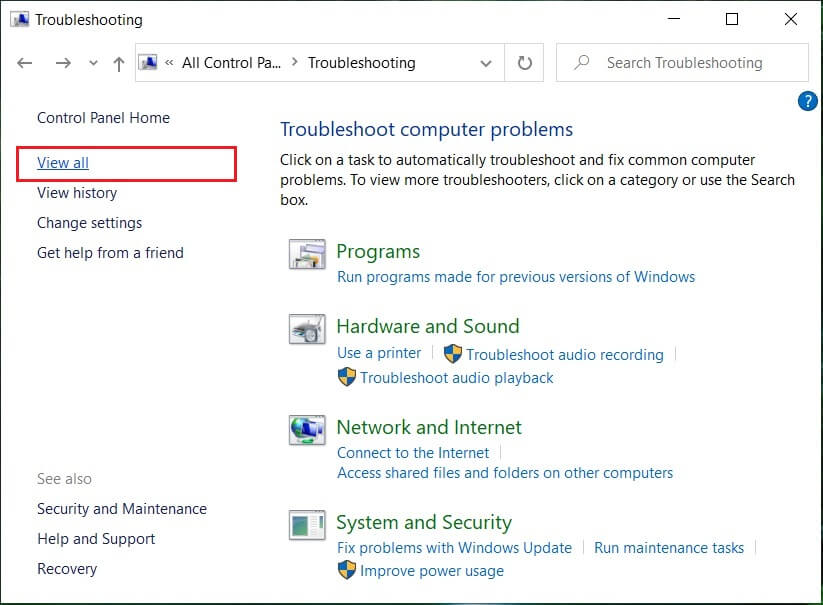
1.Type troubleshooting in Windows Search bar and click on Troubleshooting.

2. Next, from the left window, pane select View all.
3. Then from the Troubleshoot computer problems list select Windows Update.

4. Follow on-screen instruction and let the Windows Update Troubleshoot run.

5. Restart your PC to save changes.
This should help you fix Windows 10 will not shut down completely issue but if not then continue with the next method.
Method 8: Repair Install Windows 10
This method is the last resort because if nothing works out, then, this method will surely repair all problems with your PC. Repair Install uses an in-place upgrade to repair issues with the system without deleting user data present on the system. So follow this article to see How to Repair Install Windows 10 Easily.
Recommended:
That’s it you have successfully Fix Windows 10 will not shut down completely but if you still have any questions regarding this guide then feel free to ask them in the comment’s section.