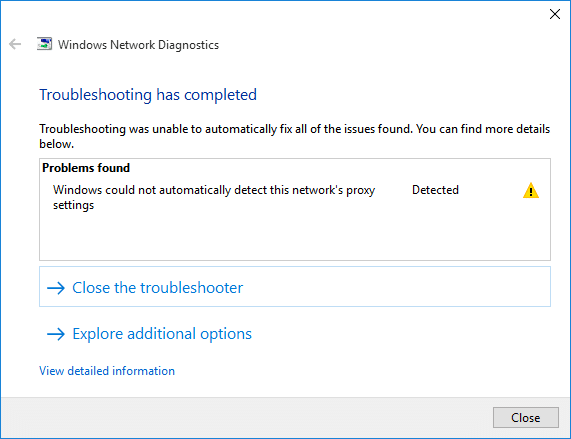
Windows comes pre-installed with a troubleshooting feature that allows you to detect and fix connectivity issues and other technical problems on your Windows systems. Whenever you use the troubleshooter to scan for errors, it automatically detects and resolves them. Often, the troubleshooter detects the problem but doesn’t recommend any solutions for it. In such cases, you will see a yellow warning sign next to your Wi-Fi icon. Now, when you run the network troubleshooter, you might encounter an error message that states Windows could not automatically detect this network’s proxy settings.
Fortunately, there are several ways that you can utilize to fix this network error on your system. Through this guide, we have explained the various reasons for this error and how you can fix Windows that could not automatically detect this network’s proxy settings issue.
Fix Windows could not automatically detect this Network’s Proxy settings
Reasons for Windows could not automatically detect this network’s proxy settings error
The common reason for this error to occur is due to changes in the proxy settings of your operating system. These settings may get altered due to
- Virus/malware on your computer or
- Changes in Windows operating system files.
Given below are few simple methods to fix the proxy settings error on your Windows system.
Make sure to create a restore point just in case something goes wrong.
Method 1: Restart the Network Adapter
Restarting your Network Adapter can help you fix pesky connection issues on your Windows computers. Follow the given steps to do so:
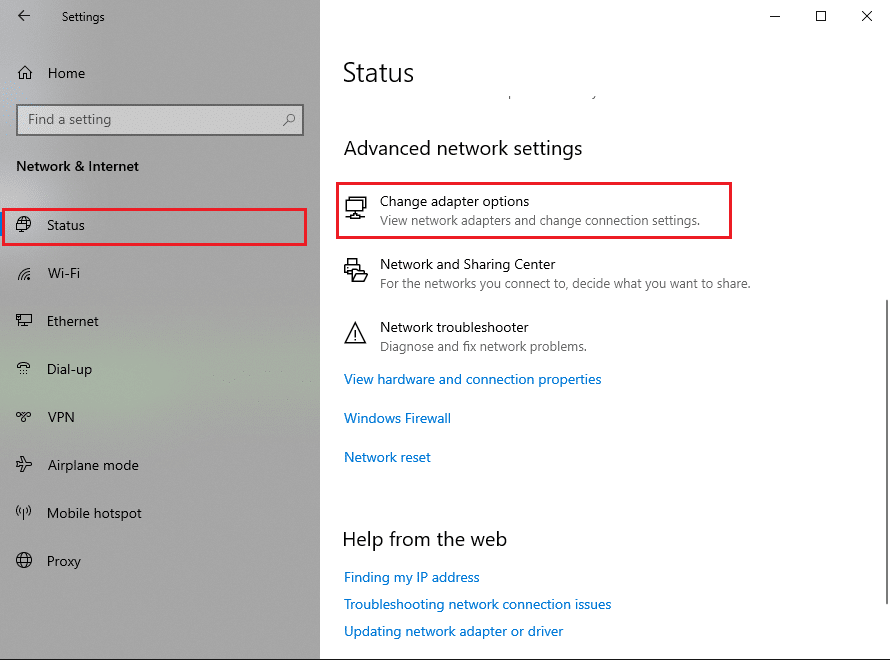
1. Press Windows + I keys on your keyboard to launch Windows settings.
2. Click on Network and Internet, as shown.

3. Under the Status tab, click on Change adapter options, as depicted.
4. Now, select either a Wi-Fi network or Ethernet for LAN connection. Click on Disable this network device from the toolbar.
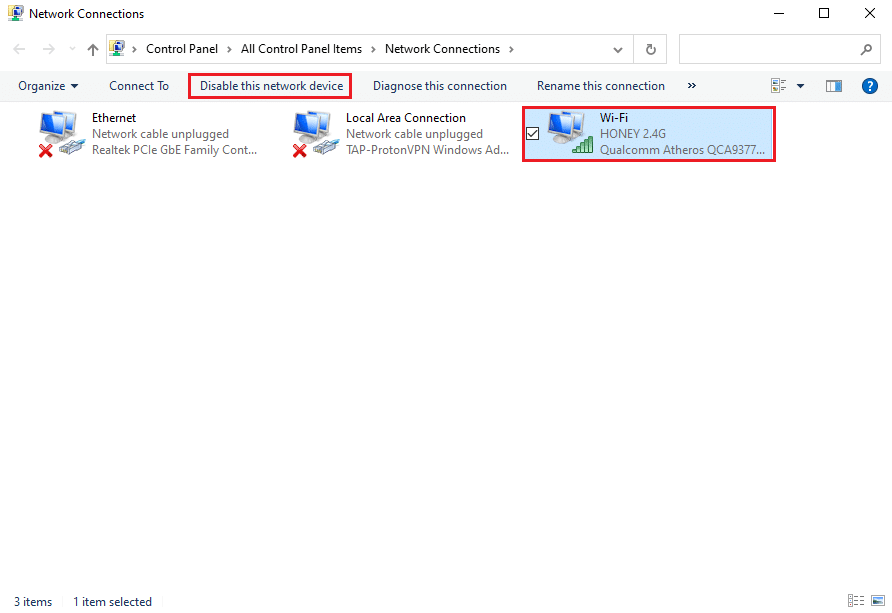
5. Wait for about 10-15 seconds.
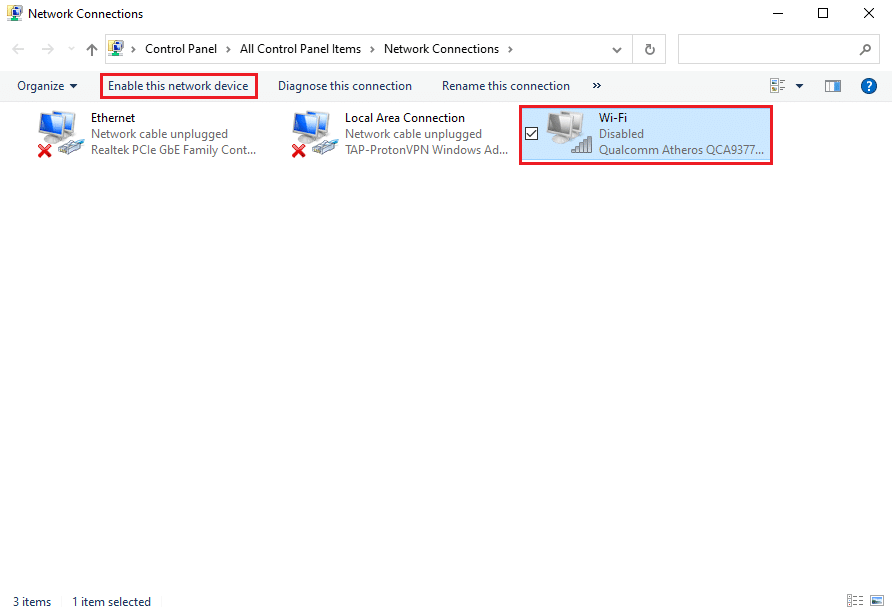
6. Finally, select your network connection again and click on Enable this network device from the toolbar as before.
Also Read: 5 Netflix Proxy Detected Error Fix
Method 2: Change Adapter IP settings
If you are unable to access the Internet, then you can try to disable the manual IP address or the DNS configuration on your system. Many users were able to fix Windows that could not automatically detect this network’s proxy settings error by enabling Windows to automatically acquire the IP address and DNS server address. Follow the given steps for the same:
1. Launch Windows Settings and go to Network and Internet section as you did in the previous method.
2. Select Change adapter options under the Status tab, as shown.
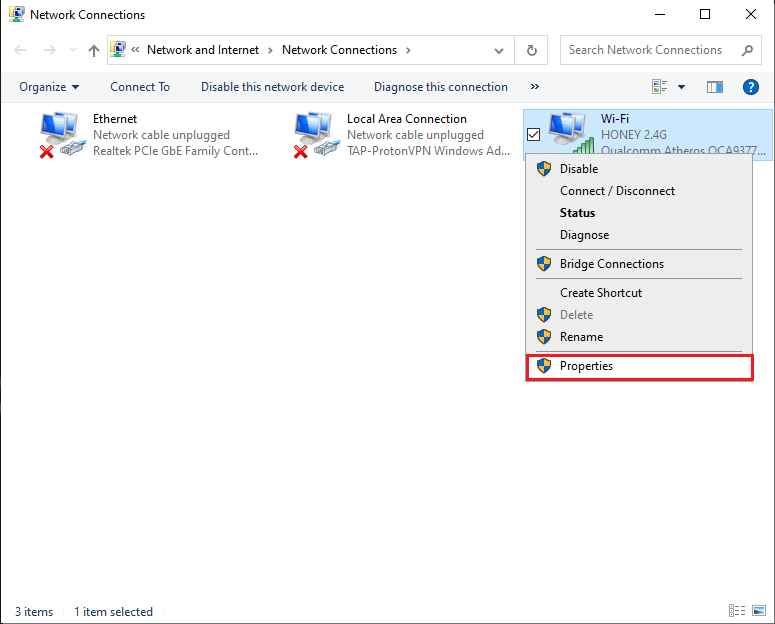
3. Select your internet network (Wi-Fi or Ethernet) and right-click to select Properties, as depicted below.
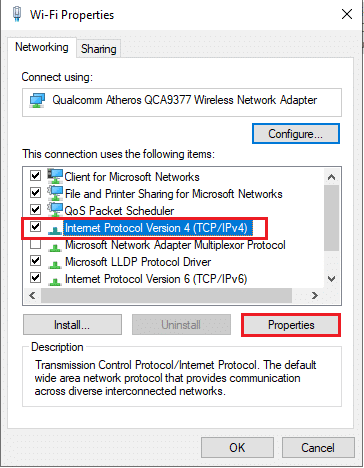
4. Locate Internet Protocol Version 4 (TCP/IPv4) from the given list. Click on Properties as depicted in the screenshot.
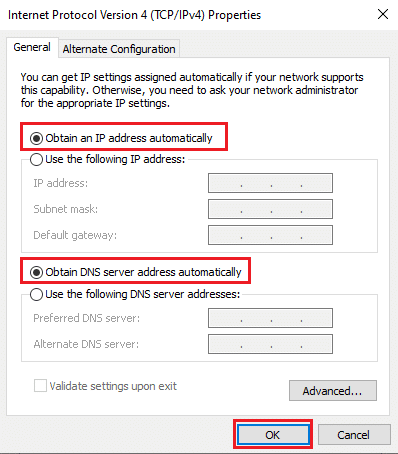
5. Under the General tab, enable the options titled Obtain an IP address automatically and Obtain DNS server address automatically.
6. Finally, click on OK to save the changes, as shown.
Also Read: Fix Windows could not automatically detect this network’s proxy settings
Method 3: Reset Network Settings
If you are still unable to access your Internet connection, try to reset your network settings. When you reset the network settings, it will reset the VPN and proxy servers. It will also roll back the network configurations to their default state. Follow the given steps to reset your network settings to fix Windows that could not automatically detect this network’s proxy settings.
Note: Make sure you close all the background running programs or applications before you proceed with Network reset.
1. Launch Windows Settings and click Network and Internet, as earlier.
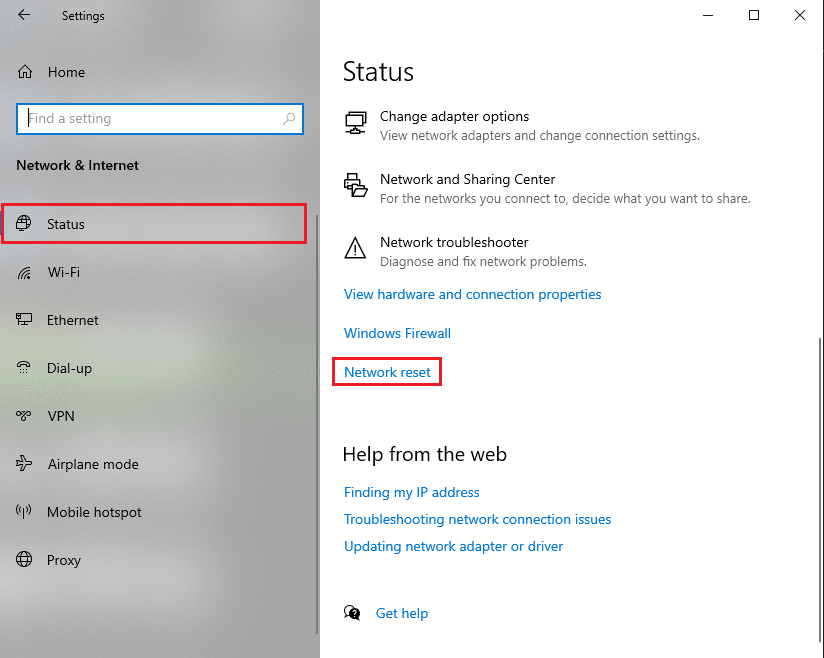
2. Scroll down and click on Network reset, as shown.
3. Click YES in the confirmation window that pops up.
4. Finally, your system will automatically reset the Network settings and restart your computer.
The Windows could not automatically detect this network’s proxy settings error should be rectified by now. If not, try the succeeding methods.
Method 4: Disable Proxy Server
Disabling the proxy server option was able to fix this issue for many Windows users. Here is how to disable the proxy server option on your Windows system:
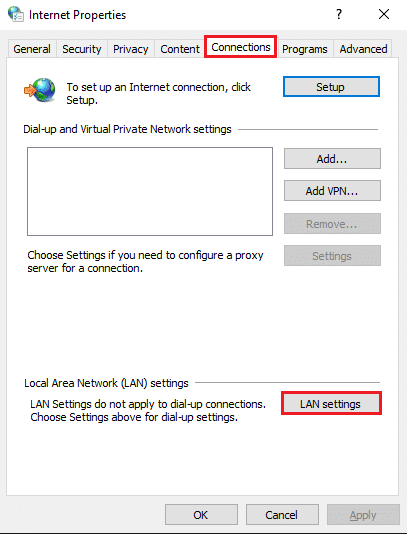
1. Launch Run by pressing the Windows + R keys together on your Keyboard.
2. Once the Run dialog box appears on your screen, type inetcpl.cpl and hit Enter. Refer to pic below.

3. The Internet Properties window will appear on your screen. Switch to the Connections tab.
4. Click on LAN settings, as depicted.
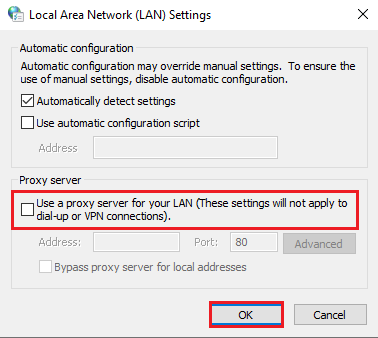
5. Now, make sure you uncheck the box next to the option titled Use a proxy server for your LAN (These settings will not apply to dial-up or VPN connections).
6. Finally, click on OK to save these changes, as shown.
Now, check whether you are able to access your Internet connection. If not, there might be an issue with Network Drivers installed on your system. We shall fix these problems in the following methods.
Method 5: Update Network Drivers
If you are encountering issues with your Internet connection and are unable to run the network troubleshooter, then you may be using outdated network drivers on your system. If the network drivers are corrupt or obsolete, you are bound to experience connectivity issues on your system.
To update network drivers, follow these steps:
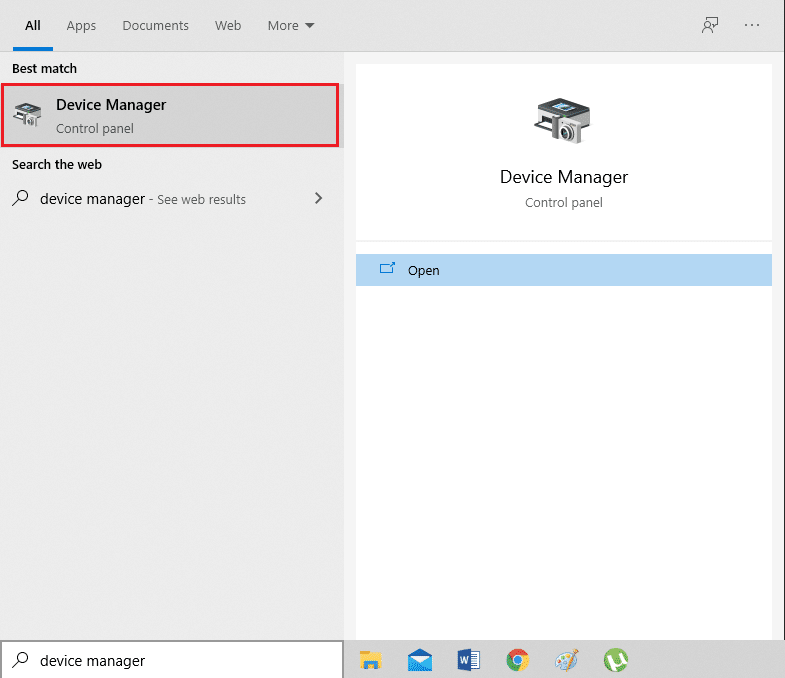
1. Go to the Windows search bar and type Device Manager. Launch it from the search results.
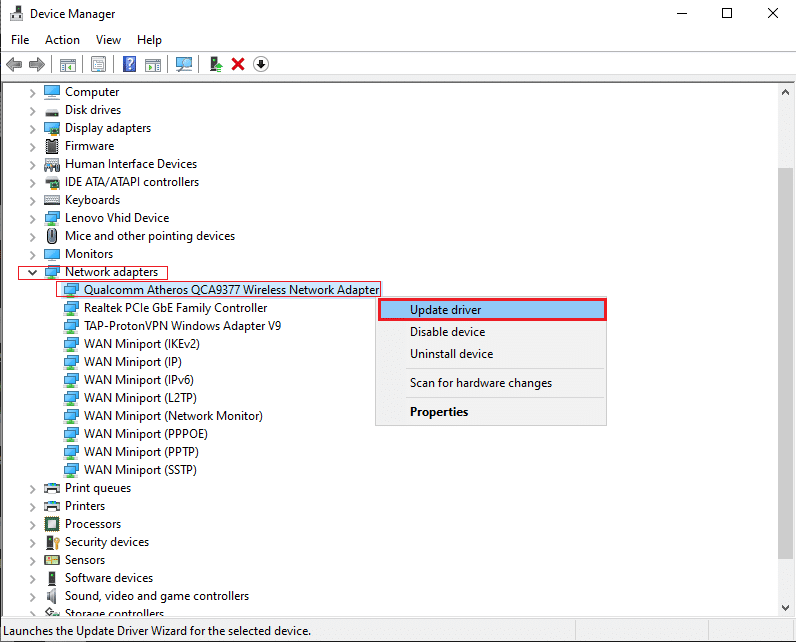
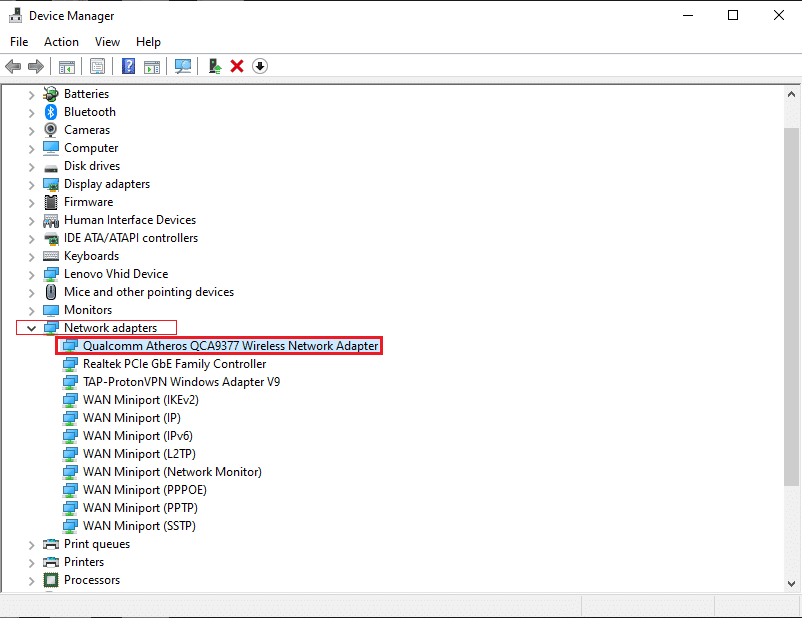
2. Locate and expand Network adapters by double-clicking on them.
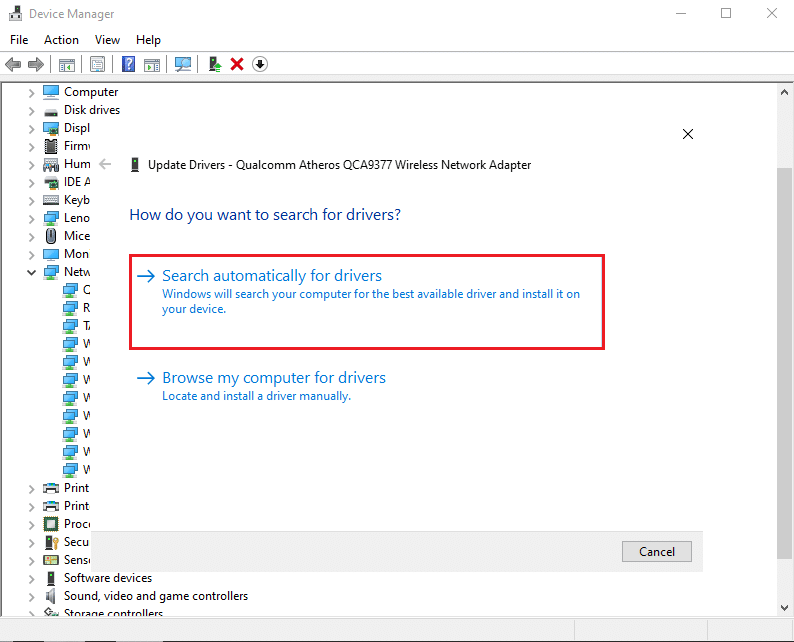
3. You will see a list of network drivers installed on your computer. Make a right-click on your Network driver and click on Update driver from the given menu. Refer to pic below.
4. A new window will appear on your screen. Here, select Search automatically for drivers.
Windows will automatically update your network driver to its latest version.
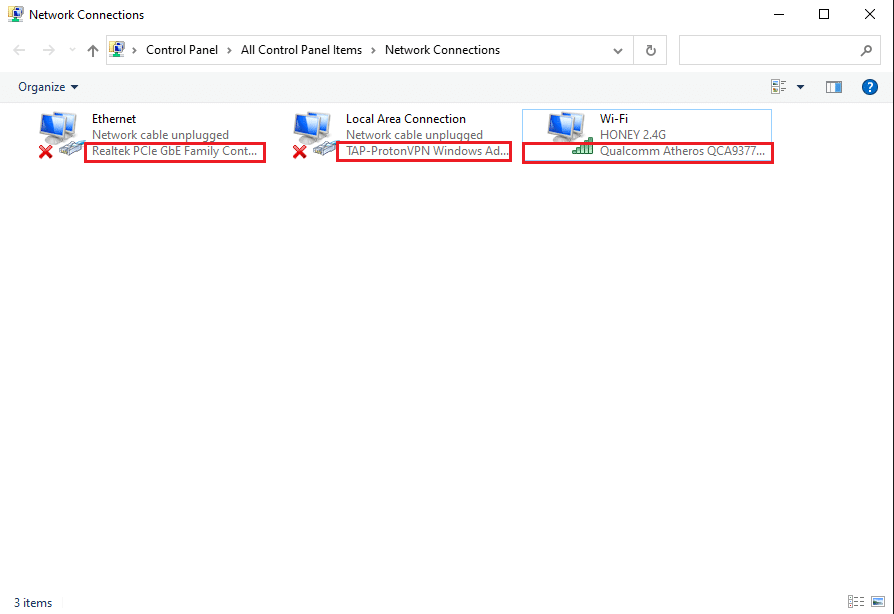
Note: If you don’t remember your network driver, you can navigate to Settings > Network and Internet > Status > Change adapter options. You will be able to see the name of the network driver under your Wi-Fi or Ethernet connection. Check the screenshot for reference.
Also Read: [SOLVED] Windows detected a hard disk problem
Method 6: Rollback Network Adapter
Sometimes, after you update your Windows operating system or your network driver, it is possible that certain driver updates are incompatible with the version of Windows OS and might lead to Windows could not automatically detect this network’s proxy settings error.
In such situations, the solution is to roll back the network driver to its previous version as instructed below:
1. Open Device Manager as earlier. Navigate to Network adapters > Network driver.
2. Right-click on your Network driver to open the Properties window. Switch to the Driver tab from the panel on the top.
3. Click on the Rollback driver option, as depicted below.
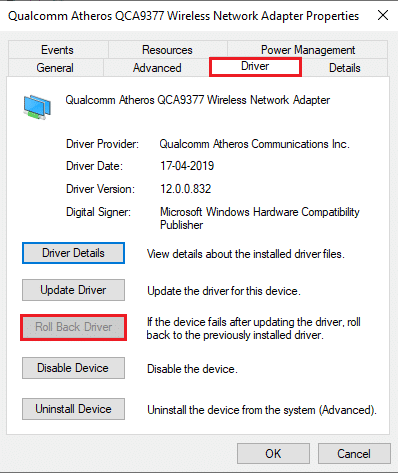
Note: If the rollback option is in grey, it means you did not update the driver, and thus, you need not roll back anything.
4. Simply follow the on-screen instructions to roll back the network driver to the previous version.
5. Restart your computer to check whether the Internet connectivity error is resolved.
If these methods haven’t worked for you, we shall now discuss few commands that you can run to fix Windows that could not automatically detect this network’s proxy settings error. So, keep reading.
Method 7: Perform SFC scan
Since corrupt system files on your system can alter network Proxy settings hence, performing an SFC (System File Checker) scan should help you fix Windows that could not automatically detect this network’s proxy settings error. SFC command will search for corrupt system files and replace these with the correct ones.
Here is how to perform an SFC scan on your PC.
1. Type the command prompt in the Windows search bar.
2. Click on Run as administrator to launch Command prompt with administrator rights.
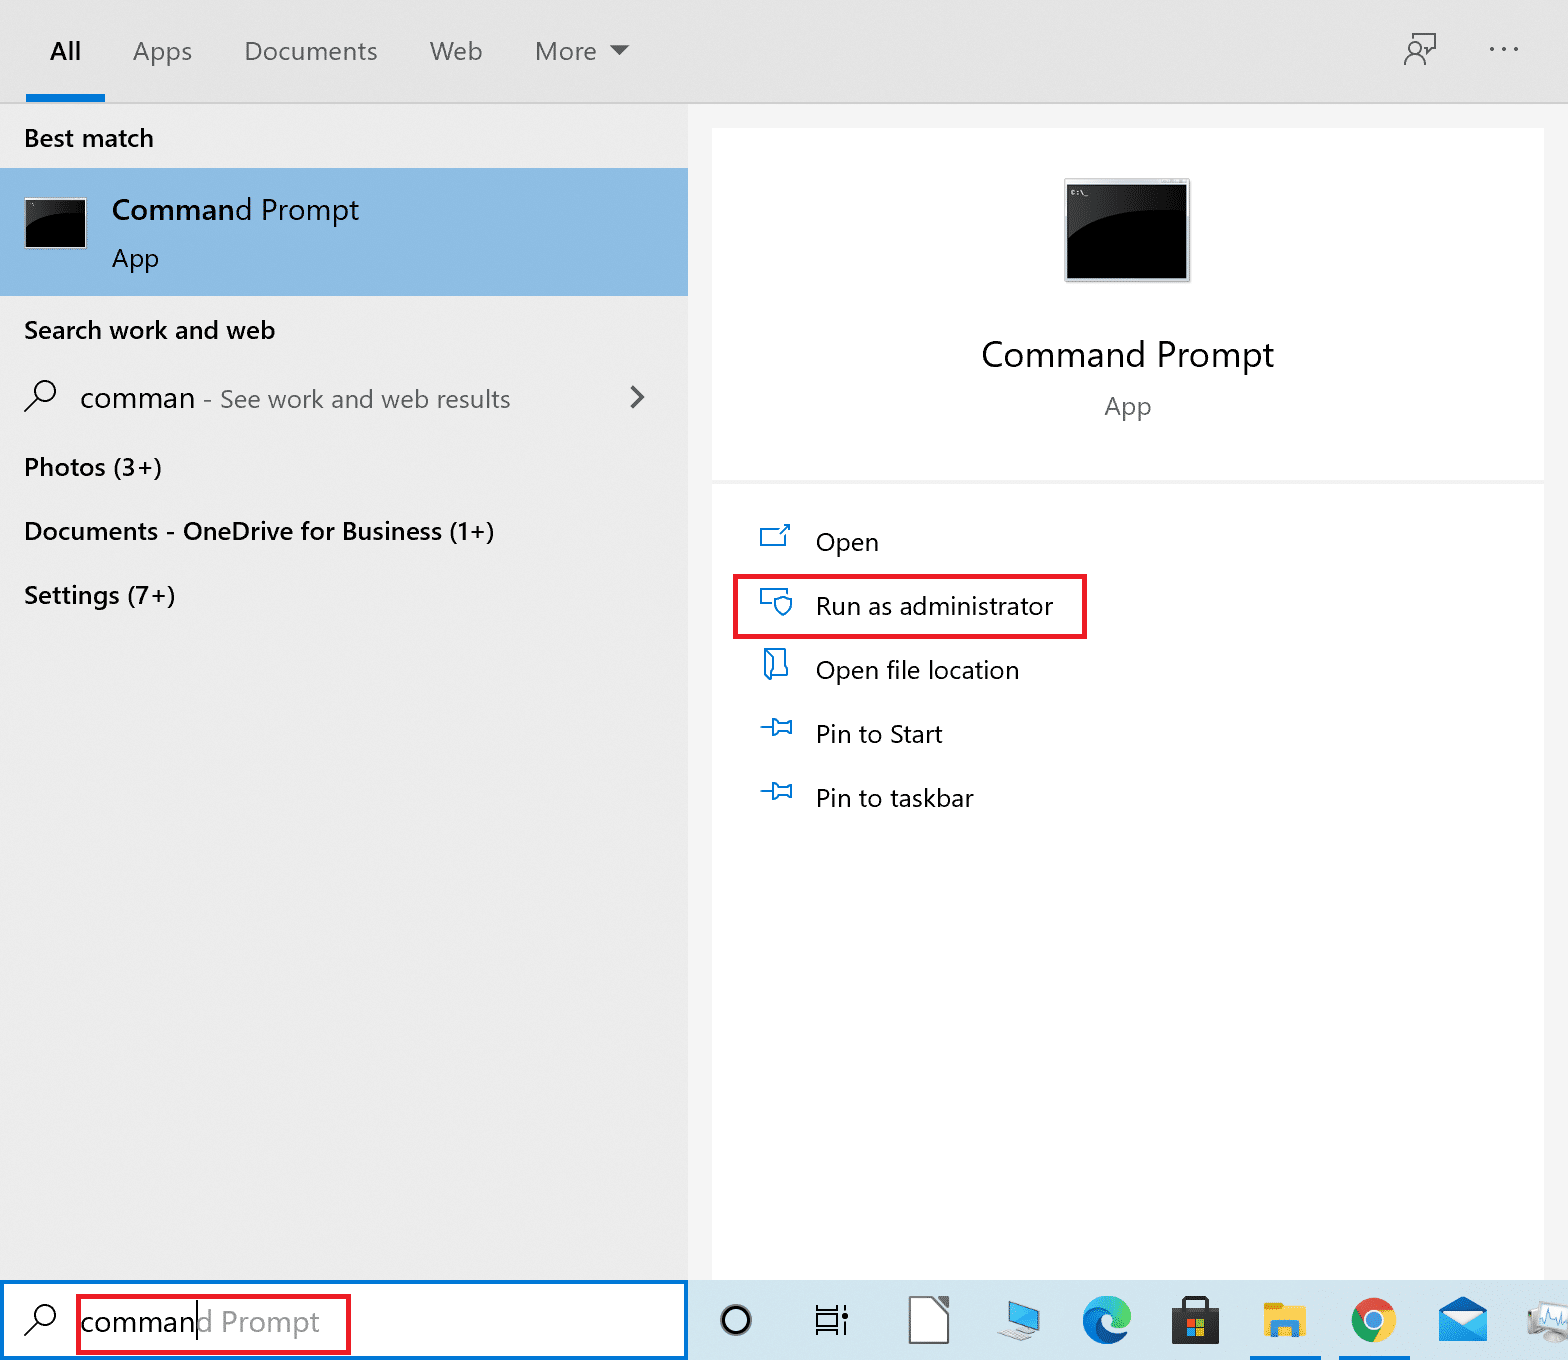
3. Click Yes when you get a prompt message on your screen.
4. Now, type sfc/scannow and hit Enter, as shown below.
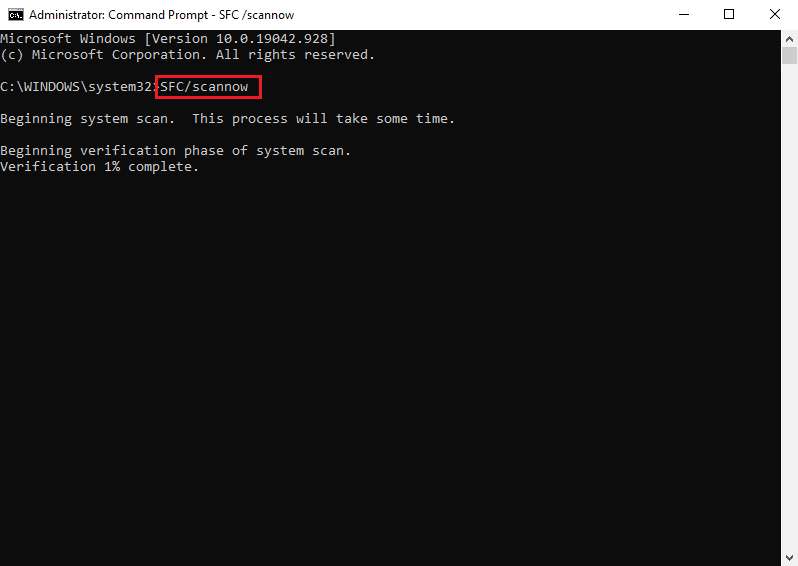
5. Finally, wait for the command to be executed. Then, check if the error is fixed.
Method 8: Use Winsock Reset Commands
By using the Winsock Reset commands, you can reset the Winsock settings back to default or factory settings. If some undesired changes are causing Windows could not automatically detect this network’s proxy settings error on your system, using the Winsock reset commands will resolve this problem.
Here are the steps to run Winsock reset commands:
1. Launch Command Prompt with administrative rights as explained above.
2. Type the following commands one by one and press the Enter key after every command.
netsh winsock reset
netsh int ip reset
ipconfig /release
ipconfig /renew
ipconfig /flushdns

3. Once the commands have run, restart your computer and check whether you were able to fix Windows that could not automatically detect this network’s proxy settings error.
Also Read: Fix Unable to connect to the proxy server in Windows 10
Method 9: Run Virus or Malware Scan
It has been observed that malware or virus in your system might be the reason behind connectivity issues as they alter network configurations thereby, preventing you from accessing them. Although scanning for such infections and getting rid of these will help you fix Windows proxy settings error.
There are several antivirus software available in the market. But we recommend the following antivirus software to run a malware scan.
a) Avast Antivirus: You can download the free version of this software if you don’t want to pay for a premium plan. This software is pretty great and does a decent job finding any malware or viruses on your computer. You can download Avast Antivirus from their official website.
b) Malwarebytes: Another option for you is Malwarebytes, a free version for running malware scans on your computer. You can easily get rid of unwanted malware from your computer.
After installing any one of the above-mentioned software, follow these steps:
1. Launch the software and run a full scan on your computer. The process may take time, but you have to be patient.

2. If the antivirus program detects any malicious data, you will be given an option to quarantine them or remove them from your computer.
3. Delete all such files then restart your computer and you may be able to resolve the error.
4. If not then read this guide to remove unwanted malware and viruses from your computer.
Method 10: Turn off Proxy, VPN, Antivirus and Firewall
There might be network interference between Windows Defender Firewall, third-party VPN services, and Proxy network servers, resulting in Windows could not automatically detect this network’s proxy settings error message.
Follow these steps to resolve such conflicts:
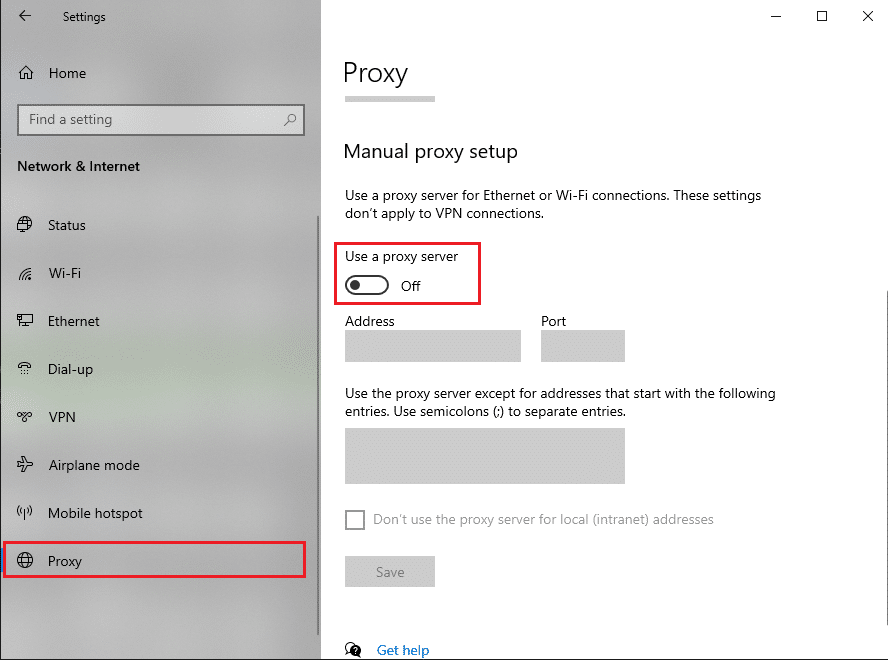
1. Press Windows + I keys on your keyboard to launch Settings.
2. Click on the Network and Internet option.
3. Select Proxy from the panel on the left.
4. Toggle off the option stating Use a proxy server for your LAN (These settings will not apply to dial-up or VPN connections) under the Manual proxy setup section. Refer to pic below for clarity.
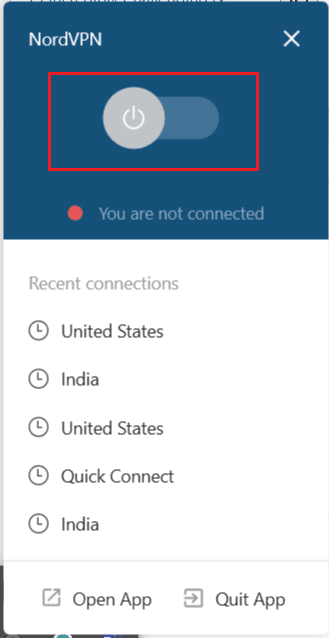
5. Turn off the VPN from the desktop taskbar itself.
Now, check if the problem is resolved, if not then temporarily disable the Antivirus and Windows Defender firewall:
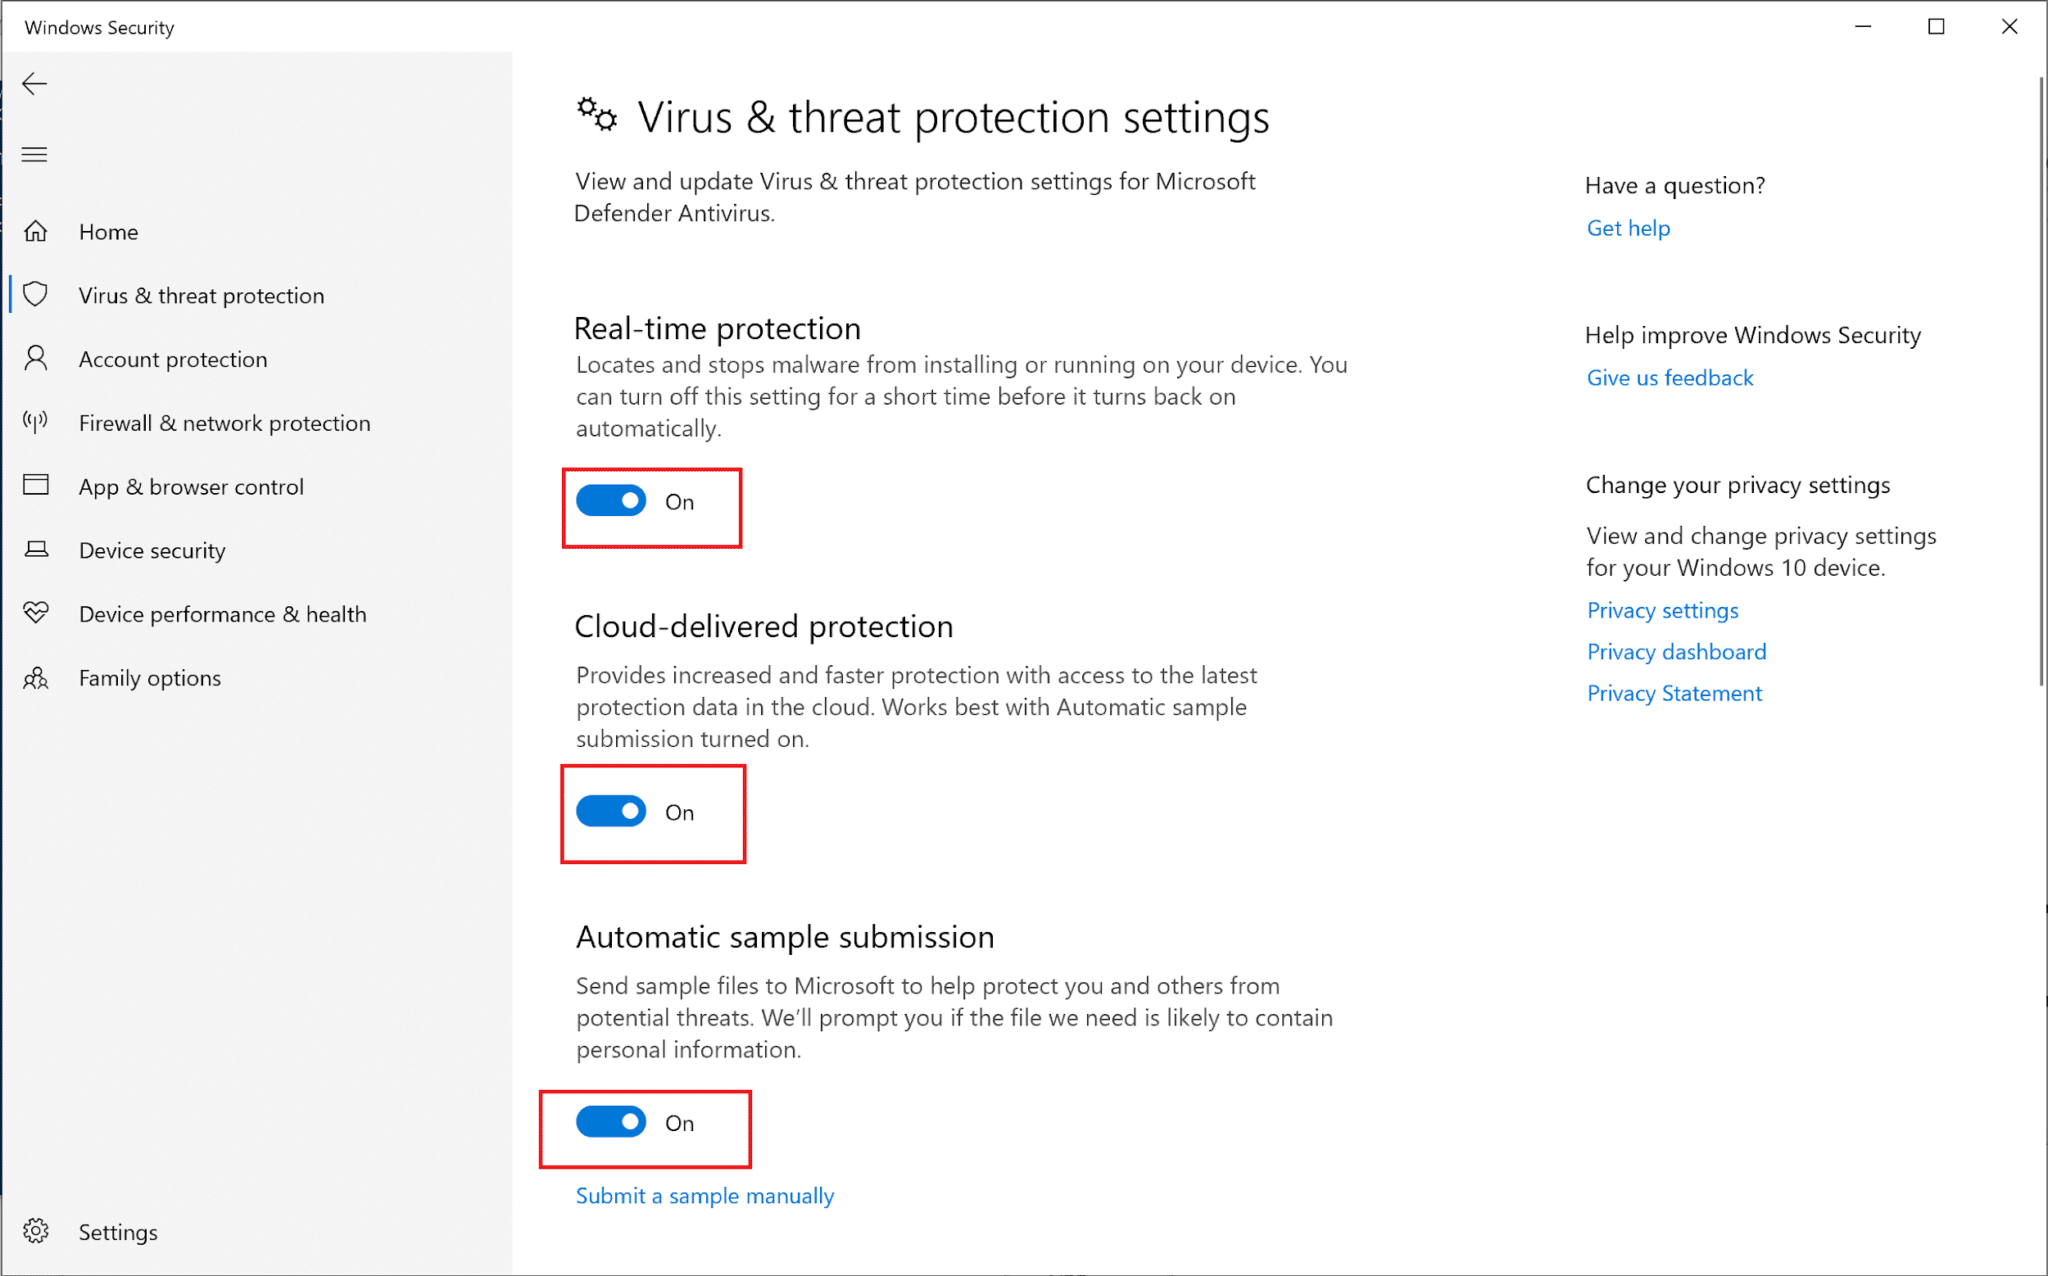
1. Type virus and threat protection and launch it from the search result.
2. In the settings window, click on Manage settings as depicted.

3. Now, turn the toggle off for the three options shown below, viz Real-time protection, Cloud delivered protection, and Automatic sample submission.
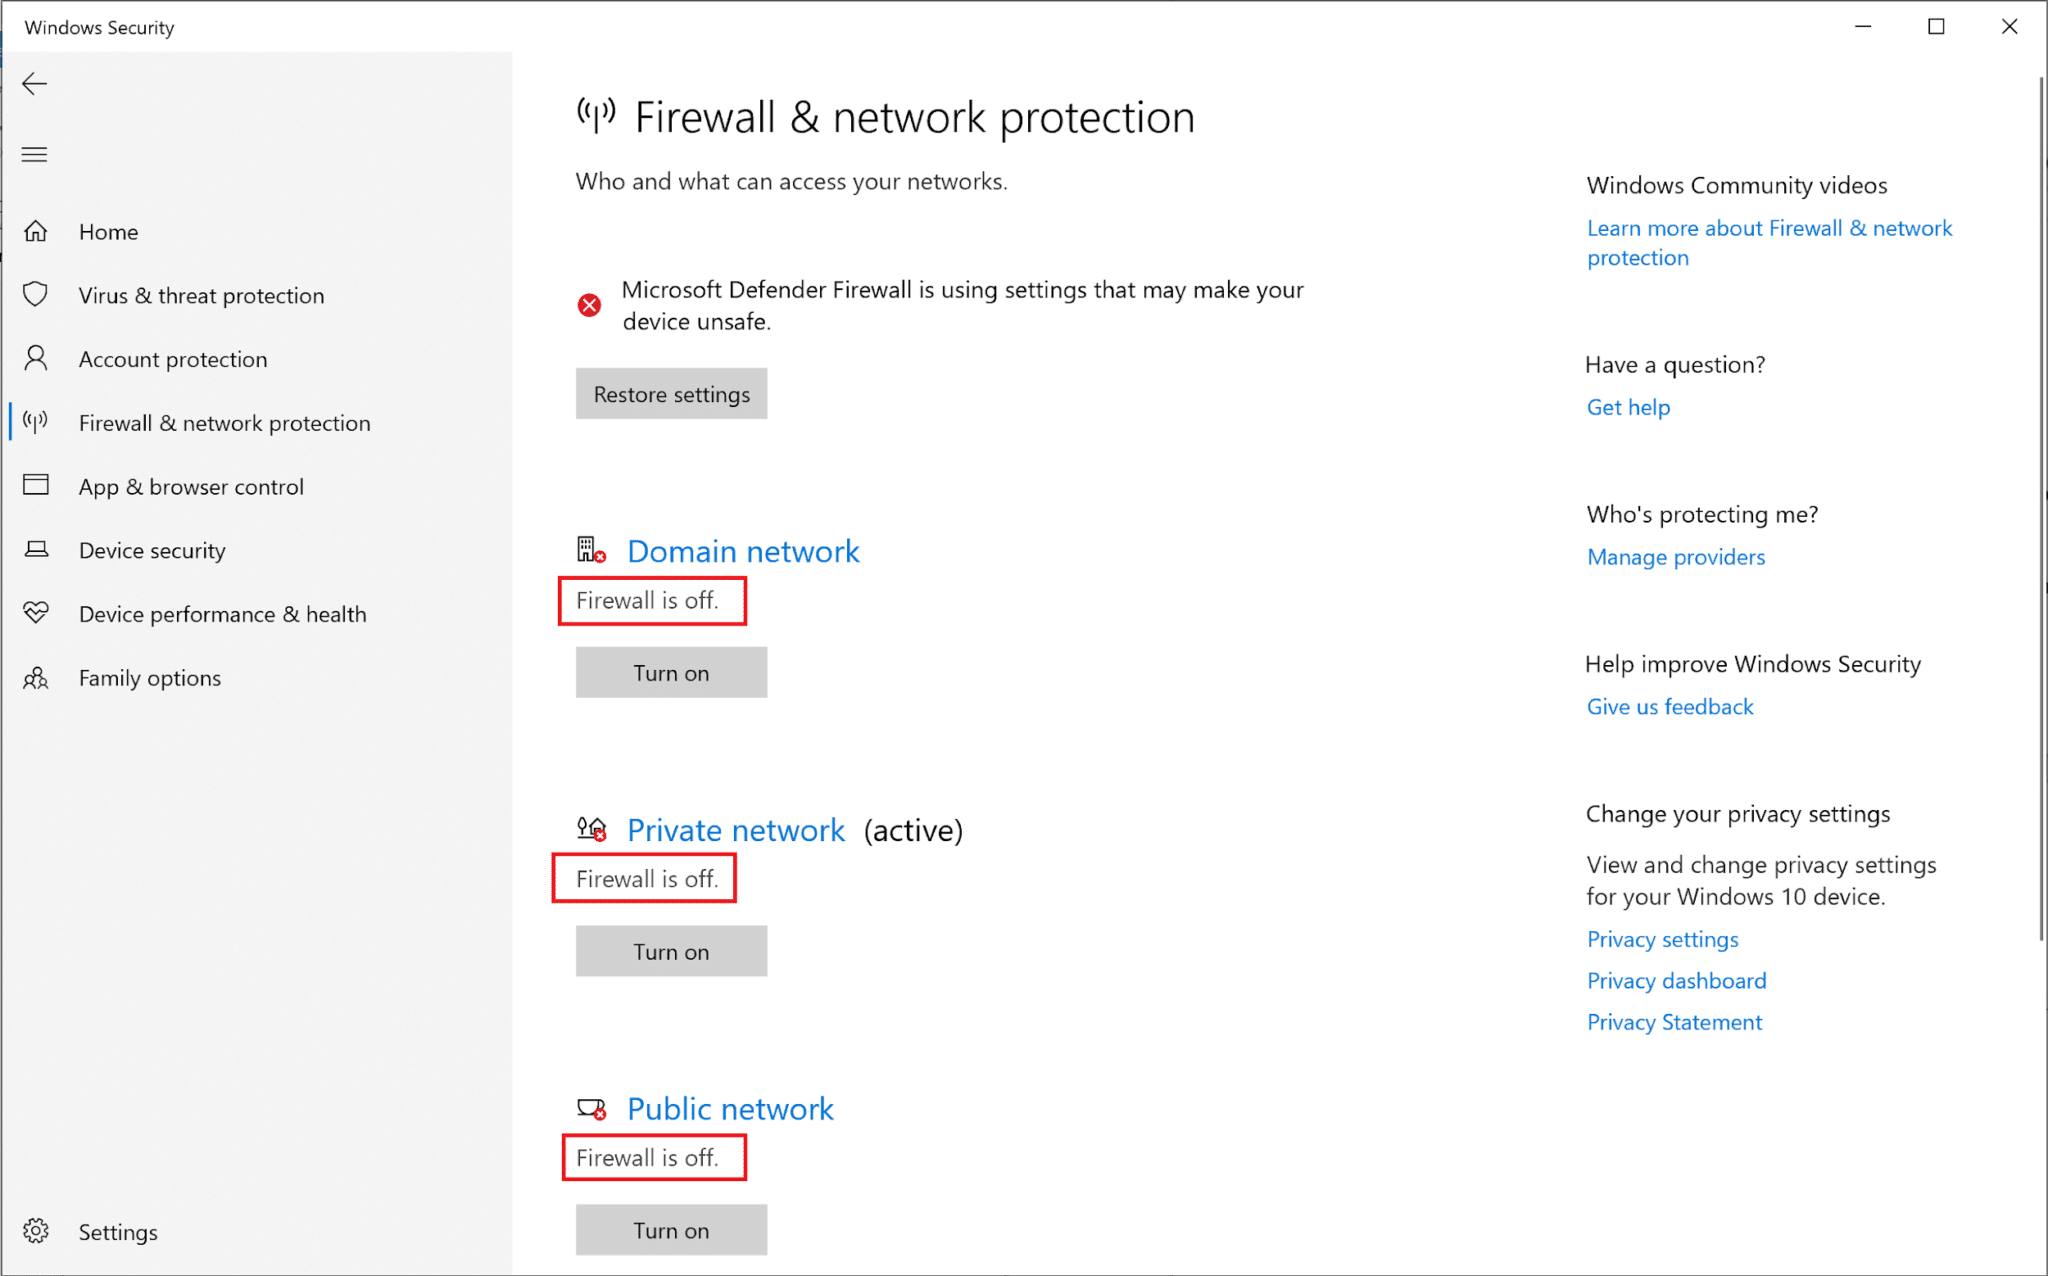
4. Next, type firewall in the Windows search bar and launch Firewall and network protection.
5. Turn the toggle off for Private network, Public network, and Domain network, as highlighted below.
6. If you have third-party antivirus software, then launch it.
7. Now, go to Settings > Disable, or options similar to it to disable antivirus protection temporarily.
8. Lastly, check if the apps that won’t open are opening now.
9. If not, turn the virus and firewall protection back on.
Method 11: Perform System Restore
When you restore your PC, all recent driver updates and program files are deleted from your system. It will restore your system to the state when your Network connection was working smoothly and will also fix Windows that could not automatically detect this network’s proxy settings error. Moreover, you don’t have to worry about your personal data as it would remain unaffected during system restore.
System Restore always works in resolving the error; therefore System Restore can definitely help you in fixing this error. So without wasting any time run system restore to Fix Windows could not automatically detect this network’s proxy settings.

Recommended:
We hope this guide was helpful, and you were able to fix Windows that could not automatically detect this network’s proxy settings error on your system. Let us know which method worked for you the best. If you have any queries regarding the above guide, let us know in the comments below.