Fix Laptop Camera Not Working on Windows 10

When the entire world went into a sudden lockdown due to the COVID-19 pandemic, applications such as Zoom, Microsoft Teams, Skype saw a tremendous rise in the number of active users. Employers started conducting online team meetings while we turned to video calls to stay in touch with our friends and family. All of a sudden the laptop web camera which was covered with a piece of black tape finally saw some daylight and experienced action for a few hours almost every day. Unfortunately, a number of users had a tough time getting their laptop camera to work properly. In this article, we will be going through various troubleshooting tips to fix the laptop camera not working on Windows 10 when your Windows 10 laptop webcam refuses to function normally.
The web camera is an additional hardware component pieced together into your laptop and like any other hardware component, the web camera also requires appropriate device drivers to be installed on the system. Certain manufacturers allow users to disable the webcam by pressing a particular key, key combination, or through a built-in app so you will need to ensure that the webcam is not disabled in the first place. Next, some users often prohibit applications from accessing/using the webcam for the sake of their privacy (and because they have seen too many hacker/cybersecurity movies). If that is indeed the case, simply allowing applications to access the camera should resolve all issues. A recent Windows quality update or a third-party antivirus program can also be culprits to your malfunctioning web camera. So, without wasting any more time, let’s begun with the issue to Fix Laptop Camera Not Working on Windows 10.
Fix Laptop Camera Not Working on Windows 10
We will start off by checking if the webcam is enabled or not, if all the required applications have access to it, and ensure that the antivirus is not blocking applications from accessing the camera. Moving on, we can try running the built-in hardware troubleshooter to have Windows automatically fix any issues and ensure that the correct camera drivers are installed. Ultimately, if the issue persists, our last resort is to roll back to a previous Windows version or to reset our computer.
Here are the 7 ways to get your Laptop webcam working again on Windows 10:
Method 1: Check Camera Access Settings
Starting off with the obvious, your laptop webcam will not work if it is disabled in the first place. The motive for disabling the webcam may vary but all of them have a common underlying concern – ‘Privacy’. A few manufacturers allow users to disable the webcam using a hotkey combination or one of the function keys. Carefully check the function keys for a camera icon with a strike through it or perform a quick Google search to know the webcam enable-disable key shortcut (manufacturer specific) and ensure the camera isn’t disabled. Some external web camera attachments also have a turn-on-off switch, before starting your video conference ensure the switch is in the On position.
Note: Lenovo users should open the Lenovo Settings application, followed by Camera settings and disable Privacy mode and also update the application to the latest version. Similarly, other manufacturers (Dell Webcam Central for Dell users) have their own webcam applications which need to be up-to-date in order to avoid issues.
Furthermore, Windows allows users to entirely restrict their device from accessing the web camera along with the ability to handpick which built-in and third-party applications have access to it. Let’s head down the Camera settings and check if the required applications (Zoom, Skype, etc.) have access to it. If not, we will manually grant them the necessary access.
1. Press the Windows key to activate the Start menu and click on the cogwheel/gear icon, or simply press Windows key + I to launch Windows Settings then click on Privacy Settings.
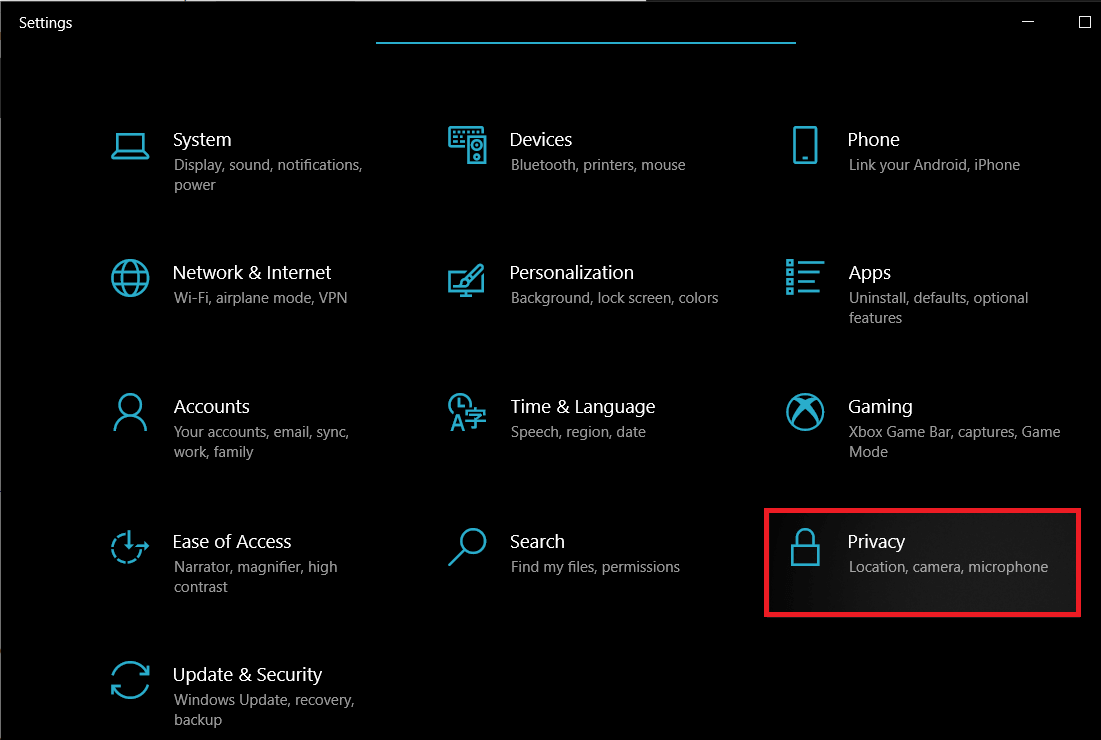
2. Using the navigation menu on the left pane, move to the Camera page (Under App Permissions).
3. On the right-panel, click on the Change button and toggle on the following ‘Camera access for this device’ switch if the device does not currently have access to the camera.
4. Next, toggle on the switch under Allow apps to access your camera.
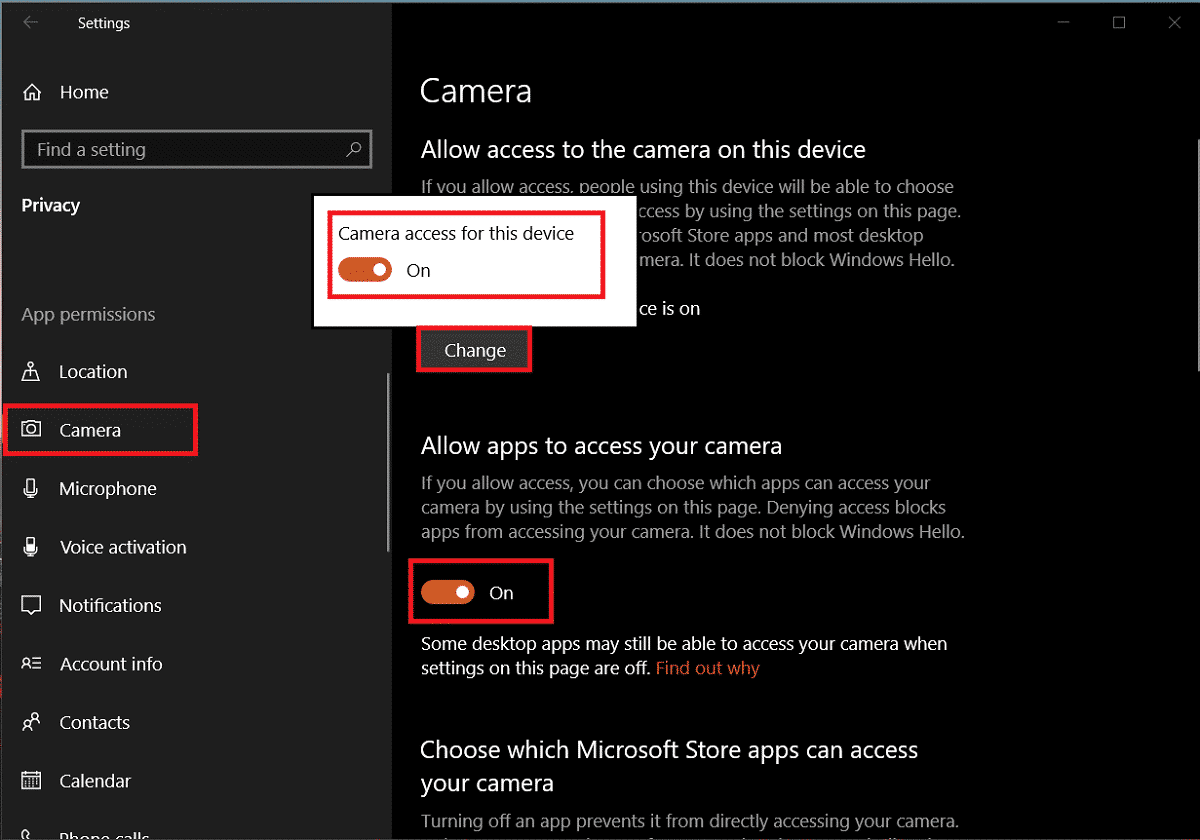
5. Scroll down the right-panel and choose individual Microsoft and third-party applications that can access the webcam.
Method 2: Check Antivirus Settings to Fix Laptop Camera Not Working
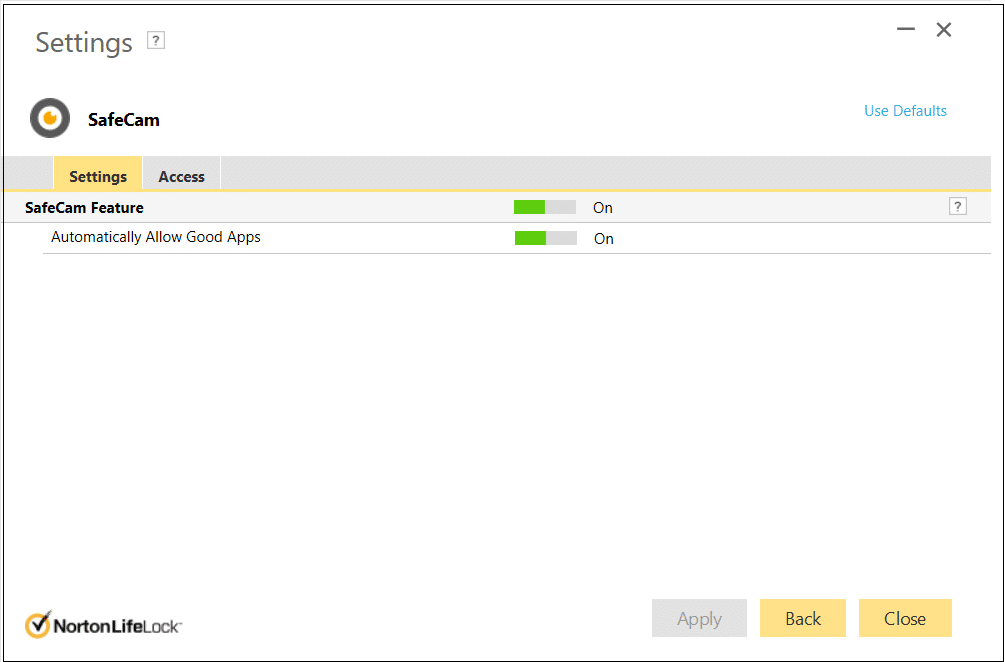
Antivirus applications while keeping a check on virus attacks and entry of malware programs also protect the users from a number of other things. Web Protection, for instance, ensures users do not visit any suspicious website or download any harmful files from the internet. Similarly, the privacy mode or protection feature of your antivirus program regulates which applications have access to your laptop camera and unknowingly may cause issues. Simply turn off the Webcam protection option and check if the camera starts working properly.
1. Open your Antivirus program by double-clicking on its shortcut icon.
2. Access the program’s Privacy settings.
3. Disable Webcam protection or any setting related to blocking webcam access for applications.
Also Read: Fix Laptop not connecting to WiFi (With Pictures)
Method 3: Run the Hardware Troubleshooter
If all the necessary permissions are available, let us allow Windows to try and fix the laptop camera not working issues on Windows 10 itself. The built-in hardware troubleshooter which can find and fix any problems with the keyboard, printer, audio devices, etc. can be employed for this purpose.
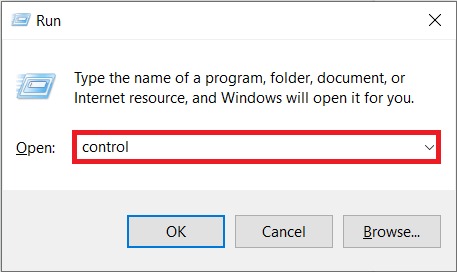
1. Launch the Run command box by pressing Windows key + R, type control or control panel, and hit enter to open the application.
2. Adjust the icon size if required and click on the Troubleshooting icon.
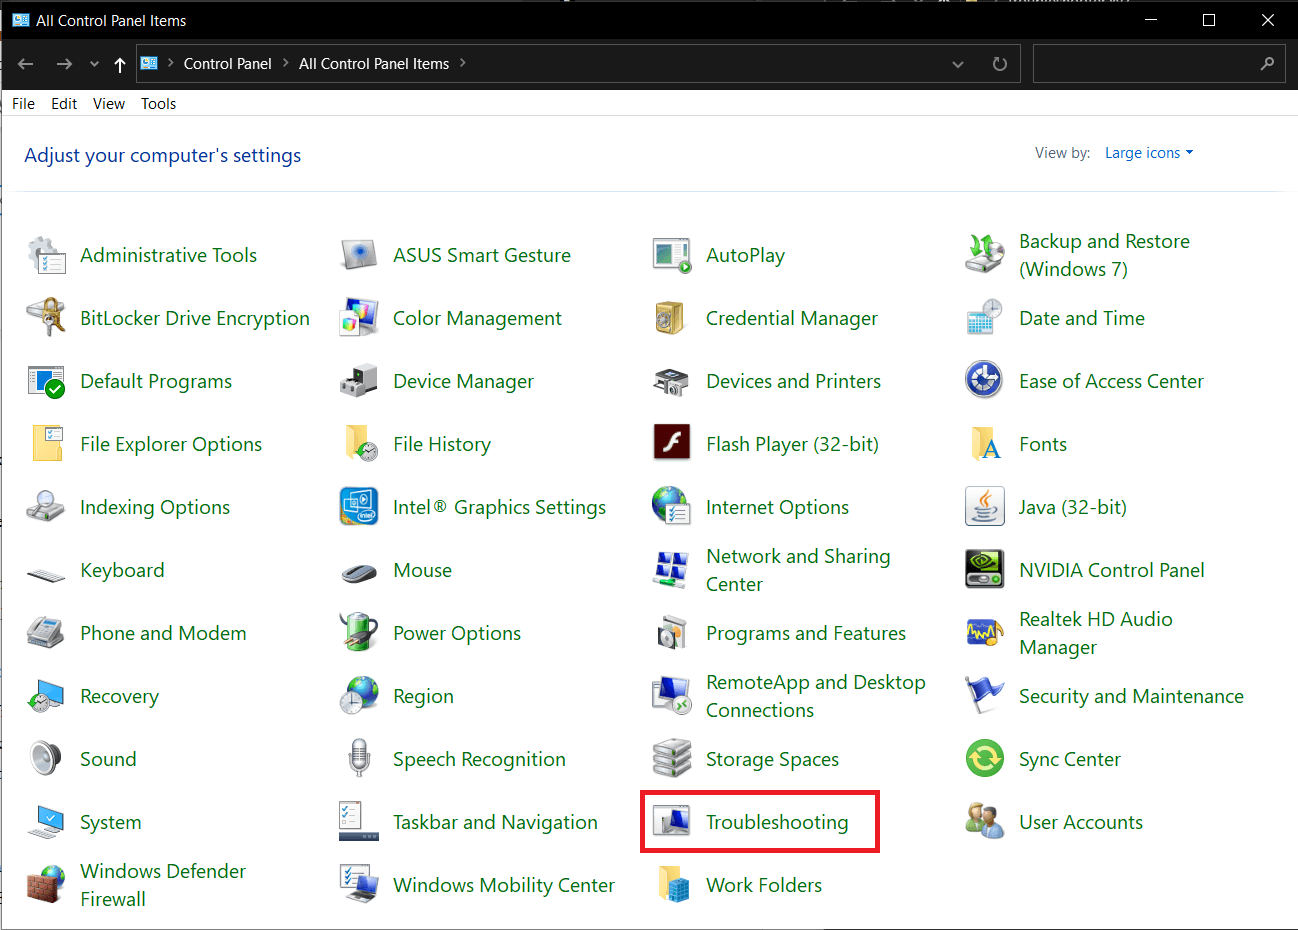
3. Click on View All next.
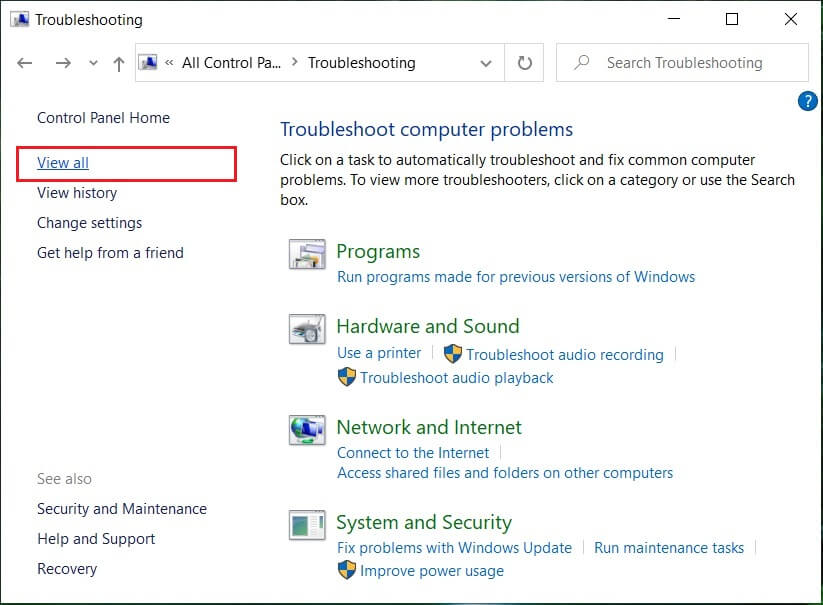
4. Find the Hardware and devices troubleshooter from the following list, click on it and follow the on-screen instructions to start the troubleshooting procedure.
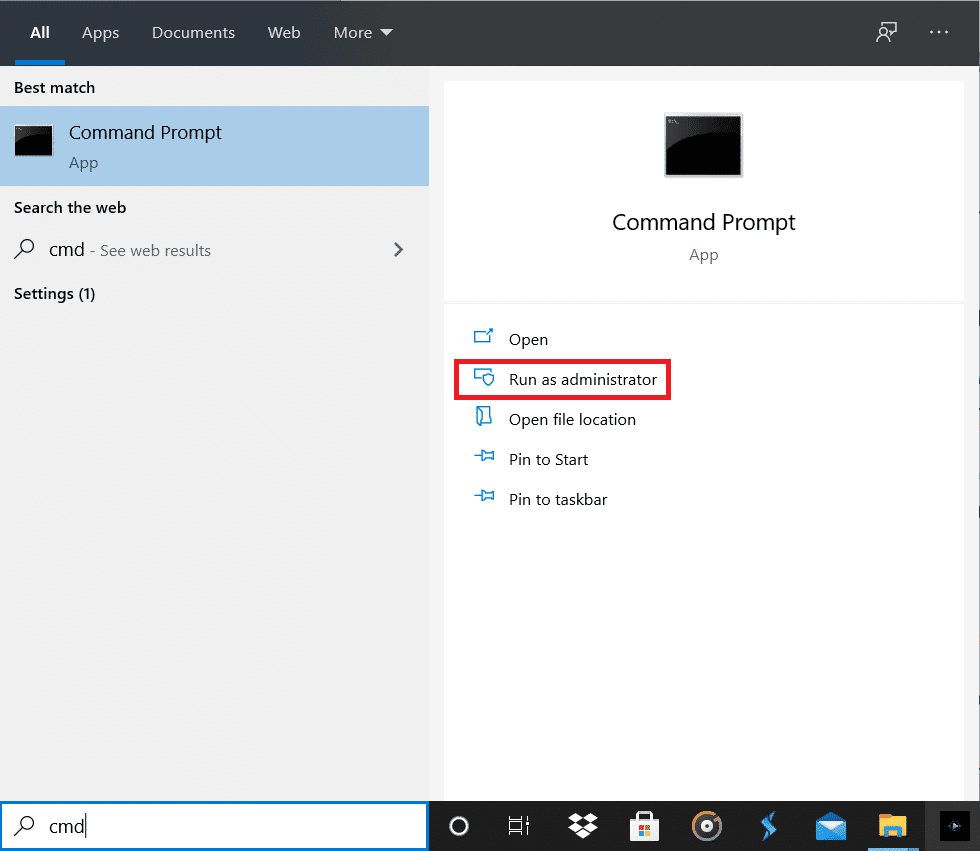
If you aren’t able to find the Hardware and device troubleshooter, do not worry as there is another way to launch the required troubleshooter:
a) Search for Command Prompt in the search bar and click on Run as Administrator.
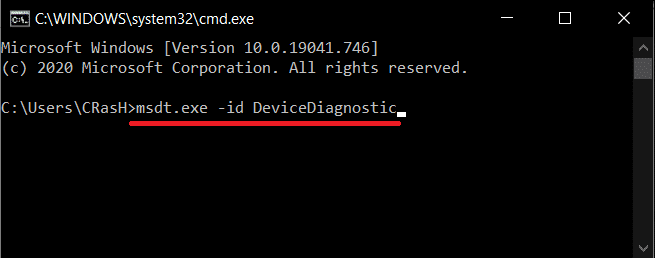
b) Carefully type the below command line and press the enter key to execute.
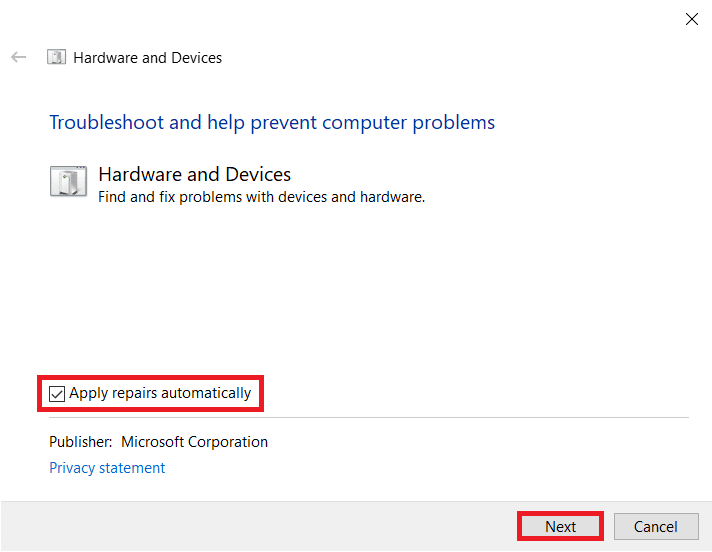
msdt.exe -id DeviceDiagnostic
c) Click on the Advanced button in the following window, ensure Apply repairs automatically is ticked and hit Next.
Hopefully, the troubleshooter will be able to fix your laptop camera not working on Windows 10 issue.
Method 4: Rollback or Uninstall Camera Drivers
Rollbacking or uninstalling the drivers is a trick that usually does the job whenever a hardware-related issue arises. Drivers are often rendered corrupt due to a recent Windows update, bugs, or compatibility issues in the current build, or interference from a different version of the same drivers.
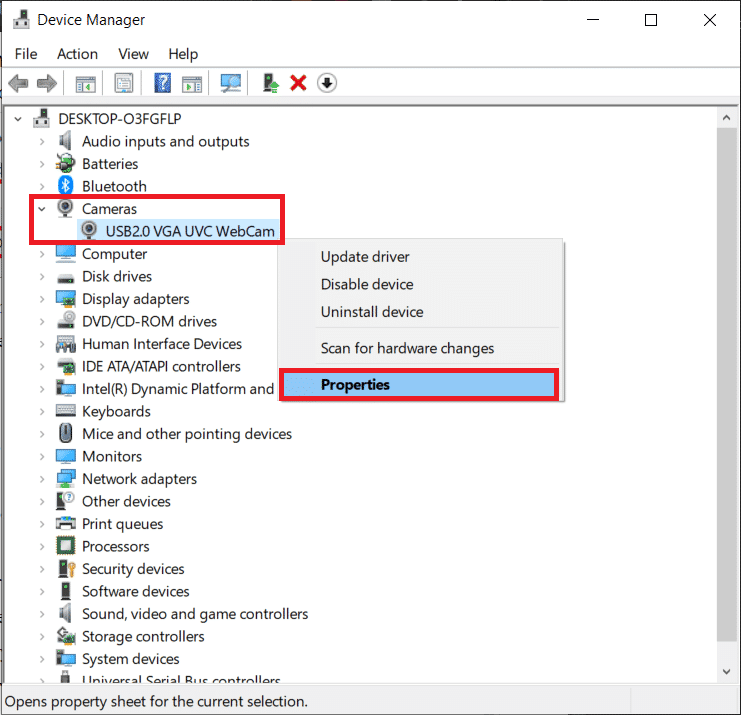
1. Right-click on the Start menu button (or press Windows key + X) and choose Device Manager from the Power User menu.
2. Depending on the Windows version, you will either find ‘Cameras’ or ‘Imaging devices’ in the device manager. Expand the available entry.
3. Right-click on the Webcam device and select Properties from the ensuing menu. You can also double-click on a device to access its settings.
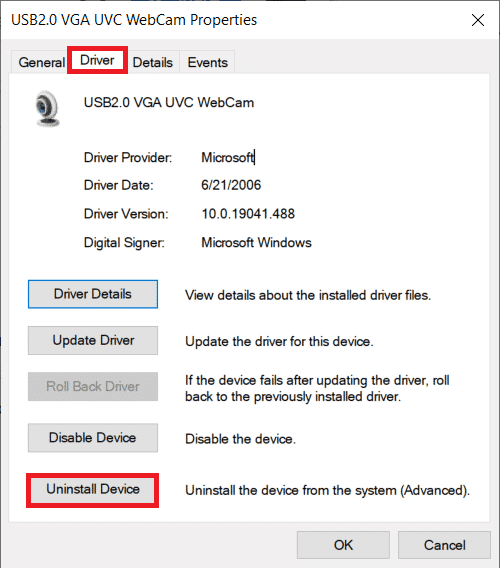
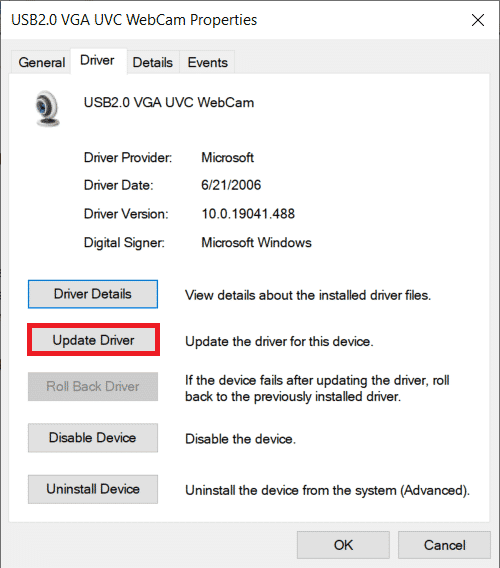
4. Move to the Driver tab of the Properties window.
5. For most users, the Rollback driver button will be grayed-out (not available) if the computer hasn’t retained the previous driver files or didn’t have any other driver files installed. If the Rollback driver option is available to you, click on it. Others can directly uninstall the current drivers by clicking on Uninstall driver/device. Confirm any pop-ups you receive.
6. Now, restart your computer to have Windows automatically reinstall the necessary camera drivers. This might help to fix your laptop camera not working on Skype issue on Windows 10.
Also Read: Split Your Laptop Screen in Half in Windows 10
Method 5: Manually Update Webcam Drivers
Sometimes, the hardware drivers may simply be outdated and need to be replaced with the most up-to-date version to fix all issues. You can either make use of third-party applications like Driver Booster for this purpose or manually download the webcam driver files from the manufacturer’s website and install them yourself. To manually update drivers-
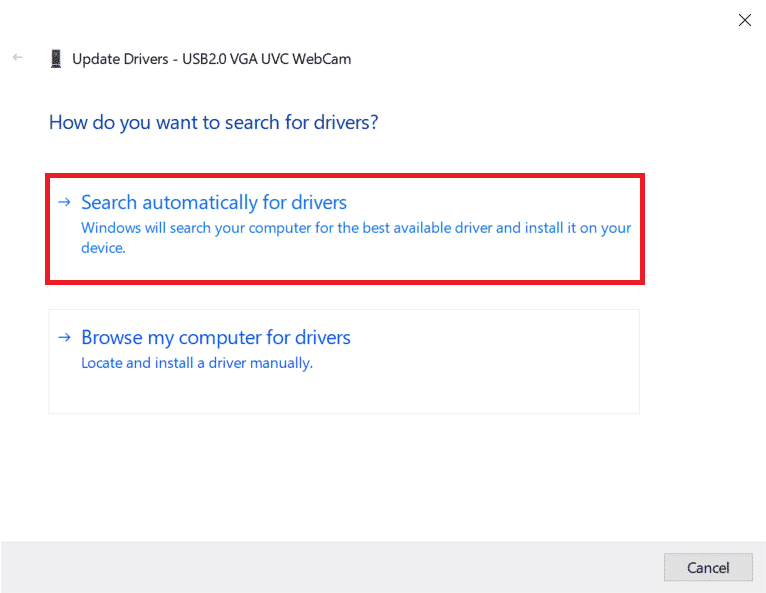
1. Follow steps 1 through 4 of the previous method and land yourself on the Driver tab of the camera Properties window. Click on the Update Driver button.
2. In the following window, choose Search automatically for drivers. If you indeed manually downloaded the driver files from the manufacturer’s website, choose the Browse my computer for the driver’s option.
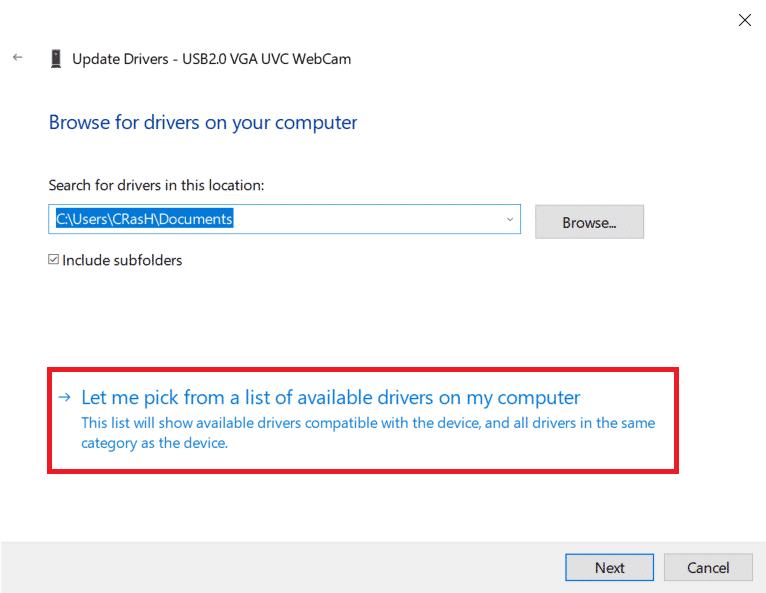
3. Either manually navigate to the location where the driver files are saved and install them or choose Let me pick from a list of available drivers on my computer, select the appropriate drivers (USB Video Device), and hit Next.
4. Restart your computer for good measure.
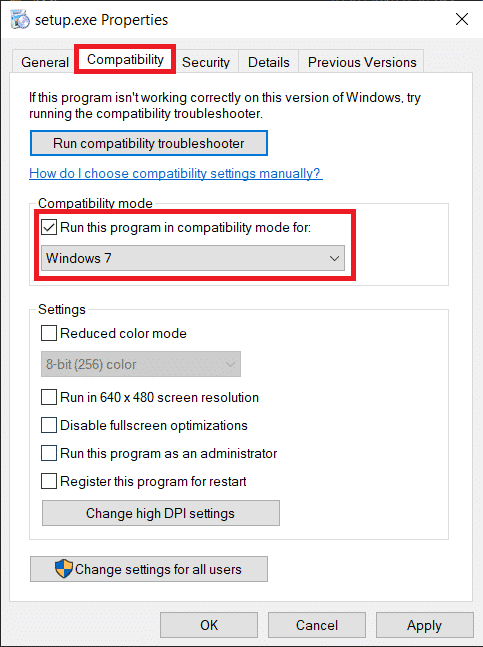
You can also try installing the drivers in compatibility mode to increase the chances of success. Locate the saved driver file, right-click on it and select Properties. Move to the Compatibility tab of the Properties window and check the box next to ‘Run this program in compatibility mode for’. Now, select the appropriate operating system from the drop-down list and click on Apply followed by OK. Install the drivers next and check if the webcam issue has been resolved.
Method 6: Uninstall Windows Updates
Feature updates are regularly pushed to Windows users introducing new features and fixing any issues/bugs in the previous OS build. Sometimes, a new update may modify things for the worse and break a thing or two. If your laptop camera worked perfectly before installing the latest update then it is indeed the case for you. Either wait for a new Windows update or rollback to a previous build in which no issues were being faced.
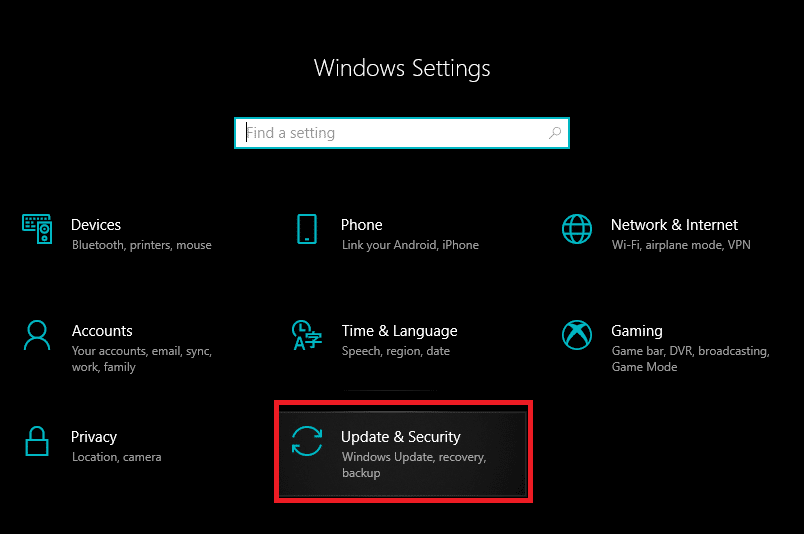
1. Open Settings by pressing Windows key + I and click on Update & Security.
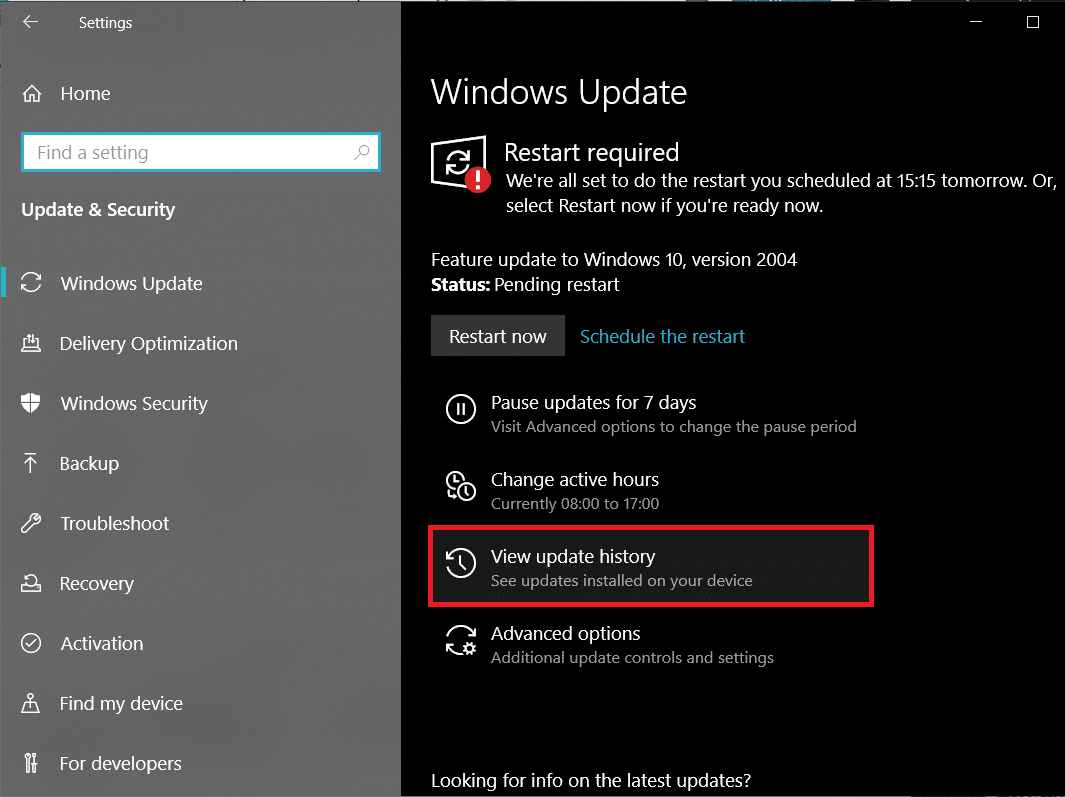
2. On the Windows Update tab, click on View update history.
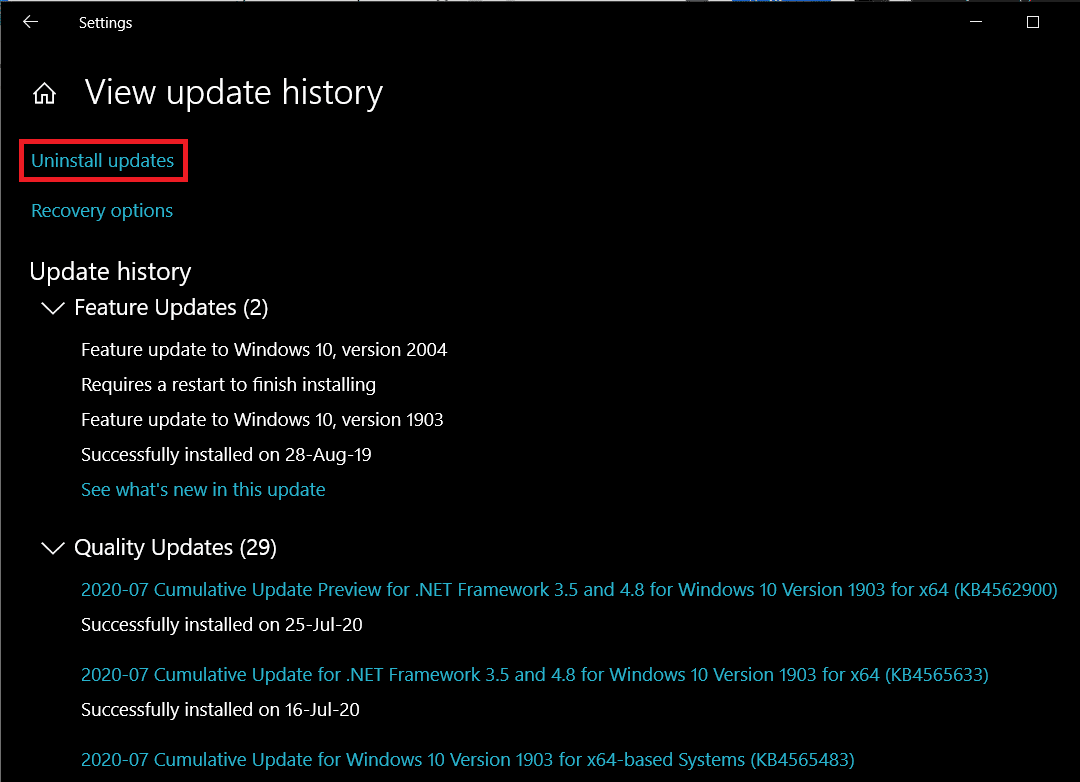
3. Next, click on Uninstall updates.
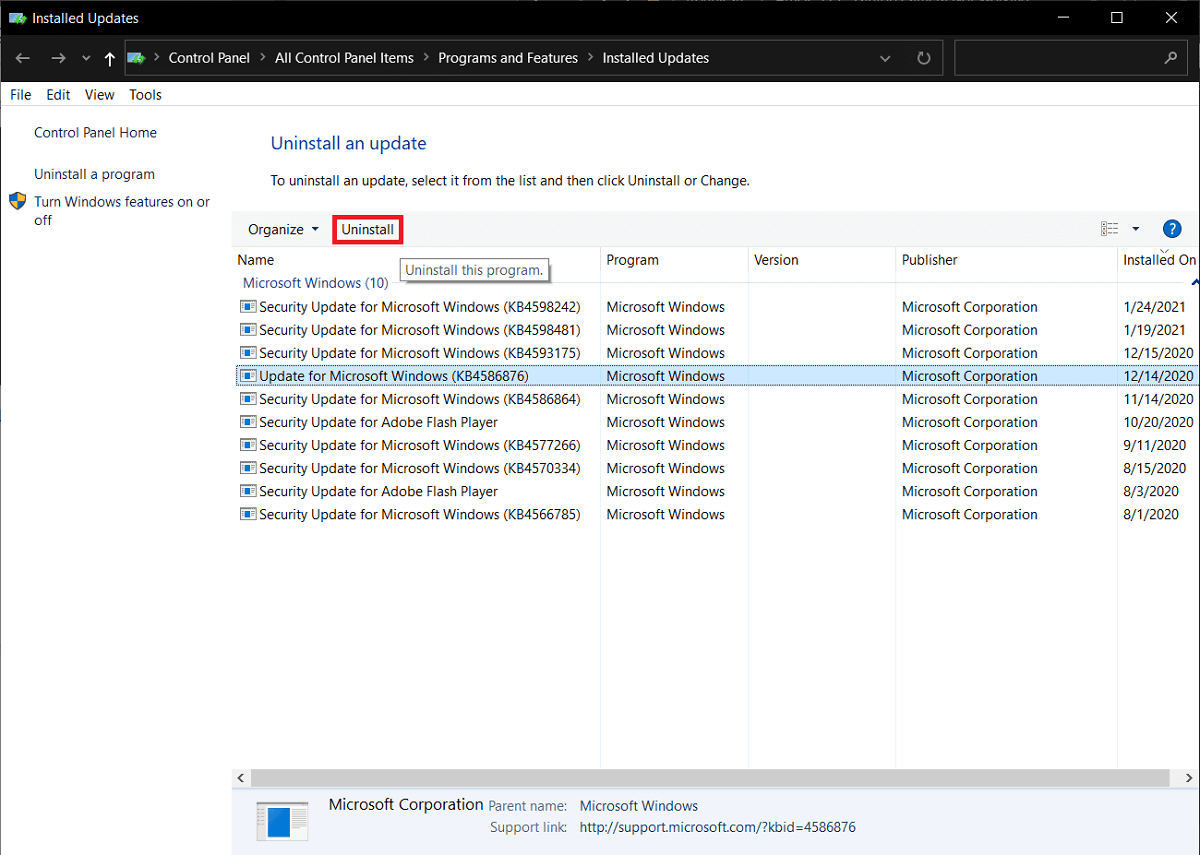
4. Uninstall the most recent feature/quality Windows update. To uninstall, simply select and click on the Uninstall button.
Method 7: Reset Your PC
Hopefully, one of the above-mentioned methods fixed all the camera issues you were encountering but if they didn’t, you can try resetting your computer as a last option. Users have the choice to keep their personal files and reset their settings (applications will be removed) or get rid of everything at once. We recommend you first reset your PC while keeping all the personal files and if that doesn’t work, try resetting everything to fix the laptop camera not working on Windows 10 issues.
1. Open the Windows Update Settings again and this time, move to the Recovery page.
2. Click on the Get Started button under Reset This PC.
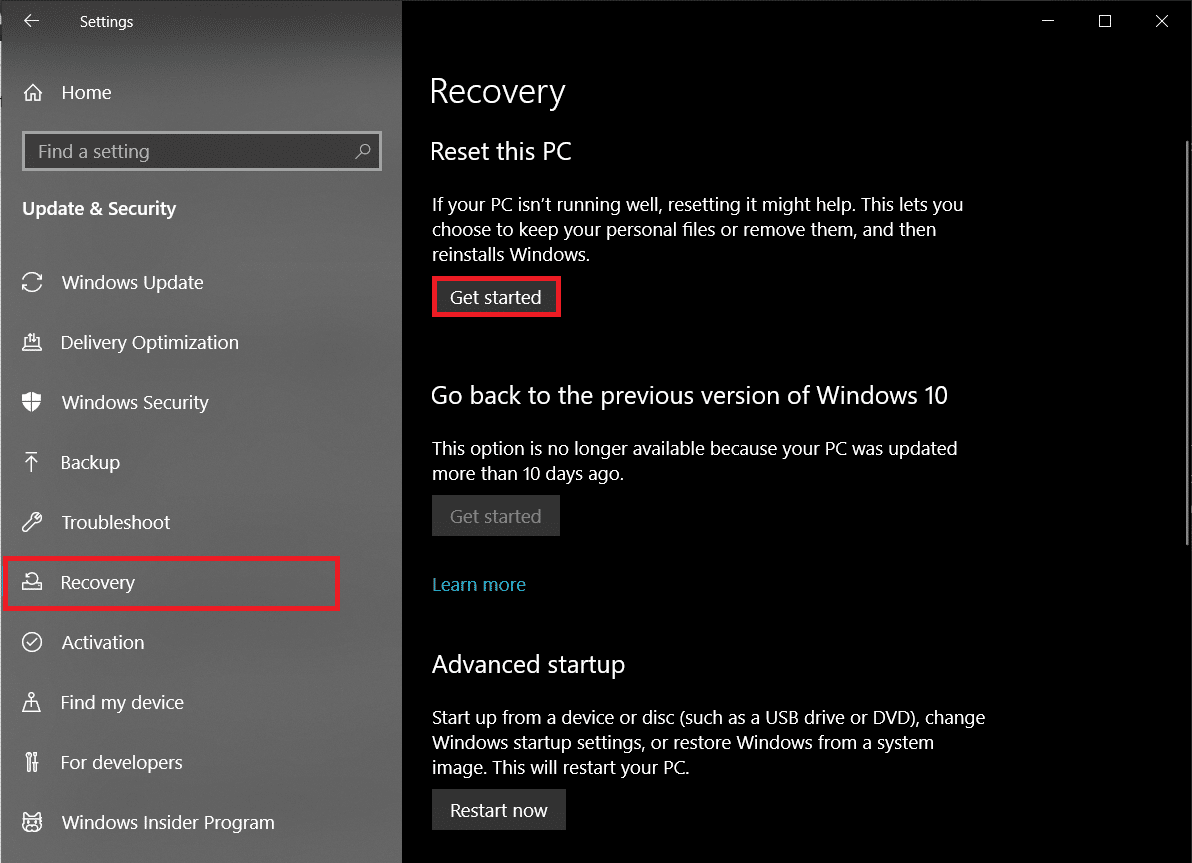
3. Choose to Keep my files in the next window and follow the on-screen prompts to reset your computer.

Recommended:
If your laptop recently took a tumble, you might want to get it checked by a professional or manually pry open the screen and have a look at the webcam connection. It is likely that the fall loosened the connection or caused some serious damage to the device.
We hope this guide was helpful and you were able to fix Laptop camera not working on Windows 10 issue. For any more assistance on this topic, feel free to get in touch with us at info@techcult.com or the comments section below.