How to Change CPU Process Priority in Windows 10

How to Change CPU Process Priority in Windows 10: The way the app works in Windows is that all the resources of your system are shared between all running processes (application) based on their priority level. In short, if a process (application) has a higher priority level then it will be automatically allotted more system resources for better performance. Now there are exactly 7 priority levels such as Realtime, High, Above Normal, Normal, Below Normal, and Low.
Normal is the default priority level which most of the apps uses but the user can change the default priority levels of an application. But the changes made to the priority level by the user are only temporary and once the app’s process terminates, the priority is again set to normal.
Some apps have the ability to adjust their priority automatically according to their needs, for example, WinRar is able to adjust it’s priority level to “Above Normal” to speed up the archiving process. So without wasting any time le’s see How to Change CPU Process Priority in Windows 10 with the help of the below-listed tutorial.
Note: Make sure you don’t set the process priority level to Realtime as it can cause system instability and cause your system to freeze.
How to Change CPU Process Priority in Windows 10
Make sure to create a restore point just in case something goes wrong.
Method 1: Change CPU Process Priority levels in Task Manager
1.Press Ctrl + Shift + Esc to open Task Manager.
2.Click on the “More details” link at the bottom, if already in the more detail view then skip to the next method.

3.Switch to Details tab then right-click on the application process and select “Set Priority” from the context menu.
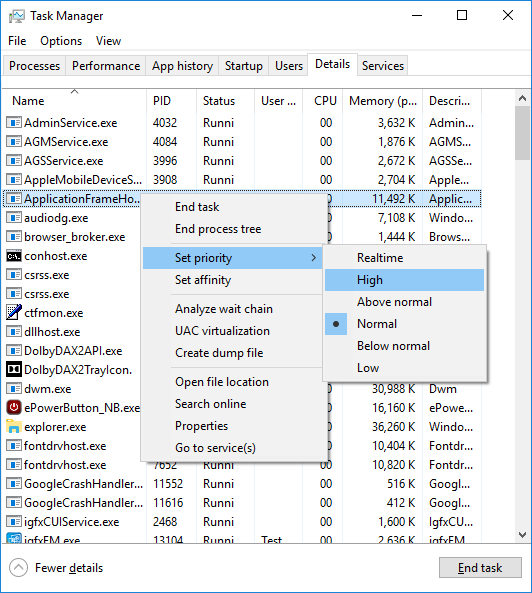
4.In the sub-menu select the preferred priority level for example, “High“.
5.Now the confirm dialogue box will open, simply click on Change priority.

Method 2: Change CPU Process Priority in Windows 10 using Command Prompt
1.Press Windows Key + X then select Command Prompt (Admin).

2.Type the following command into cmd and hit Enter:
wmic process where name=”Process_Name” CALL setpriority “Priority_Level”
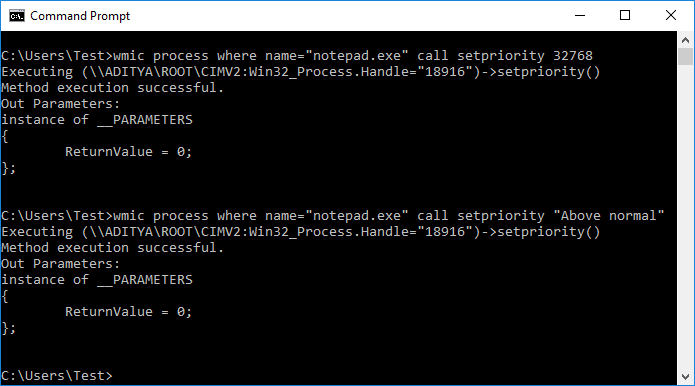
Note: Replace Process_Name with the actual name of the application process (ex:chrome.exe) and Priority_Level with the actual priority you want to set for the process (ex: Above normal).
3.For example, you want to change the priority to High for Notepad then you need to use the following command:
wmic process where name=”notepad.exe” call setpriority “Above normal”
4.Once finished, close command prompt.
Method 3: Start an Application with a Specific Priority
1.Press Windows Key + X then select Command Prompt (Admin).

2.Type the following command into cmd and hit Enter:
start “” /Priority_Level “Full path of application”
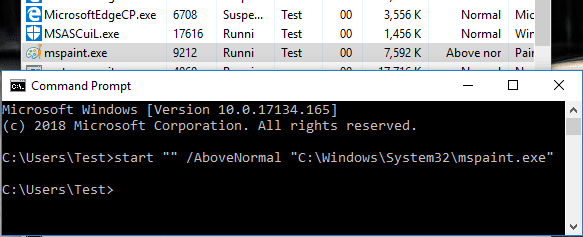
Note: You need to replace Priority_Level with the actual priority you want to set for the process (ex: AboveNormal) and “Full path of application” with the actual full path of the application file (example: C:WindowsSystem32notepad.exe).
3.For example, if you want to set the priority level to Above Normal for mspaint then use the following command:
start “” /AboveNormal “C:WindowsSystem32mspaint.exe”
4.Once finished, close command prompt.
Recommended:
That’s it you have successfully learned How to Change CPU Process Priority in Windows 10 but if you still have any questions regarding this tutorial then feel free to ask them in the comment’s section.