How to Rename file in Destination Directory
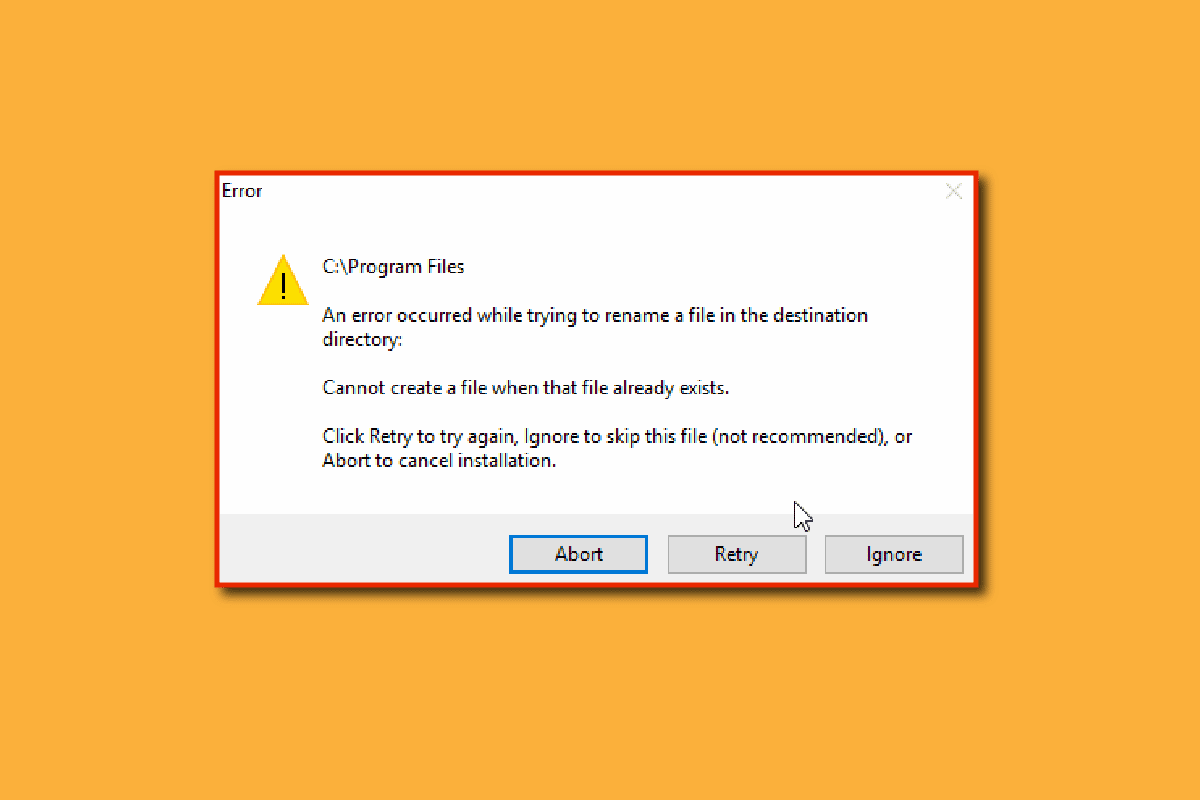
Windows 10 Operating system offers many ways to do a particular task, and renaming files is not an exception. There are many ways to rename a file, but sometimes you might go through errors such as you can’t rename file in file explorer. There are various reasons for these errors. Also, if you are trying to rename file in destination directory, that might also throw an error that leaves you with the question how do I rename a file in a directory? If you are wondering how to fix this problem, then you are at the right article. Here, I show the methods for fixing this issue, let’s get started.

How to Rename file in Destination Directory in Windows 10
Before we see the methods for the fix, let us see some of the main causes of the issue
- Windows defender conflicts
- Windows ownership issues
- Renaming glitch
- Windows slideshow background issue
- Problems with autorun.inf
- Corrupt registry
- Administrator rights issues
- File or folder is in use
Method 1: Ensure File or Folder Is Not Opened in Background
The most common and overlooked cause is renaming a file or folder when it is open by Windows explorer or in any app, in this case, you can do either of these two ways.
You can close Windows Explorer and rename the file or folder (or) you can close the app and rename the file or folder

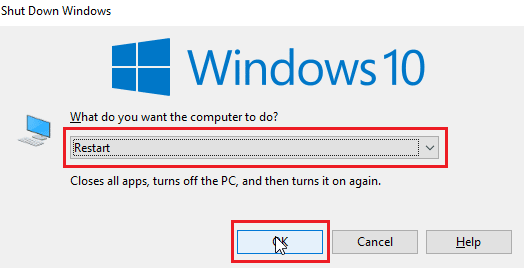
If you cannot pinpoint which app or where the file is located a simple Windows restart can be a potential solution allowing you to rename the file or folder after a Windows restart.
1. Hit the Alt + F4 keys simultaneously and select Restart from the dropdown menu.
2. Click on OK to restart the PC.
Method 2: Use Administrator Account
Another way is to log in to the Windows account as an administrator,
1. Hit the Windows + I keys together to open Settings.
2. Click on Accounts setting.
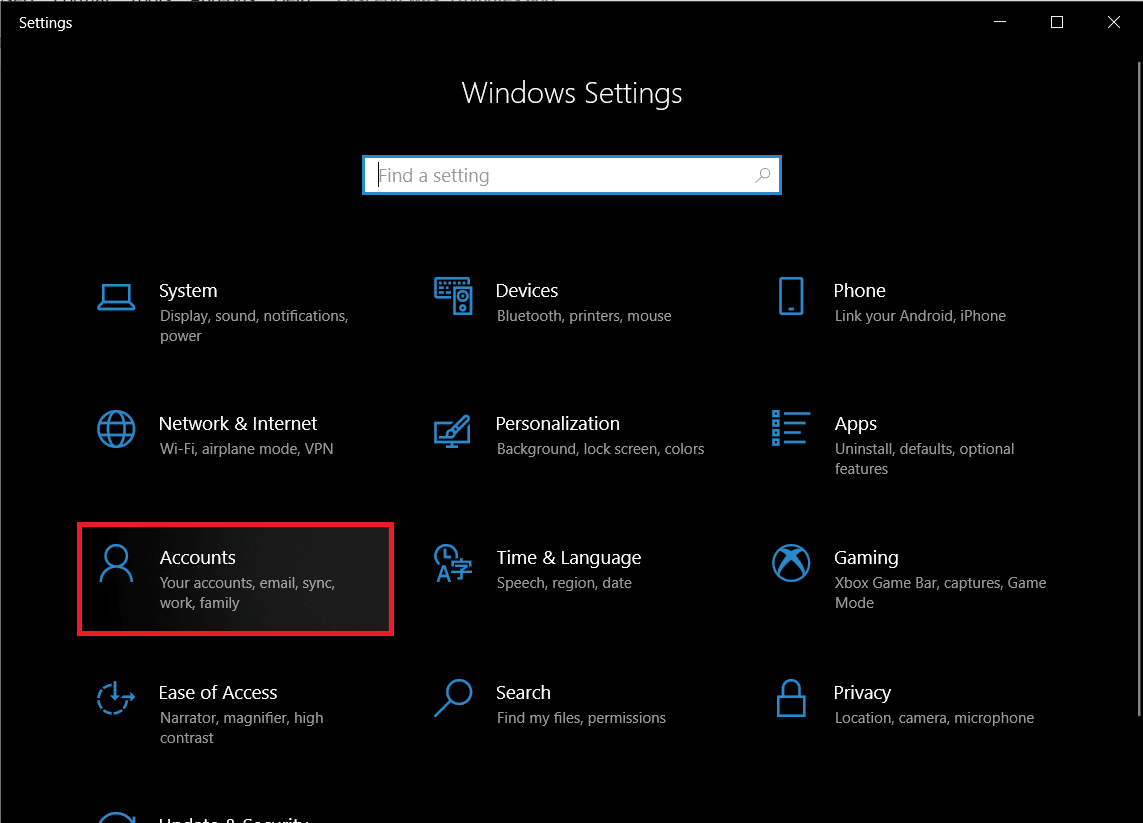
3. Now, click Your info in left– pane
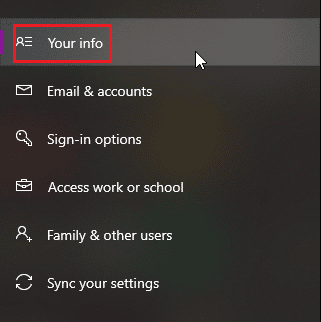
4. Now, the account you are currently signed in will open in the right- pane

Check if the account has Administrator rights.
Also Read: How to Find Administrator Password On Windows 10
Method 3: Update Windows
Windows 10 is updated regularly, so please check and install the necessary updates regularly to avoid any issues or glitches with it. Read our guide on How to Download and Install Windows 10 Latest Update.
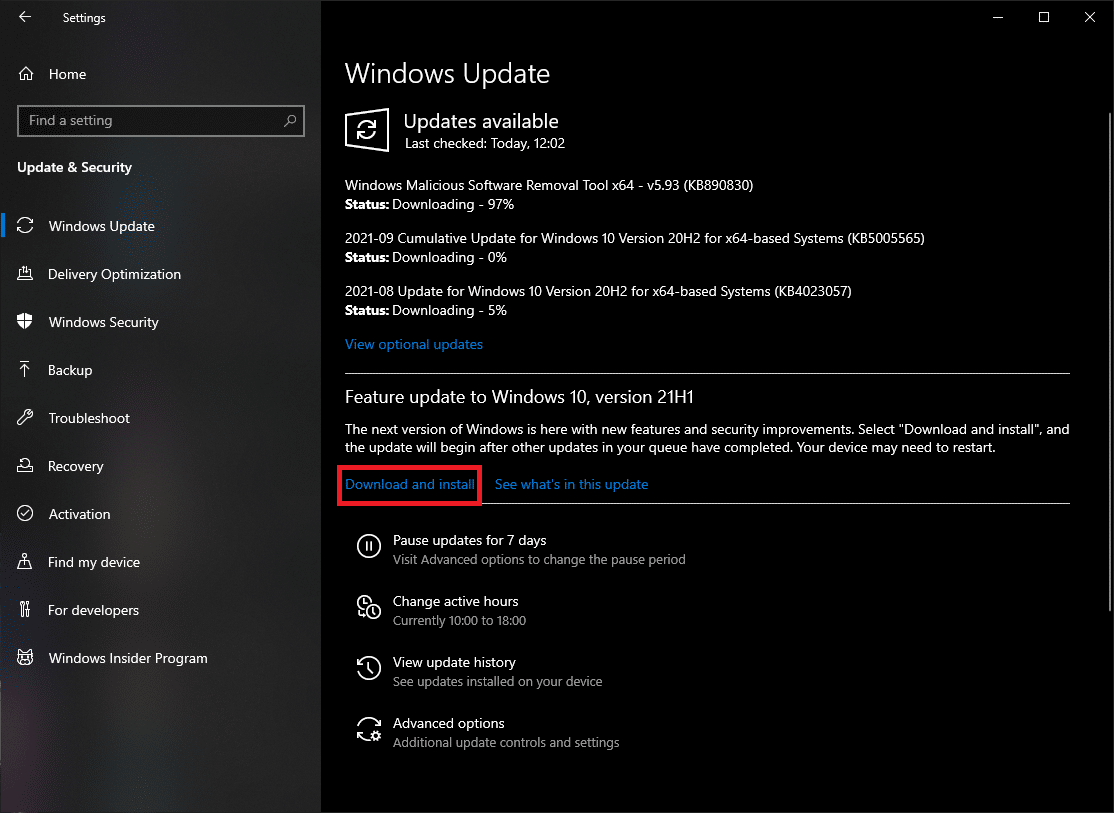
3. Windows now will check for any updates and will download and install automatically, there might be a restart required for installation
Method 4: Perform Malware Scan
Sometimes malware can be an issue in these cases, running a scan in Windows Defender scan can help protect the PC and also help with this issue. Follow our guide on How do I Run a Virus Scan on my Computer?
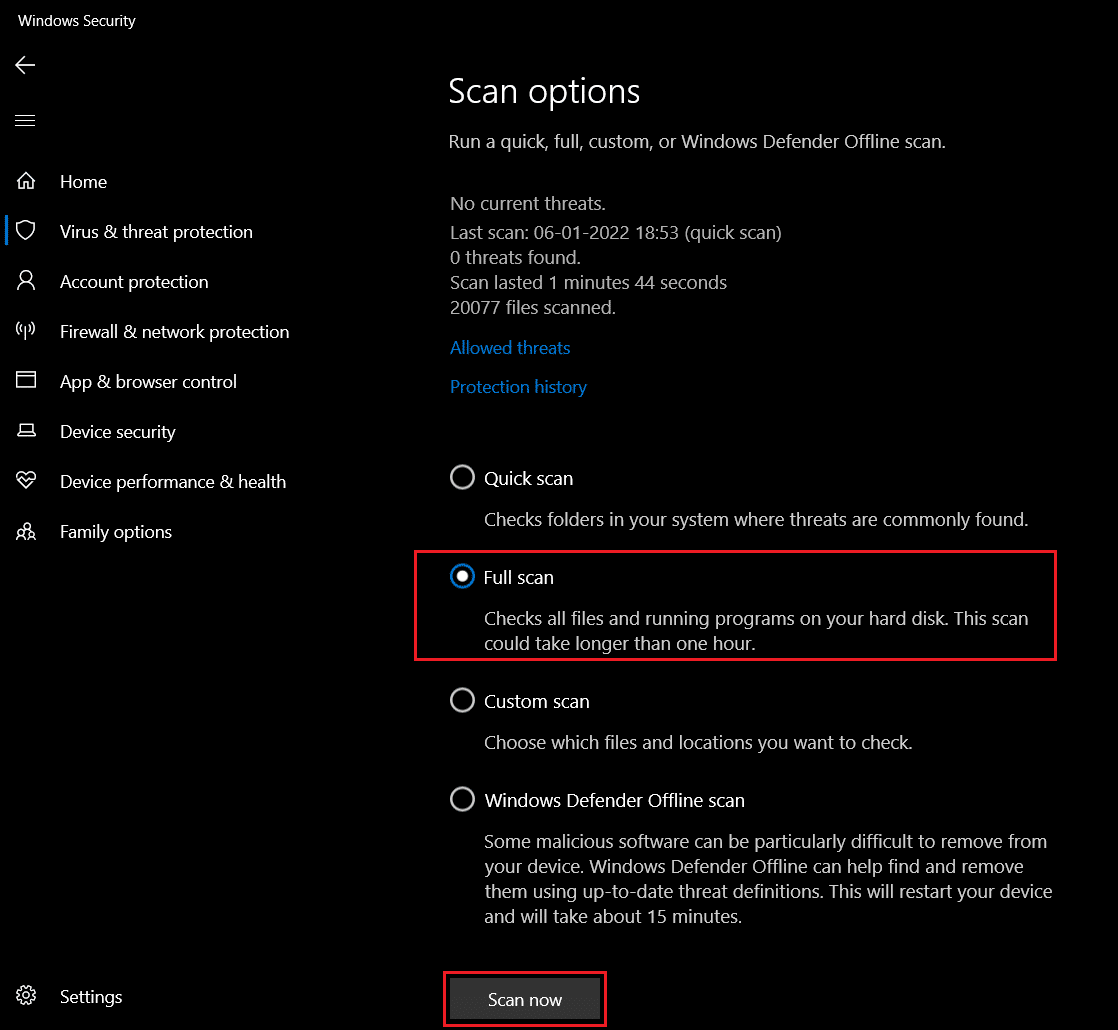
Also Read: 26 Best Free Malware Removal Tools
Method 5: Set Constant Background Image
Windows allows Backgrounds to be slideshows instead of wallpapers for a different experience for users, but these can sometimes lead to issues for renaming file in destination directory.
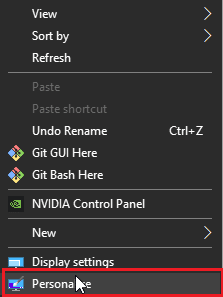
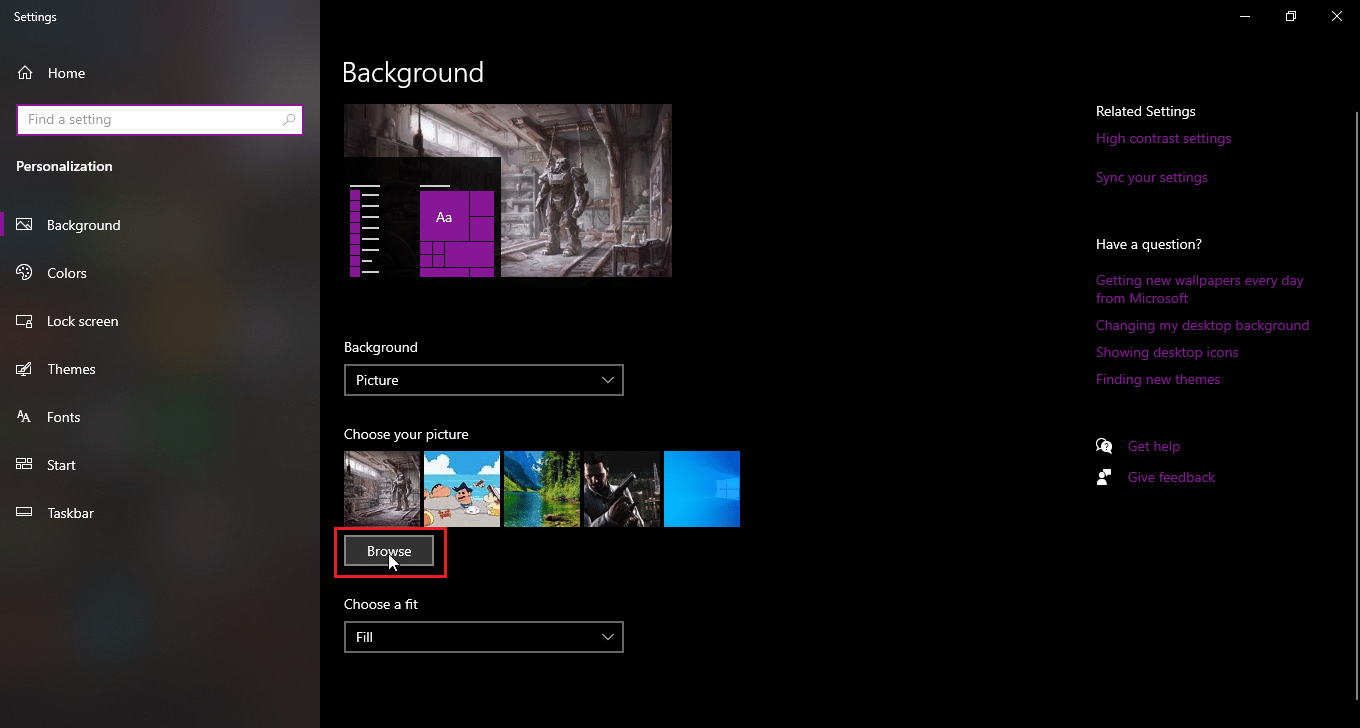
1. Right-click from the desktop and click on Personalize.
2. Now, click on Background Drop-down from the Slideshow to Picture option.

3. You can now choose background wallpaper from the options below or you can Browse for one wallpaper.
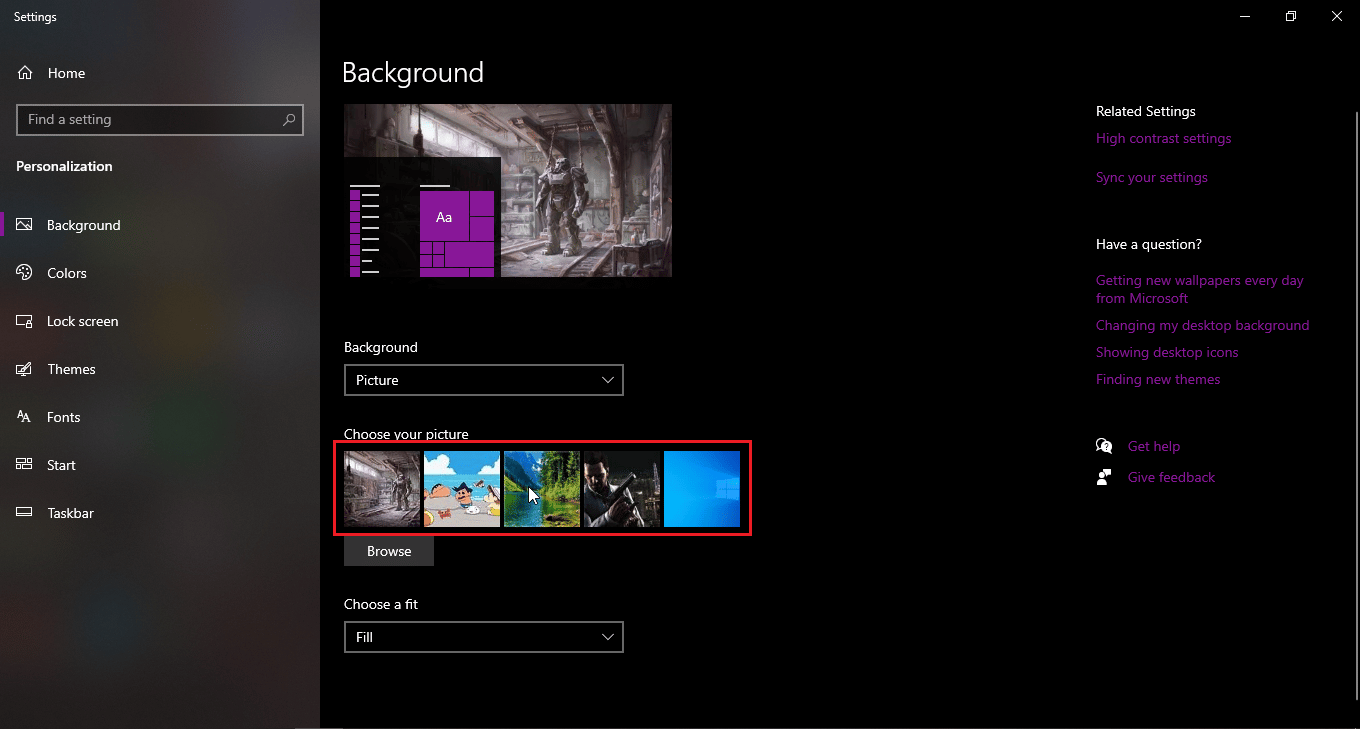
4. Browse for a new wallpaper by clicking on Browse.
Method 6: Change View Tab
There is a glitch in Windows 10 which occurs when the files or folders are viewed as small icons, if your view is set to small icons then this glitch can happen causing errors in rename file in destination directory. To change the view follow the below steps.
1. Open the folder or directory in which you want to rename a file
2. In case you want to rename a file on desktop, open File Explorer and select desktop on left-pane.
3. After you opened the directory, click View tab

4. Now, click on any view except Small icons and Rename files.

Also Read: Fix Windows 10 File Explorer Working on it Error
Method 7: Turn Off Periodic Scanning
Windows defender has a useful feature that can control folder access, but this feature can conflict with the system which lends you unable to rename the file in destination directory, try turning controlled folder access off to see if renaming works,
1. Hit Windows + I keys simultaneously to open Settings.
2. Navigate to Update and Security setting.
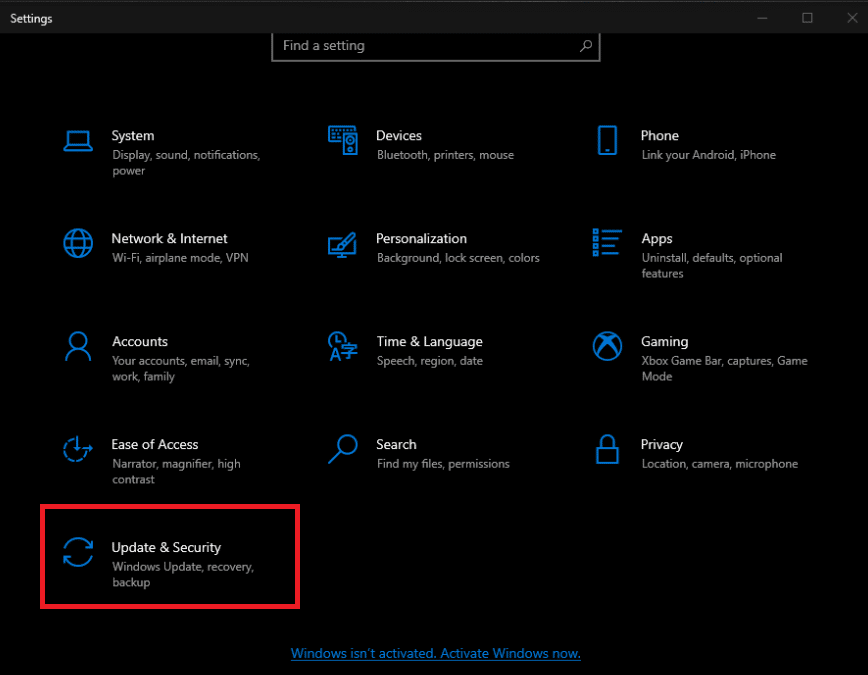
3. Click on Windows Security in left-pane
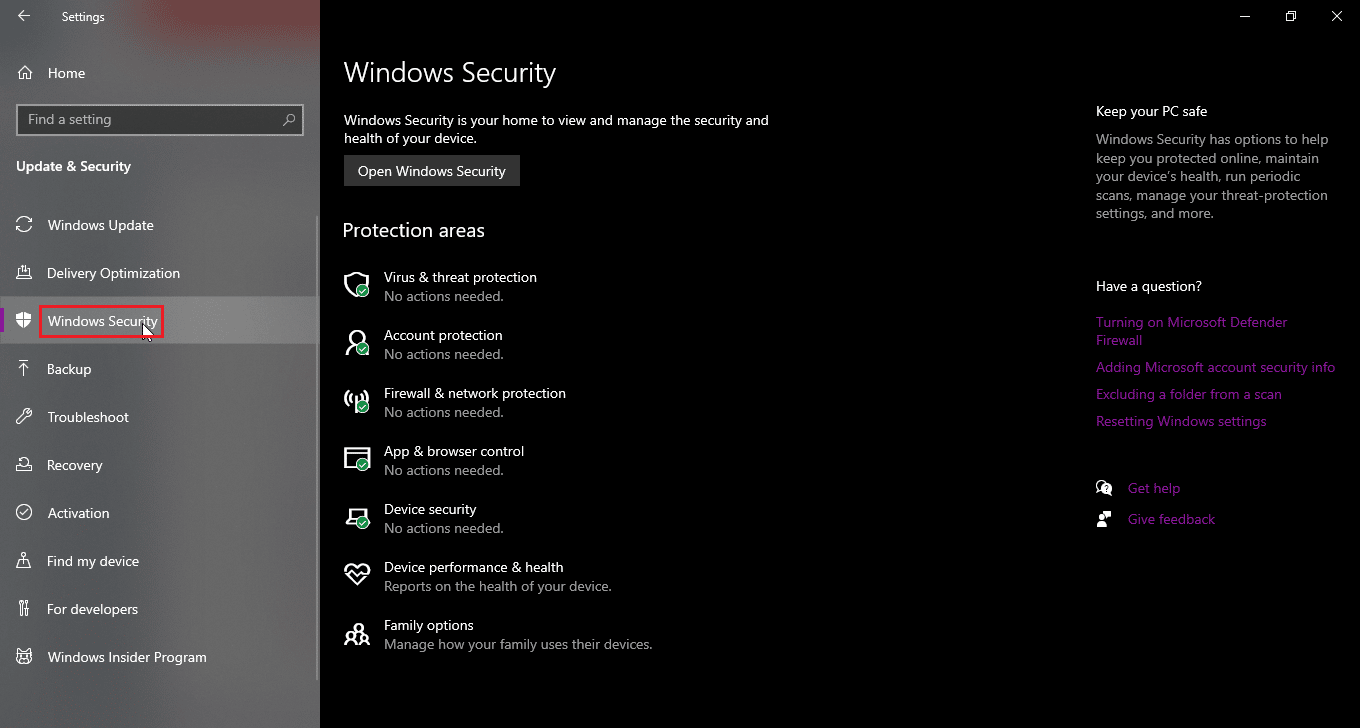
4. Now click Open Windows Security button in the right-pane
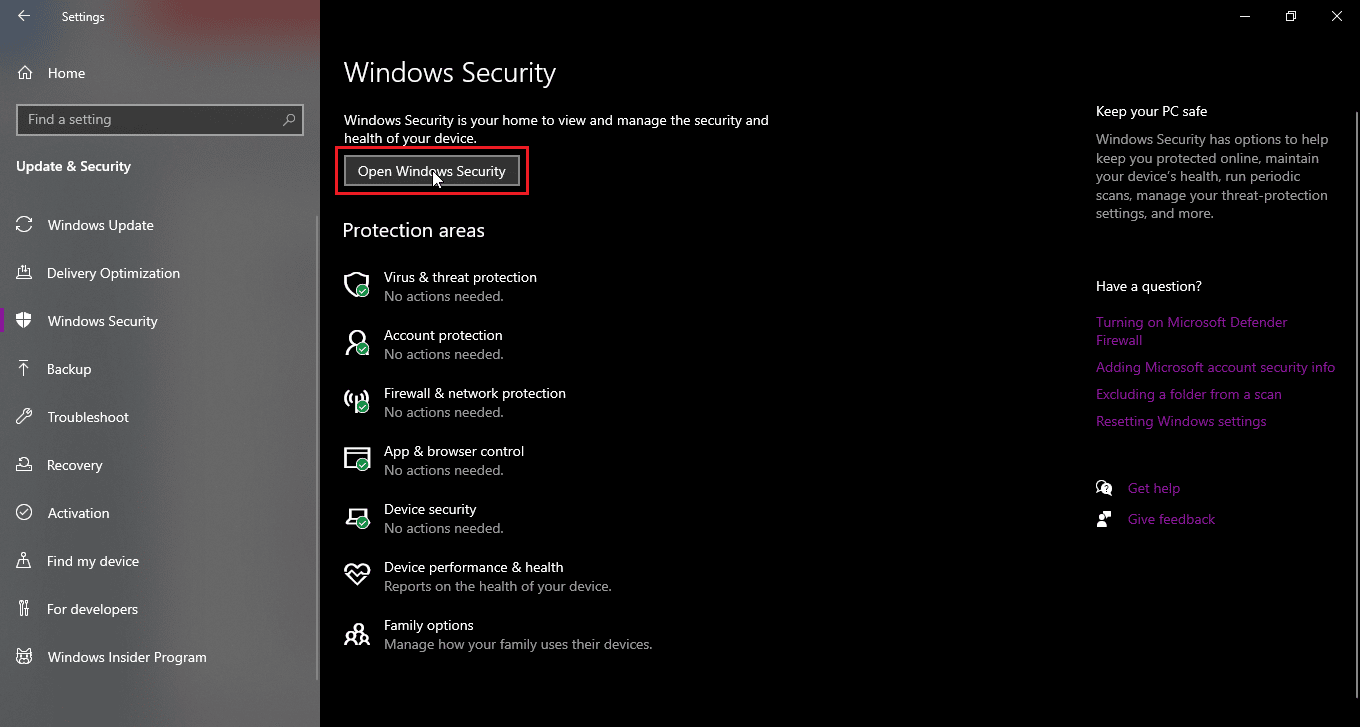
5. Click on Virus and threat protection
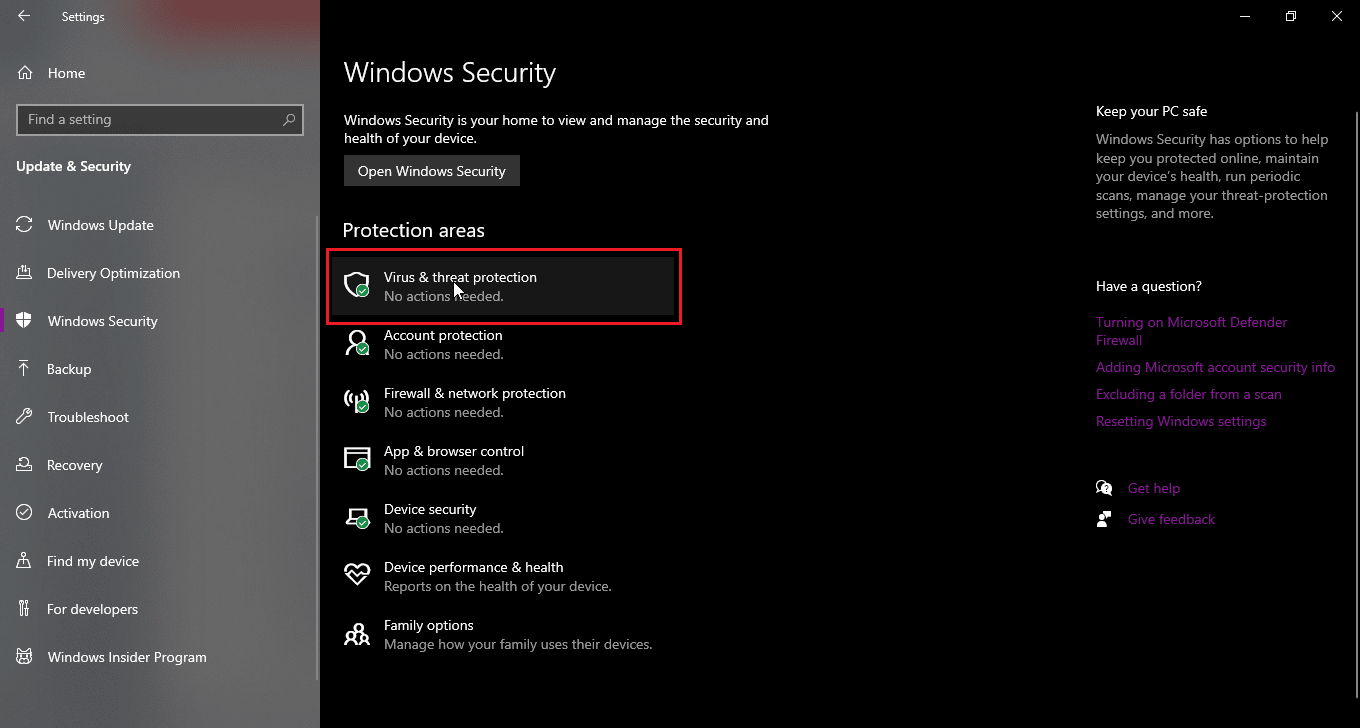
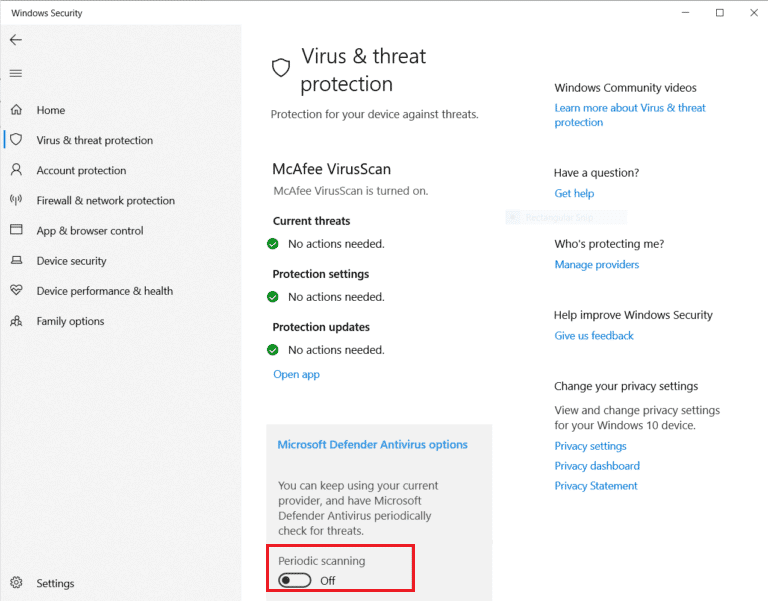
6. Now scroll down and click on Virus and threat protection settings
7. Now turn OFF the periodic scanning.
Method 8: Restart Windows Explorer
Windows Explorer, also known as file explorer, lets the user navigate through files and folders in there and perform a myriad of actions, including renaming files. A glitch in Windows Explorer can be an issue for rename file in destination directory and also users can’t rename file in file explorer, to resolve it
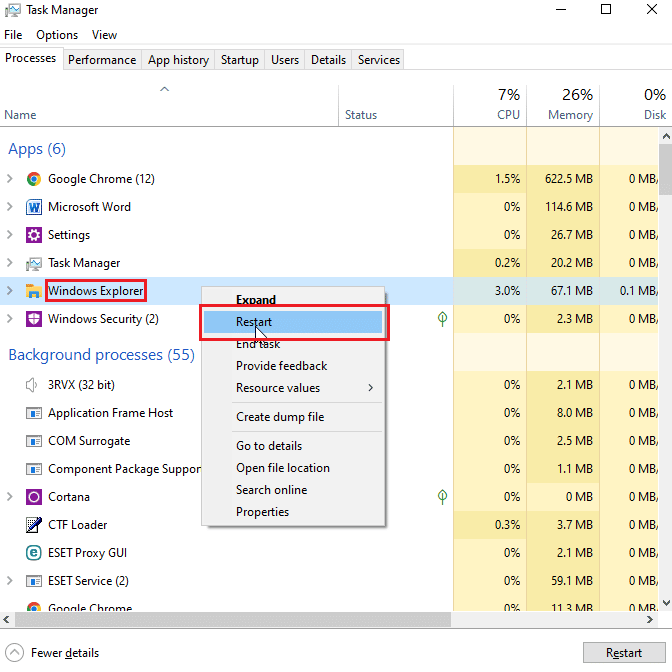
1. Press Ctrl + Shift + Esc to open Task Manager

2. Search for Windows Explorer process.
3. Right-click on it and select the Restart option.
Also Read: Fix File Explorer Not Responding in Windows 10
Method 9: Delete Autorun.inf
Autorun. inf is a settings file that runs first when a disk is inserted and is a file that is read first, the purpose of this file is to show up a UI such as an installation or play prompt for a game and/or an application. Users reported that these Autonrun.inf can conflict with the system can cause rename file in destination directory
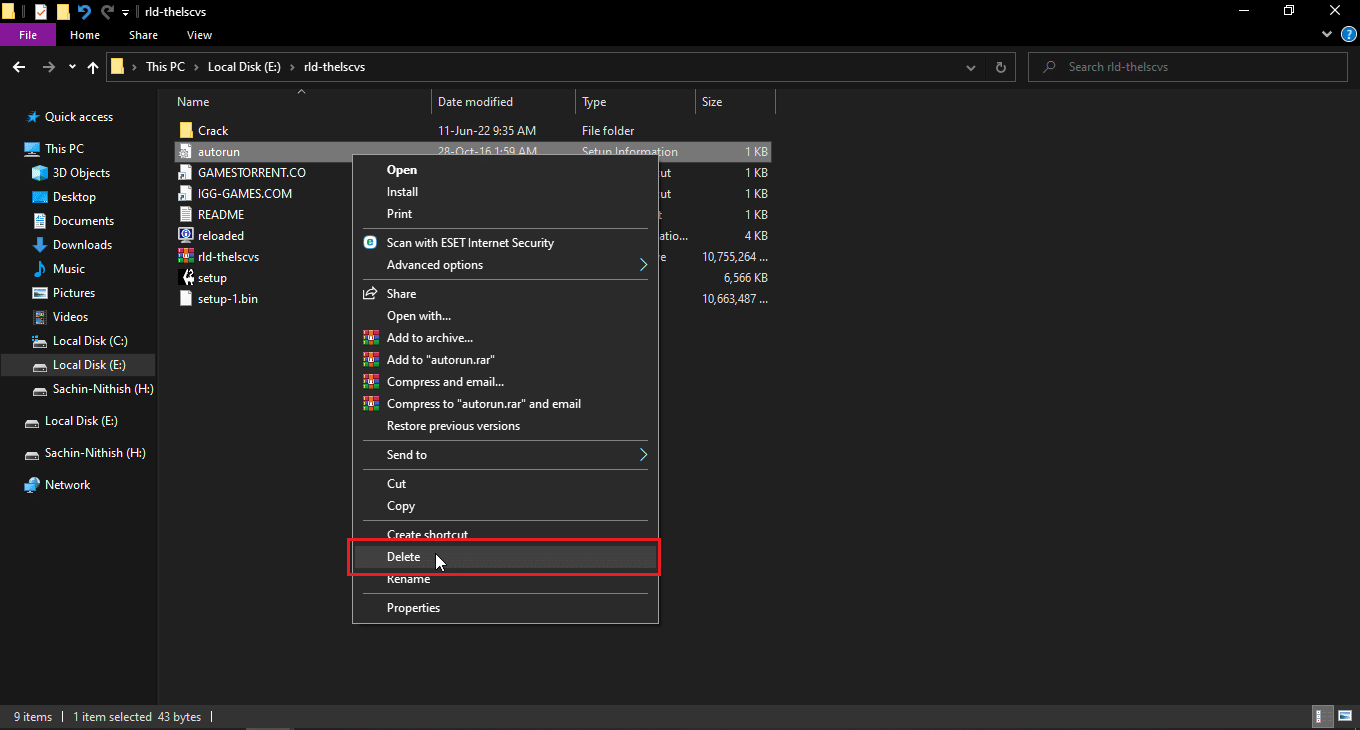
1. Go to File explorer and the file directory where a possible autorun.inf file is located

2. Right-click on file and Delete it
3. If you cannot see an autorun file, then click on the View tab on top of the Windows explorer

4. Tick the box near hidden items, this will show the hidden items including autorun.inf.
Method 10: Use Windows PowerShell
If you cannot rename files or folders you can try this method through PowerShell
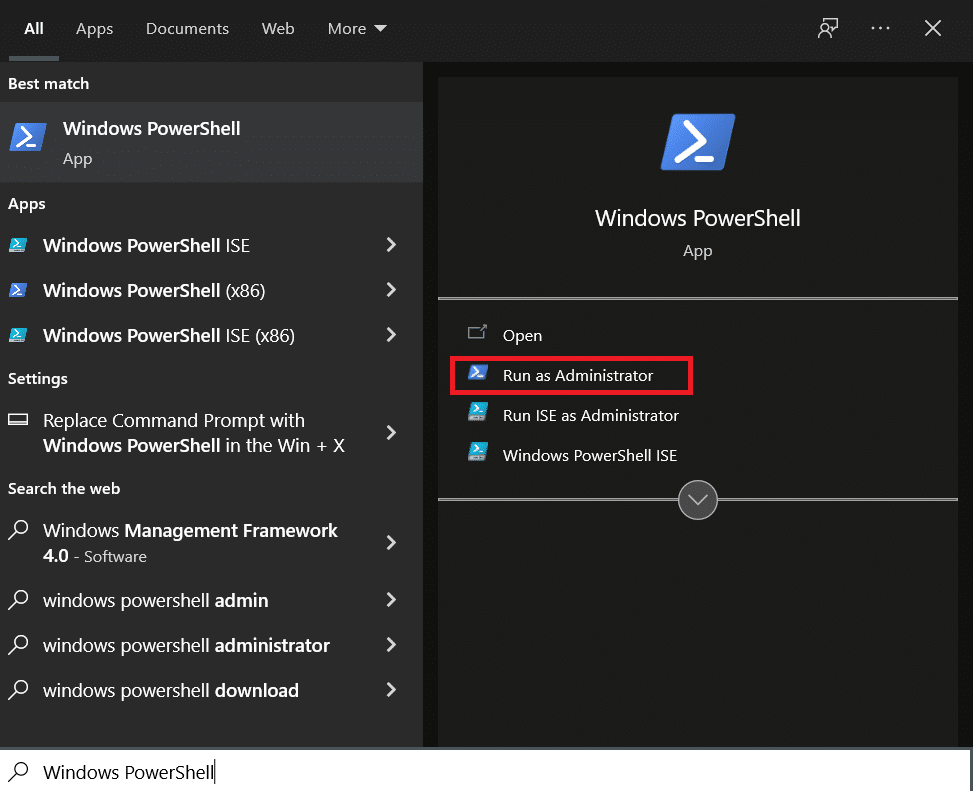
1. Hit the Windows key, type Windows PowerShell, then click on Run as administrator.
2. Type the following command and press the Enter key.
$manifest = (Get-AppxPackage Microsoft.WindowsStore).InstallLocation + 'AppxManifest.xml' ; Add-AppxPackage -DisableDevelopmentMode -Register $manifest
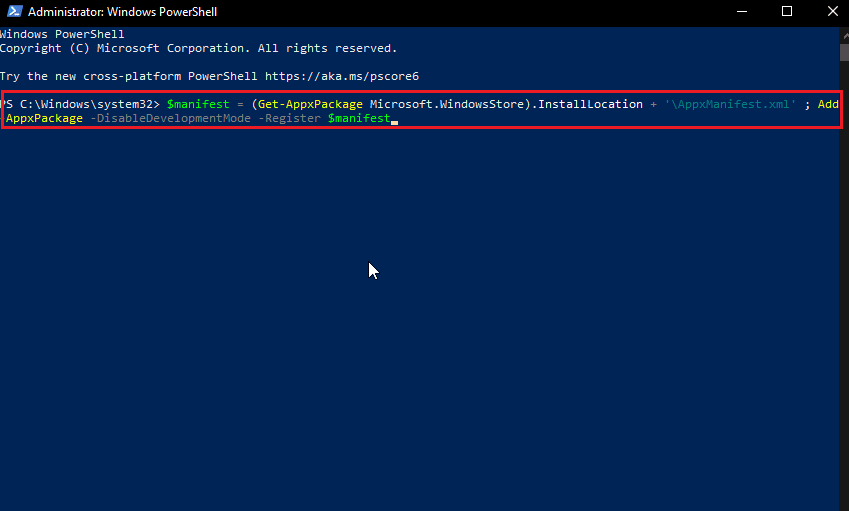
3. Once successfully complated, close PowerShell and restart the PC.
Also Read: Fix The Process Cannot Access the File error on Windows 10
Method 11: Change Ownership of File
Normally in Windows using multiple User accounts can be problematic because only one account can have administrator privileges, which can cause problems in renaming a file or a folder, though a single user account on a computer doesn’t account for this problem. For multiple User accounts, try the following
1. Right-click the folder you want to rename or a file you want to rename.
Note: In case you want to rename a file that is on the desktop, move that file to another folder.
2. Click on the Properties option as shown.

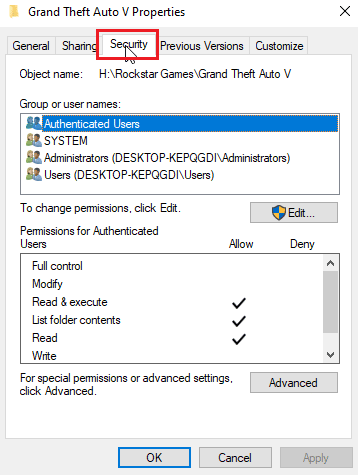
3. Go to the Security tab.
4. Next, click on Advanced.
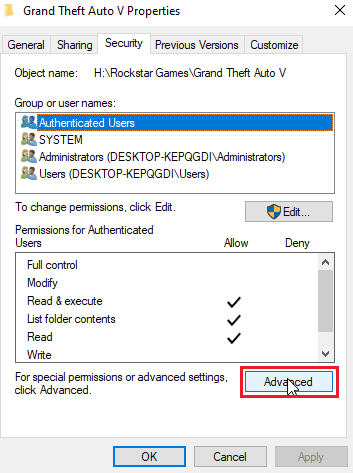
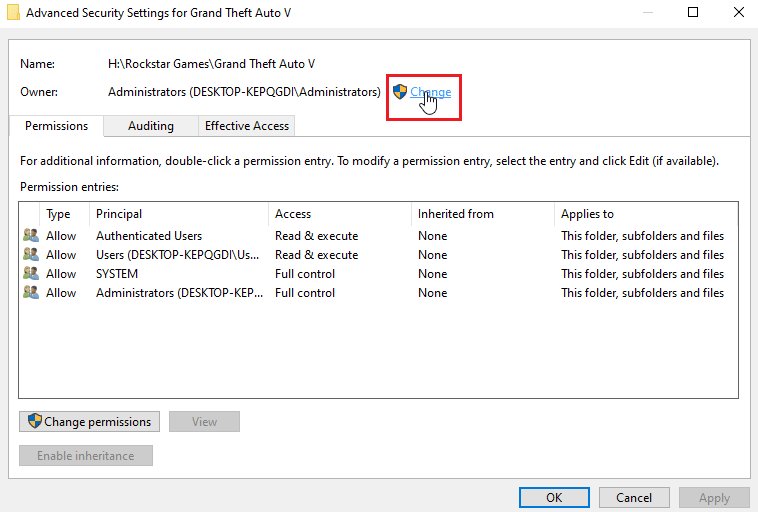
5. Now, you will see the menu for Ownership access. For Owner field at the top, click on the Change link
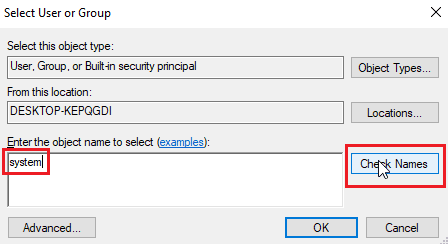
6. Type a username or user account which you have created in Windows and click on Check names.
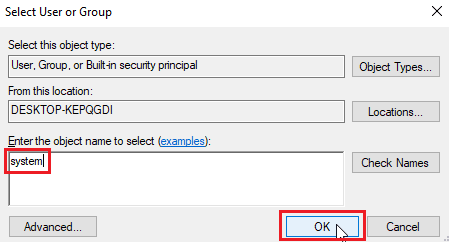
7. Now, the entered username will appear and Windows will recognize it. Click on OK.
8. Check the box marked Replace owner on subcontainers and objects shown highlighted.
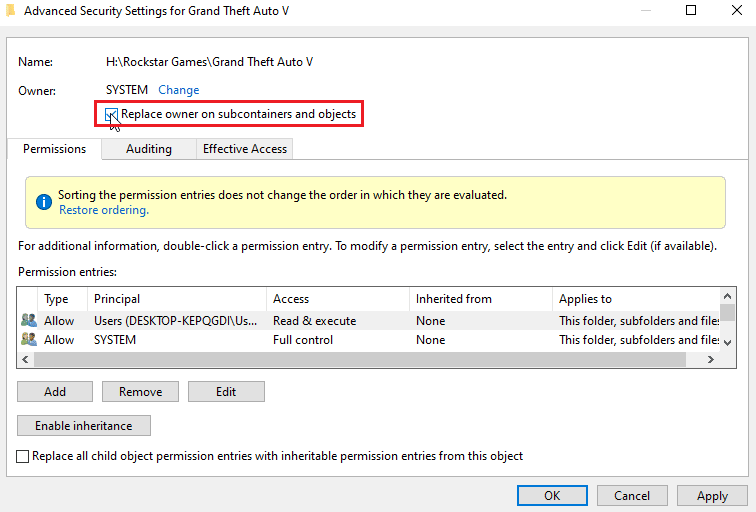
9. Finally, click on Apply and click on OK to save all changes
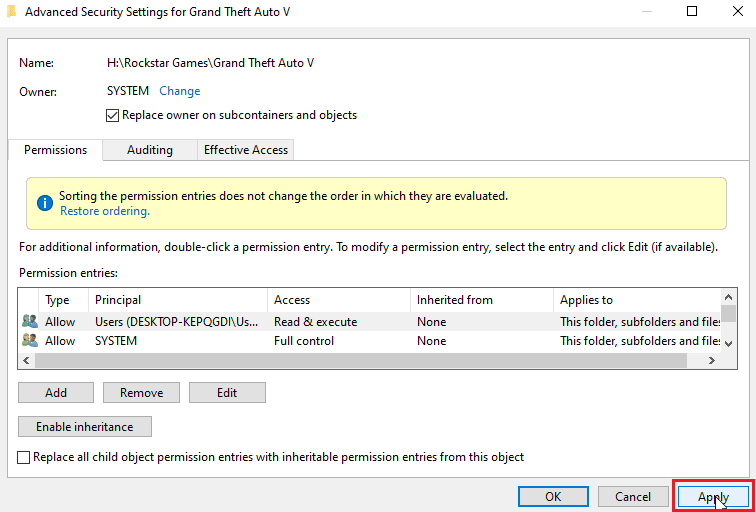
After the change, you can edit, move delete or do anything with the file because you have granted the ownership access. This will be a fix for rename file in destination directory.
Also Read: How to Take Full Control or Ownership of Windows Registry Keys
Method 12: Edit Registry Keys
Note: It is important to create a system restore point before performing this solution; In case of any registry failures you can use the System restore point to restore your Windows system to its previous state. Don’t proceed without creating a system restore point from here.
1. Hit Windows + R keys to open the Run dialog box.
2. Type regedit and click OK to launch the Registry Editor.

3. Now, carefully navigate to the following key folder path.
HKEY_LOCAL_MACHINESOFTWAREMicrosoftWindowsCurrentVersionExplorerFolderDescriptions
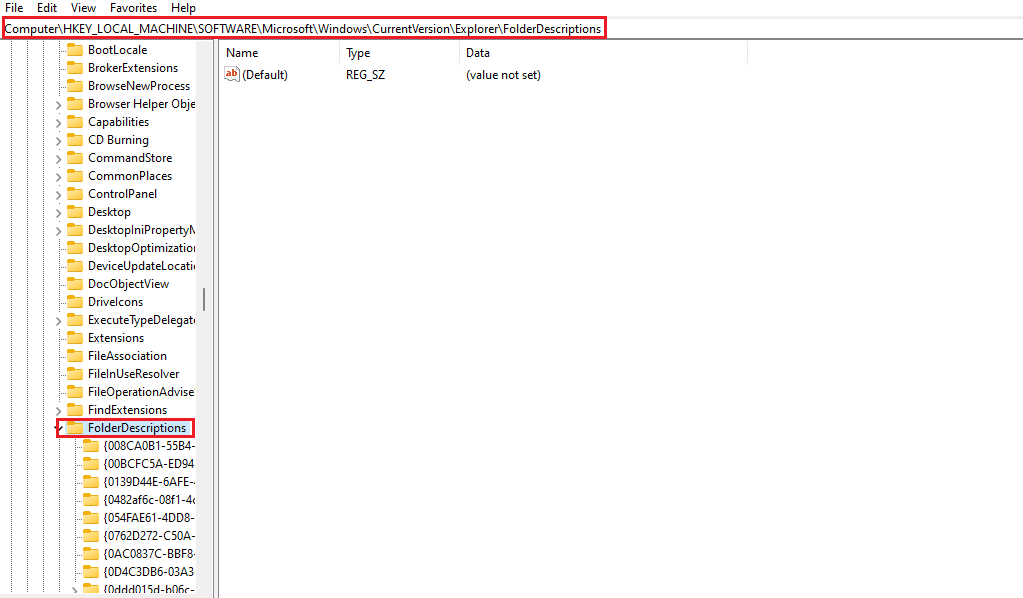
4. Delete the following keys folders.
- {2112AB0A-C86A-4ffe-A368-0DE96E47012E}
- {491E922F-5643-4af4-A7EB-4E7A138D8174}
- {7b0db17d-9cd2-4a93-9733-46cc89022e7c}
- {A302545D-DEFF-464b-ABE8-61C8648D939B}
- {A990AE9F-A03B-4e80-94BC-9912D7504104}
Note: Double-check the keys before deleting them.
5. Finally, reboot the PC.
Frequently Asked Questions (FAQs)
Q1. Why I can’t rename a file or folder in Windows 10?
Ans. The primary causes are due to the file or folder already in use or you may not have the necessary permissions to edit the file, read the above guide to fix the problem.
Q2. What is the shortcut for renaming?
Ans. F2 key is the shortcut for renaming, for laptops that have an action when F2 key is pressed, press Fn (Function) + F2 keys simultaneously to rename.
Q3. I don’t know what is open or what application is in conflict what do I do?
Ans. A simple Windows restart will be sufficient to remove all files or folders from conflict.
Q4. Do I need administrator access for a folder to be able to edit changes?
Ans. Yes, You may need administrator access for a folder or you may need to be logged in to an Administrator account for the access edit privileges.
Recommended:
I hope the above article on Fix Error to Rename File in Destination Directory is helpful and you were able to solve your problem, please let us know what method or solution helped you fix your problem. If there are any suggestions or queries you need to tell, please let us know in the comment section below.