Fix Startup Repair Infinite Loop on Windows 10/8/7

Fix Startup Repair Infinite Loop on Windows 10/8/7: Windows is the operating system managed by Microsoft and there are several versions of Windows operating system like Windows 7, Windows 8, and Windows 10 (latest). As new technologies are entering into the market on a daily bases, so to provide good service to their customers Microsoft also provides an update of these technologies on Windows from time to time. Some of these updates are very good and increase the experience of users while some updates cause an additional problem to users.
That’s why when a new update arrives in the market, users try to avoid it as they fear it might cause a problem in their PC and their PC will not work as it was working before the update. But it does not matter how much users try to avoid these updates as at some point of time they need to install those updates as it becomes mandatory to updater their Windows or else some features might stop working & chances are their PC will become vulnerable to virus or malware attacks without these updates.
Sometimes, when you update your PC, it faces a huge problem of an endless loop which means after an update, when you restart your PC it enters into the endless reboot loop i.e. it continues to reboot and keeps restarting. If this problem occurs, then you don’t need to panic as it can be fixed using the steps mentioned in this guide. There are various ways by which this endless loop problem can be solved. But you have to be very careful using these methods as they may cause harm to your computer and so follow the listed methods carefully to solve this problem.
These methods are the most common methods to solve this issue for all versions of Windows and you need not any third party software to solve the problem of Infinite Loop.
Methods To Fix Startup Repair Infinite Loop
Make sure to create a restore point just in case something goes wrong.
How to open Command Prompt when you can’t access Windows
NOTE: You need to do that a lot in all the methods listed in this fix.
a)Put in the Windows installation media or Recovery Drive/System Repair Disc and select your language preferences, and click Next.
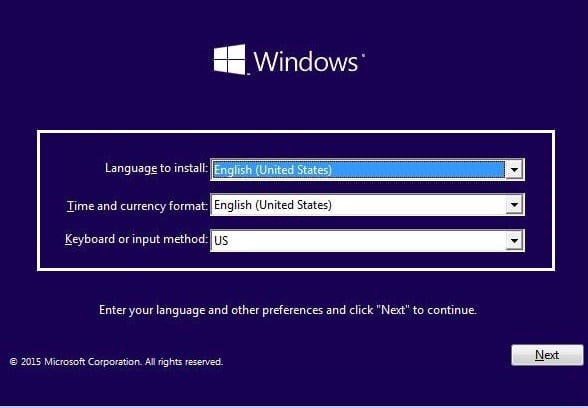
b)Click Repair your computer at the bottom.

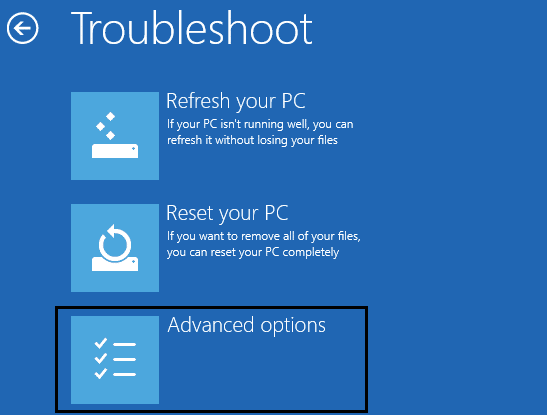
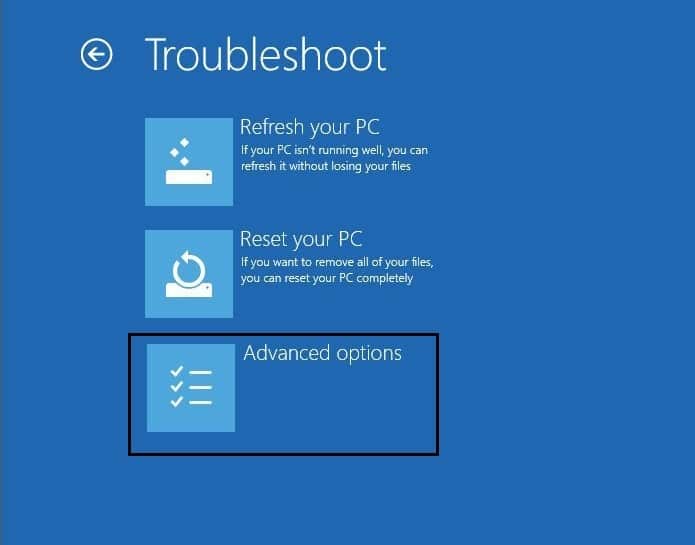
c)Now choose Troubleshoot and then Advanced Options.
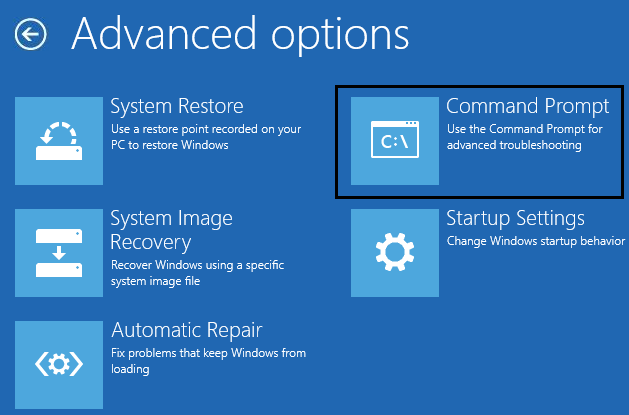
d)Select Command Prompt (With networking) from the list of options.
Method 1: Rebooting Continuously After Installing Update, Driver or Programs
If you have a single operating system installed on your computer, then you have to boot your Windows in safe mode.
To boot the Windows in safe mode first you need to enter into the safe mode. To do so follow the below steps:
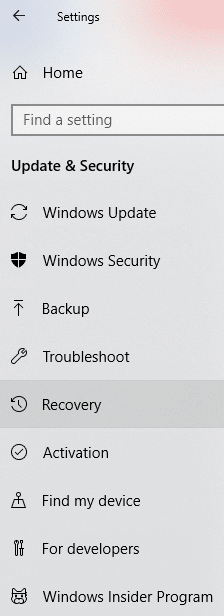
1.Press Windows Key + I to open Settings then click on Update & Security.
![]()
2.From the left-hand menu click on Recovery.
4.Under Advanced startup, click on Restart now.
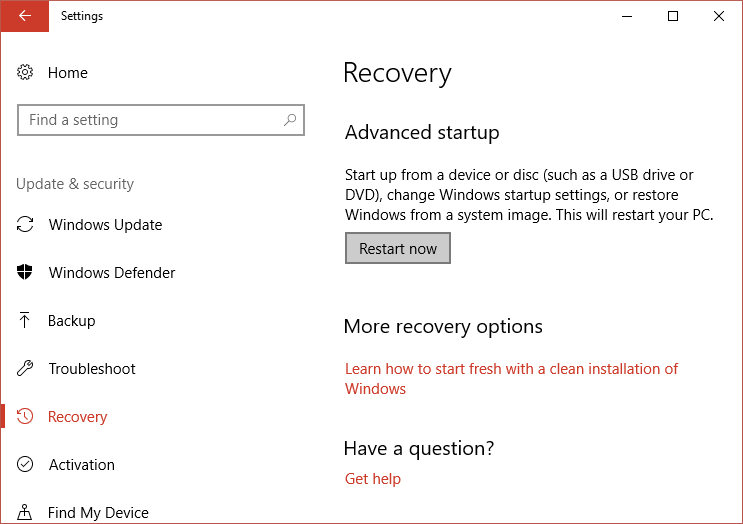
5.Once the computer restarts, then your PC will open in safe mode.
Once you enter into the safe mode you will have below options to fix the problem of Startup Repair Infinite Loop on Windows:
I.Uninstall the recent Install Programmes
The above problem may be arising due to the recently installed programs. Uninstalling those programs may solve your problem.
To uninstall the recently installed programs follow the below steps:
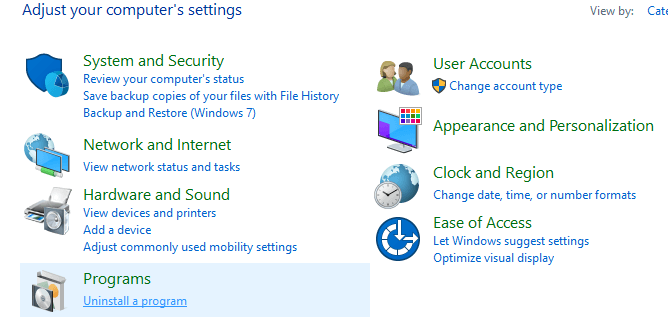
1.Open Control Panel by searching for it using the search bar.
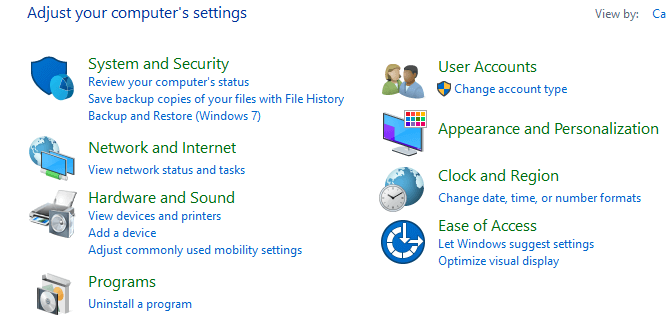
2.Now from the Control Panel window click on Programs.
3.Under Programs and Features, click on View Installed Updates.
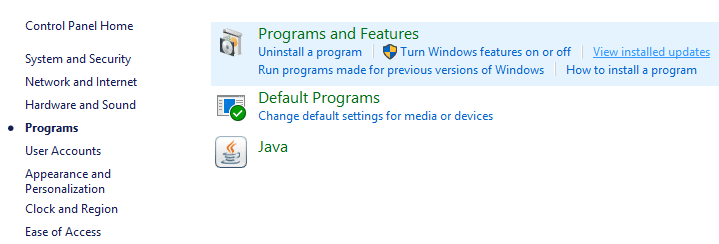
4.Here you will see the list of currently installed Windows updates.
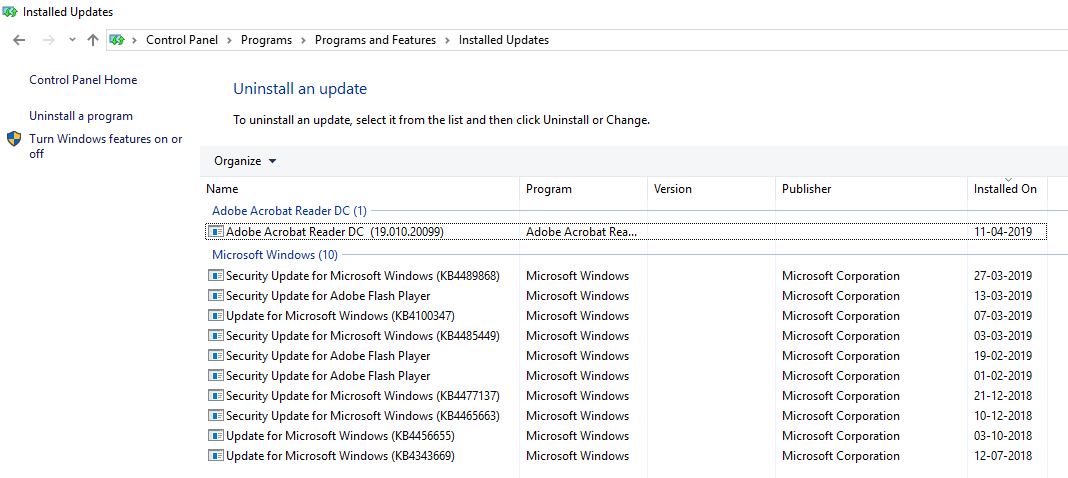
5.Uninstall the recently installed Windows updates which might be causing the issue and after uninstalling such updates your problem may be solved.
II.Troubleshoot Driver problems
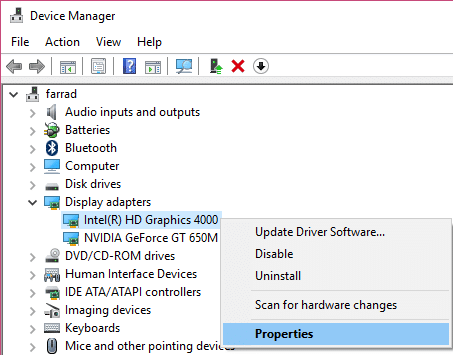
For a driver related issue, you can use the ‘Rollback driver’ feature of the Device Manager on Windows. It will uninstall the current driver for a hardware device and will install the previously installed driver. In this example, we will rollback Graphics drivers, but in your case, you need to figure out which drivers were recently installed that is causing the infinite loop issue then only you need to follow the below guide for that particular device in Device Manager,
1.Press Windows Key + R then type devmgmt.msc and hit Enter to open Device Manager.

2.Expand Display Adapter then right-click on your graphics card and select Properties.
3.Switch to Driver tab then click “Roll Back Driver“.
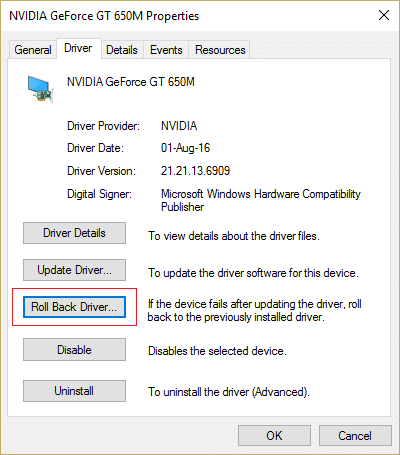
4.You will get a warning message, click Yes to continue.
5.Once your graphics driver is rolled back, reboot your PC to save changes.
Method 2: Disable Automatic Restart on System Failure
After a system failure occurs, Windows 10 automatically restart your PC to recover from the crash. Most of the time a simple restart is able to recover your system but in some cases, your PC might get into a restart loop. That’s why you need to disable automatic restart on system failure in Windows 10 in order to recover from the restart loop.
1.Open Command Prompt and enter the following command:
bcdedit /set {default} recoveryenabled No
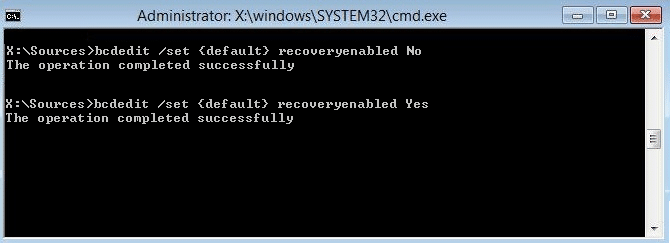
2.Restart and Automatic Startup Repair should be disabled.
3.If you need to again enable it, enter the following command in cmd:
bcdedit /set {default} recoveryenabled Yes
4.Reboot to apply changes and this should Fix Automatic Repair Infinite Loop on Windows 10.
Method 3: Run chkdsk Command to check and repair Drive errors
1.Boot Windows from the bootable device.
2.Click on Command Prompt.
3.Type the below command in command prompt and hit the enter:
chkdsk /f /r C:
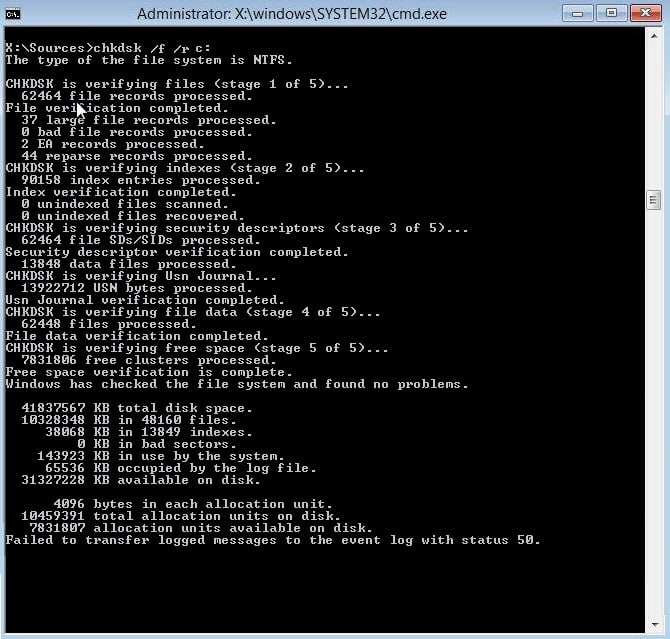
4.Restart the system and see if you’re able to Fix Startup Repair Infinite Loop on Windows 10.
Method 4: Run Bootrec to repair damaged or corrupted BCD
Run the bootrec command to repair damaged or corrupted BCD settings by following below steps:
1.Again open Command Prompt using the above guide.
2.Type the below commands in the command prompt and hit Enter after each one:
bootrec /fixmbr
bootrec /fixboot
bootrec /rebuildbcd
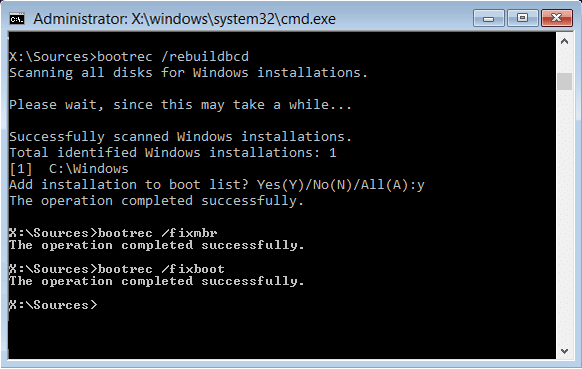
3.Restart the system and let bootrec repair the errors.
4.If the above command fails then enter the following commands in cmd:
bcdedit /export C:BCD_Backup
c:
cd boot
attrib bcd -s -h -r
ren c:bootbcd bcd.old
bootrec /RebuildBcd
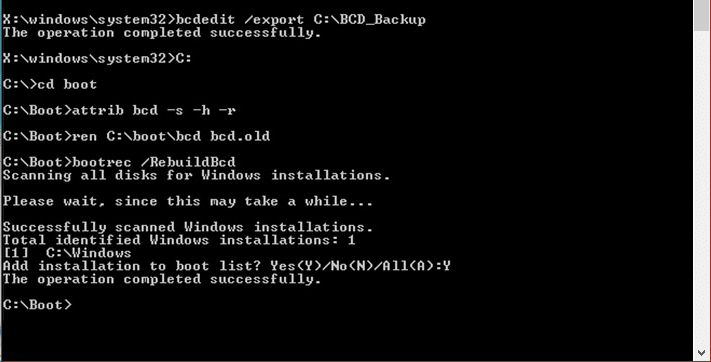
5.Finally, exit the cmd and restart your Windows.
6.This method seems to Fix Startup Repair Infinite Loop on Windows 10 but if it doesn’t work for you then continue.
Method 5: Perform a System Restore
By performing the system restore you can fix the Startup Repair Infinite Loop issue by following the below steps:
1.Insert the Windows 10 bootable installation DVD and restart your PC.
2.When prompted to Press any key to boot from CD or DVD, press any key to continue.

3.Select your language preferences, and click Next. Click Repair your computer in the bottom-left.
4.On choose an option screen, click Troubleshoot.

5.On Troubleshoot screen, click Advanced option.
6.On the Advanced options screen, click System Restore.
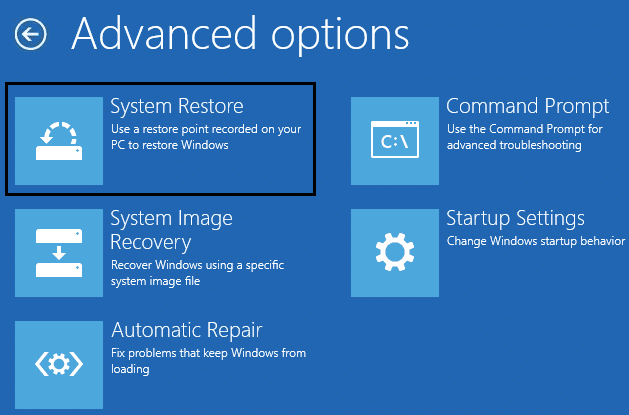
7. Follow the onscreen instructions and restore your computer to an earlier point.
Method 6: Restore Windows Registry
1.Enter the installation or recovery media and boot from it.
2.Select your language preferences, and click next.
3.After selecting language press Shift + F10 to command prompt.
4.Type the following command in command prompt:
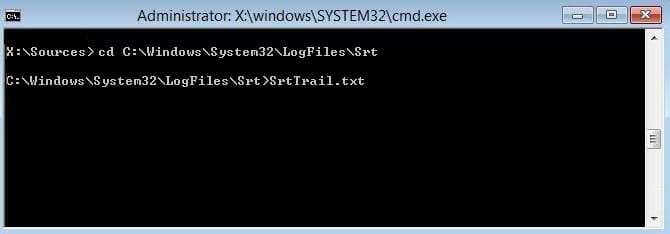
cd C:windowssystem32logfilessrt (change your drive letter accordingly)

5.Now type this to open the file in notepad: SrtTrail.txt
6.Press CTRL + O then from file type select “All files” and navigate to C:windowssystem32 then right click CMD and select Run as administrator.
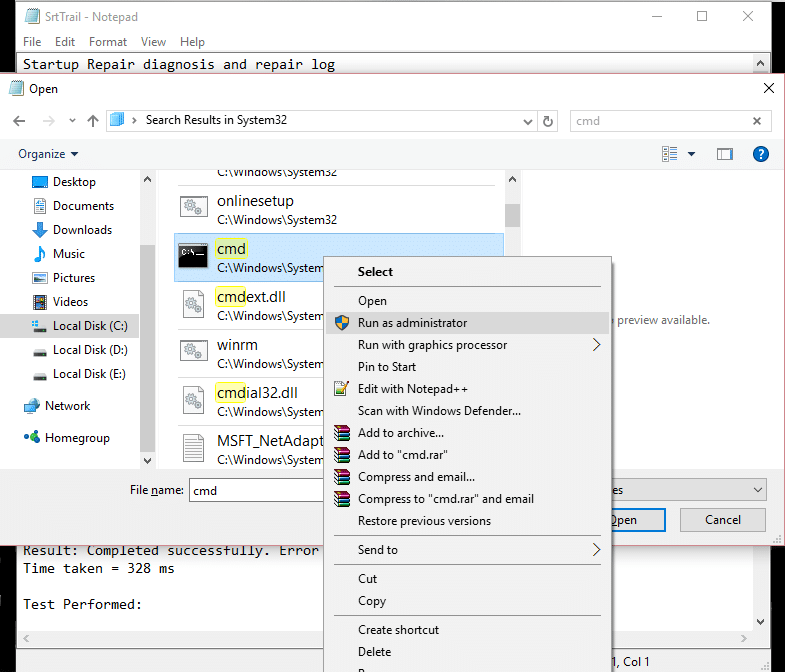
7.Type the following command in cmd: cd C:windowssystem32config
8.Rename Default, Software, SAM, System and Security files to .bak to back up those files.
9.To do so type the following command:
(a) rename DEFAULT DEFAULT.bak
(b) rename SAM SAM.bak
(c) rename SECURITY SECURITY.bak
(d) rename SOFTWARE SOFTWARE.bak
(e) rename SYSTEM SYSTEM.bak
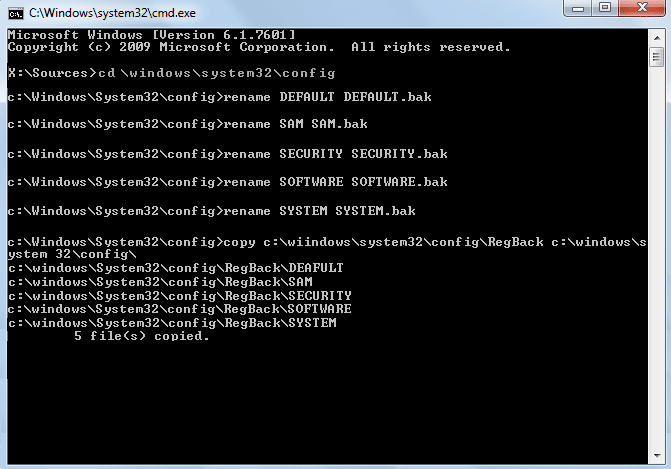
10.Now type the following command in cmd:
copy c:windowssystem32configRegBack c:windowssystem32config
11.Restart your PC to see if you can boot to windows.
Method 7: Delete the problematic file
1.Access Command Prompt again and enter the following command:
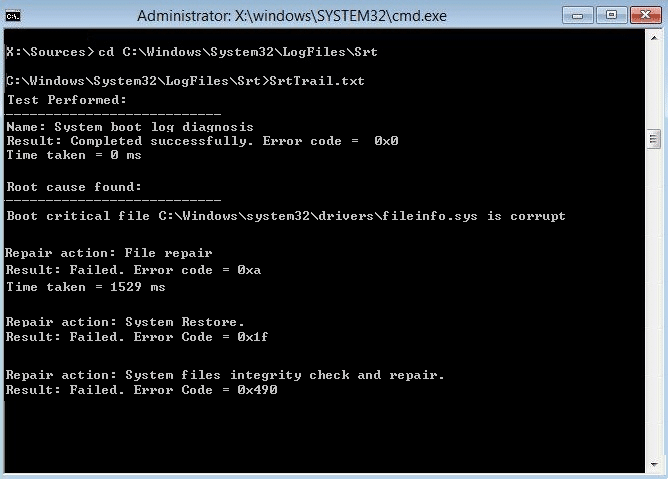
cd C:WindowsSystem32LogFilesSrt
SrtTrail.txt
2.When the file opens you should see something like this:
Boot critical file c:windowssystem32driverstmel.sys is corrupt.
3.Delete the problematic file by entering the following command in cmd:
cd c:windowssystem32drivers
del tmel.sys
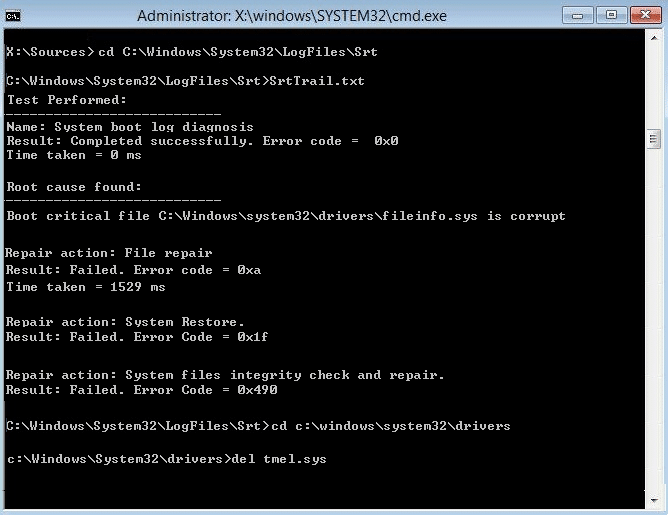
NOTE: Don’t delete drivers which are essential for windows to load the operating system
4.Restart to see if the issue is fixed if not continue to next method.
Method 8: Set correct values of device partition and osdevice partition
1.In Command Prompt type the following and press enter: bcdedit
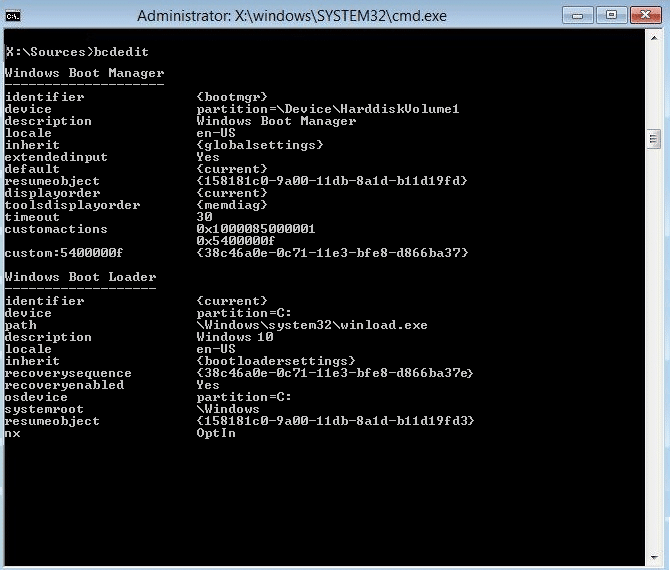
2.Now find the values of device partition and osdevice partition and make sure their values are correct or set to correct partition.
3.By default value is C: because windows pre-installed on this partition only.
4.If by any reason it is changed to any other drive then enter the following commands and press Enter after each one:
bcdedit /set {default} device partition=c:
bcdedit /set {default} osdevice partition=c:

Note: If you have installed your windows on any other drive make sure you use that one instead of C:
5.Reboot your PC to save changes and this should fix Automatic Repair infinite loop on Windows 10.
Recommended:
I hope this article was helpful and you can now easily Fix Startup Repair Infinite Loop on Windows 10/8/7, but if you still have any questions regarding this tutorial then feel free to ask them in the comment’s section.