Fix Windows 10 Audio Error 0xc00d4e86

Are you a music lover? While enjoying pleasant music on your Windows 10 computer, you may wish to take a break. So, if you put your PC to sleep and if you turn it on again after a while, you may be suddenly popped up with Windows 10 audio error 0xc00d11d1 (0xc00d4e86). If you have faced this error ever in your music history and want to fix the same, this guide is for you. We bring an awesome troubleshooting article that will help you fix the discussed Windows 10 audio error. So, continue reading!
How to Fix Windows 10 Audio Error 0xC00D11D1 (0XC00D4E86)
If you are facing Windows 10 audio error 0xc00d11d1 (0xc00d4e86) while enjoying your audio contents, the most probable reason would be due to improper configurations of sound settings. Although this problem affects many versions of Windows, many users are struggling with this issue in Windows 10. Here are some common reasons that contribute to the discussed issue on your computer.
- The volume may be muted or very low on Windows 10.
- The Audio enhancement features are enabled on PC.
- Other applications on your PC are using audio.
- Outdated audio drivers in computers.
- Damaged cables, plugs, and speakers.
- Access for using a Microphone is not granted.
- Outdated Windows Operating System.
- Outdated/incompatible audio drivers.
- Presence of corrupt files on PC.
- Few essential Windows Audio services are not enabled.
Now, move ahead to the next section to fix Windows 10 audio error 0xc00d11d1 (0xc00d4e86) issue. In this section, you will come to know about the troubleshooting methods that will help you fix Windows 10 audio errors. Implement the methods as instructed in the same order to get perfect results.
Basic Troubleshooting Steps
Before you head towards the advanced troubleshooting methods, a few simple hacks will help you fix 0xc00d11d1 (0xc00d4e86) within clicks. Make sure your PC meets all of these preliminary checks and still if you did not attain any fix, move to the next section.
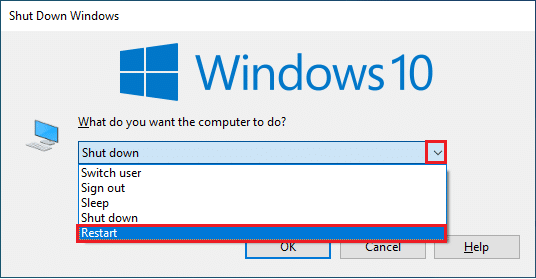
1. Restart PC
Follow the steps below to reboot the PC.
1. Press the Alt + F4 keys together to open the Shut Down Windows window.
2. Select the Restart option and hit the Enter key.
2. Check External Devices
If you have not attained any fix from the above preliminary checks, then it’s time to check if there is any external damage to the external speakers, microphone, and other audio devices contributing to the error.
1. Check cables for loose connections and whether all other cables are plugged in or not.
2. Make sure all other cables and cords are plugged into the correct jack. If you are not sure of the correct jacks, contact the hardware manufacturer.
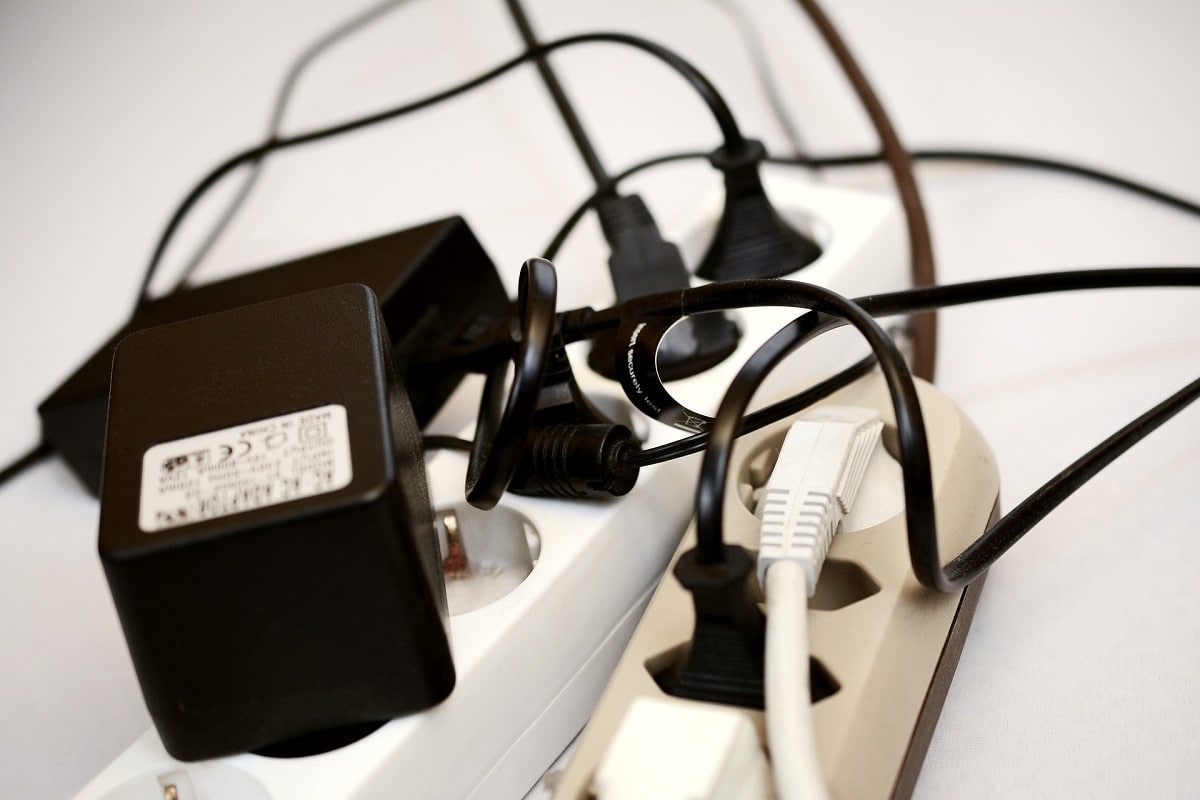
3. Check the volume levels and whether the power is turned on.
4. Ensure you use a high-quality microphone and it is set firmly with your PC. To avoid external noise, make sure you use the best quality speakers or microphones.

5. Last but not least, ensure that you are not in a noisy environment with traffic sounds or crowd noises in the background.
Method 1: Ensure Correct Audio Device
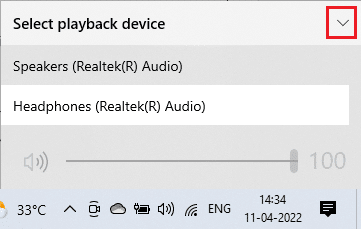
When you are using more than one audio output device, you have to confirm when the device is used up as an output device. To check the audio output in your Windows 10 PC, follow the below-mentioned steps.
1. Click on the Speakers icon at the bottom right corner of the screen.
![]()
2. Then, click on the arrow icon to expand the list of audio devices connected to the computer.
![]()
3. Finally, Select playback device and make sure the audio is playing through the selected device.
If this method doesn’t help you, move ahead to the next one.
Method 2: Manage Sound Settings
In this method, you have to check if the sound settings are correct and compatible with the audio device you are using. This helps you to fix Windows 10 audio error 0xc00d11d1 (0xc00d4e86) as you follow the steps instructed below.
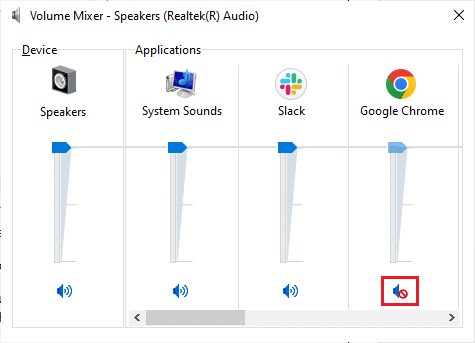
1. Right-click on the Speakers icon on the right side of the Taskbar and click on Open Volume mixer.
![]()
2. Now, a set of volume controls will be opened up. Make sure all volume levels are not muted. If you find any red circle with a line, unmute the volume level.
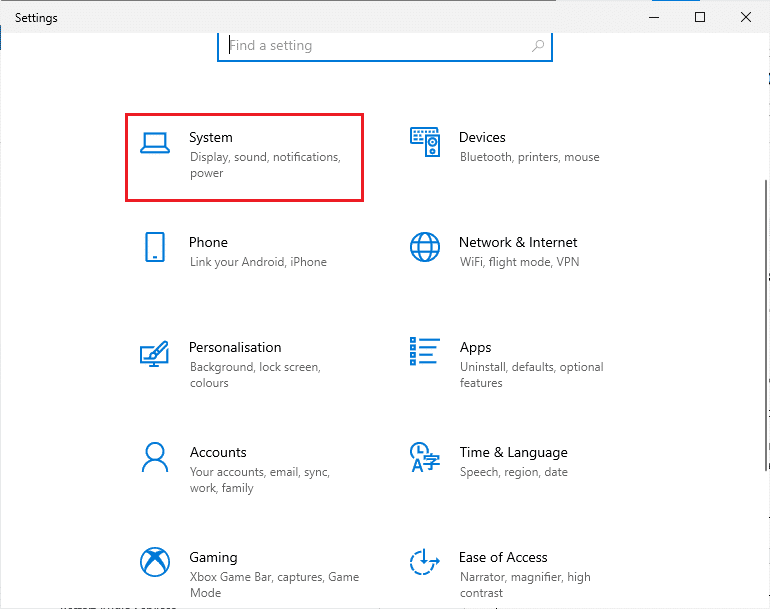
3. Press the Windows + I keys together to open Settings.
4. Click on System.
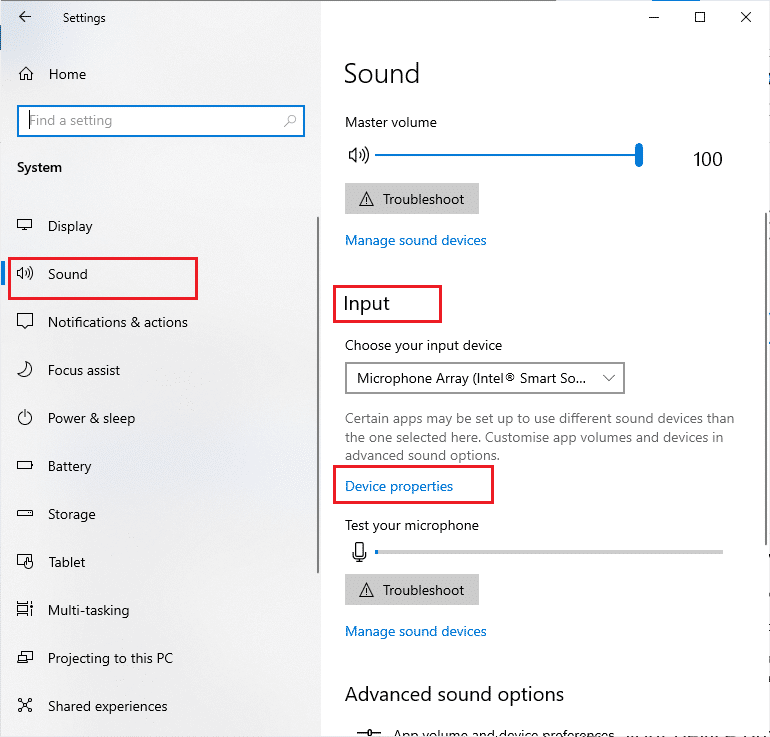
5. Click on Sound from the left pane and click on Device properties under the Output menu.

6. Make sure Disable box is not checked.
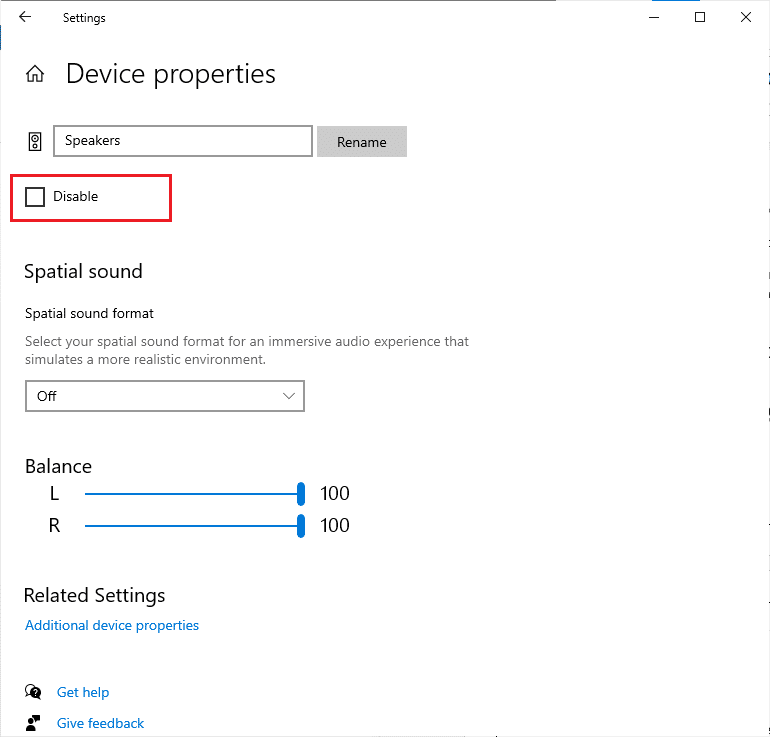
7. Repeat Steps 5-6 for input devices as depicted. Now, check if you have fixed Windows 10 audio error.
Also Read: How to Access Sound Control Panel on Windows 10
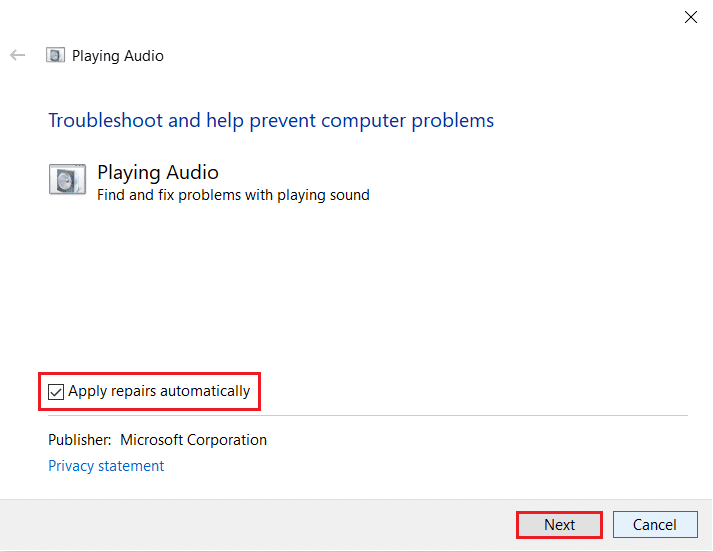
Method 3: Run Audio Troubleshooter
You must be aware of the fact that your PC contains an inbuilt troubleshooting tool to fix any issues and errors arising automatically. The audio devices plugged into your computer and the inbuilt audio devices will be scanned and altogether the problems associated with the process will be sorted out.
Follow our guide on How to Run Hardware and Devices Troubleshooter to fix issues to fix all the audio-related hardware issues in your PC. Also, you can run the Audio troubleshooter individually as instructed in our guide How to Run Windows Update Troubleshooter, but make sure you select the Playing Audio option.
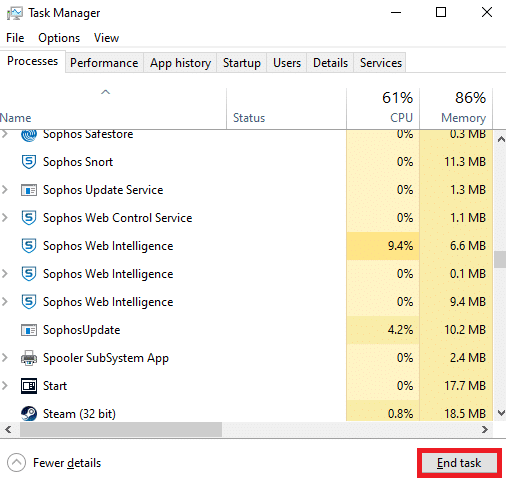
Method 4: End Background Processes Using Audio
When the audio utility is used by other programs on your Windows 10 PC, then you may face Windows 10 audio error 0xc00d11d1 (0xc00d4e86). To resolve the problem, you are advised to close all other programs or applications running in the background one by one or force them to shut down by using Task Manager. To do so, follow our guide on How to End Task in Windows 10.
Also Read: Fix Zoom Audio Not Working Windows 10
Method 5: Restart Windows Explorer Processes
Some users have reported that restarting Windows Explorer processes will help to resolve the discussed issue. Follow the below-listed instructions to do the same.
1. Press the Ctrl + Shift + Esc keys simultaneously to open Task Manager.
2. In the Processes tab, click on Windows Explorer and select the Restart button.
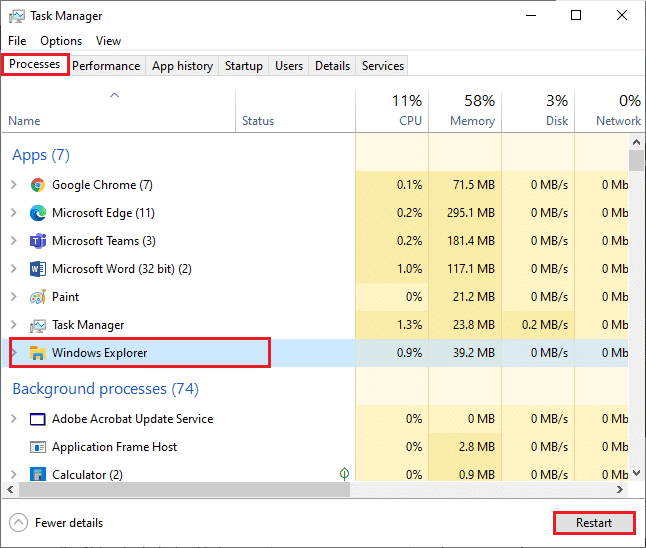
Now, Windows Explorer restarts and Windows 10 audio issue will be fixed now.
Method 6: Allow Audio Access
There is a list of applications and programs on your computer that will have access for using audio devices. If your audio application is not on the list, you cannot hear any audio content contributing to the discussed error. Therefore, ensure the audio settings are enabled for your game on your PC by following the below-mentioned steps.
1. Launch Windows Settings by pressing Windows + I keys together.
2. Click on Privacy.
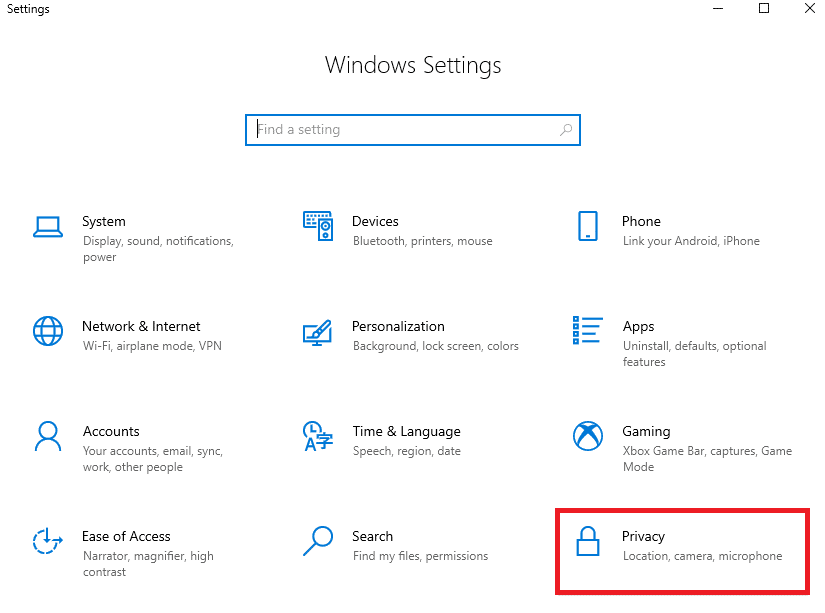
3. Scroll down the left pane and click the Microphone option. Ensure Allow apps to access your microphone option is enabled as shown.
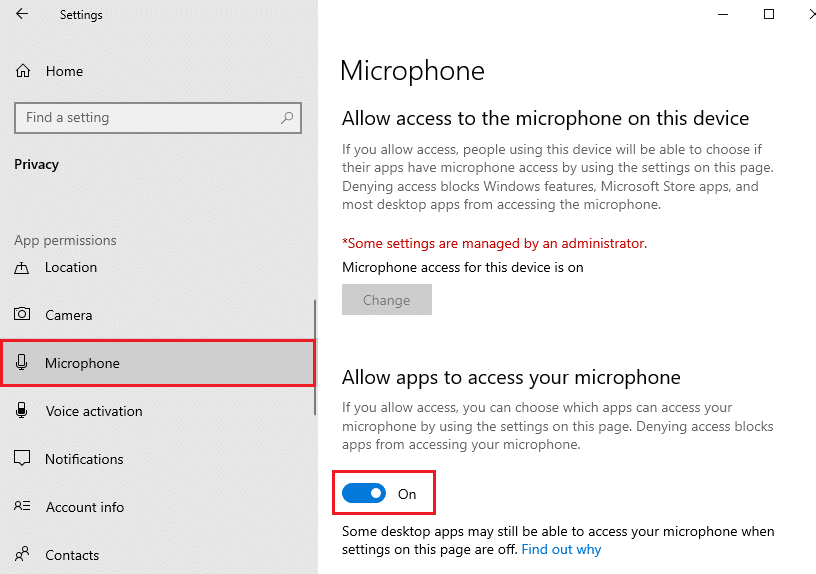
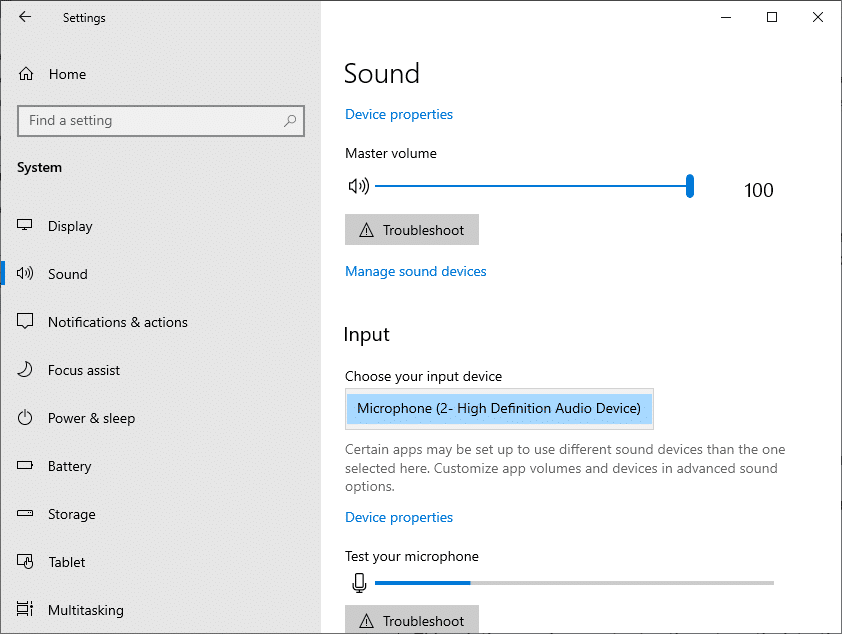
Note: Launch Sound Settings from the search menu and select the correct input device (Microphone (2-High Definition Audio Device)) as default.
Check if you have fixed Windows 10 audio error 0xc00d11d1 (0xc00d4e86).
Also Read: Fix No Sound in Firefox on Windows 10
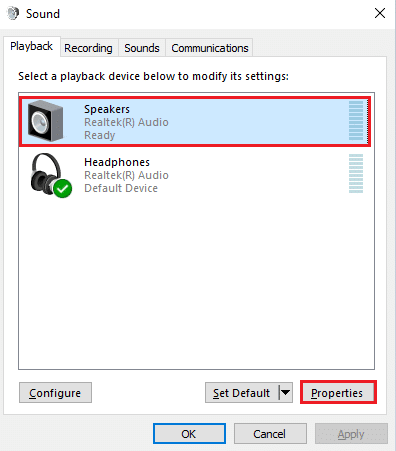
Method 7: Set Audio Device as Default Device
If you are using an audio device like headphones or speakers, you must ensure whether it is set as a default device or not. Let us assume a case of connecting an external monitor (that does not have built-in speakers) to your PC. If this monitor is set as a default output device, you cannot hear any audio. You have to set your audio device as the default device as instructed below to fix Windows 10 audio error.
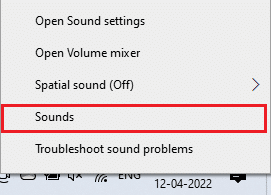
1. Right-click on the Speakers icon at the bottom right corner of the screen and select the Sounds option.
![]()
2. Switch to the Playback tab and right-click on the audio device you would like to set as the default one.
3. Select the Set as Default Device option as highlighted and click on Apply and OK to save the changes.
 OK to save the changes.” width=”400″ height=”455″>
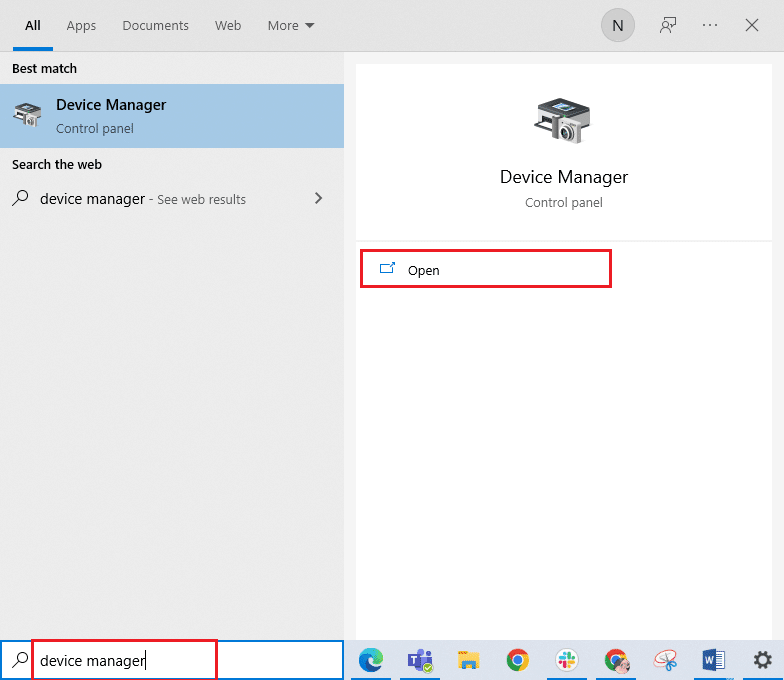
Method 8: Re-enable Sound Card
You can easily resolve 0xc00d11d1 (0xc00d4e86) by restarting the sound card as instructed below.
1. Press the Windows key and type Device Manager, then click on Open.
2. Expand the Sound, video, and game controllers by double-clicking on them.
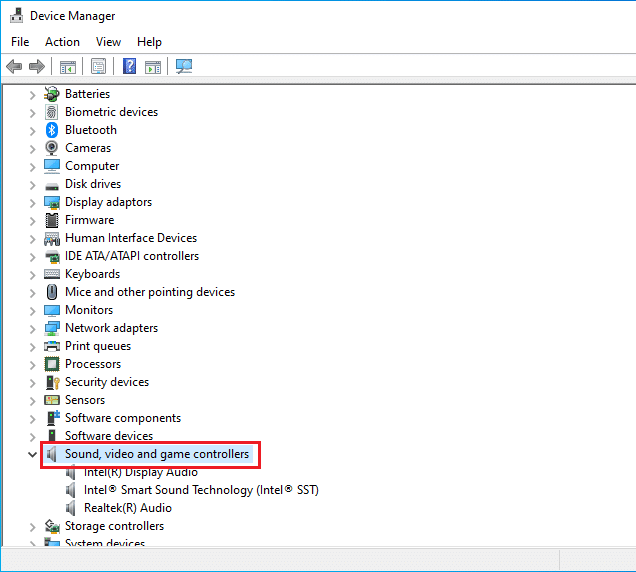
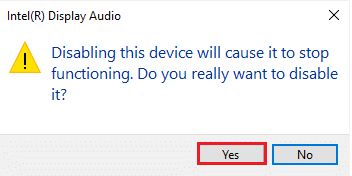
3. Right-click on your sound card and select the Disable device option.
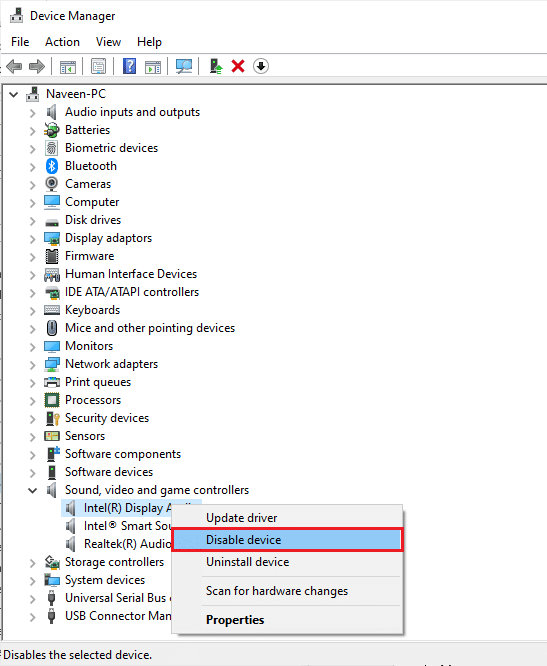
4. Confirm the prompt by clicking on Yes and restart the PC. Then, repeat Steps 1 – 2.
5. Right-click on your sound card and select the Enable device option.
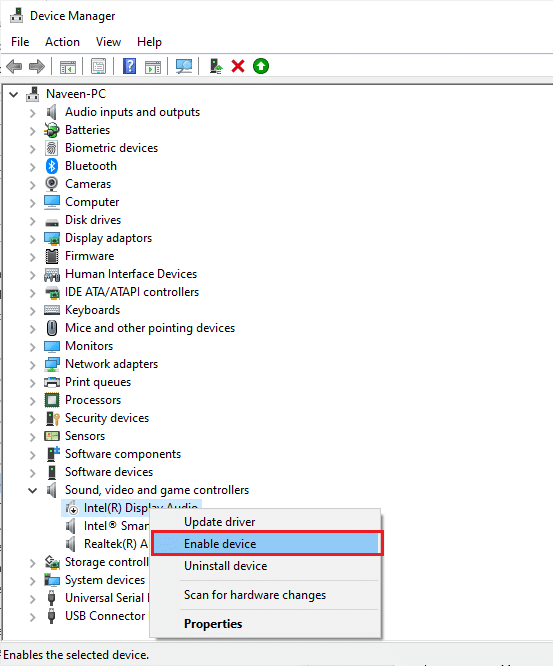
6. Now, try playing any sound in your audio application and check if the issue is resolved or not.
Also Read: How to Fix The Audio Service is Not Running Windows 10
Method 9: Disable Audio Enhancements
If you find your audio working well for other multimedia resources, but the sound seems to be of low quality or noisy, you are advised to change the sample rate. A low-frequency sample rate will cause Windows 10 audio error 0xc00d11d1 (0xc00d4e86), yet you can select a higher frequency sample rate by following the below-mentioned steps.
1. Right-click on the Speakers icon at the bottom right corner of the screen and select the Sounds option.
![]()
2. Switch to the Playback tab and select the audio device followed by the Properties button as shown.
3. Then, switch to the Advanced tab and from the drop-down menu under Default Format, make sure you select the highest frequency range (24 bit, 48000 Hz).
Note: Make sure Disable audio enhancements option is unchecked under Signal Enhancements.
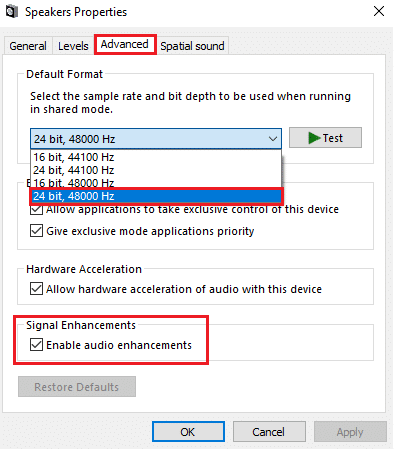
6. Click on Apply and then OK to save the changes.
Check if you face 0xc00d11d1 (0xc00d4e86) again. If so, adjust different levels of frequency ranges by repeating these steps and confirm which range solves the problem.
Method 10: Repair Corrupt Files
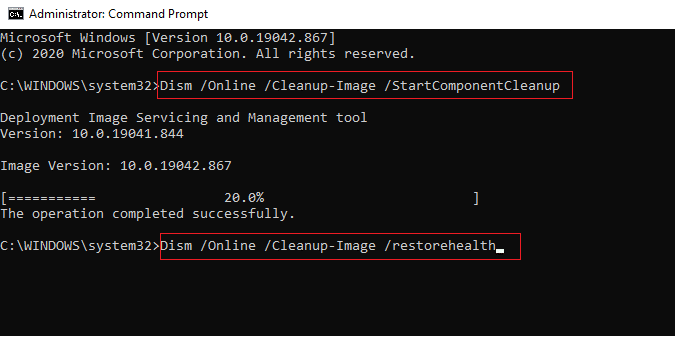
For perfect audio quality services, a few essential files and programs must be functioning on your PC. But, if they are corrupt or misconfigured, you will face Windows 10 audio error 0xc00d11d1 (0xc00d4e86). Fortunately, all these corrupt misconfigured files can be repaired by using the inbuilt utilities of your Windows 10 PC namely, System File Checker and Deployment Image Servicing and Management. Read our guide on How to Repair System Files on Windows 10 and follow the steps as instructed to repair all your corrupt files.
Wait for the commands to be executed and check if you have fixed the Windows 10 audio error 0xc00d4e86.
Also Read: How to Fix Audio Stuttering in Windows 10
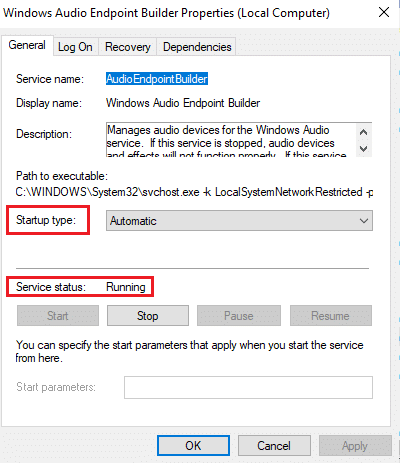
Method 11: Restart Audio Services
Few essential Windows audio services will help you prevent Windows 10 audio error. If in case, if these services are turned off, you may face several conflicts. Hence, you are advised to restart a few essential audio services as instructed below steps.
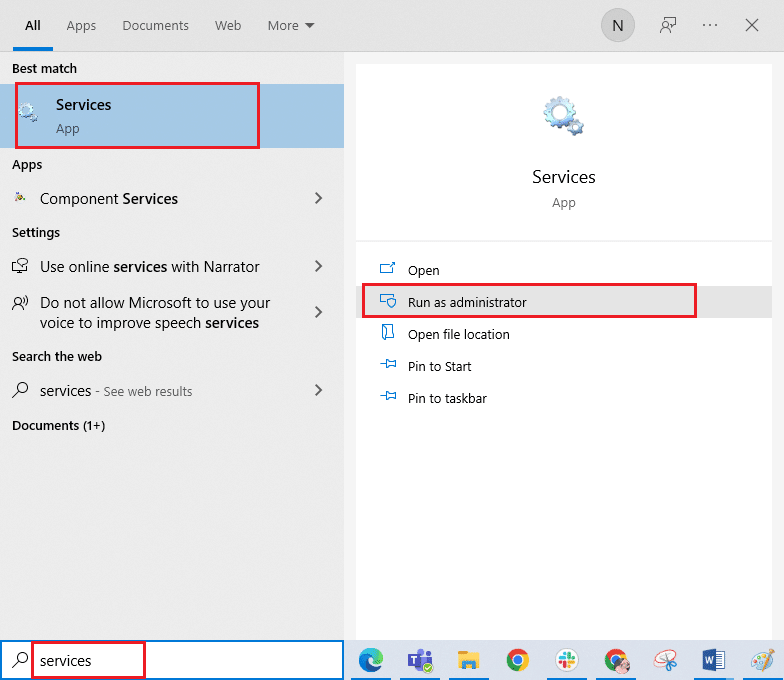
1. Hit the Windows key, type Services, and click on Run as administrator.
2. Scroll down and double-click on the Windows Audio service.
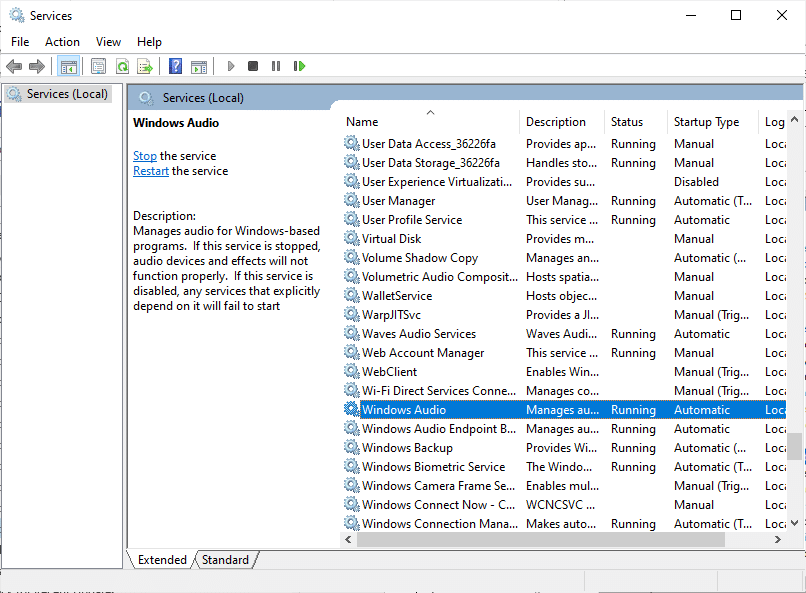
3. Now, in the new pop-up window, select the Startup type to Automatic, as depicted.
Note: If the Service status is Stopped, then click on the Start button. If the Service status is Running, click on Stop and Start it again.
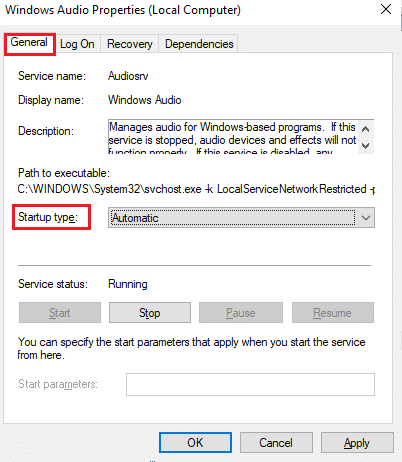
4. Click on Apply and OK to save the changes.
5. Repeat all these steps for other Windows services like Windows Audio Endpoint Builder and Remote Procedure Call (RPC).
Method 12: Disable Exclusive Mode
Still, if you are struggling with audio error 0xc00d11d1 (0xc00d4e86), then you have to ensure no other program is taking the exclusive control of your audio device. You can disable the discussed feature by following the below-mentioned steps.
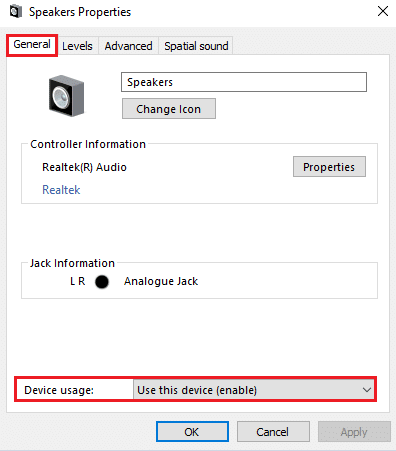
1. Right-click on the Speakers icon and select the Sounds option.
2. Select your audio device and click on the Properties button.

3. In the General tab, make sure the Device usage option is set to Use this device (enable) as shown. Click on Apply and OK if you have made any changes.
4. Switch to the Advanced tab, and under the Exclusive Mode menu, make sure the following options are unchecked.
- Allow applications to take exclusive control of this device.
- Give exclusive mode applications priority.
Note: As soon as you uncheck Allow applications to take exclusive control of this device option, Give exclusive mode applications priority option will be automatically unchecked.

5. Finally, click on Apply and OK to save the changes. Now, you would have fixed Windows 10 audio error 0xc00d11d1 (0xc00d4e86).
Also Read: How to Fix iCUE Not Detecting Devices
Method 13: Update Audio Drivers
Outdated and incompatible audio drivers will always result in Windows 10 error code 0xc00d11d1 (0xc00d4e86). Ensure you use an updated version of audio drivers and if your computer lacks the latest drivers, you are advised to update them as instructed in our guide How to Update Realtek HD Audio Drivers in Windows 10.
Once you have updated your audio drivers to the latest version, check if you have fixed error 0xc00d11d1 (0xc00d4e86).
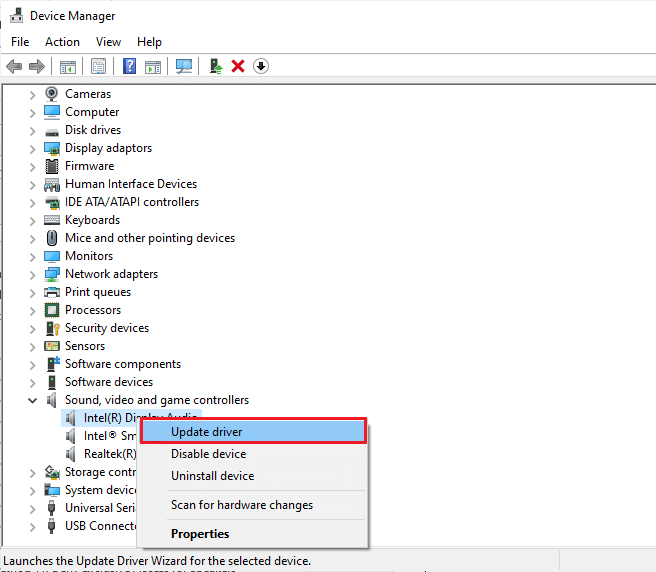
Method 14: Reinstall Audio Drivers
Incompatible drivers must be reinstalled to resolve all the audio-related problems. Reinstall device drivers only if you cannot attain any fix by updating them. The steps to reinstall drivers are very easy and you can do so by using a third-party application or by implementing the steps manually as instructed in our guide How to Uninstall and Reinstall Drivers on Windows 10
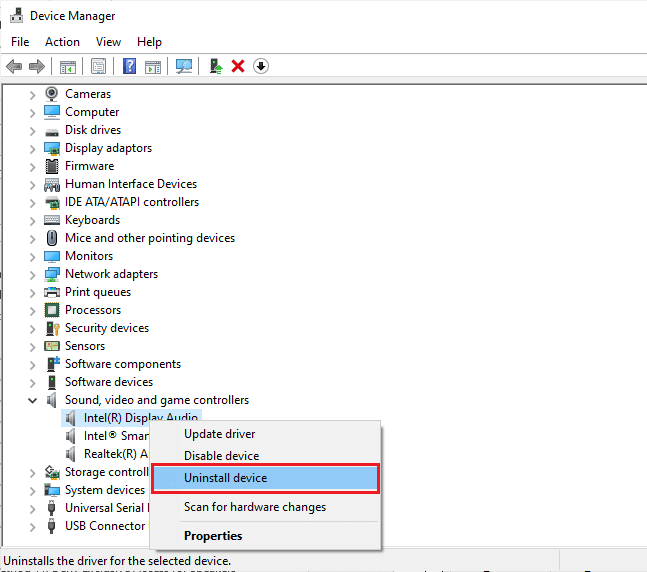
After reinstalling audio drivers, check if you can hear audio while playing them in Windows 10.
Also Read: Fix No Audio Output Device Is Installed Error
Method 15: Roll Back Audio Drivers
The current version of audio drivers may sometimes cause audio conflicts and in this case, you have to restore previous versions of installed drivers. This process is called rollback of drivers and you can easily roll back your computer drivers to their previous state by following our guide How to Rollback Drivers on Windows 10.
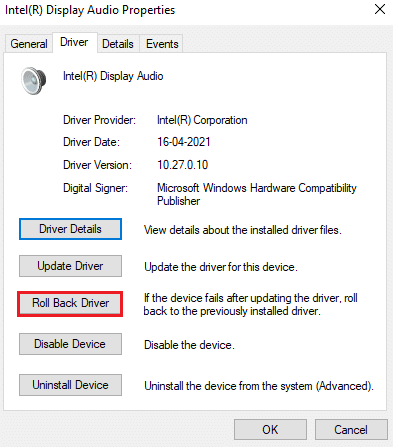
Wait until the previous versions of drivers are installed on your PC. Once done, check if you have fixed the issue.
Method 16: Update Windows
A few bugs and problems cannot be resolved on your computer if any new Microsoft updates are pending to be installed on your PC. As suggested by many users, updating Windows 10 computers will help you resolve Windows 10 audio error 0xc00d11d1 (0xc00d4e86). Follow our guide on How to Download and Install Windows 10 Latest Update to update your Windows 10 computer.
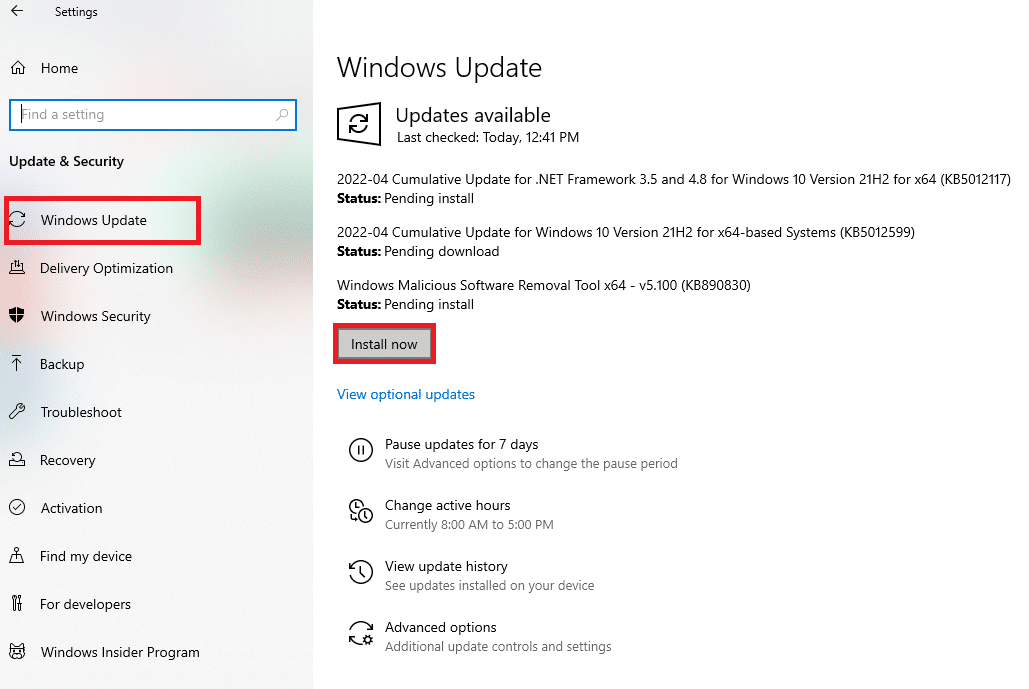
After updating your Windows Operating System, check whether you can access audio on your Windows 10 PC.
Also Read: What is NVIDIA Virtual Audio Device Wave Extensible?
Method 17: Repair and Reset Apps
If none of the methods has helped you fix Windows 10 audio error 0xc00d11d1 (0xc00d4e86), but you can hear the audio in other apps on your PC, then there is a possibility that your game is conflicting somewhere. So, in this case, repair or reset the app if possible to fix the problem.
Note: In this guide, steps to repair and reset Minecraft Launcher are demonstrated. Follow the steps according to your game.
1. Hit the Windows key and type Minecraft Launcher, then click on App settings.
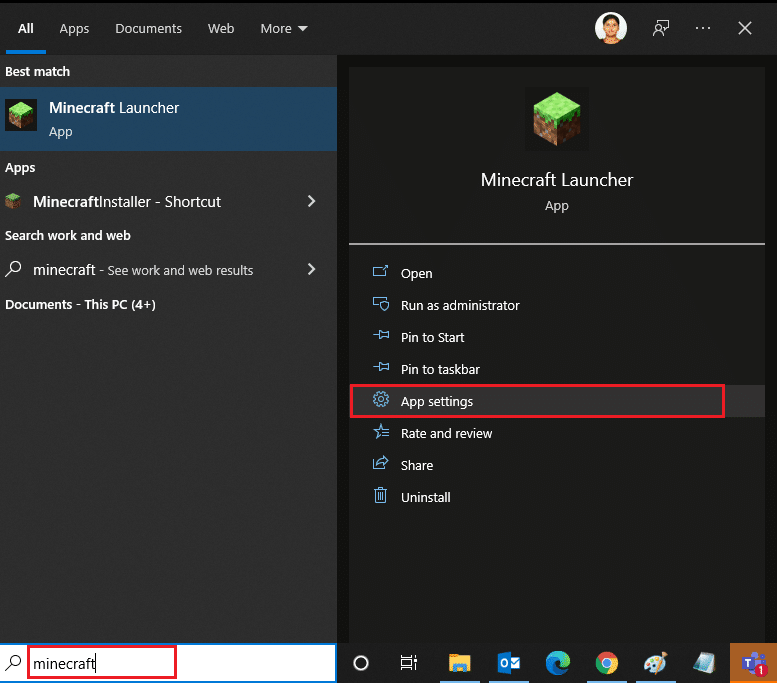
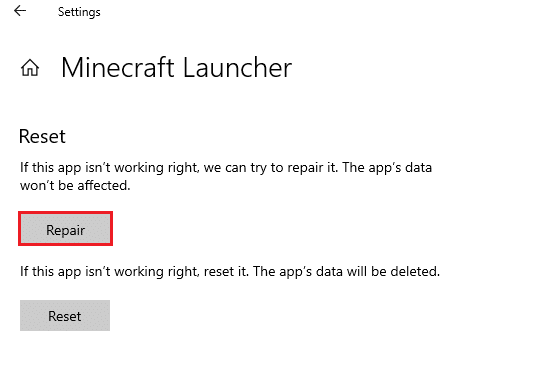
2. Scroll down the Settings screen and click on the Repair option as highlighted.
Note: Your app data will not be affected while repairing Minecraft Launcher.
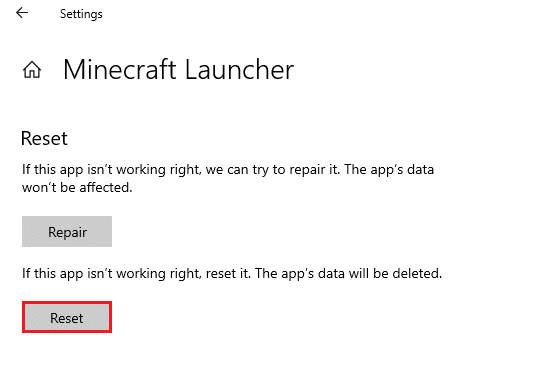
3. Check if you have fixed the issue. If not, click on the Reset option.
Note: Resetting Minecraft Launcher will delete the app data.
4. Finally, reboot your PC and check if you have fixed the error. Still, if you face the same, then try reinstalling the app as a last option.
Also Read: Fix Windows 10 Audio Crackling
Method 18: Perform System Restore
If the above methods have not helped you, then the only option left is to restore your computer to its previous version. To do so, follow our guide on How to use System Restore on Windows 10 and implement the instructions as demonstrated.
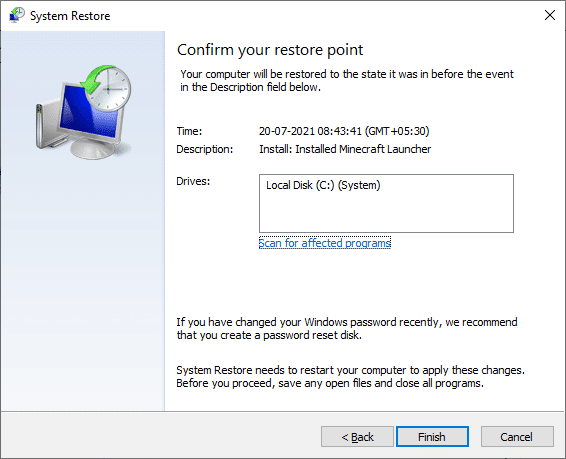
After restoring your Windows 10 PC, check if have fixed Windows 10 audio error 0xc00d11d1 (0xc00d4e86) problem.
Recommended:
We hope that this guide was helpful and you could fix Windows 10 audio error 0xc00d11d1 (0xc00d4e86). Feel free to reach out to us with your queries and suggestions via the comments section below.