How to Fix Scratch Disks Are Full Error in Photoshop

Photoshop is a powerful raster graphics editing software developed by Adobe in the 90s. Today, it is synonymous with the art of photo editing and the manipulation itself, it is famous for the flexibility and creative freedom it grants, but it is also infamous for its long list of annoying errors. Dealing with these errors seems like a rite of passage for its users. Scratch disks being full error is a particularly notorious one. One can be greeted with this while completing a particular action or opening the application itself.
First things first, let’s understand what a scratch disk exactly does. It is a disk drive or solid-state drive (SSD) used for temporary storage while the application is in use. Photoshop uses scratch disks to store things that don’t fit in the RAM, like portions of your document and their history panel states. It acts as a working space and a virtual or cache memory. Scratch files directly go into an invisible operating system specific folder.
By default, Photoshop uses the hard disk on which the OS is installed as the primary scratch disk.
What causes the Scratch Disk error?
Before you embark on the not so complex or tiring journey to eliminate this error, it is essential to understand its cause. There are a few possible reasons for this error:
- Lack of enough space: This is the root cause of all the problems. Photoshop requires a good amount of storage space to function smoothly, may it be temporary or permanent.
- Too many temporary files: When Photoshop is closed incorrectly, it generates a lot of temporary files. Photoshop doesn’t get rid of temporary files when they are not needed anymore, which can create a more permanent problem as these can occupy a huge amount of scratch space.
- Too much Photoshop cache: If your program doesn’t delete the cache automatically, the cache will grow over time and take up the entire scratch space. Hence, deleting the cache files is essential.
How to check the location of the Scratch Disk?
Finding the location of the scratch disk is essential in solving the error. By default, the ‘C Drive’ is chosen to serve as the scratch disk. But if you are unsure, follow the below-mentioned process.
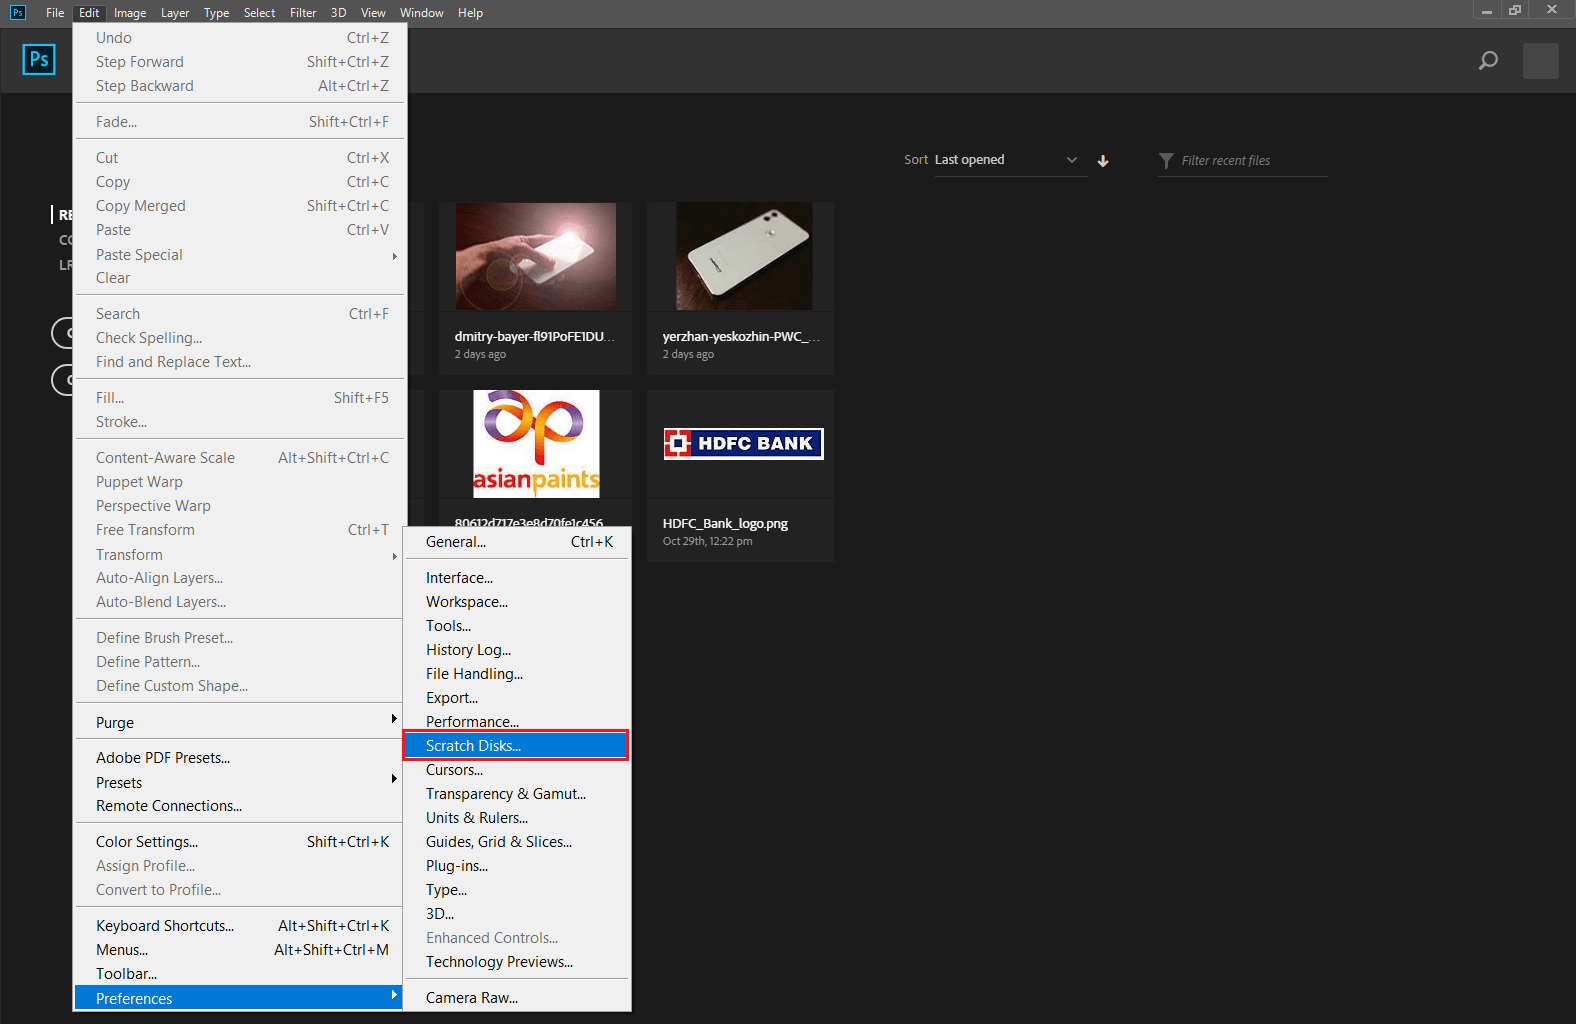
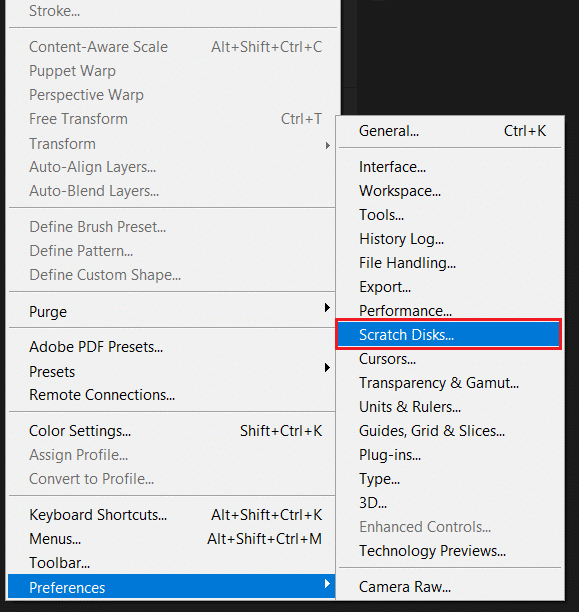
1. Open Photoshop and click on ‘Edit’ located on the top ribbon.
2. In the drop-down menu, locate ‘Preferences.’ When you hover your mouse over it, a sub-menu will open up. In the sub-menu, click on ‘Scratch Disks…’.
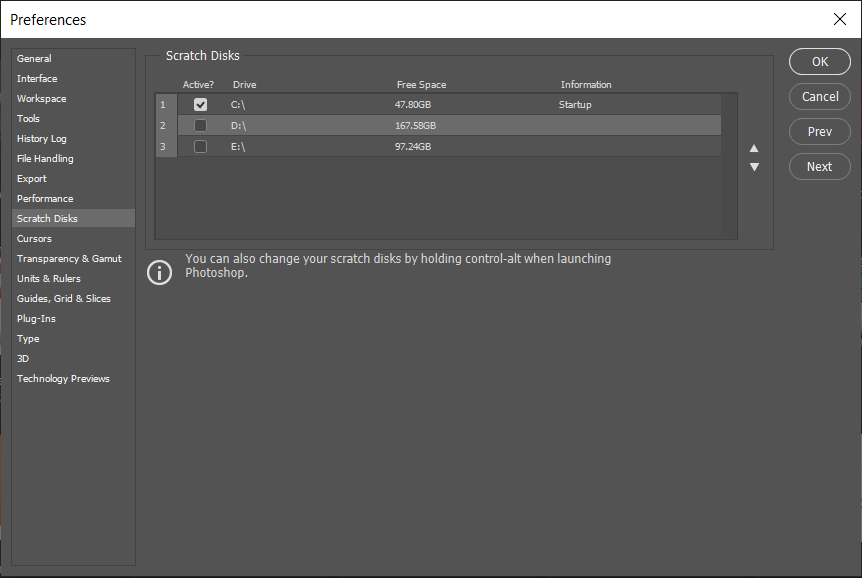
3. In the ‘Preference Menu’ pop up box, Scratch Disks setting will open up. This will confirm which storage drive serves as the scratch disk.
How to Fix Scratch Disks Are Full Error in Photoshop
Whether you get the error while opening Photoshop or while performing a particular task in Photoshop, there are a few quick and easy ways to fix it. They range from deleting unnecessary data to clearing storage space to expand the existing space. Follow the methods mentioned below one by one until you find the one that fixes your situation.
Method 1: Check and free up disk space
As mentioned earlier, the most common cause of this error is the lack of free space in the drive in which the scratch disk is accommodated. So before you do anything else, find where the scratch disk is located and check if you have enough storage space or not. Photoshop requires at least 40 GB of storage if you don’t have the said amount of available space, clear as much data as possible by deleting some old and useless files.
Method 2: Delete Temporary Files
Temporary Files, as the name suggests, are the files that store the temporary data created by Windows OS itself or the program that users use. In the case of media or graphics-related editing software, these temporary files are created to store your work progress and create a recovery backup in the case of unexpected system or program shutdowns.
Photoshop is more than capable of creating a huge mountain of temporary files when you are working on a large project. These files help the program run smoother and faster. When you force close your program enough times, it will leave a large chunk too. So it is necessary to delete these temporary files for the proper functioning of Windows. These files are easily identifiable and removable as they usually start with ~PST or Photoshop Temp (in newer versions).
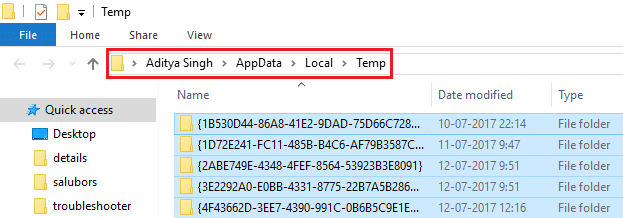
The deleting process is simple, visit the temp folder and delete all files starting with ~PST or Photoshop Temp. You can locate the temp folder in C:UsersUsernameAppDataLocalTemp.
If you are unable to find the ‘Temp’ folder there, press Windows Key + R to open the ‘Run’ dialogue box. In the box next to ‘Open’, type ‘%appdata%’ and hit the Enter key.
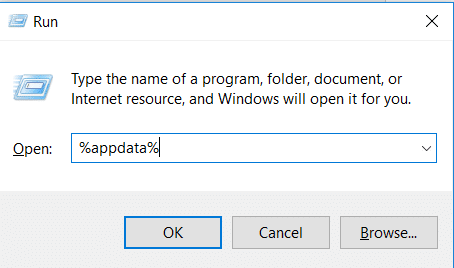
This will open the user AppData folder in Explorer, navigate yourself into ‘Local > Temp.’
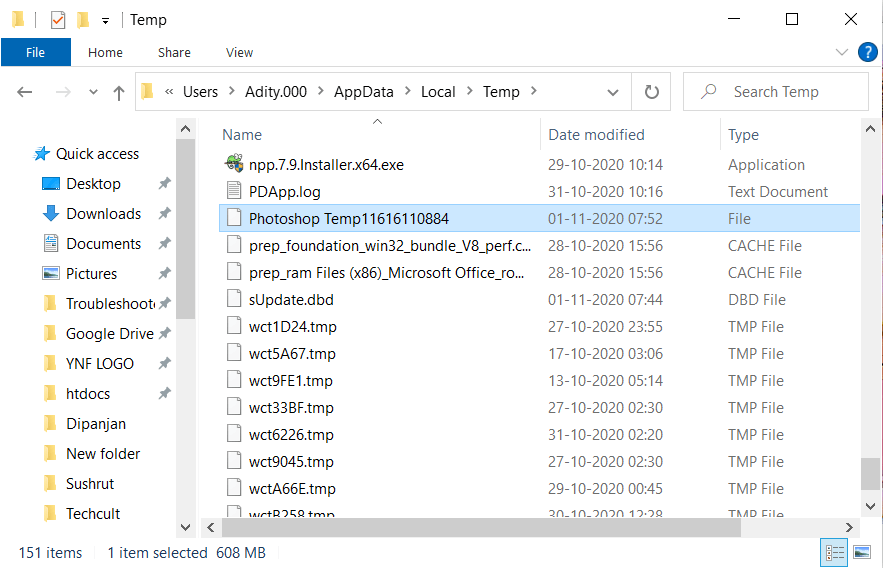
Now, you can directly search for ~PST or Photoshop Temp files through the search bar. Select all the temp files by holding down the Ctrl key and hit delete. Restart your application and your system once.
Method 3: Change the Scratch Disk location.
Ideally, a harddisk should not be filled with more than 85% of its capacity; once you pass that threshold, problems will be around the corner. If the current disk is nearly full, allocate the scratch disk to a more spacious drive.
Following the method mentioned above, navigate to the Edit menu then select Preferences and click on the ‘Scratch Disk…’ option. In the list of all drives available, select the drive you will switch to, and you will be good to go once you restart the system.
If your application shows you the ‘scratch disk is full’ error before you manage to get into settings, there is an easy shortcut useful to change the Scratch Disk Preference. You can press the ‘CTRL + Alt’ key on Windows or ‘Command+Option’ on a Macbook. When you press on the arrow in the box next to ‘First’, a list of all the available partitions with the available space will open up. Select another partition and hit ‘OK’, and restart your device.
Method 4: Allow Photoshop to use more RAM
RAM, as you might know, stands for random access memory. It is an extremely fast component that temporarily stores all the information which your system might need at the moment or shortly. It is volatile and is essentially your device’s short-term memory.
Photoshop is programmed to draw in around 60% of your total RAM. But you can manually increase or decrease the RAM limit. Follow the below steps to increase the RAM limit.
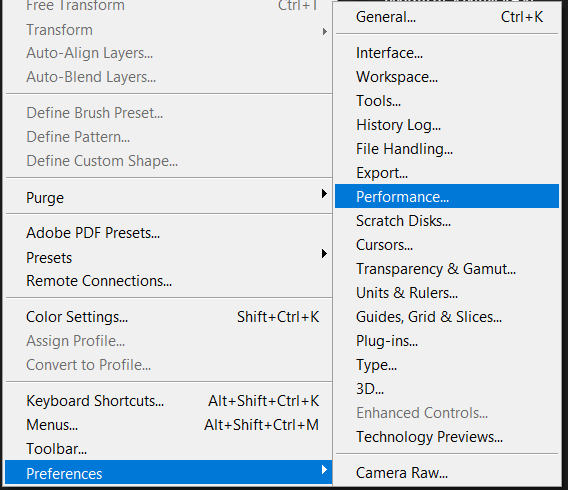
1. Once Photoshop is launched, go to ‘Edit’ and find ‘Preferences’ located at the bottom. In its sub-menu, click on ‘Performance.’
2. In the Performance Menu, adjust the slider located under ‘Memory Usage’ to increase the amount of RAM that Photoshop is allowed to access.
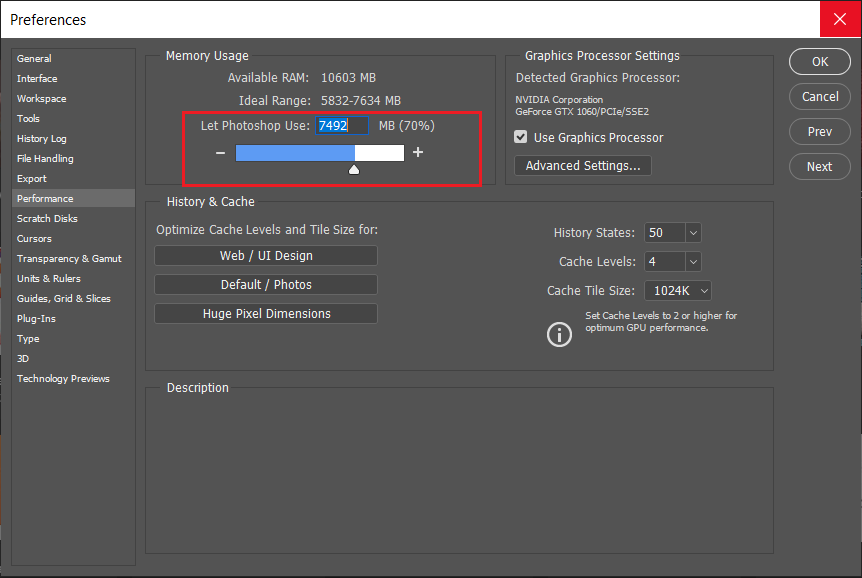
We would warn you against allowing access above the 80% threshold, as it could slow down your PC. Now, exit the application and restart your system once before using Photoshop again.
Method 5: Adjust your Scratch Disk preference
If you use Photoshop regularly, setting up a dedicated hard drive partition is the way to go. If that isn’t possible, the default scratch disk will work just fine too, but you can still allow the application to use other partitions as well. Basically, allow all your partitions to share the burden of being a scratch disk.
The process is easy, go to Edit > Preferences and select Scratch Disk. Once you are in the Scratch Disk tab, check the boxes next to all drives under the ‘Active?’ section. Click ‘OK’ to exit and restart Photoshop.
Once your system restart, see if you’re able to fix scratch disks are full error in Photoshop. If not, then continue with the next method.
Method 6: Purge the Caches
Every time you undo a step, the data and information related to the step undone will be stored as cache. If you are working on a huge project with multiple steps and experimentation, it can take up a few gigabytes of space. Hence it is essential to purge this data.
The purging process is simple but keep in mind that once data is purged, you won’t be able to go back to an older version of the project or image.
In the top tray, open the ‘Edit’ menu and select the ‘Purge’ button. In the sub-menu, you will find multiple options, these are explained below:
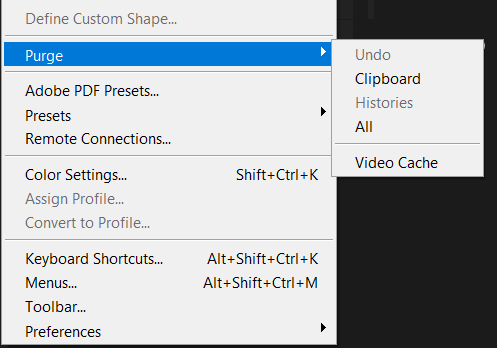
1. Undo: Choosing this deletes the record of all changes made. By deleting this, you won’t be able to undo your changes.
2. Clipboard: Clipboard acts as a buffer to operating systems for providing short-term storage and transfer within and between application programs. By clearing the Clipboard, you won’t be able to paste anything that was once copied and stored in the clipboard.
3. History: It stores the history of changes made to an image. Once cleared, you won’t be able to look up the changes made. Note that this action won’t delete the changes made, just their history.
4. All: This clears all the caches stored.
5. Video Cache: All the video caches the program must have stored will be deleted with this option. Once deleted, you won’t be able to revert changes made to a video.
Choose the required option, and once you confirm the warning prompt, you will be good to go.
Method 7: Disable Auto-Recovery Saving
If Photoshop exits unexpectedly like a crash or computer reboot, the program tries to auto-recover your document. But this process can take a lot of your hard disk space.
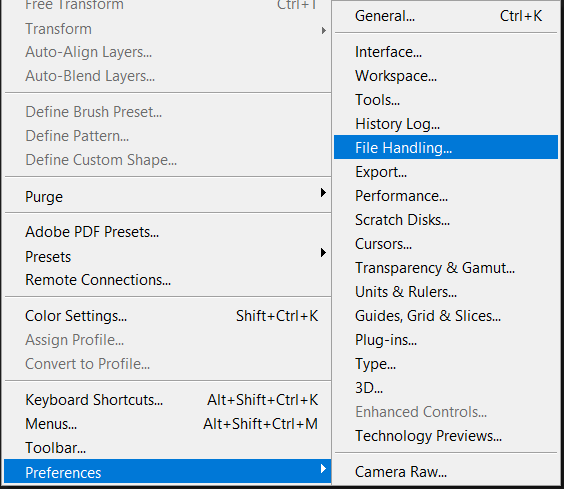
To disable this feature, open Photoshop, navigate yourself to the ‘Edit’ menu, and find ‘Preferences’ located at the bottom. In the sub-menu click on ‘File Handling…’.
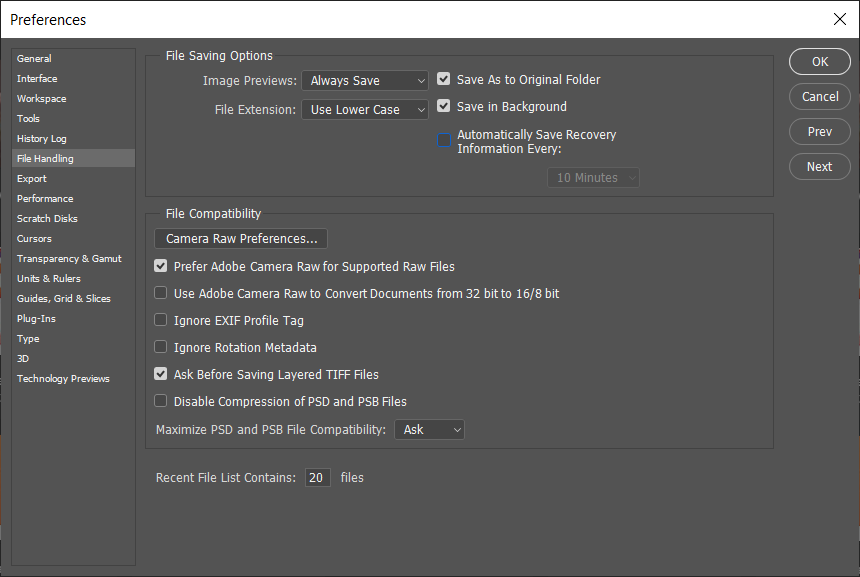
A preferences pop-up window will arrive, under the ‘File Saving Options’, you will find ‘Automatically Save Recovery Information Every (N Minutes).’ Uncheck the box next to it, after which the size of your Photoshop temp file will reduce substantially. Check if the ‘scratch disks are full’ issue is solved.
Method 8: Extend your Scratch Disk’s space
Apart from freeing up existing space, there is another way to create more scratch disk storage space.
Sometimes, a lot of storage exists in a hard drive that is unallocated; this unallocated storage can be tapped into and merged with the drive’s main storage. This directly increases the main drive’s storage capacity. One can also merge or combine unused chunks of space from several other hard drives into the main one. You can either use the in-built Disk Management Console Window or use a third-party application.
Third-party applications can help you in extending the partition that saves the Photoshop files. This application helps in moving, resizing, extending, merging, or even splitting the partition. After space in the main hard drive is extended, restart Photoshop and check if the issue is still prevailing.
Method 9: Defragment your Hard Disk
Sometimes the Photoshop “scratch disks are full error” can pop up even when your scratch disk has enough free space. In such cases, a defragmentation is a viable option.
The defragmentation process increases data access speed by rearranging files stored on a disk to occupy contiguous storage locations. Here, head travel is minimized, reducing the time it takes to read files from and write files to the disk. You can easily defragment your hard drive using this guide.

Method 10: Clear crop tool value
If the error pops up while you are cropping a picture, the size and resolution values may be incorrectly entered in the options bar, or values are in the wrong units. For example: entering 1440×1600 dimensions in inches instead of pixels can trigger the scratch disk are full error by creating a larger file.
Here, the solution is to select ‘Clear’ in the options bar after selecting the crop tool, but before you drag a crop selection.
How much scratch disk space do you need?
Scratch space mainly required depends on how you edit and the number of history states in memory. A minimum of 1.5 GB storage space is required if you only plan on making small changes, plus at least two times the size of all the files you have open at the same time. For larger and more complex edits, you would require more space. You could need as many times the size of the original file as there are history states. At least 6 GB of space on the boot drive and around 1 GB of space on the non-boot drive is reserved for Photoshop. This helps avoid problems caused by the operating system completely running out of space. Hundreds of loaded patterns or brushes significantly increase the scratch space required for Photoshop to launch.
Recommended: 10 Best Photoshop Alternatives For Android
We hope this information was helpful and you were able to Fix Scratch Disks Are Full Error in Photoshop. But if you still have any questions regarding this guide then feel free to ask them in the comment section.