How to Partition Your Hard Disk in Windows 7

In Windows XP, we needed external programs to create partitions on our hard drive disks, but Windows 7 knows how to create a partition without the use of third party applications, which is a great thing because it saves us a lot of time and it’s something 100% backed up by Microsoft, so we know it’s as safe as it gets.
It’s also quite an easy task to accomplish if you follow the steps in this tutorial that will explain how to partition your hard disk in Windows 7. So let’s get this started and you’ll become a partitioning expert in no time!
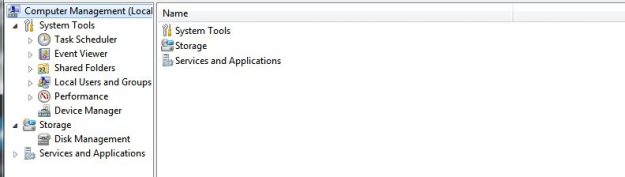
1. Click the Start button and right click Computer. Select Manage.
2. In the Computer Management window, in the left sidebar under the Storage category, click on Disk Management:
3. Now right click the drive you want to partition (in my case, drive D:). From the menu, select Shrink volume:

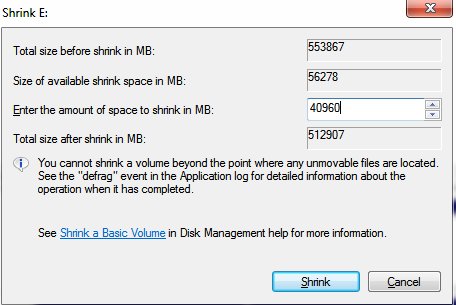
4. After Windows 7 calculates the available space, you will see a new window telling you how much space you have available to be shrunk. Enter the amount of space to shrink in MB (1024MB = 1GB). So if you want a new partition of 40GB, you would type “40960” and so on (make sure that the number you type is lower than the size of available free space on your drive!) When you’re satisfied with the numbers written there, click the Shrink button:
5. Wait a little while until Windows 7 performs the action, and when it’s done you will see next to the drive letter you shrunk a new partition with unallocated space. Right click that partition and select the New Simple Volume tab.
6. A new wizard will appear, asking you for further details: type in the size of the partition (which should be similar to the amount of unallocated space, in our case 40960MB), assign any drive letter you wish, and make sure to have the “NTFS” file system selected. You can also give any name to your partition in the “Volume label” section – you should do so to easily identify your partition in the future and know what it was created for (Photos, Back-up and so on).
When you’re done, click Next and soon you’ll have your new partition up and running! And this is it! You know now how to partition your HDD in Windows 7!