Share files and printers without HomeGroup on Windows 10

The HomeGroup feature of Windows allowed users to share files and resources with other Windows computers over a small network, say their home or office network. With HomeGroup, users could easily share documents, images, media, printers, etc. over a local network easily. However, Microsoft removed this feature from Windows 10 (Version 1803), which is why after this update, HomeGroup won’t appear in File Explorer, Control Panel or the Troubleshoot screen from this version onwards. Users will no longer be able to share their resources over a network using HomeGroup, but some other Windows will provide file and printer sharing options.
Note that the previously shared files or printers will still be available and will continue to be shared. You can access them through File Explorer. Type the name of the computer and the shared folder name in the following format: homePCSharedFolderName. Additionally, you can still access any shared printers through the Print dialog box.
Also, note that the HomeGroup option will still appear when you right-click on a file and select ‘Give access to’. However, it won’t do anything if you click on it.
In this article, we will talk about how you can share files and printers without HomeGroup.
In the absence of HomeGroup, you can share files using one of the three given methods:
If you want to share files with someone only a few times and wouldn’t require a regular connection, you can use the Windows Share functionality. To share files using this method,
1. Go to File Explorer.
2. Locate the folder where the file you want to share is present.
3. Select one or more files you want to share. You can share multiple files by pressing down the Ctrl key while selecting files.
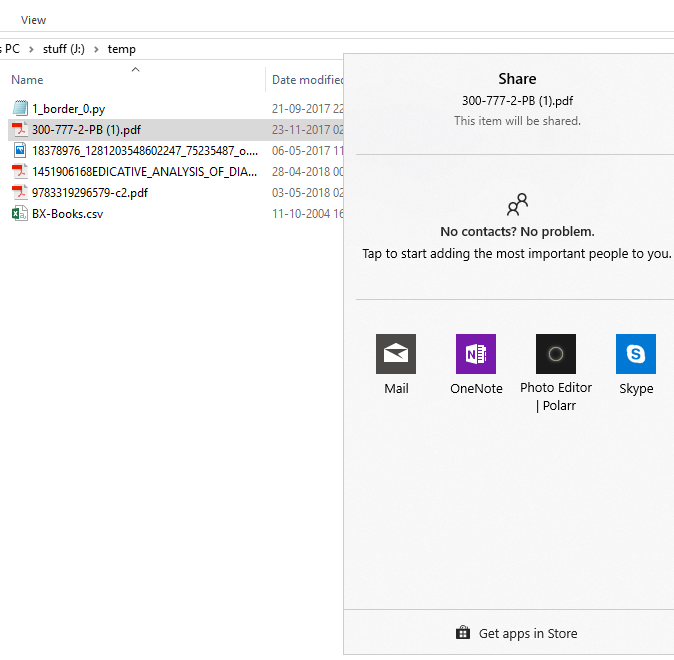
4. Now, click on the ‘Share’ tab.
5. Click on ‘Share’.
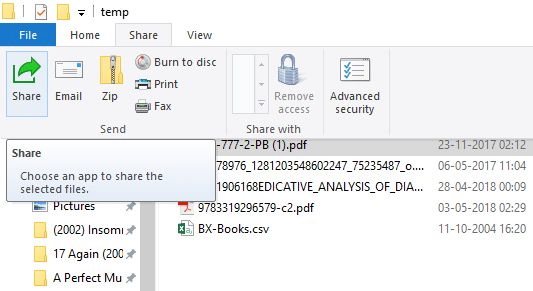
6. Choose the app that you want to share your file through.
7. Follow any further instructions provided.
8. Your file will be shared.
You can also send the selected files as an email by clicking on the Email in the Share tab.
Method 2: Use Onedrive
You can also share your OneDrive files saved on your PC. For this,
1. Go to File Explorer.
2. Move on to the OneDrive folder where the files you want to share are located.
3. Right-click on the file that you want to share.
4. Select ‘Share a OneDrive link’.
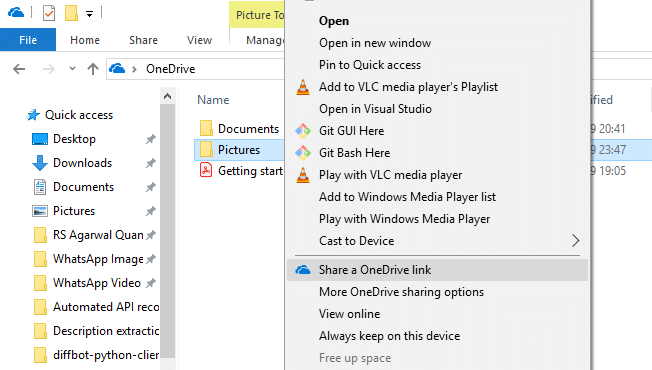
5. On doing this, a link to your file will be created and placed on your clipboard.
6. You can paste and send this link through your desired service like email.
7. Your file will be shared.
8. You can also right-click on your file and select ‘More OneDrive sharing options’ to configure expiration date, password, edit access, etc.
To share files over a local network, you can use this method. Before, sharing your files over a network, you will have to enable file and printer sharing options.
Enable Network Discovery And Sharing Options
To enable the sharing options,
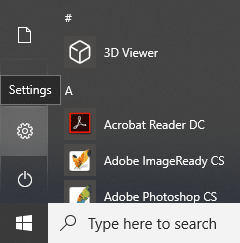
1. Click on the Start button on your taskbar.
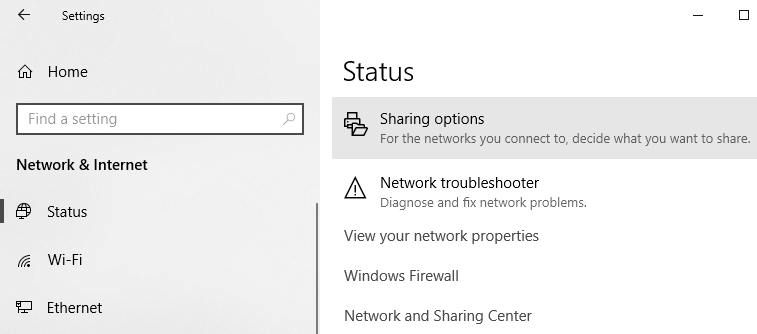
2. Click on the gear icon to open Settings.
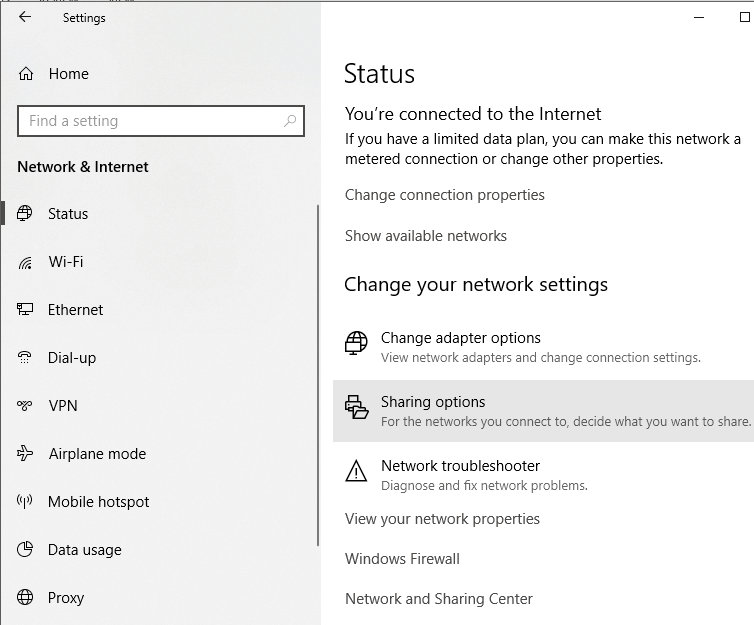
3. Click on ‘Network & Internet’ in the settings window.

4. Click on ‘Sharing options’.
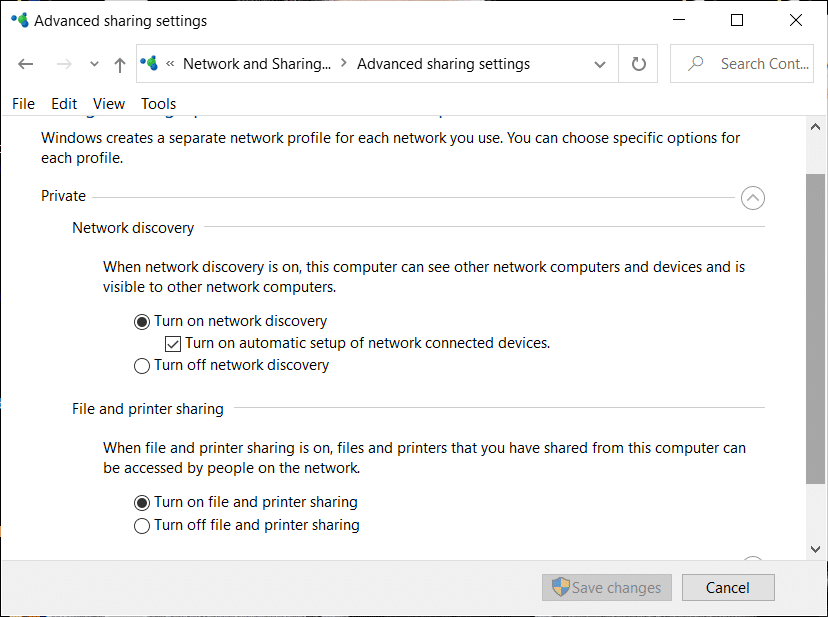
5. The advanced sharing settings window will open.
6. Under the ‘Private’ section, click on the radio button for ‘Turn on Network discovery’.
7. Ensure that ‘Turn on automatic setup of networked connected devices’ checkbox is also checked.
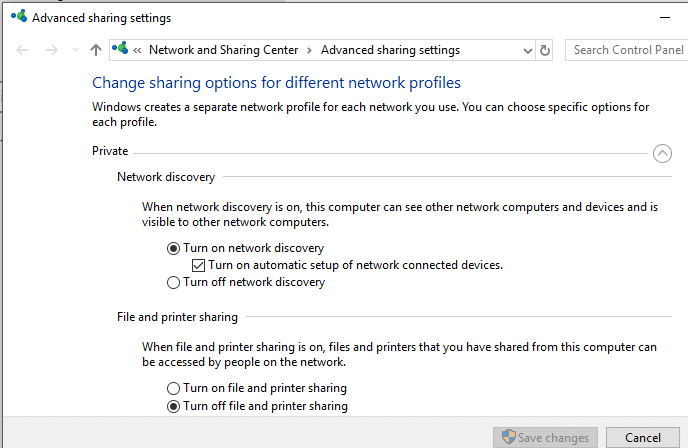
8. Also enable the ‘Turn on file and printer sharing’ radio button.
9. Further, expand the ‘All Networks’ block.
10. You can optionally turn on ‘Public folder sharing’ if you want people on your home network to be able to access or modify your default public folders.
11. You can also choose to enable password protected sharing if you need it.

12. Click on ‘Save changes’.
13. Network discovery will be enabled on your computer.
14. Follow the same steps on each computer on your local network.
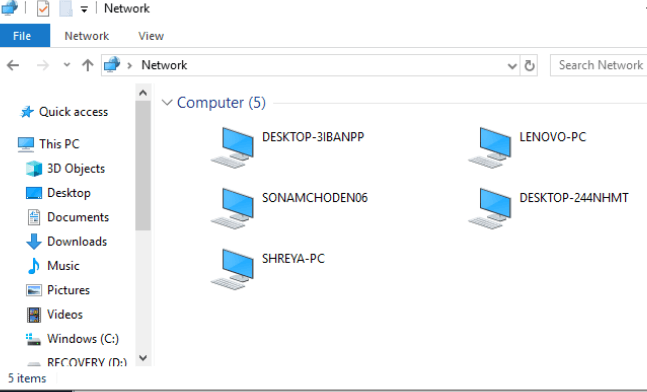
15. All the computers on your network will appear in the ‘Network’ section of your File Explorer.
Once you have configured these settings on all your desired computers, you can share your files by following the steps below:
1. Go to File Explorer.
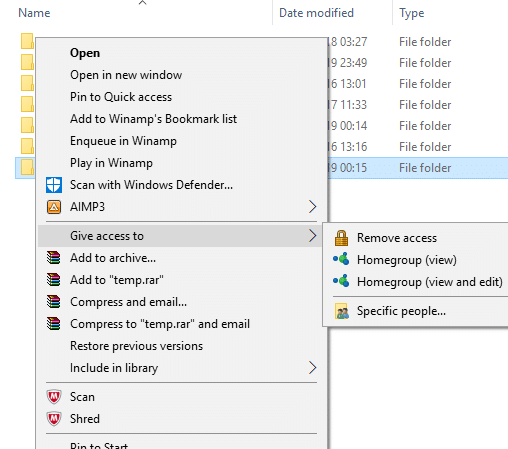
2. Go to the location of your file or folder that you want to share and right-click on it and select ‘Give access to’ from the menu. Click on ‘Specific people…’
3. In the ‘Network access’ window, select the users that you want to share your folder with. If you select a specific user, then the user will have to provide the username and password to access the resource or the user should be logged in to an account with the same credentials on their device. If you select ‘everyone’ in the drop-down list, then your resource will be shared with everyone without having to enter credentials.

4. Click on the Add button after selecting the desired users.
5. To decide the access permissions, click on the drop-down menu under the ‘Permission Level’ column. Choose read if you want the user to only view the file and not modify it. Select read/write if you want the user to be able to read and make changes to the shared file.
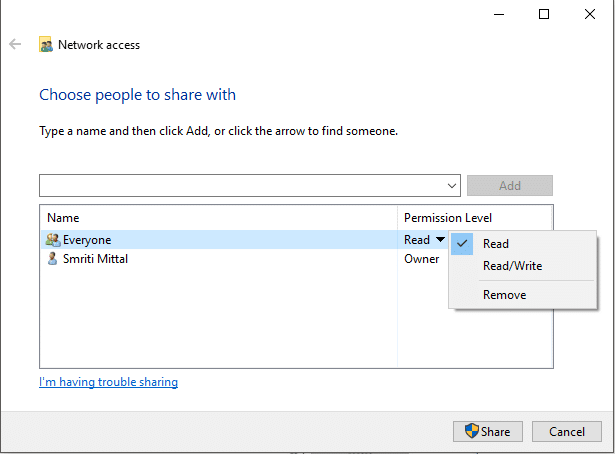
6. Click on Share.
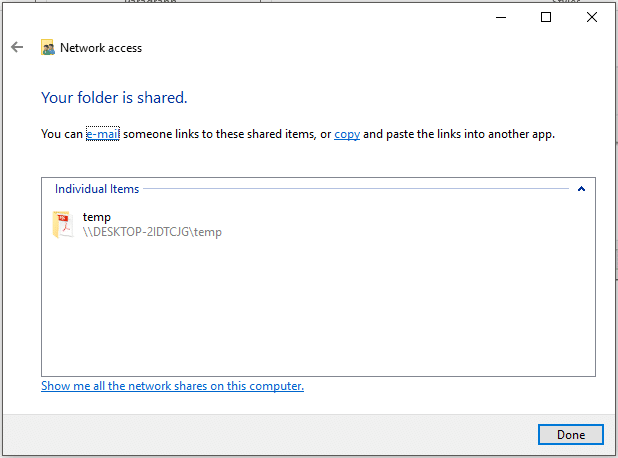
7. You will be given the link to the folder.
Note that other devices will be able to access the shared content only if the sharing device is active and connected to the network.
Also Read: Allow or Block Apps through the Windows Firewall
To access this shared content from some other device you should
1. Open File Explorer.
2. Copy and paste the shared link in the address bar.
Or,
1. Open File Explorer and navigate to the ‘Network’ folder.
2. Here, you will see the list of connected devices and their shared content or resources.
Also Read: Fix Printer Driver is unavailable on Windows 10
In Case Of Problem
If you are not able to access the shared content, it is possible that your device is not able to map the computer name of the sharing computer to its IP address. In such a case, you should replace the computer name in the path link directly with its IP address. You will find it in the ‘Network & Internet’ section of settings, under ‘View your network properties’.
If the problem persists, it is possible that your device’s firewall is blocking it. To see if this is the problem, you can temporarily disable the firewall on both the devices and try accessing the shared content then. To disable the firewall,
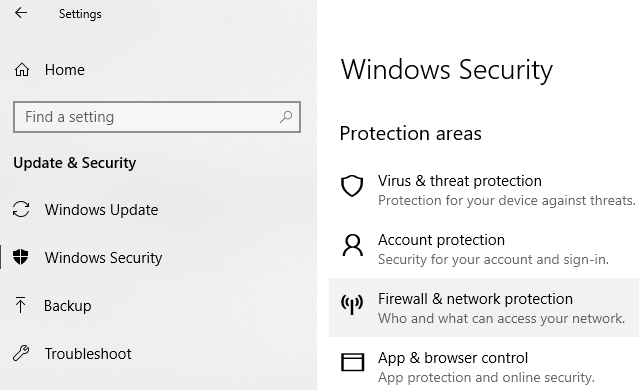
1. Open Settings.
2. Go to ‘Update & Security’.
![]()
3. Click on the ‘Windows Security’ from the left pane.
4. Click on ‘Firewall & network protection’ under Protection areas.
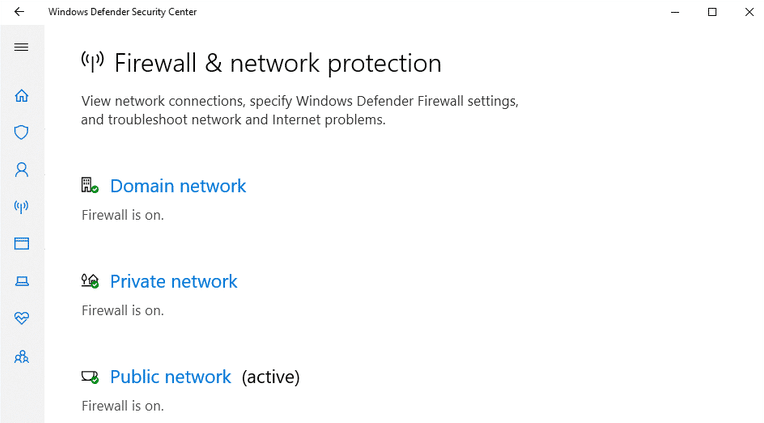
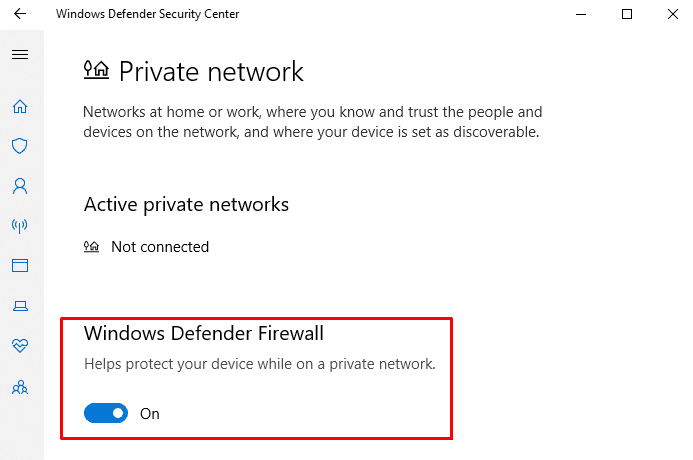
5. Windows Defender Security Center window will open. Click on ‘Private network’ under Firewall & network protection heading.
6. Next, disable the toggle under Windows Defender Firewall.
Now, if you can access the shared content, it means that the problem was being caused by the firewall. To fix this,
1. Open Windows Defender Security Center window as above.
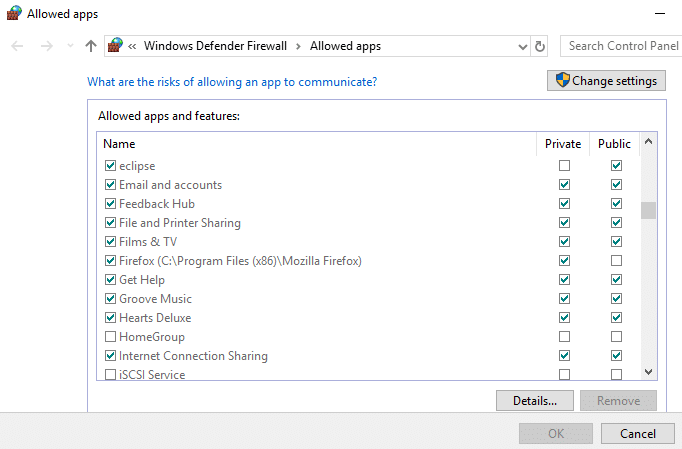
2. Click on Allow an app through a firewall.

3. Ensure that ‘file and printer sharing’ is enabled for the private network.
Sharing Printers
Note that file and printer sharing options should be enabled on your computer. The steps for the same have been already discussed above.
To share with other users on a local network,
1. Open settings by clicking on the gear icon in the Start menu. Click on ‘Devices’.

2. Select ‘Printers & scanners’ from the left pane. Select the printer you want to share and click on ‘Manage’.
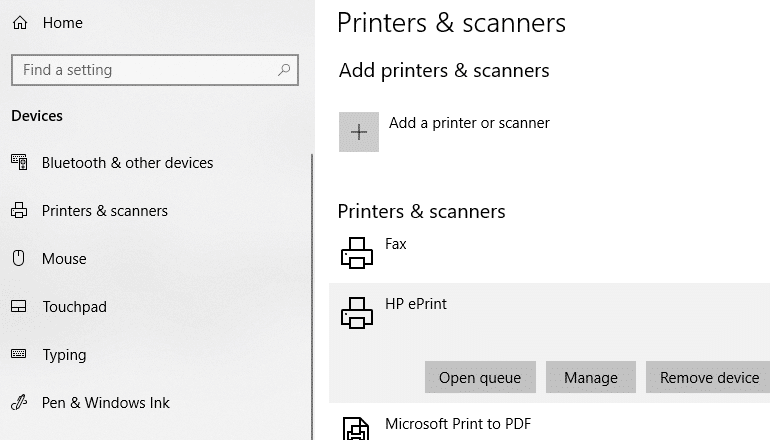
3. Click on ‘Printer properties’. In the properties window, switch to the Sharing tab.
4. Check the ‘Share this printer’ checkbox.
5. Type an identification name for this printer.
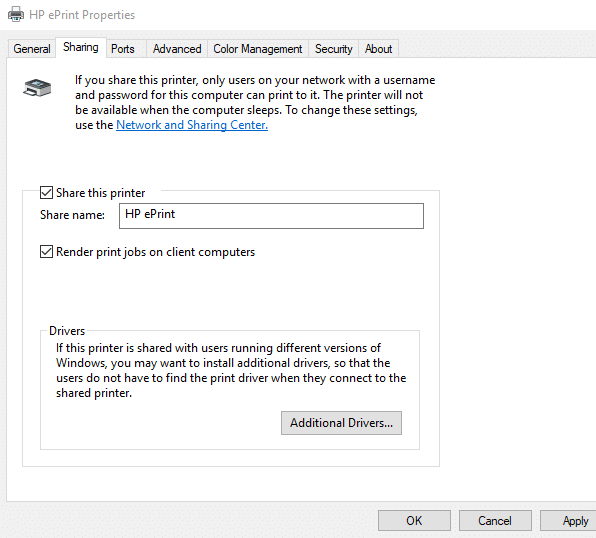
6. Click on Apply. Then click on OK.
Recommended: How To Setup Network Files Sharing On Windows 10
Connect The Devices To This Printer
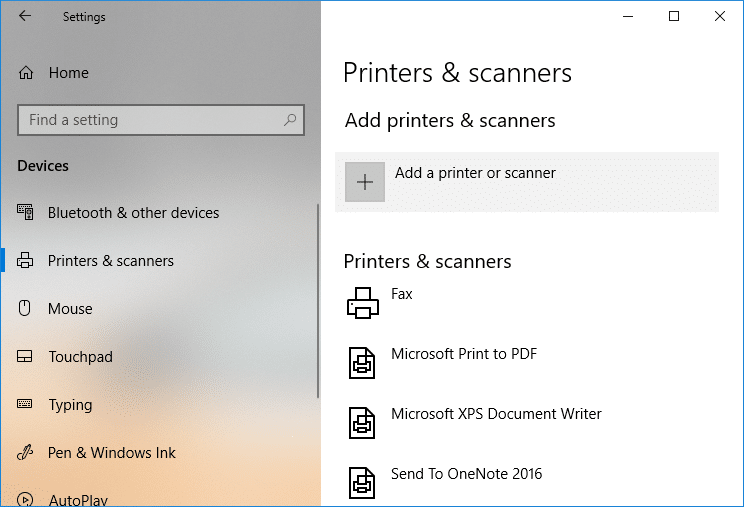
1. Open Settings by clicking on the gear icon in the Start menu.
2. Click on ‘Devices’.
3. Select ‘Printers & scanners’ from the left pane.
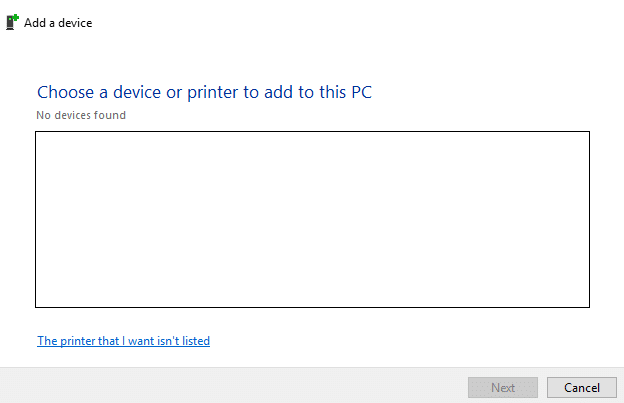
4. Click on ‘Add a printer or scanner’.
5. If the printer does not appear, click on ‘The printer that I want isn’t listed’.
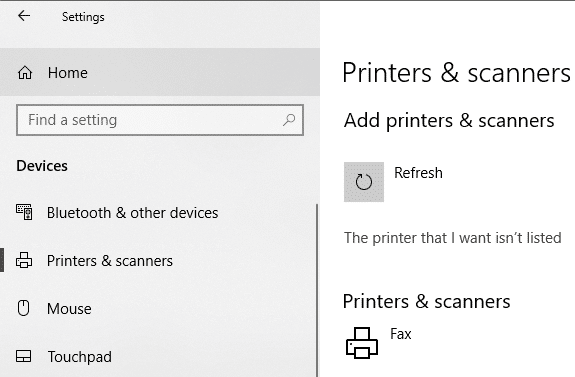
6. Click on ‘Select a shared printer by name’ and click on Browse.
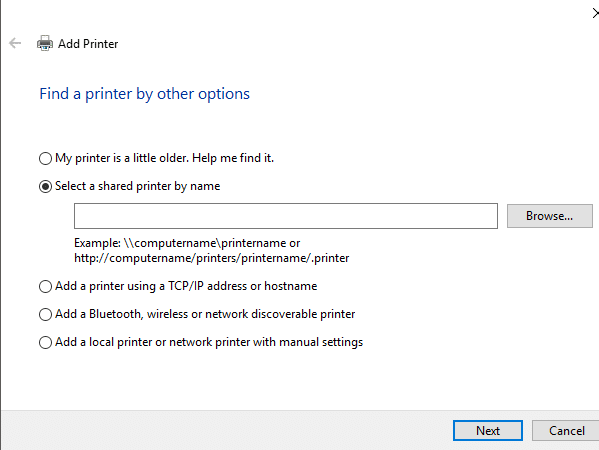
7. Double click on the computer which is sharing the printer. If you don’t know the name of the computer, go to settings on that computer. Type the computer name in the search box and select ‘View your PC name’. You will see the PC (computer) name under the device name.
8. Select the shared printer.
9. Click on Select.
10. Click on Next.

11. Click on Next again and then click on Finish.
12. Do the same on all the computers to which you want the printer to be shared.
For a device with an older version of Windows.
1. Go to Control Panel.
2. Click on ‘View devices and printers’ under the ‘Hardware and Sound’ category.
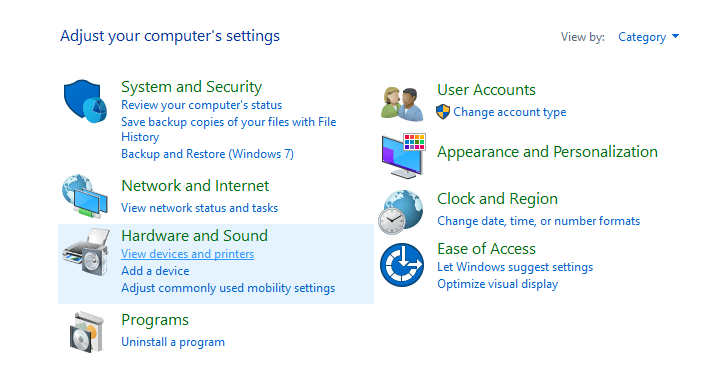
3. Click on ‘Add a printer’.
4. Select the printer if it appears and follow the given instructions.
5. If your printer does not appear, click on ‘The printer that I want isn’t listed’.
6. Click on ‘Select a shared printer by name’ and click on Browse.
7. Double click on the computer which is sharing the printer.
8. Select the shared printer.
9. Click on Select.
10. Click on Next.
11. Click on Next again and then click on Finish.
12. Note that other users will be able to access the printer only when the computer sharing the printer is active.
These were a few ways in which you can easily share your files and printers to other computers without using HomeGroup on Windows 10.