10 Ways to Fix Resolving Host Error in Chrome

If you’re facing the issue of Resolving Host Error In Google Chrome causing the websites to load slowly or DNS server not found then don’t worry as in this guide we will talk about several fixes that will resolve the issue.
If you’re not able to open a website or the website is loading very slowly in Google Chrome then if you look closely you will see the “Resolving Host” message in the status bar of the browser which is the root cause of the issue. This issue is experienced by most of the users but they don’t actually know the reason behind this and they simply ignore the message until they are not able to open the website. Not only Google Chrome but all the other browsers are also affected by this problem such as Firefox, Safari, Edge, etc.

Note: This message may vary from browser to browser like in Chrome it shows “Resolving host”, in Firefox it shows “Looking up”, etc.
Why Did Resolving Host happen on Chrome?
To open any website the first thing you do is enter the URL of the website in the browsers address bar and hit Enter. And if you think this is really how the website opens then you are wrong my friend as in reality there is a complex process involved to open any website. In order to open any website, the URL which you enter is first converted into the IP address so that the computers can understand it. The resolution of the URL into an IP address happens through Domain Name System (DNS).
When you enter any URL, it goes to a multilevel hierarchy of DNS and as soon as the correct IP address is found for the entered URL, it is sent back to the browser and as a result, the webpage is displayed. The reason for resolving the host issue can be your Internet Service Provider (ISP) as the DNS servers configured by them is taking a long time to find a mapping IP address for the entered URL. Other reasons for the issues are a change in ISP or change in the DNS settings. Another reason is the stored DNS cache may also cause a delay in finding the correct IP address.
10 Ways to Fix Resolving Host Error in Google Chrome
Below are given several methods using which you can fix Resolving host error in Chrome:
Method 1: Disable DNS Prediction or Prefetching
Chrome Prefetch option allows web pages to load quickly and this feature works by storing the IP addresses of the web pages visited or searched by you in the cache memory. And now whenever you try to visit the same URL, then instead of searching for it again, the browser will directly search for the IP address of the entered URL from the cache memory improving the loading speed of the website. But this option can also cause the Resolving host issue on Chrome, so you need to disable the prefetch feature by following the below steps:
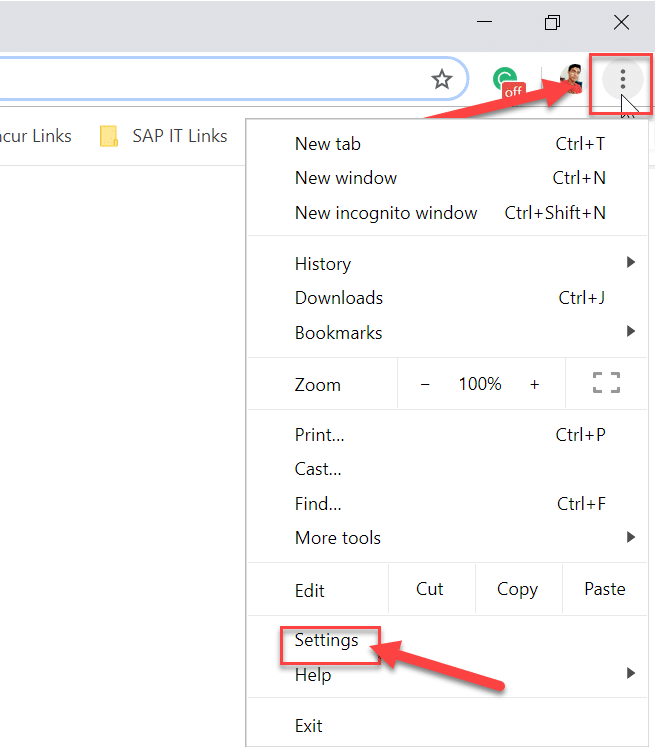
1.Open Google Chrome.
2.Now click on the three dots icon available at the top right corner and select Settings.
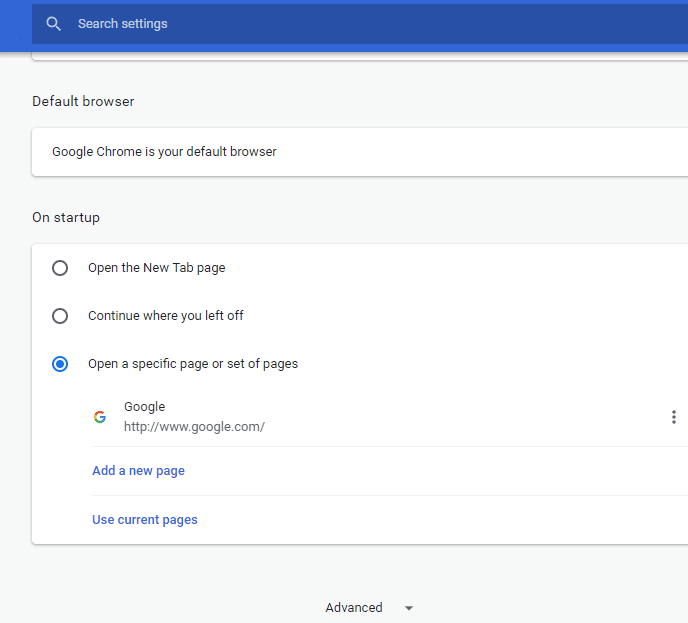
3.Scroll down to the bottom of the window and click on Advanced option.
4.Now under the Privacy and security section, toggle OFF the button next to the option “Use a prediction service to load pages more quickly“.
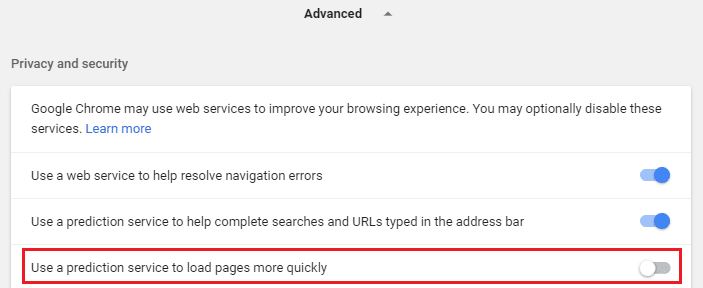
After completing the above steps, the Prefetch resources option will be disabled and now you will be able to visit the webpage earlier showing Resolving Host error.
Method 2: Use Google DNS Server
Sometimes the default DNS server provided by the ISP can cause the error in Chrome or sometimes the default DNS isn’t reliable, in such cases, you can easily change DNS servers on Windows 10. It is recommended to use Google Public DNS as they are reliable and can fix any issues related to DNS on your computer.

Method 3: Clear DNS Cache
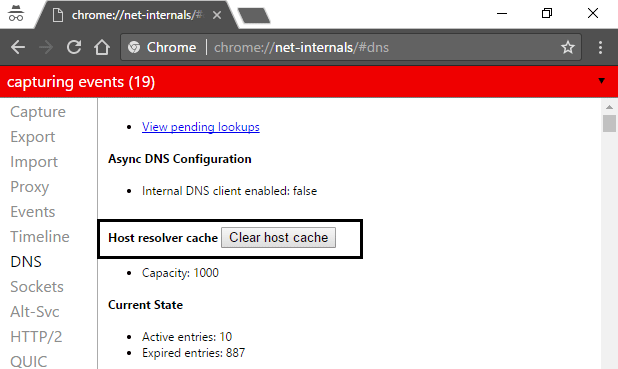
1.Open Google Chrome and then go to Incognito Mode by pressing Ctrl+Shift+N.
2.Now type the following in the address bar and hit Enter:
chrome://net-internals/#dns
3.Next, click Clear host cache and restart your browser.
Recommended: 10 Ways To Fix Slow Page Loading In Google Chrome
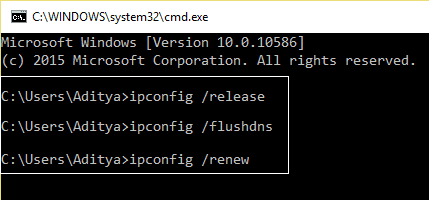
Method 4: Flush DNS & Reset TCP/IP
1.Right-click on Windows Button and select “Command Prompt(Admin).“

2.Now type the following command and press Enter after each one:
ipconfig /release
ipconfig /flushdns
ipconfig /renew
3.Again open elevated Command Prompt and type the following and hit enter after each one:
ipconfig /flushdns
nbtstat –r
netsh int ip reset
netsh winsock reset
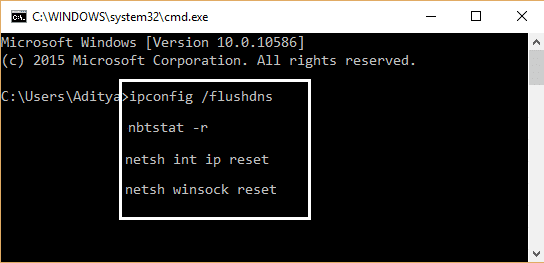
4.Reboot to apply changes. Flushing DNS seems to Fix Resolving Host Error In Google Chrome.
Method 5: Disable VPN & Proxy
If you’re using a VPN to unblock the blocked sites in schools, colleges, business places, etc then it can also cause the Resolving Host problem in Chrome. When the VPN is activated, the user’s real IP address is blocked and instead some anonymous IP address is assigned which can create confusion for the network and it can block you from accessing the webpages.
Since the IP address assigned by the VPN can be used by a large number of users which can lead to Resolving Host issue on Chrome, it is advised to temporarily disable VPN software and check if you’re able to access the website or not.

If you have VPN software installed on your system or browser then remove you can remove them by following the below steps:
- Generally, if a VPN is installed on your browser, its icon will be available at the Chrome address bar.
- Right-click the VPN icon then select the “Remove from Chrome” option from the menu.
- Also, if you have a VPN installed on your system then from the notification area right-click on the VPN software icon.
- Click on the Disconnect option.
After performing the above steps, the VPN will either be removed or temporarily disconnected and now you can try to check if you’re able to visit the webpage which earlier was showing the error. If you’re still facing the issue then you also need to disable Proxy on Windows 10 by following the below steps:
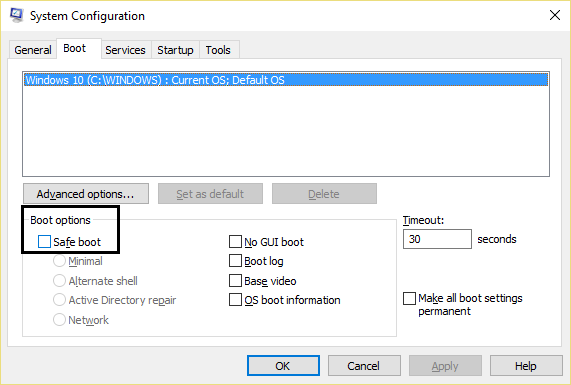
1.Press Windows Key + R then type msconfig and click OK.

2.Select boot tab and check Safe Boot. Then click Apply and OK.
3.Restart your PC and once restarted again press Windows Key + R then type inetcpl.cpl.
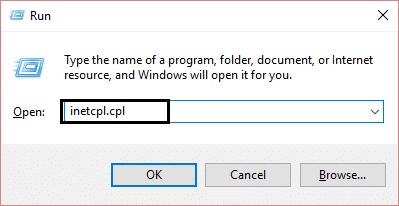
4.Hit Ok to open internet properties and from there select Connections.
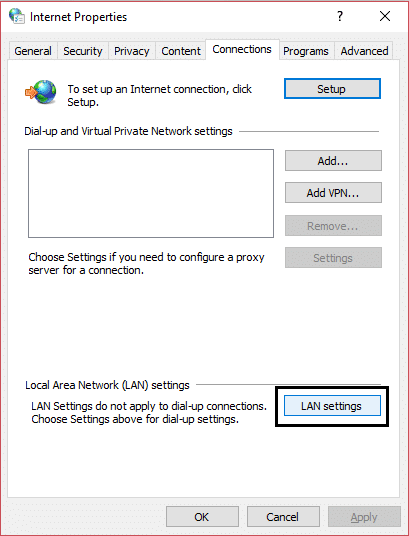
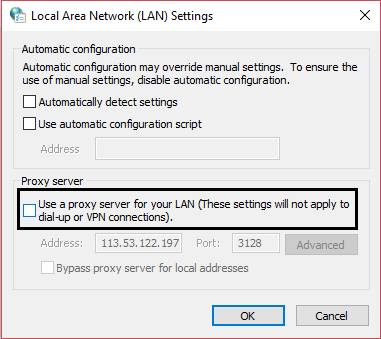
5.Uncheck “Use a proxy server for your LAN“. Then click OK.
6.Again open MSConfig window and uncheck Safe boot option then click apply and OK.
7.Restart your PC and you may be able to Fix Resolving Host Error In Google Chrome.
Method 6: Clear Browsing Data
As you browse anything using Chrome, it saves the URLs you have searched, download history cookies, other websites, and plugins. The purpose of doing so is to increase the speed of the search result by searching first in the cache memory or your hard drive and then go to the website to download it if not found in the cache memory or the hard drive. But, sometimes this cache memory becomes too large and it ends up slowing down the page loading giving Resolving Host error in Chrome. So, by clearing the browsing data, your problem may be resolved.
To clear the entire browsing history, follow the below steps:
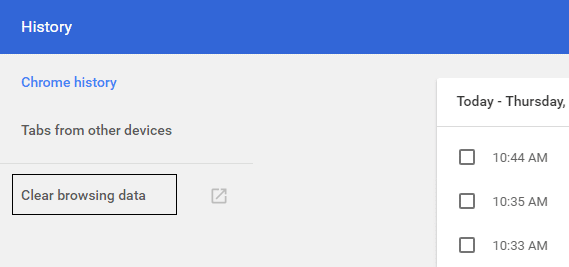
1.Open Google Chrome and press Ctrl + H to open history.
2.Next, click Clear browsing data from the left panel.
3.Now you need to decide the period for which you are deleting the history date. If you want to delete from the beginning you need to choose the option to delete browsing history from the beginning.

Note: You can also select several other options such as Last hour, Last 24 hours, Last 7 days, etc.
4.Also, checkmark the following:
- Browsing history
- Cookies and other site data
- Cached images and files

5.Now click Clear data to start deleting the browsing history and wait for it to finish.
6.Close your browser and restart your PC.
Method 7: Modifying Hosts Profile
A ‘hosts’ file is a plain text file, which maps hostnames to IP addresses. A host file helps in addressing network nodes in a computer network. If the website which you are trying to visit but unable to due to the Resolving Host Error is added in the hosts file then you to remove the particular website and save the hosts file to fix the issue. Editing the hosts file is not simple, and therefore it is advised that you go through this guide. To modify the host’s file follow the below step:
1.Press Windows Key + Q then type Notepad and right-click on it to select Run as administrator.
2.Now click File then select Open and browse to the following location:
C:WindowsSystem32driversetc

3.Next, from the file type select All Files.
4.Then select hosts file and click open.
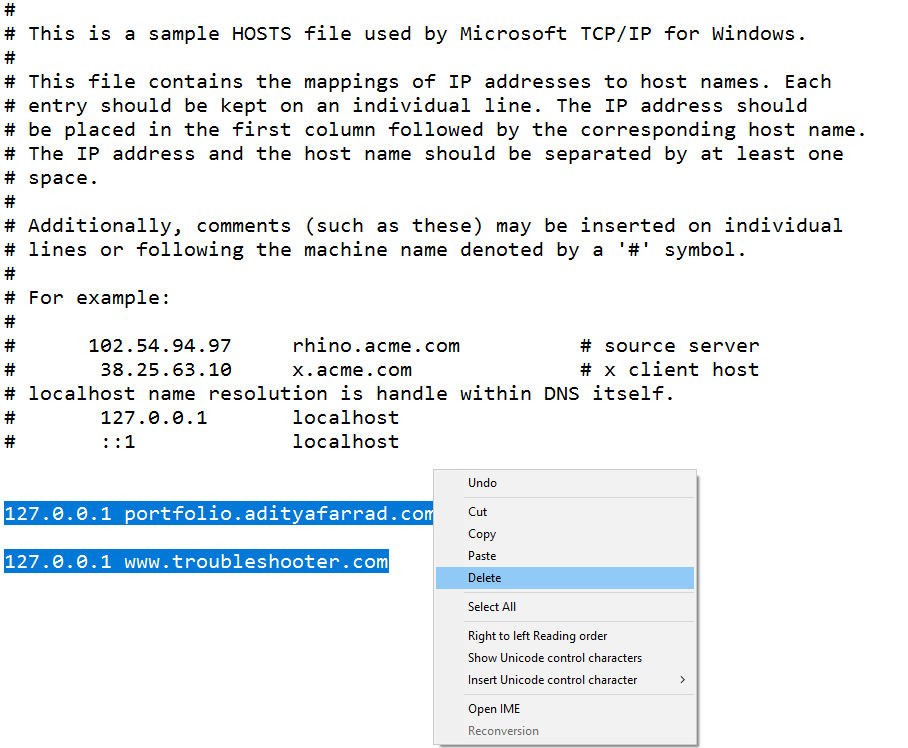
5.Delete everything after the last # sign.
6.Click File>save then close notepad and restart your PC.
After completing the above steps, your host’s file will be modified and now try to run the website, it may load perfectly now.
But if you’re still not able to open the website then you can control the resolution of the domain name to the IP address using the host file. And the resolution of the host file takes place before the DNS resolution. So you can easily add the IP address and it’s corresponding domain name or the URL in the host file to fix the Resolving Host error in Chrome. Thus whenever you visit the particular website, the IP address will get resolved from the hosts file directly and the resolution process will be much faster for the sites you visit frequently. The only downside of this method is that it is not possible to maintain the IP addresses of all the websites you visit in the hosts file.
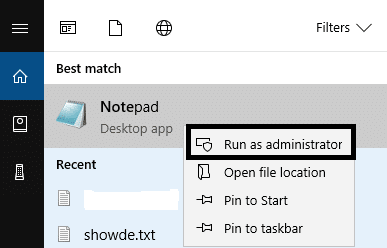
1.Type Notepad in Start Menu search bar and then right-click on it and select Run as administrator.
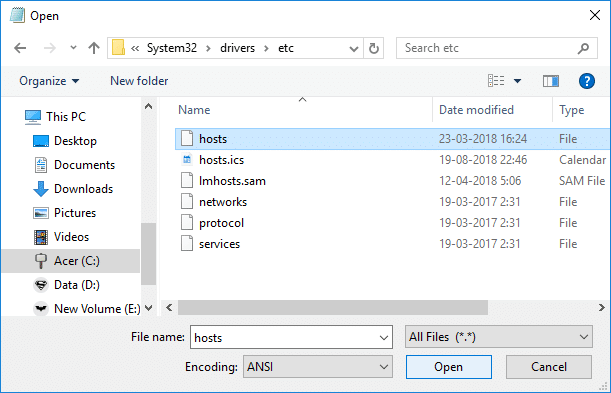
2.Now click File from notepad menu then select Open and browse to the following location:
C:WindowsSystem32driversetc
3.Next, from the file type select All Files then select hosts file and click open.
4.The hosts file will open, now add the required IP address & its domain name (URL) in the hosts file.
Example: 17.178.96.59 www.apple.com
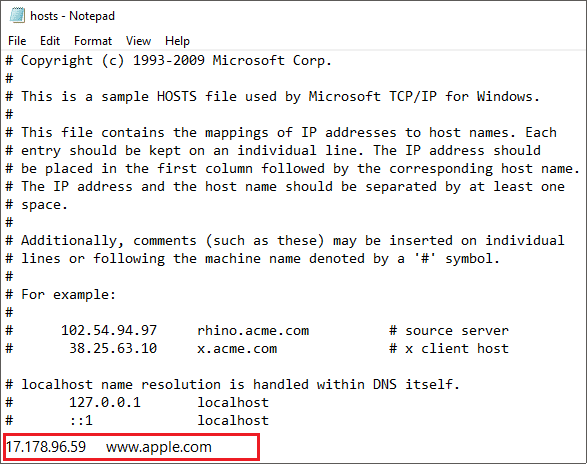
5.Save the file by pressing the Ctrl + S button on your keyboard.
After completing the above steps, your hosts file will be modified and now you can again try to open the website and this time it may load without any issues.
Method 8: Disable IPv6
1.Right click on the WiFi icon on the system tray then click on “Open Network and Internet Settings“.
![]()
2.Now scroll down in the Status window and click on Network and Sharing Center.
3.Next, click on your current connection in order to open its Properties window.
Note: If you can’t connect to your network then use Ethernet cable to connect and then follow this step.
4.Click on the Properties button in the Wi-Fi Status window.
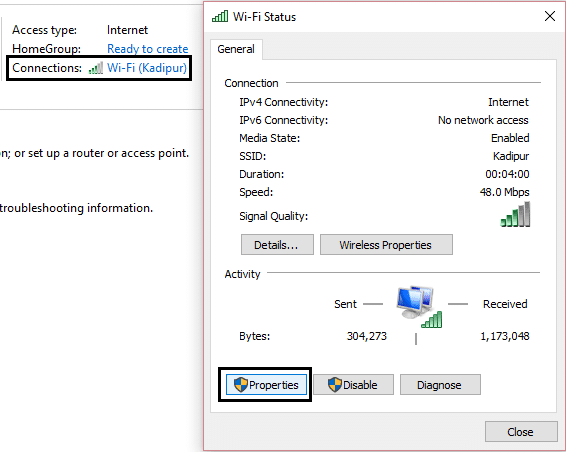
5.Make sure to uncheck Internet Protocol Version 6 (TCP/IPv6).
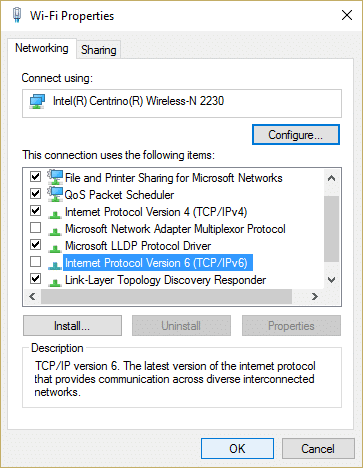
6.Click OK then click Close. Reboot your PC to save changes.
Method 9: IP Address Conflict
Even though it is not something occurs frequently, still, IP address conflicts are extremely real problems and troubles a lot of users. Conflicting of IP address happens when 2 or more systems, connection end-points or hand-held devices in the same network wind up being allocated the same IP address. These endpoints can be either PCs, mobile devices, or other network entities. When this IP conflict occurs between 2 endpoints, it causes trouble to use the internet or connect to the internet.
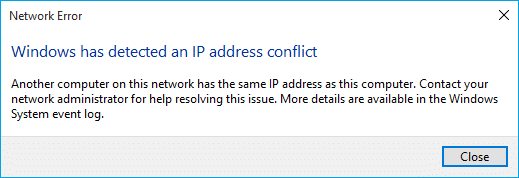
If you are facing the error Windows has detected an IP address conflict on your computer then this means another device on the same network has the same IP address as your PC. The main issue seems to be the connection between your computer and the router, so try to restart the modem or router and the problem may get resolved.
Method 10: Contact Your Internet Service Provider
If none of the above methods work then the last option is to contact your Internet Service Provider (ISP) and discuss the issue with them. You also need to provide them with all the URLs of the websites that you’re trying to access but unable to because of the Resolving Host Error in Chrome. Your ISP will check the issue on their end and will either fix the problem or let you know that they are blocking these websites.
Recommended:
So, hopefully by using any of the above-explained solutions you could able to fix your Resolving host issue in Google Chrome.