5 Ways to Turn Off Touchpad on Windows 10

The touchpad plays the role of a pointing device in laptops and replaces the external mouse used in bigger computers. The touchpad, also known as the trackpad, has been around for more than 20 years but still doesn’t entirely replace the functionality and ease of using an external mouse.
Some Windows laptops do come equipped with an exceptional touchpad but several contain only an average or below par touchpad. Many users, therefore, connect an external mouse to their laptops when performing any kind of productive work.
However, having two different pointing devices at one’s disposal can also be counter-productive. The touchpad can often get in your way while typing and an accidental palm or wrist click on it could land the writing cursor elsewhere on the document. The rate and chances of accidental touches increase with the proximity between the keyboard and the touchpad.
For the above reasons, you might want to disable the touchpad and fortunately, disabling touchpad on a Windows 10 laptop is quite easy and only takes a couple of minutes.
We strongly recommend you to have another pointing device, an external mouse, already connected to the laptop before disabling the touchpad. Absence of an external mouse and a disabled touchpad will render your laptop almost unusable unless you know your keyboard shortcuts. Also, you will require an external mouse to turn the touchpad back on. You also have the option to disable the touchpad automatically when the mouse is connected.
How to disable touchpad on Windows 10?
There are quite a few methods to disable the touchpad on your Windows 10 laptop. One can either dig around Windows Settings & the Device Manager to disable it or take the aid of an external third-party application to shun the touchpad.
Although, the easiest method is to use the keyboard shortcut/hotkey that most laptop & keyboard manufacturers incorporate. The enable-disable touchpad key, if present, can be found in the top row of the keyboard and is usually one of the f-numbered keys (For example: fn key + f9). The key will be marked with an icon resembling the touchpad or a finger touching a square.
Also, certain laptops like the HP branded ones contain a physical switch/button on the top right corner of the touchpad which when double-clicked disables or enables the touchpad.
Moving on to the more software-focused methods, we start off by disabling touchpad via the Windows Settings.
5 Ways to Turn Off Touchpad on Windows 10 laptops
Method 1: Turn Off Touchpad Via Windows 10 Settings
If your laptop is using a precision touchpad, you can disable it by using the touchpad settings in the Windows Settings. However, for laptops with a non-precision type touchpad, the option to disable touchpad is not directly included in settings. They can still disable the touchpad through Advanced touchpad settings.
1. Launch Windows Settings by any of the methods mentioned below
a. Click on the start/windows button, search for Settings and press Enter.
b. Press Windows key + X (or right-click on the start button) and select Settings from the power user menu.
c. Press Windows key + I to directly launch Windows Settings.
2. Locate Devices and click on the same to open.
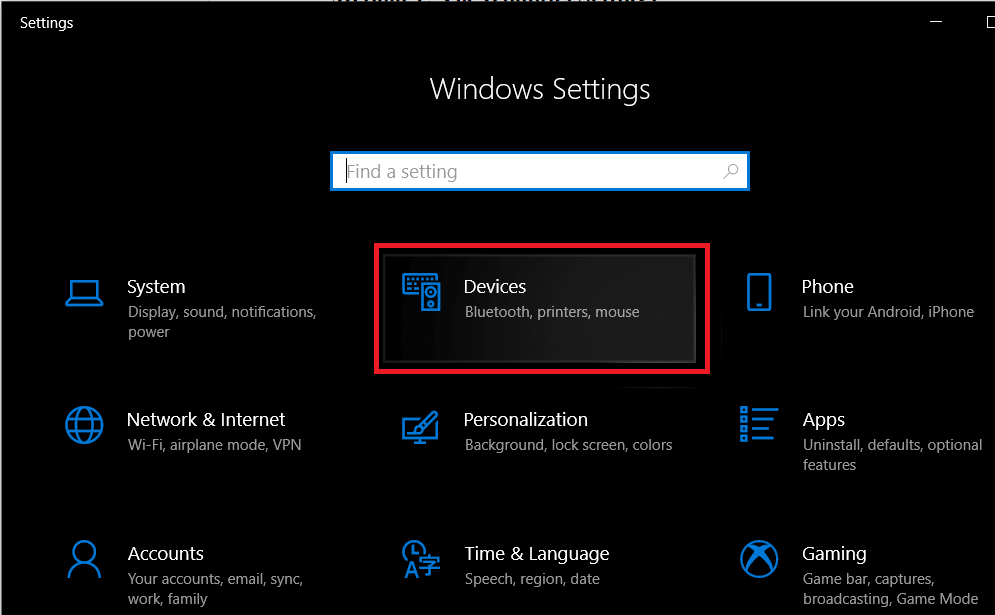
3. From the left-panel where all the devices are listed, click on Touchpad.

4. Finally, in the right-panel, click on the toggle switch under Touchpad to turn it off.
Also, if you would like your computer to automatically disable the touchpad when you connect an external mouse, uncheck the box next to ‘Leave touchpad on when a mouse is connected’.
While you are here in touchpad settings, scroll down further to adjust other touchpad settings such as tap sensitivity, touchpad shortcuts, etc. You can also customize what actions occur when you swipe three-fingers and four-fingers in different directions on the touchpad.
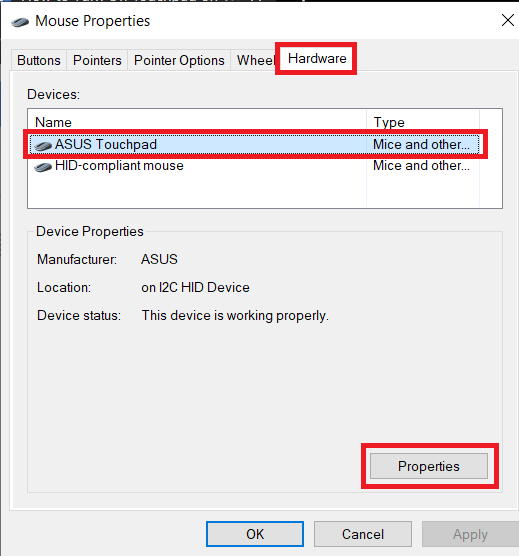
For the ones with a non-precision touchpad, click on Additional settings option found in the right-hand panel.

This will launch a Mouse Properties window with a greater number of customizable options concerning the trackpad. Switch over to the Hardware tab. Highlight/select your touchpad by clicking on it and click on the Properties button present at the bottom of the window.
In the touchpad properties window, click on Change Settings under the general tab.
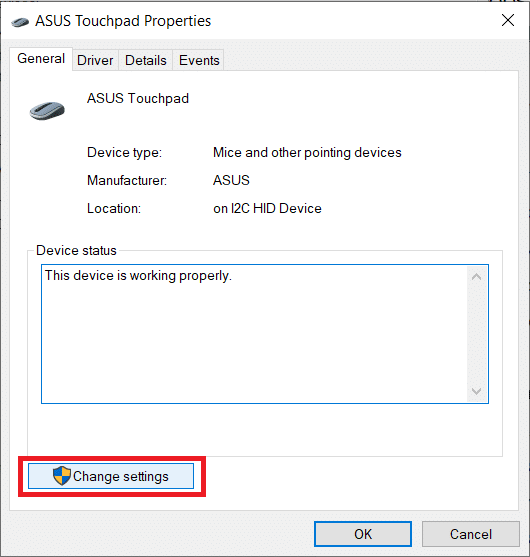
Finally, switch to the Driver tab and click on Disable Device to disable the touchpad on your laptop.

Alternatively, you can also choose to Uninstall Device but Windows will request you to download the touchpad drivers back again every time your system boots up.
Method 2: Disable Touchpad Through Device Manager
Device Manager helps windows users view and control any and all hardware connected to their systems. The device manager can be used to enable or disable a certain piece of hardware (including the touchpad on laptops) and also update or uninstall device drivers. To disable touchpad through device manager, follow the below steps:
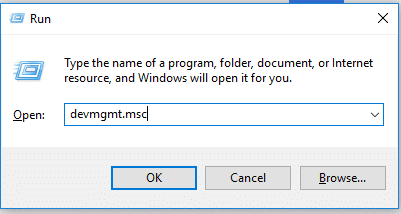
1. Open Device Manager by one of the below methods.
a. Press Windows Key + X (or right-click on the start menu button) and select Device Manager from the power user menu
b. Type devmgmt.msc in Run command (Launch run by pressing Windows Key + R) and click on OK.
c. Press Windows Key + S (or click on the start button), search for Device Manager and hit enter.
2. From the list of connected devices, expand Mice and other pointing devices by clicking on the arrow to its left or double-clicking on the title.
![]()
3. It is possible you might find more than one entry for touchpad under the Mice and other pointing devices menu. If you already know which one corresponds to your touchpad, right-click on it and select Disable Device.
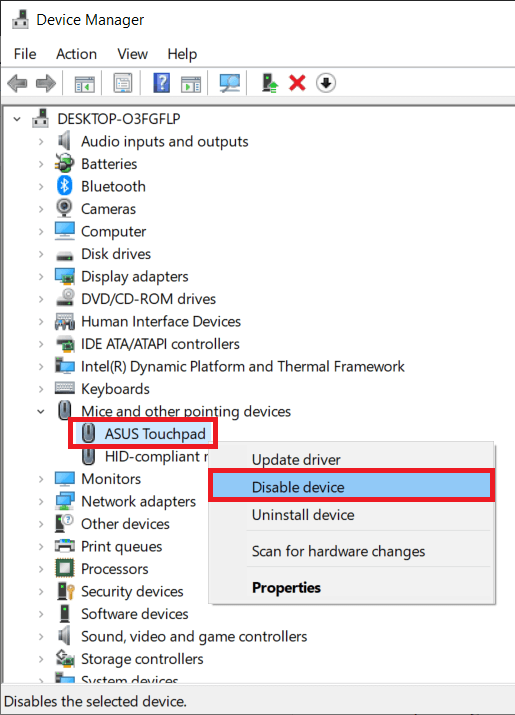
However, if you have multiple entries, disable them one by one until you manage to successfully turn off your touchpad.
This method won’t work for all laptop users as the feature to disable or enable touchpad through the BIOS menu is specific to certain manufacturers and OEMs. For example: ThinkPad BIOS and Asus BIOS do have the option to disable the trackpad.
Boot into the BIOS menu and check if the option to disable trackpad is present or not. To know how to boot into BIOS, simply google ‘How to enter BIOS in your laptop brand & model’
Method 4: Disable ETD Control Center
The ETD control center is short for Elan Trackpad Device Control Center and as obvious, controls the trackpad in certain laptops. The ETD program automatically starts when your laptop boots up; the touchpad only works when ETD is running in the background. Preventing the ETD control center from launching during boot up will, in turn, disable the touchpad. However, if the touchpad on your laptop isn’t regulated by the ETD control center, you are better off trying one of the other methods mentioned in this article.
To prevent ETD Control Center from running on startup:
1. Launch Task Manager by any of the following methods:
a. Click on the Start button, search for Task Manager and click on Open when the search returns
b. Right-click on the Start button and select Task Manager from the power user menu.
c. Press ctrl + alt + del and select Task Manager
d. Press ctrl + shift + esc to directly launch Task Manager

2. Switch to the Startup tab in the Task Manager.
The startup tab lists all the applications/programs that are allowed to automatically start/run when your computer boots up.
3. Locate the ETD Control Center from the list of programs and select it by clicking on it.
4. Finally, click on the Disable button at the bottom right corner of the task manager window.
(Alternatively, you can right-click on ETD Control Center and then select Disable from the options menu)
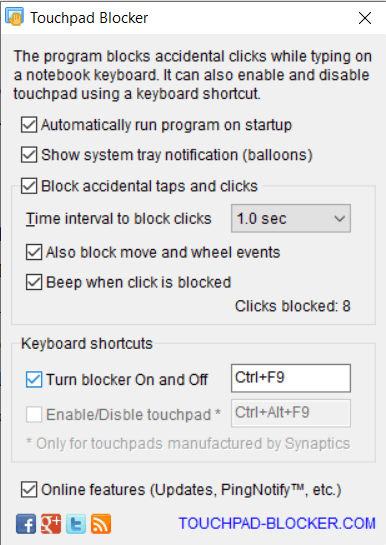
Method 5: Turn off Touchpad using third-party applications
If none of the above-mentioned methods did the trick for you, consider using one of the many third-party applications available on the internet. One of the more popular applications to disable touchpad in laptops is Touchpad Blocker. It is a free and lightweight application that lets you set shortcut keys to disable and enable the application. Users with a synaptic touchpad can also set a shortcut key to disable or enable the touchpad itself. However, the application only disables the touchpad when it is running in the running background (or foreground). Touchpad blocker, when running, can be accessed from the taskbar.
Other features included in Touchpad Blocker include automatically run at startup, block accidental taps and clicks, etc.
To disable the touchpad using Touchpad Blocker:
1. Head over to their website Touchpad Blocker and click on the Download button to start downloading the program file.

2. Double click on the downloaded file and follow the on-screen instructions to install Touchpad Blocker on your system.
3. Once installed, set up Touchpad Blocker according to your preference and Turn On Blocker by pressing the keyboard shortcut for the same (Fn + f9).
Another set of very popular applications worth trying are Touchfreeze and Touch Tamer. While not as feature-rich as Touchpad Blocker, both of these applications do help get rid of those accidental palm touches users make when typing. They disable or freeze the touchpad for a short amount of time after a key on the keyboard is pressed. By using any of the two applications, you don’t have to worry about disabling or enabling the touchpad every time you wish to use it but can also relax knowing that it won’t cause any issues when typing your homework essay or work report.
Recommended: 8 Ways to Fix Laptop Touchpad Not Working
We hope you were successful in disabling the touchpad on your Windows 10 laptop and if not, reach out to us in the comments section below and we shall help you out. Also, are you aware of any other applications like Touchpad Blocker or Touchfreeze? If yes, let us and everyone know below.