Fix Ntoskrnl.exe High CPU Usage

The system processes like Ntoskrnl.exe might slow down the overall performance of your PC. It is expanded as Windows NT operating system kernel executable. This executable is responsible for memory management, process management, hardware extraction, and it is the fundamental part of the Operating System. When you find a process consuming excessive CPU and disk resources in your system, you can close them forcefully from Task Manager. But this is not in the case of Ntoskrnl.exe, since closing them forcefully might affect the areas they are responsible for. Hence, to address High CPU or disk usage by Ntoskrnl.exe issue, read this guide and share it with your friend facing the same issue.
How to Fix Ntoskrnl.exe High CPU Usage on Windows 10
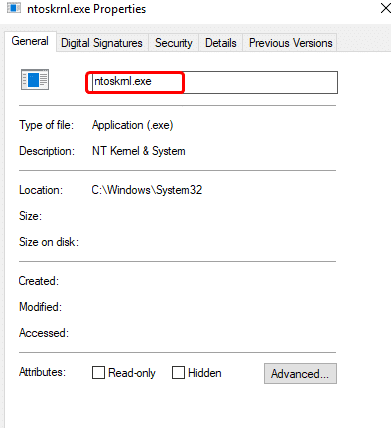
If you find your system very slow than usual, navigate to Task Manager to see which System item is consuming high CPU resources. If, in case, you have found it consuming the highest CPU resources, then right-click on it and select the Properties option. Now, you will find a new item called ntoskrnl.exe. In this article, we have shown the steps to fix Ntoskrnl.exe high CPU usage on Windows 10.
Why Ntoskrnl.exe Consumes a lot of Disk Space & CPU Resources?
The most prominent issues like these can be reported due to memory leakage from hardware and malware. However, many of you might be confused with a question, Ntoskrnl.exe manages memory, yet why does it consume excess memory resources? Continue reading to learn why?
Following are some possible reasons behind this error.
- The most common reason that triggers the issue is new compressed memory. Whenever you use any application or program in your system, RAM will be used up to increase the speed instead of regular storage. Yet, when you open multiple applications simultaneously, more RAM will be used up, and thus CPU performance will be slowed down.
- If your system faces any malware or virus attack, the CPU consumes high resources, and thus your computer will be slowed down apparently. Run an antivirus scan to sort any virus/malware attacks in your system.
- Outdated or incompatible drivers in your system contribute to the same issue. Update or roll back your drivers accordingly to avoid the problem.
- If the Ntoskrnl.exe files are corrupt, you will face the said problem again and again. This rarely happens since these files are system-protected by default. However, when you face the problem, you will not normally work in your system.
This section has compiled a list of troubleshooting methods that would help you fix the CPU usage issue. The troubleshooting steps are arranged according to the severity and extreme of causes. Follow them to attain the best results.
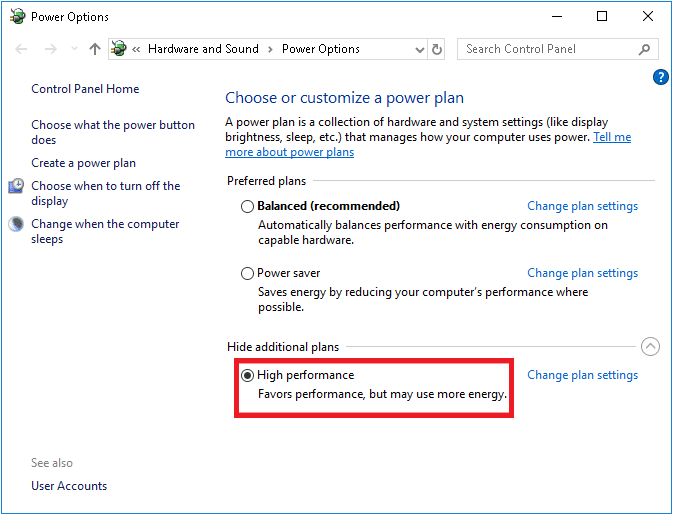
Method 1: Use High-Performance Power Plan
You can also optimize your computer when you set your settings to a high-performance power plan. These power plans are developed to manage the power settings on portable settings. Follow the below-mentioned instructions to use high-performance power plan settings in your system.
1. Right-click on the Battery icon on the Taskbar and select Power Options.
![]()
2. Now, select the High performance option as highlighted in the pic below.
Now you have optimized your system for games and better performance.
Also Read: Fix Steam Client Bootstrapper High CPU on Windows 10
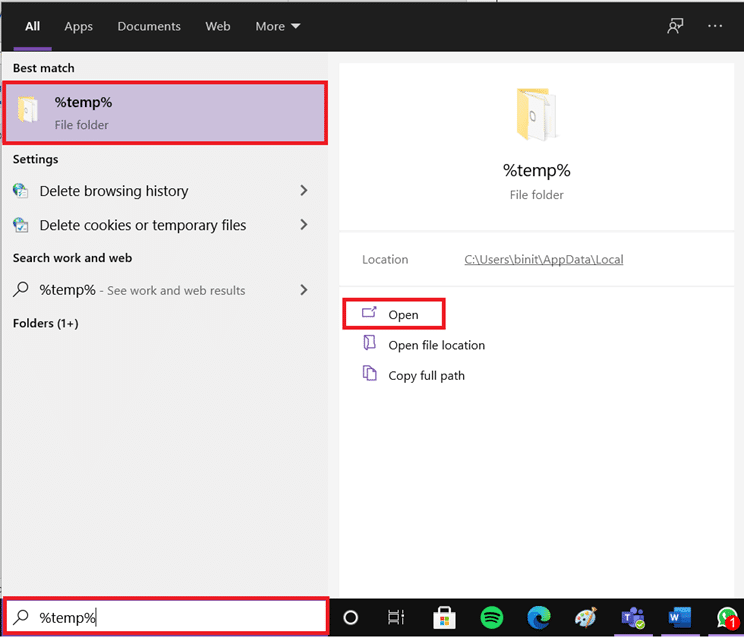
Method 2: Delete Temporary Files
When your system has any corrupt Ntoskrnl.exe files, you will encounter Ntoskrnl.exe high CPU usage issues. You can sort out this error by clearing the temporary files in your system. Then, follow the instructions to implement the same.
1. Press the Windows key, type %temp%, and click on Open.
2. Here, select all files and folders by pressing Ctrl + A keys together and then right-click on the selected files.
3. Select the Delete option to remove all the temporary files.

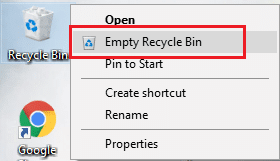
4. Finally, go to Desktop and right-click on Recycle Bin. Select Empty Recycle Bin option to permanently delete the data from your Windows PC.
Also Read: Fix keyboard Input lag in Windows 10
Method 3: Run Performance Troubleshooter
If the performance of your system is prolonged, it can be due to this high CPU usage issue, you can troubleshoot it by using the following steps.
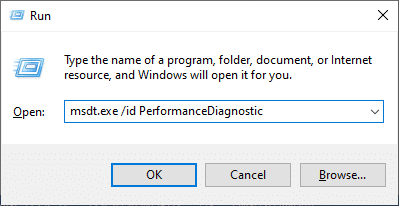
1. Press and hold Windows + R keys together to open the Run dialog box.
2. Now, type msdt.exe /id PerformanceDiagnostic and hit the Enter key.
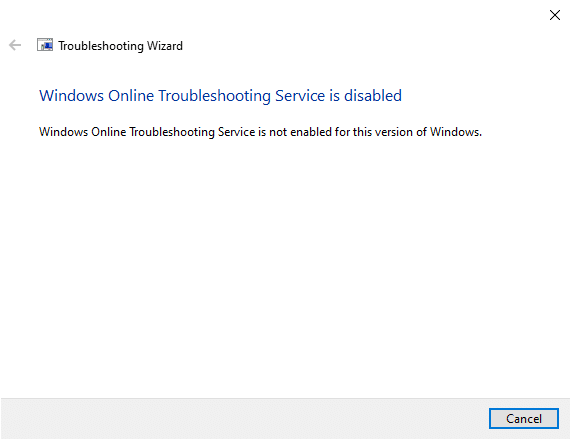
3. Here, the performance troubleshooter starts the scanning process and displays any issues to be fixed. Follow the on-screen instructions to complete the process and check if you have fixed the issue.
Note: If you receive a prompt, Windows Online Troubleshooting Service is disabled, then follow other methods discussed in this article.
Method 4: Scan the Local Drives
Sometimes, errors in hard disks might contribute to High CPU or disk usage by the Ntoskrnl.exe issue. Thus, you can perform a scan and sort out any errors, if any. Thus, find where your installation files are stored and scan the corresponding drive as instructed below.
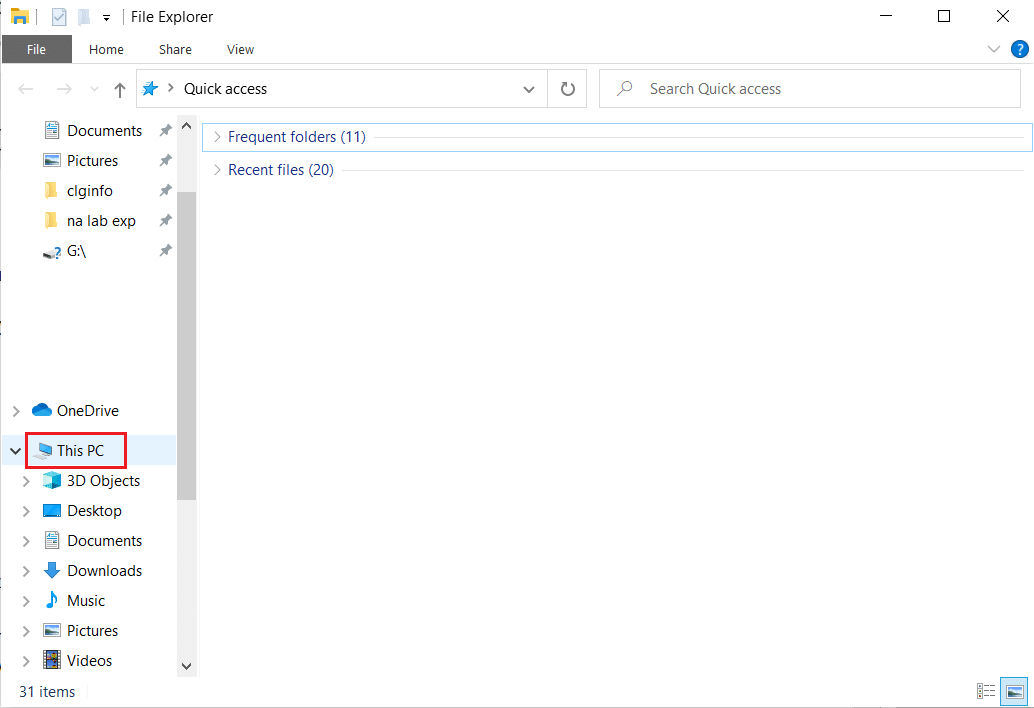
1. Hit the Windows + E keys simultaneously to open File Explorer and click on This PC.
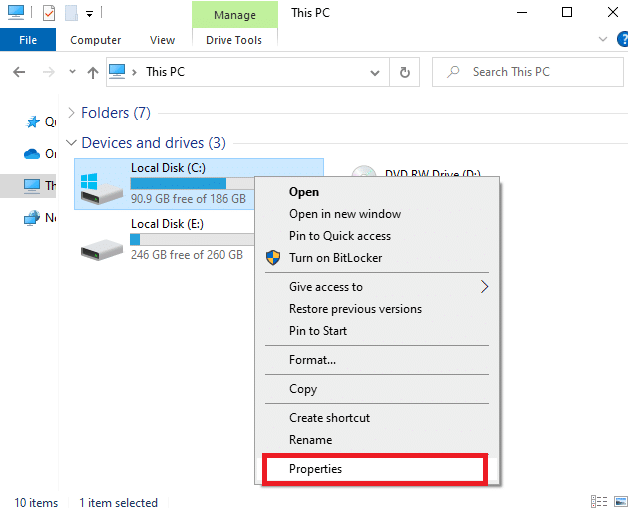
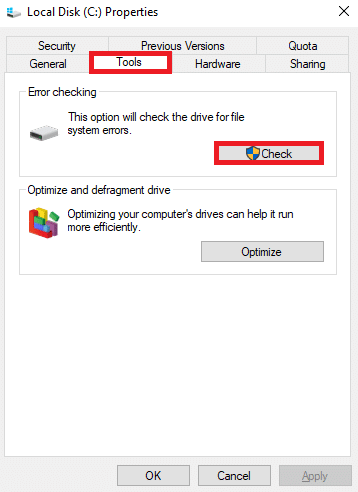
2. Right-click on your Local Disk and select Properties as highlighted in the pic below.
3. Now, go to the Tools tab and click on the Check button.
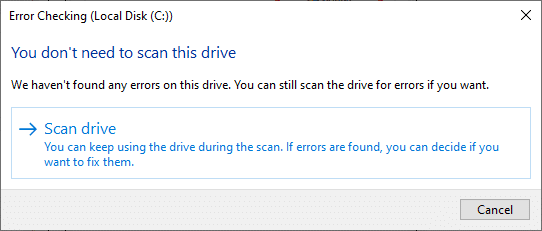
4. Now, click on the Scan drive option in the Error Checking window.
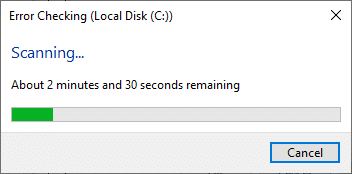
5. Wait for the Scanning process to be completed and sort out any errors if any.
Finally, check if you have fixed the issue. If you do not find any errors, follow the rest of the methods discussed in this article.
Also Read: Fix WSAPPX High Disk Usage in Windows 10
Method 5: Perform Disk Cleanup
Disk Cleanup is like Recycle Bin. The data deleted through Disk Cleanup are not permanently deleted from the system and remain available on your hard drive. You may recover the files whenever needed.
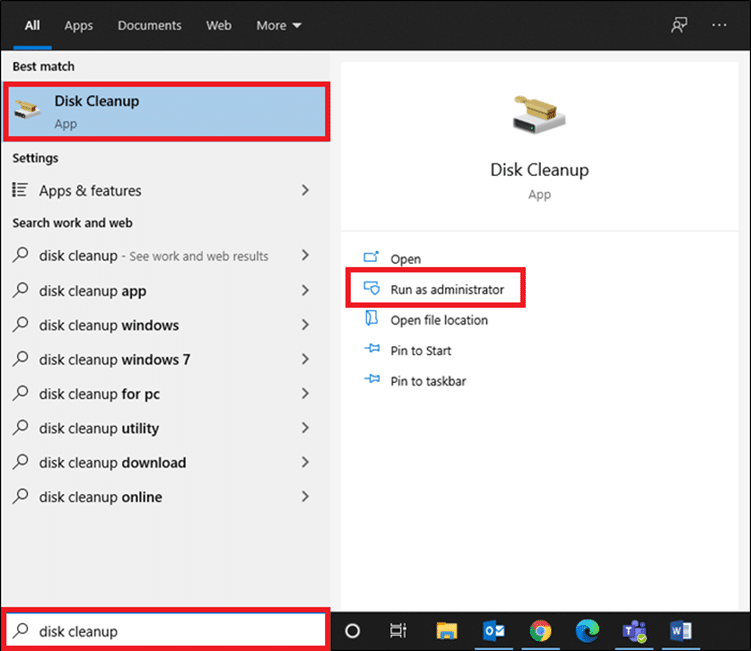
1. In the Windows search bar, type Disk Cleanup and click on Run as administrator, as highlighted below.
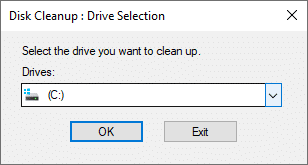
2. You will be asked to Select the drive you want to clean up. Here, we have selected C: drive. Click on OK to proceed.
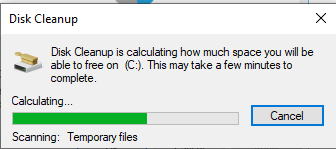
3. A prompt will appear and The Disk Cleanup will calculate the amount of space that can be made free.
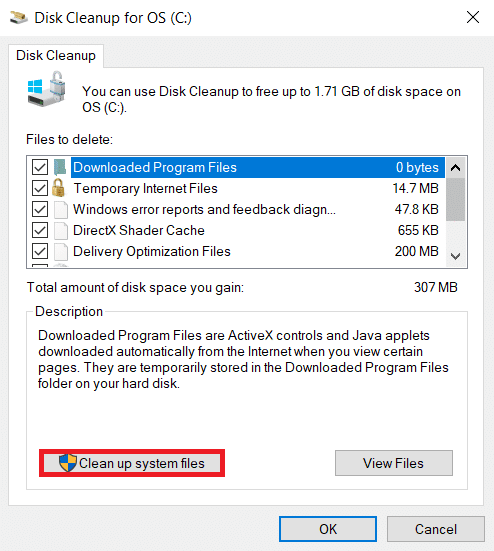
4. Check the box for all desired items under Files to delete: and click Clean up system files.
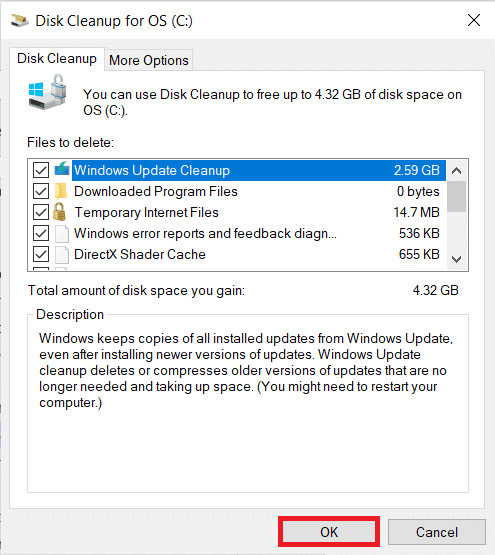
5. Once the scanning is complete, again check the boxes for all the chosen items and click on OK.
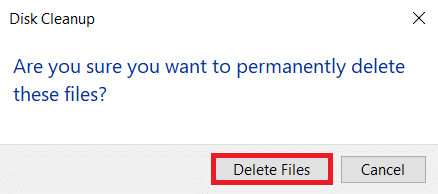
6. Finally, click on the Delete Files button in the confirmation prompt.
7. Restart your PC. To clean up additional space, read 10 Ways to Free up Hard Disk Space.
Method 6: Disable SuperFetch (SysMain)
The startup time for applications and Windows is improved by a built-in feature called SysMain (formerly SuperFetch). But programs of the system are not benefited from this feature. Instead, the background activities are increased, and the performing speed of your system will be reduced relatively. These Windows services will eat your CPU resources, and it is often recommended to disable SuperFetch in your system.
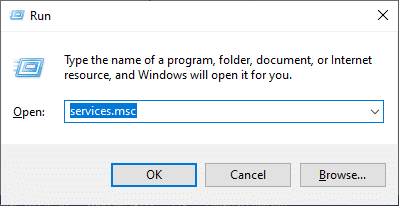
1. Launch the Run dialog box by holding Windows + R keys together.
2. Type services.msc as shown and click OK to launch the Services window.

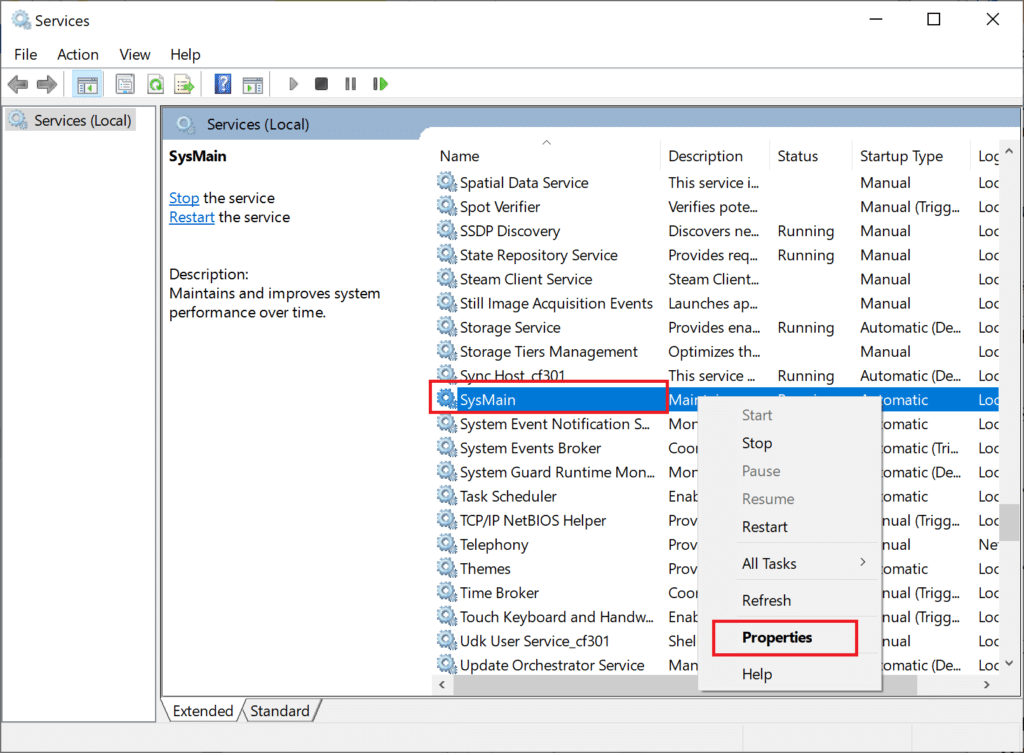
3. Now, scroll down and right-click on SysMain. Then, select Properties, as depicted.
4. Here, in the General tab, set the Startup type to Disabled from the drop-down menu, as highlighted below.
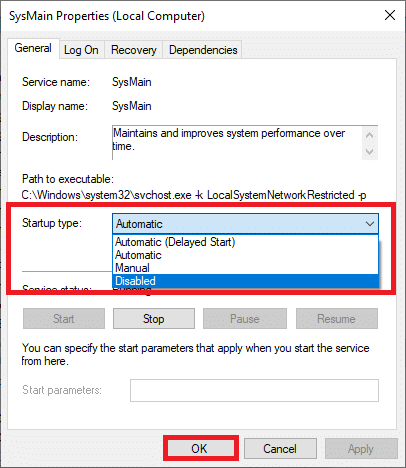
5. Finally, click Apply and then, OK to save the changes.
Also Read: Fix .NET Runtime Optimization Service High CPU Usage
Method 7: Restart Windows Update Service
Sometimes, you could fix the Ntoskrnl.exe high CPU usage issue by manually deleting the Software Distribution Folder and restarting the Windows Update Service. Then, follow the below instructions to implement the same.
1. You can launch the Run dialog box by going to the search menu and typing Run.
2. Type services.msc as follows and click OK to launch the Services window.
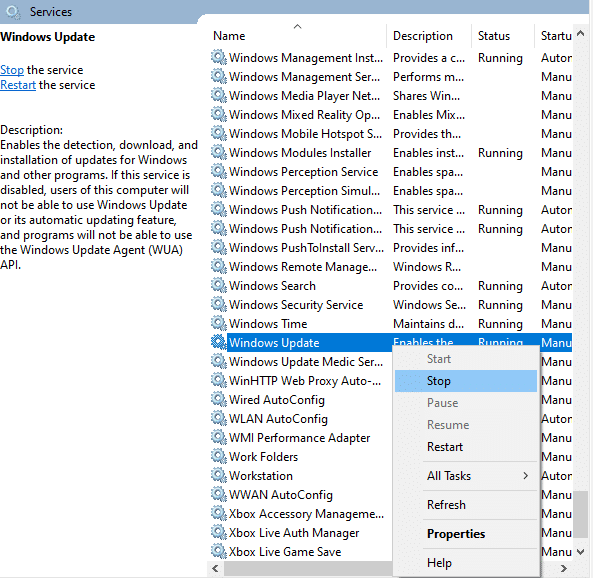
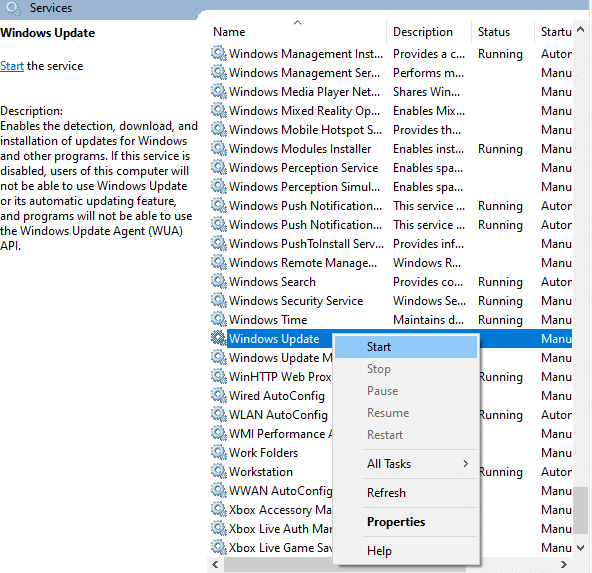
3. Now, scroll down the screen and right-click on Windows Update.
Note: If the current status is not Running, you can skip the below step.
4. Here, click on Stop if the current status displays Running.
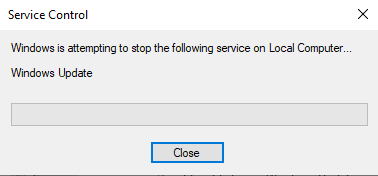
5. You will receive a prompt Windows is attempting to stop the following service on the Local Computer… Wait for the prompt to be completed. It will take around 3 to 5 seconds.
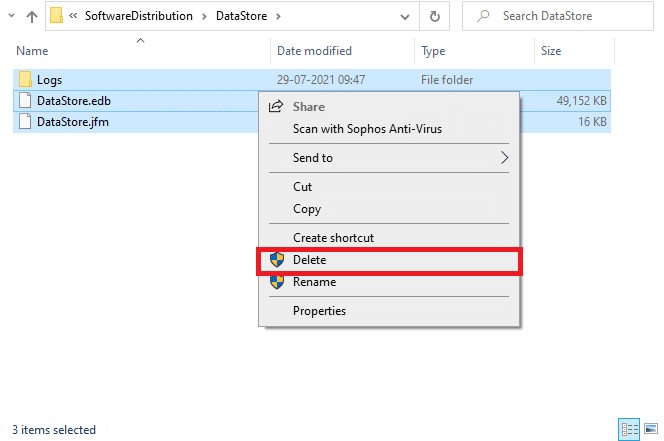
6. Now, open the File Explorer by clicking Windows + E keys together. Now, navigate to the following path.
C:WindowsSoftwareDistributionDataStore
7. Now, select all the files and folders by pressing Ctrl + A keys together and right-click on the bare space.
8. Here, select the Delete option to remove all the files and folders from the DataStore location.
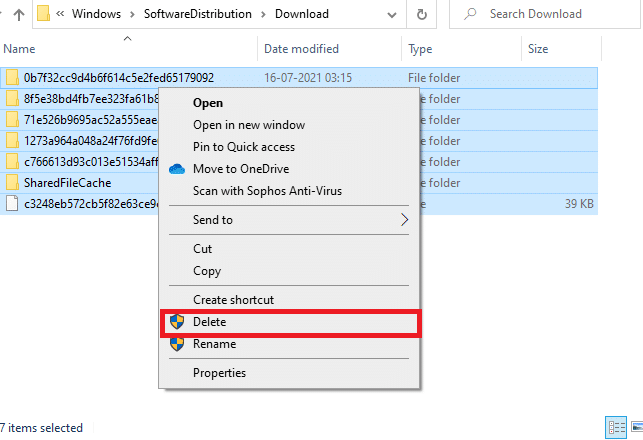
9. Now, navigate to the path, C:WindowsSoftwareDistributionDownload, and Delete all the files in the Downloads location as mentioned in the previous steps.
10. Now, go back to the Services window and right-click on the Windows Update.
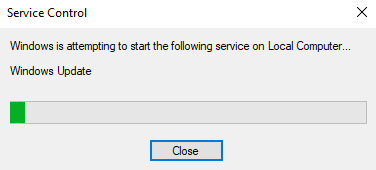
11. Here, select the Start option as depicted in the below picture.
12. You will receive a prompt, Windows is attempting to start the following service on Local Computer… Wait for 3 to 5 seconds and close the Services window.
13. Finally, check if the issue is resolved in your system.
Method 8: Stop BlueStacks Services
The BlueStacks is an Android emulator but, it creates so many conflicts with Ntoskrnl.exe files causing Ntoskrnl.exe issue. But you can stop them by following the below-mentioned steps.
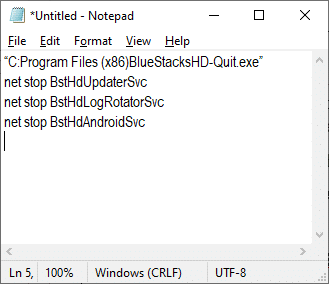
1. Open Notepad and paste the following keys into it.
C:Program Files (x86)BlueStacksHD-Quit.exe
net stop BstHdUpdaterSvc
net stop BstHdLogRotatorSvc
net stop BstHdAndroidSvc
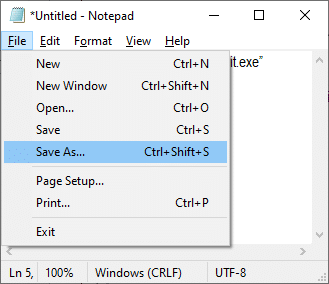
2. Now, go to File and save the file as name_you_like.bat
3. Now, navigate to the location where you have saved the file and run it with administrative privileges.
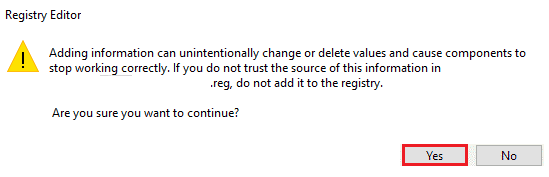
4. Now, confirm the registry changes by clicking on Yes and rebooting your system.
Now, all the BlueStacks services will be disabled, thereby fixing the Ntoskrnl.exe high CPU usage issue.
Also Read: Fix Service Host: Diagnostic Policy Service High CPU Usage
Method 9: Run Malware Scans
Few anti-malware programs can help you overcome malicious software. However, they routinely scan and safeguard your system. Therefore, to avoid Ntoskrnl.exe high CPU usage, run an antivirus scan in your system and check if the problem is solved. Then, follow the below-mentioned steps to do so.
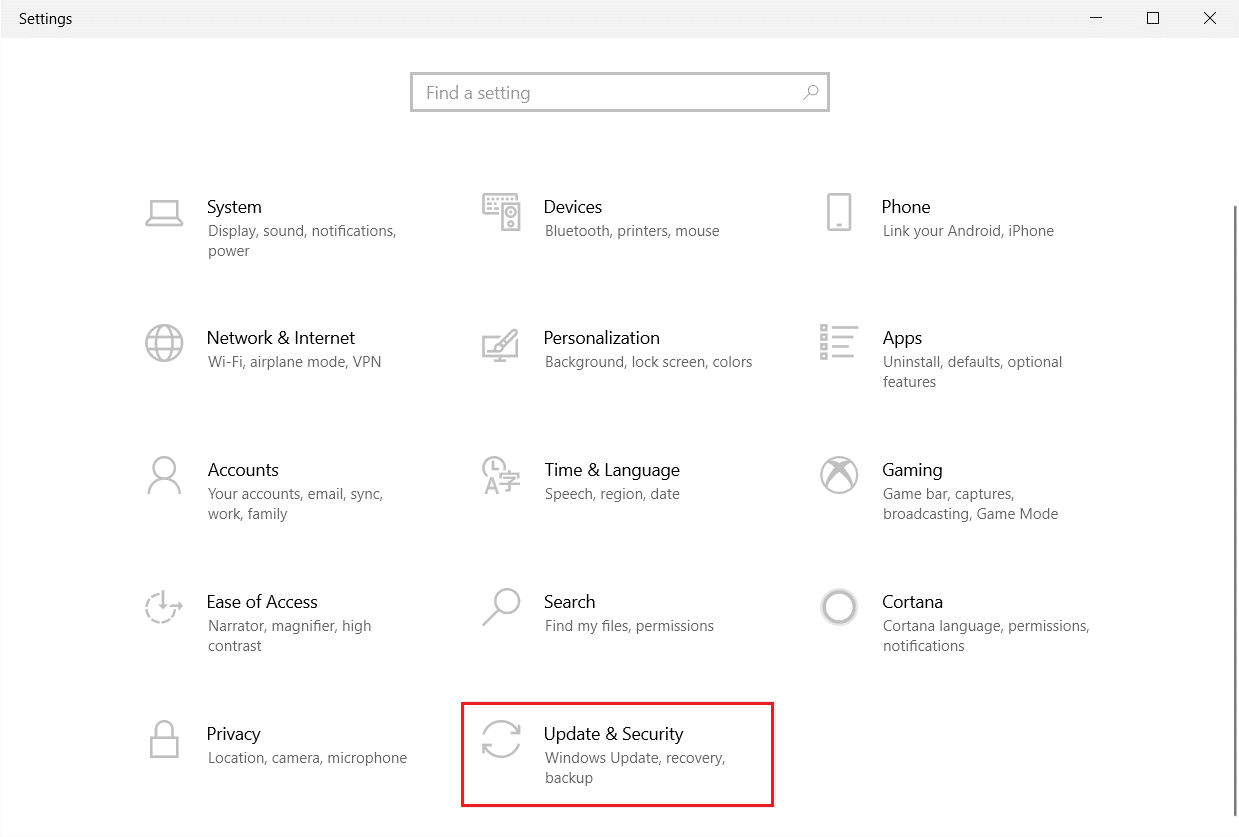
1. Hit Windows + I keys simultaneously to launch Settings.
2. Here, click on Update & Security settings as shown.
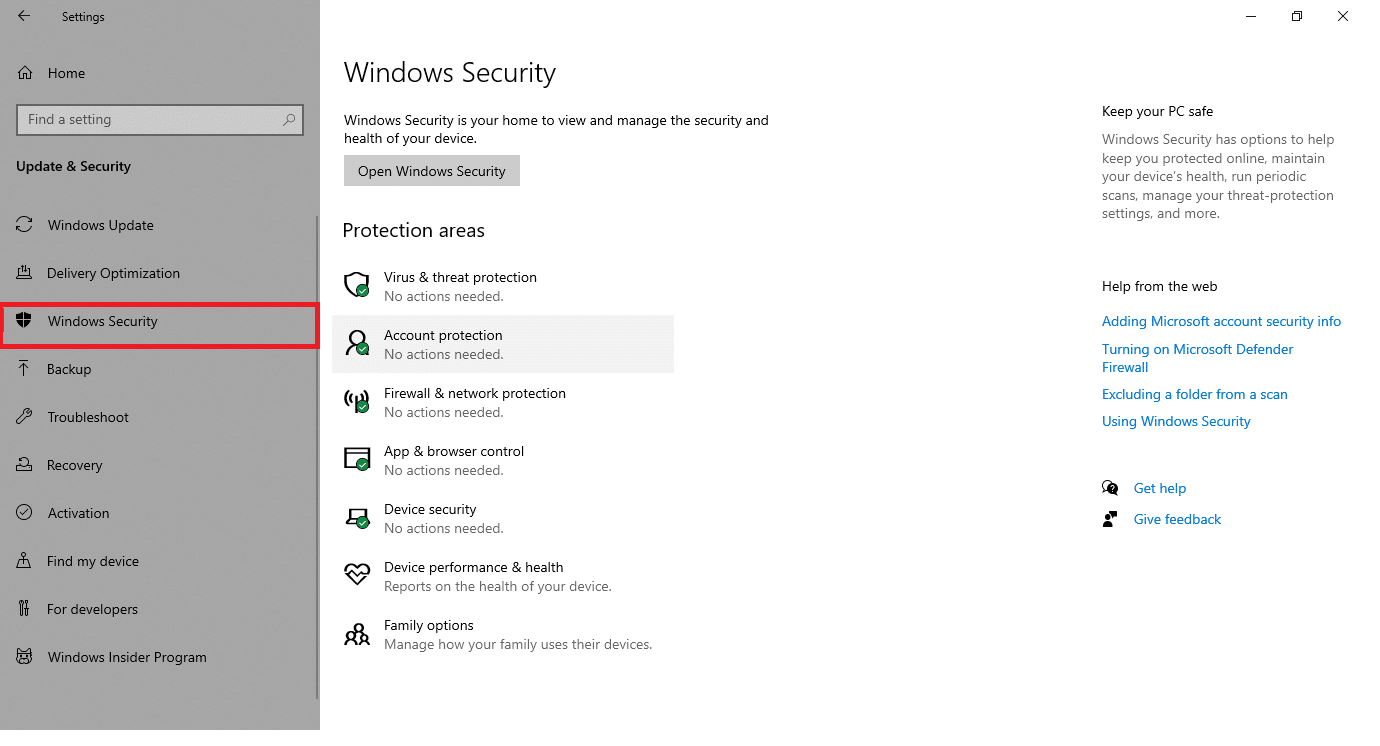
3. Go to Windows Security in the left pane.
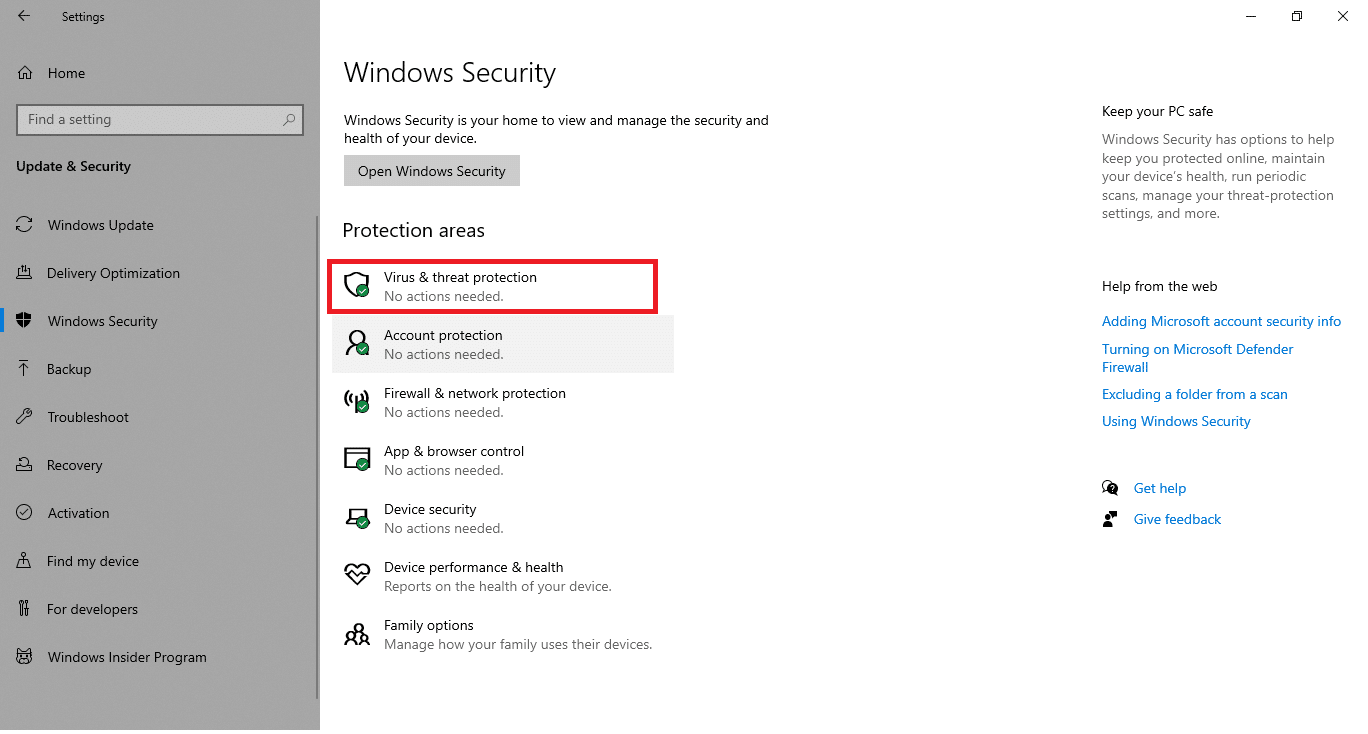
4. Click on the Virus & threat protection option in the right pane.
5. Click on the Quick Scan button to search for malware.
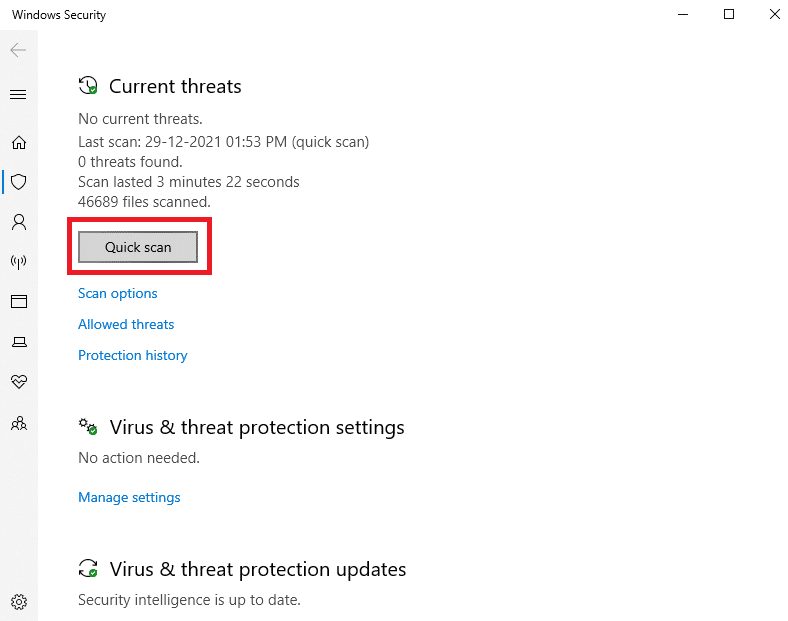
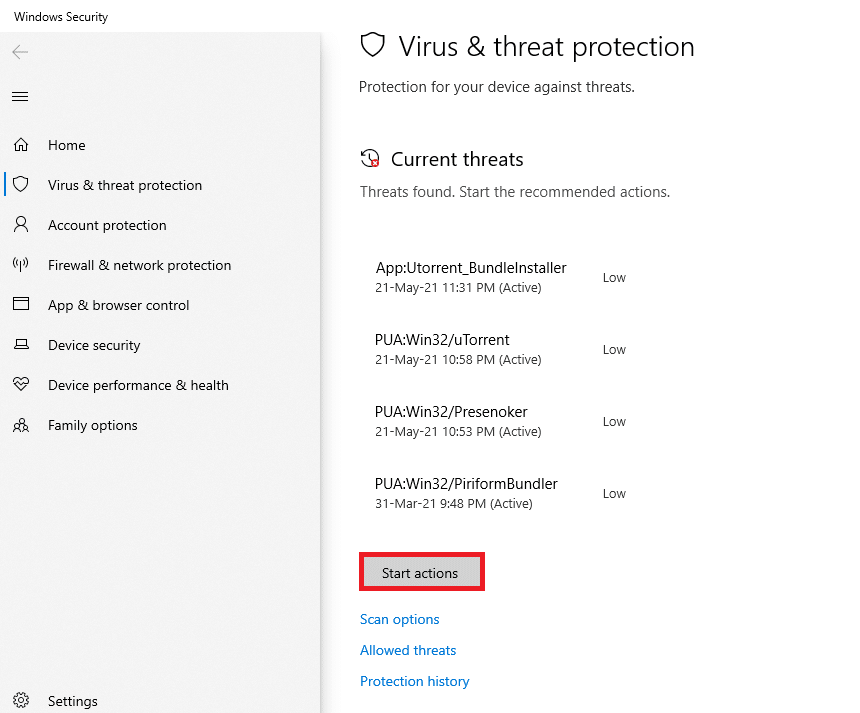
6A. Once the scan is done, all the threats will be displayed. Click on Start Actions under Current threats.
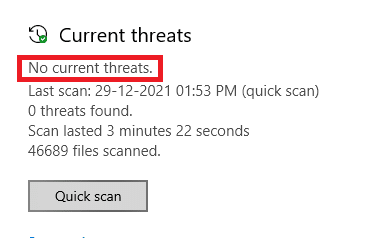
6B. If there is no threat in your device, the device will show the No current threats alert.
Method 10: Repair System Files
Windows 10 users can automatically scan and repair their system files by running System File Checker. In addition, it is a built-in tool that lets the user delete files and fix this issue. Then, follow the below-mentioned steps to implement the same.
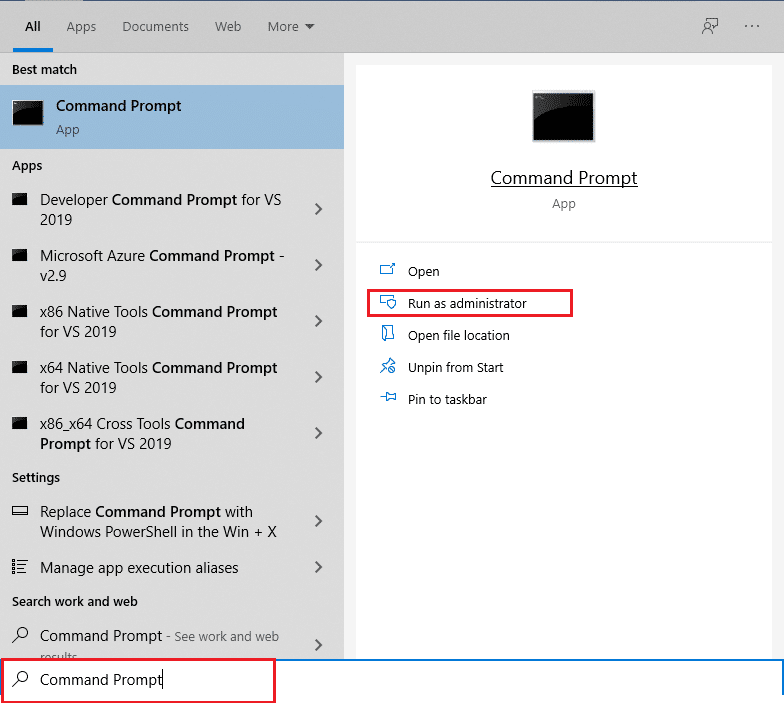
1. Hit the Windows key, type Command Prompt and click on Run as administrator.
2. Click on Yes in the User Account Control prompt.
3. Type chkdsk C: /f /r /x command and hit Enter key.

4. If you are prompted with a message, Chkdsk cannot run…the volume is… in use process, then, type Y and hit the Enter key.
5. Again, type the command: sfc /scannow and press Enter key to run the System File Checker scan.
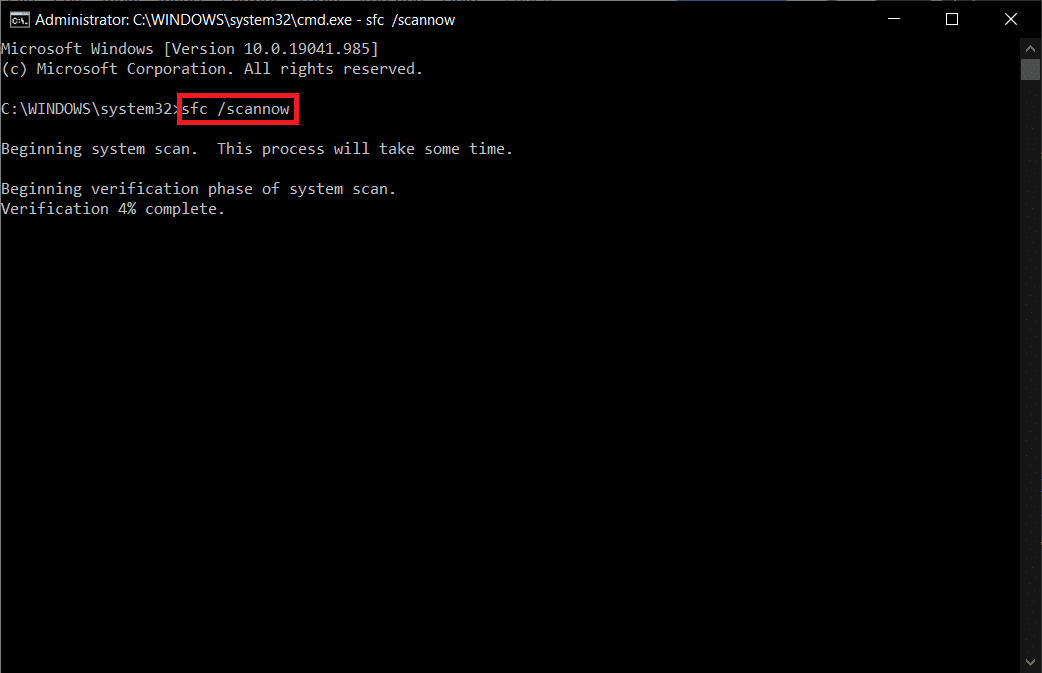
Note: A system scan will be initiated and it will take a couple of minutes to finish. Meanwhile, you can continue performing other activities but be mindful of not accidentally closing the window.
After completing the scan, it will show either of these messages:
- Windows Resource Protection did not find any integrity violations.
- Windows Resource Protection could not perform the requested operation.
- Windows Resource Protection found corrupt files and successfully repaired them.
- Windows Resource Protection found corrupt files but was unable to fix some of them.
6. Once the scan is finished, restart your PC.
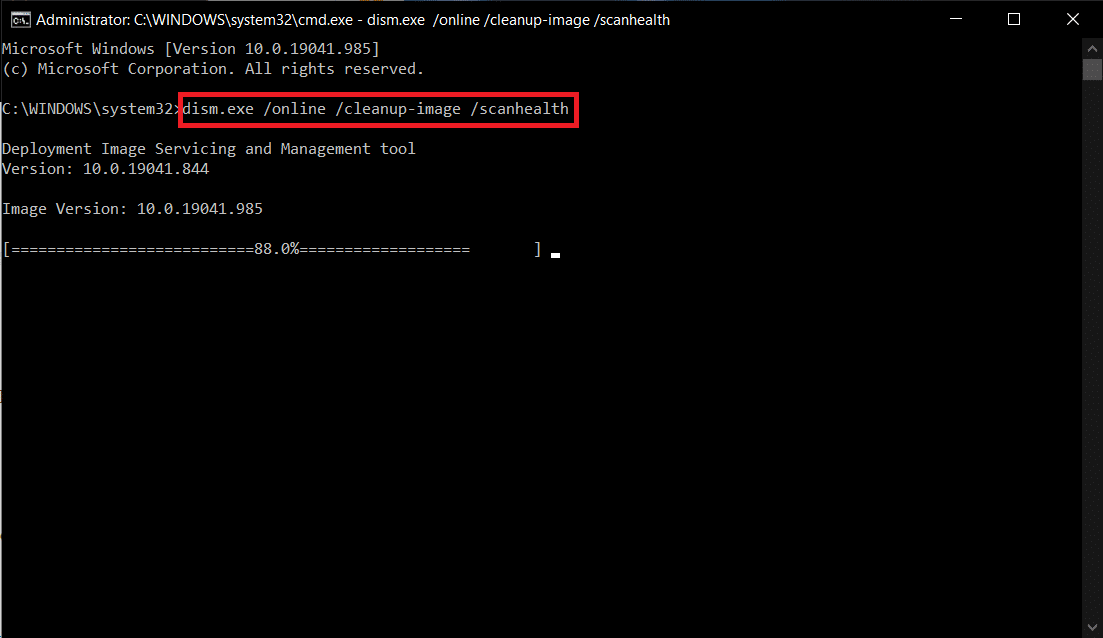
7. Again, launch Command Prompt as administrator and execute the given commands one after the other:
dism.exe /Online /cleanup-image /scanhealth
dism.exe /Online /cleanup-image /restorehealth
dism.exe /Online /cleanup-image /startcomponentcleanup
Note: You must have a working internet connection to execute DISM commands properly.
Also Read: How to Fix High CPU Usage on Windows 10
Method 11: Rollback Driver Updates
If your system had been working correctly and began to malfunction after an update, rolling back the drivers might help. The rollback of the driver will delete the current driver installed in the system and replace it with its previous version. This process should eliminate any bugs in the drivers and potentially fix the said problem.
Note: In this guide, we have compiled steps to roll back a common Display Driver. You are advised to roll back all the incompatible drivers.
1. Hit the Windows key, type device manager, and click on Open.
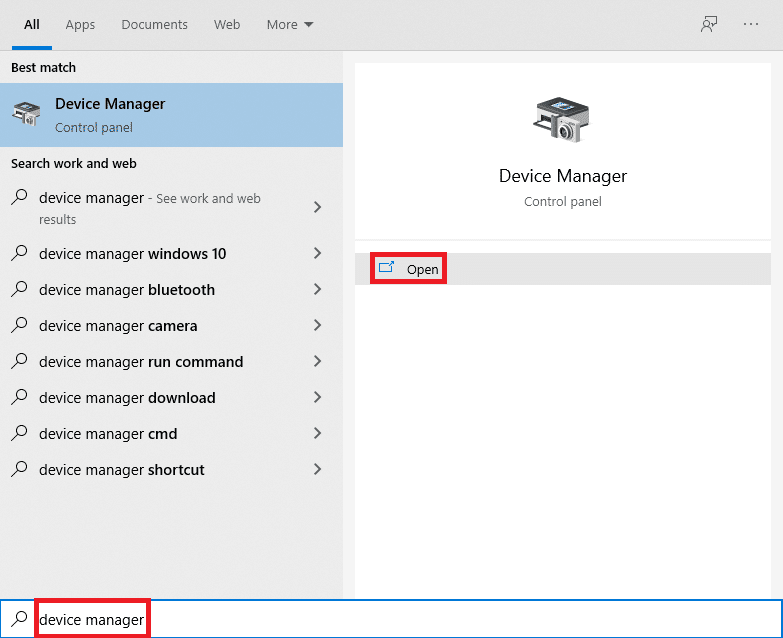
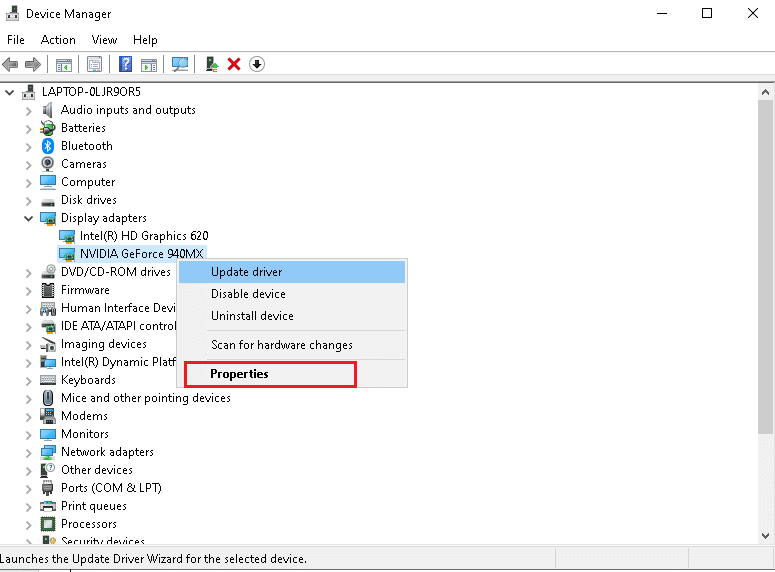
2. Click on the arrow next to Display adapters to expand it.
![]()
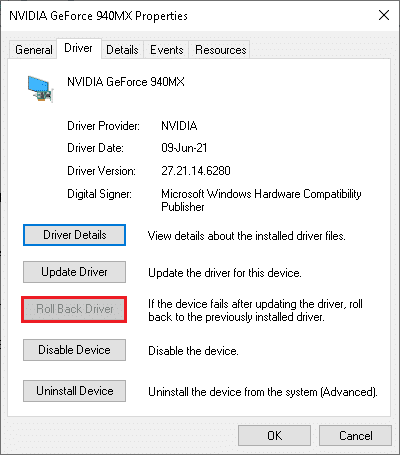
3. Right-click on your display driver (e.g. NVIDIA GeForce driver) and select Properties, as illustrated below.
4. Switch to the Driver tab and click Roll Back Driver, as shown.
Note: If the option to Roll Back Driver is greyed out, then it indicates that your Windows PC does not have the pre-installed driver files or tit has never been updated. In this case, try alternative methods discussed in this article.
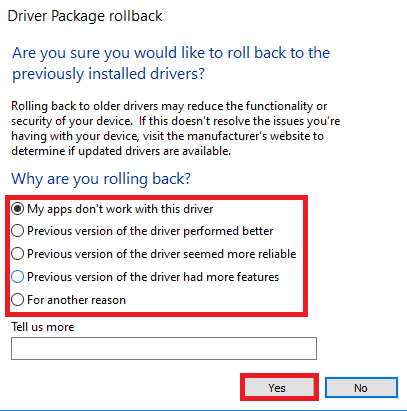
5. Provide a Reason for Why are you rolling back? in the Driver Package rollback window. Then, click the Yes button, shown highlighted.
6. Now, restart your system to make the rollback effective.
Method 12: Uninstall Zune Software (If Applicable)
Many users have reported that Zune software interferes with ntoskrnl.exe files causing Ntoskrnl.exe high CPU usage issue. Uninstall them by following the below-mentioned steps.
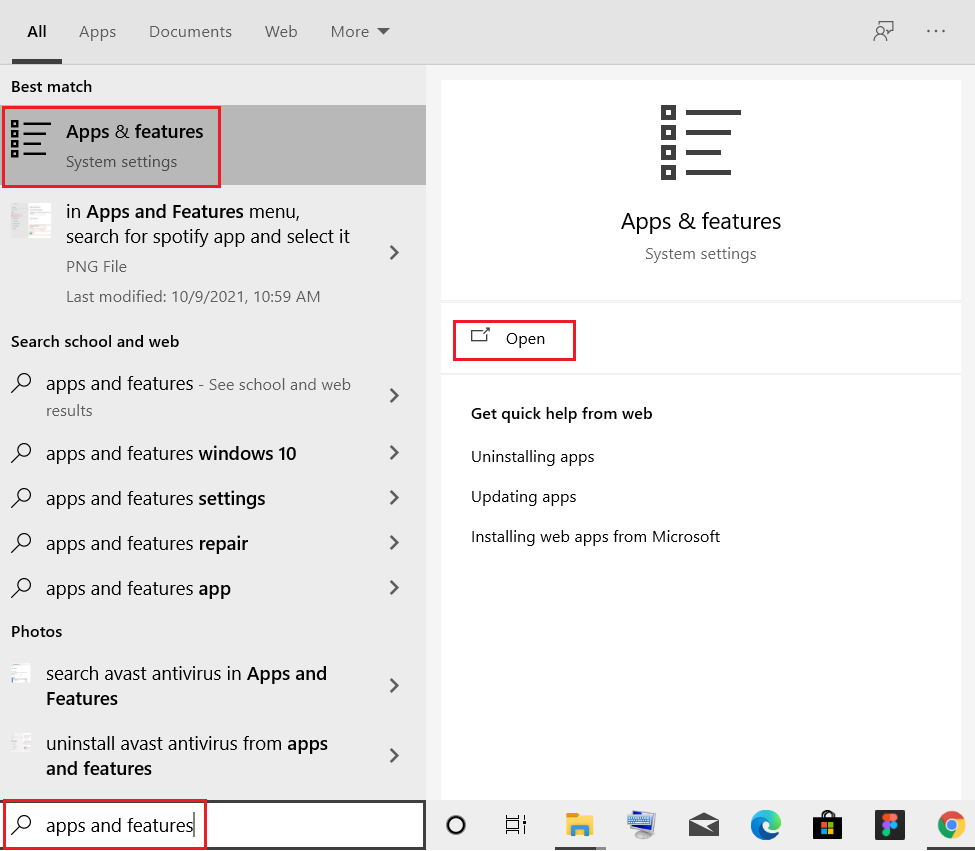
1. Hit the Windows key, type apps and features, and click on Open.
2. Click on the Zune app and select Uninstall option, as depicted below.
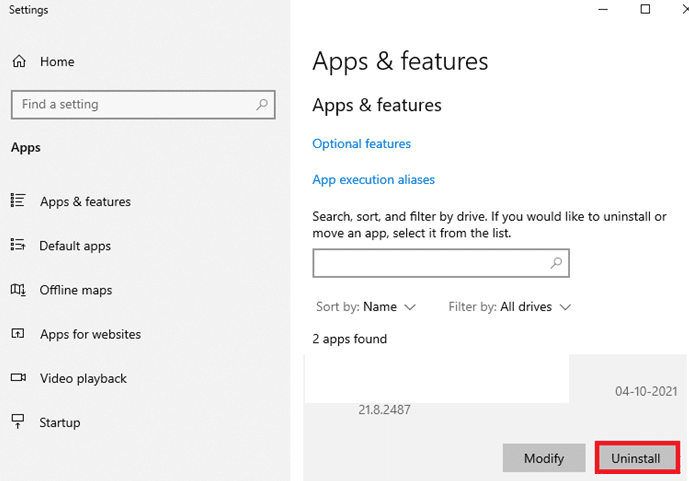
3. Click on Uninstall again to confirm the same as shown above.
4. Follow the on-screen instructions to finish the uninstallation process.
5. Finally, restart your PC.
Recommended:
We hope that this guide was helpful and you could fix Ntoskrnl.exe high CPU usage issue. Let us know which method worked for you the best. Also, if you have any queries/suggestions regarding this article, then feel free to drop them in the comments section.