Unless you’re the kind of Zoom caller who prefers to be mysterious, you’re going to need a working webcam to make high-quality video calls with your friends, family, and work colleagues. Windows 10 offers plenty of built-in and third-party apps for video calling (including Skype), but you need the right camera to make it work.
Windows 10 is perfect for calling, but that doesn’t mean that you won’t run into problems with your webcam. If your Windows 10 camera is not working, it’ll prevent you from staying in touch with your essential contacts.

Thankfully, there are a few things you can try to get your camera operational again.
1. Verify That Your Camera Is Connected
It’s important to remember to check your camera hardware is connected first before you look for software fixes. If you’re using a USB camera, make sure that the cabling is firmly connected to the USB port. If it is, try switching USB ports to see if this resolves the issue.

For Bluetooth cameras, you’ll need to double-check that it’s connected and that Bluetooth is working on your PC.
- Select the action center icon in the bottom-right corner of the taskbar. From there, select the Bluetooth card to switch Bluetooth on, then right-click and select Go to Settings to quickly access the Bluetooth settings menu.

- The Bluetooth camera should be listed in the menu. If it isn’t, select Add Bluetooth or other device to pair the camera to your PC and follow the on-screen process. Once paired, your camera will be available in your chosen app.
Built-in cameras are ready to use by default (unless privacy settings are blocked). You can check this for yourself by opening the pre-installed Window 10 Camera app, which you can find in the Start menu.
If the app shows your camera feed, then you should be able to use it with other services like Zoom. If it doesn’t, you’ll need to investigate further using the steps below.
2. Check the Lens
When a camera lens is blocked, it can appear as if your camera isn’t working. A common way to protect your privacy is to place a sticker or other obstacles over a camera lens (especially if you’re using a built-in camera on a laptop).

There isn’t a way to check this without visually inspecting the lens itself—the camera feed in your camera or calling app will simply appear black. If there is an obstacle or sticker in place, remove it.
As long as the obstacle is the only thing stopping your camera feed from appearing, this should resolve the issue. Other privacy settings are available in Windows 10, however, so you’ll need to investigate these next.
3. Configure Windows Camera Privacy Settings
It’s important to protect your privacy, especially when it comes to your camera and microphone feeds. Thankfully, Microsoft is a step ahead, introducing easy-to-use privacy settings to block unnecessary camera and microphone usage in Windows 10.
If these settings are active, however, you might not be able to use your camera in third-party apps or services (or with other Microsoft apps). You can configure these settings and enable camera access in the Windows Settings menu.
- To begin, right-click the Start menu and select the Settings option.

- In the Windows Settings menu, select Privacy > Camera. To enable camera access, select the Change button in the Allow access to the camera on this device section, then select the slider in the pop-up menu to enable it.

- You’ll also need to grant camera access to apps by selecting the Allow apps to access your camera slider beneath, making sure that it’s in the On position.

- To grant camera access to apps from the Microsoft Store, scroll down to the Choose which Microsoft Store apps can access your slider section. From here, select the slider next to a listed app to grant camera access.

- If you want standard desktop apps to have camera access, scroll down to the Allow desktop apps to access your camera section, then select the slider to the On position.
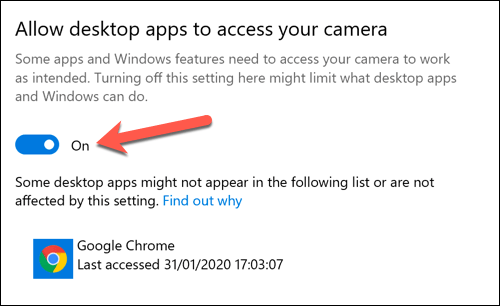
Certain apps, like your web browser, can also be configured to block camera access for extra privacy. You’ll need to enable browser access to your camera if this is the case.
4. Close Other Camera Apps and Try Alternatives
Most users will find that when a camera is detected and working in the built-in Windows 10 camera app, it should be accessible in any other camera or web calling app you have installed. That isn’t always the case, however, with unknown bugs and app conflicts sometimes preventing you from using your camera.
If you have two open apps attempting to use the camera, you may find that the camera feed is blocked in one of them. Make sure that only the app you’re trying to use is open and has access to the camera feed before you begin.
If the camera is working, but your chosen app still doesn’t work, then you may need to try an alternative. This will help you determine if the problem is software or hardware based. For instance, if the Windows 10 Camera app is working but a video calling app isn’t, then the problem is likely with the app and not your hardware.
5. Restarting Devices in Device Manager
It’s a cliche in PC maintenance that switching a device on and off often fixes a hard-to-diagnose problem. If your Windows 10 camera is not working, you can force it to restart by disabling and re-enabling it in the Device Manager menu.
- To access the Device Manager menu, right-click the Start menu and select the Device Manager option.

- In the Device Manager menu, find your camera device listed under the Cameras category. If you’re using a Bluetooth camera, you may find it listed under Bluetooth category instead. Once you find your camera, right-click it, then select the Properties option.

- In the Properties menu, select the Driver tab, then select the Disable Device option. Windows will ask you to confirm, so select Yes to do so.

- Once disabled, select the Enable Device option in the same menu to re-enable your camera.

6. Install Windows System and Driver Updates
Microsoft regularly issues new system updates for Windows, introducing new features and bug fixes. A problem with a Windows 10 camera could be caused by a previously-unknown bug, so installing updates may resolve the problem.
Likewise, device manufacturers often release new driver updates that help to resolve issues between the hardware (the camera) and the software (Windows itself, as well as any installed camera apps). You can install new drivers and system updates using Windows Update.
- To access Windows Update, right-click the Start menu and select the Settings option.

- In the Settings menu, select Update & Security > Windows Update. Select Check for Updates to look for new system and driver updates and allow the Windows Update process to begin downloading and installing them. If a feature update is available, select Download and Install to begin.

If your device is new, supported drivers may not be available through the Windows Update system. If that’s the case, check your user manual and search the manufacturer’s website to download and install appropriate drivers instead.
Fixing Windows 10 Camera Issues
When a Windows 10 camera is not working, these steps should (in most cases) help to resolve the problem. If it doesn’t, you may need to try a new camera or look at alternative options for your video calls.
For instance, you could try a Facebook Portal to take calls in front of your TV or, if you’re also a Mac, iPhone, or iPad user, you could think about making group calls using FaceTime instead. Mac owners will need to make sure that the built-in Mac camera is working first, however.