How to Mount an ISO image in Windows 7, 8, and 10

Mount an ISO image in Windows
Mounting ISO images (disc image information) is a handy method to entry information on a digital disc drive in Home windows. This is easy methods to do it relying in your working system:
Home windows 10 (model 1809 and later):
The excellent news is that Home windows 10 (model 1809 and later) presents a built-in method to mount ISO images:
- Find your ISO file in File Explorer.
- Proper-click on the ISO file.
- Choose “Mount” from the context menu.
Home windows will routinely mount the ISO image and assign it a brand new digital disc drive letter. You possibly can then entry the information on the ISO image by opening the digital disc drive in File Explorer.
Home windows 8 and seven:
For Home windows 8 and seven, you will want to make use of third-party software program to mount ISO images. Some common free choices embody:
- WinCDEmu: https://wincdemu.sysprogs.org/ (Free for private use)
- Digital CloneDrive: https://www.elby.ch/en/products/vcd.html (Free for private use)
- DAEMON Instruments Lite: https://www.daemon-tools.cc/products/dtlite (Free for private use)
This is a common course of utilizing a third-party software (steps would possibly range barely relying on the software program):
- Obtain and set up your most popular ISO mounting software program.
- Launch the ISO mounting software program.
- The software program will sometimes have a “Browse” or “Open” button to find your ISO file.
- Choose the ISO file you wish to mount.
- Click on the “Mount” button inside the software program.
The software program will mount the ISO image and assign it a digital disc drive letter. You possibly can then entry the information on the ISO image by opening the digital disc drive in File Explorer.
Extra Notes:
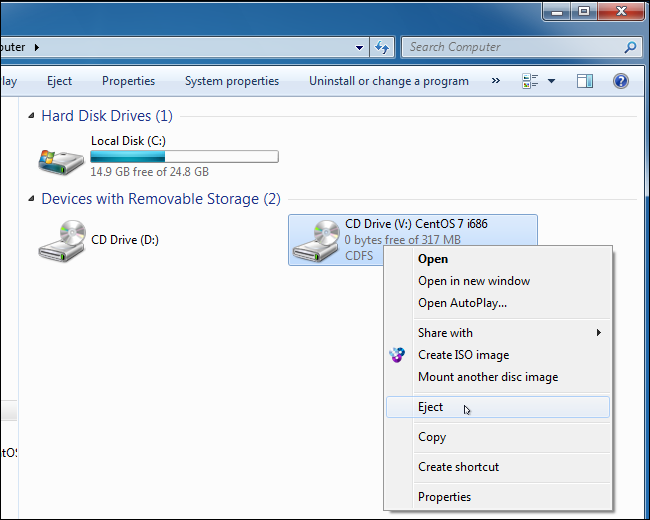
- As soon as you’ve got completed utilizing the ISO image, you’ll be able to eject it like a daily disc. Proper-click on the digital disc drive in File Explorer and choose “Eject.” It will unmount the ISO image.
- Some third-party ISO mounting software program would possibly provide further options like password safety or burning ISO images to disc.
By following these steps, it is best to be capable to mount ISO images in Home windows 7, 8, and 10. Should you’re utilizing Home windows 10 (model 1809 or later), the built-in technique is the only method. For Home windows 8 and seven, dependable free choices like WinCDEmu or Digital CloneDrive can deal with your ISO mounting wants.
Fast Hyperlinks
Key Takeaways
Proper-click an ISO file and click on “Mount” to mount it on Home windows 10 or Home windows 8. You do not want third-party software program. Home windows 7 requires specialised software program, like WinCDEmu.
Home windows lastly presents a built-in method to mount ISO disc image information on Home windows 10, Home windows 11, and Home windows 8. Should you’re utilizing Home windows 7, you will want a third-party software.
Mounting an ISO image in Home windows 8 or Home windows 10
On Home windows 8 (and eight.1) and 10, Home windows has the built-in skill to mount each ISO disc image and VHD digital arduous drive image information. You may have three choices. You possibly can:
- Double-click an ISO file to mount it. This would possibly not work if in case you have ISO information related to one other program in your system.
- Proper-click an ISO file and choose the “Mount” choice.
- Choose the file in File Explorer and and click on the “Mount” button beneath the “Disk image Instruments” tab on the ribbon.

On older variations of Home windows, you will want a third-party software to mount ISO image information. We like WinCDEmu, a easy and open-source disc mounting program. It helps ISO information and different disc image codecs.
WinCDEmu is even helpful on Home windows 8 and 10, the place it’ll will let you mount the BIN/CUE, NRG, MDS/MDF, CCD, and IMG image information that Home windows nonetheless would not provide built-in help for.
Set up WinCDEmu and provides it permission to put in the {hardware} driver it requires. After you do, simply double-click a disc image file to mount it. You can even right-click a disc image file and click on “Choose drive letter & mount” within the context menu.
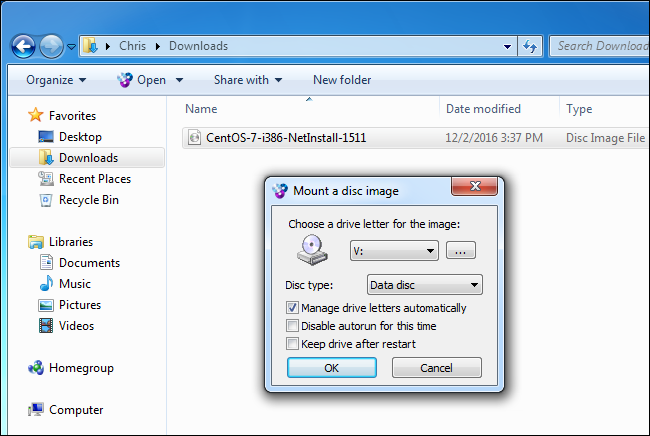
You will see a easy interface for selecting the drive letter and different primary choices. Click on “OK” and the mounted image will seem beneath Laptop. To unmount the disc image if you’re achieved, right-click the digital disc drive and choose “Eject”.
See Also:
How to Add Arrows, Superscript and Symbols in Google Docs
How to Fix Magic Mouse Not Connecting on Windows 10