Fix HDMI Sound Not Working in Windows 10

If you’re facing “HDMI No Sound in Windows 10” issue then don’t worry as today we are going to see a way to fix this issue. HDMI (High Definition Multimedia Interface) is a connector cable that helps transmit uncompressed video data and compressed or uncompressed digital audio between devices. HDMI replaces the old analogue video standards, and with HDMI, you get clear and sharper images.
There are several causes because HDMI Sound might not be working, such as outdated or corrupted sound drivers, damaged HDMI cable, no proper connection with the device, etc. So before moving forward, first check if the cable is working properly by connecting it to another device or PC. If the cable works, then you can follow the below guide. So without wasting any time let’s see How to Fix HDMI Sound Not Working in Windows 10 with the help of the below-listed tutorial.
Fix HDMI Sound Not Working in Windows 10
Make sure to create a restore point just in case something goes wrong.
Method 1: Set HDMI the default playback device
1. Right-click on Volume icon from the taskbar and select Sounds.
![]()
2. Make sure to switch to Playback tab then right-click on HDMI or Digital Output Device option and click on “Set as Default“.
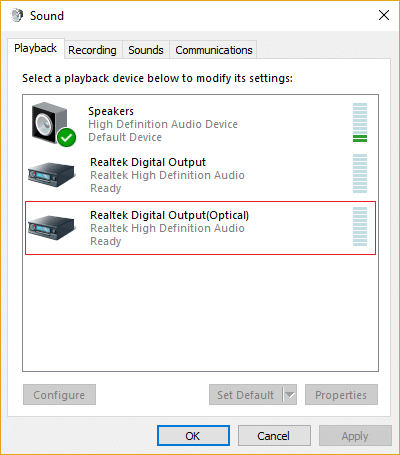
3. Click Apply, followed by OK.
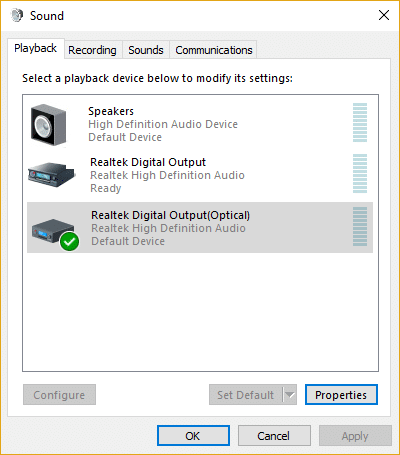
4. Reboot your PC to save changes.
Note: If you do not see HDMI option in the Playback tab then right-click in an empty area inside the playback tab then click on Show disconnected devices and Show disabled devices to checkmark it. This will show you HDMI or Digital Output Device option, right-click on it and select Enable. Then again right-click on it and select Set as default.
Method 2: Update your Sound Drivers
1. Press Windows Key + R then type devmgmt.msc and hit Enter to open Device Manager.

2. Expand Sound, video and game controllers and then right-click on “Realtek High Definition Audio” & select Update driver.
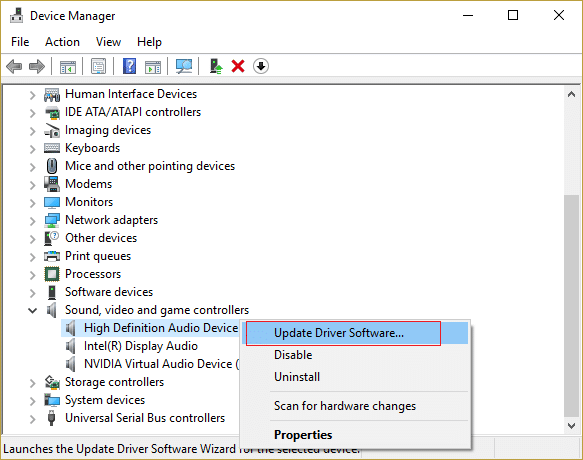
3. On the next window, click on “Search automatically for updated driver software“.

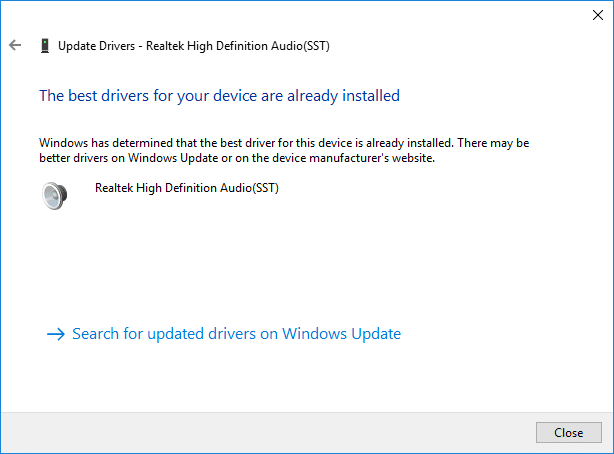
4. If you already have the updated driver, you will see the message “The best drivers for your device are already installed“.
5. If you don’t have the latest drivers, then Windows will automatically update Realtek Audio drivers to the latest update available.
6.Once finished, reboot your PC to save changes.
If you’re still facing the HDMI Sound Not Working Issue, then you need to update the drivers manually, follow this guide.
1. Again open Device Manager then right-click on Realtek High Definition Audio & select Update driver.
2. This time, click on ” Browse my computer for driver software.”

3. Next, select “Let me pick from a list of available drivers on my computer.”

4. Select the appropriate driver from the list and click Next.

5. Let the driver installation complete and then restart your PC.
Method 3: Enable Audio Controllers
1. Press Windows Key + R then type devmgmt.msc and hit Enter to open Device Manager.
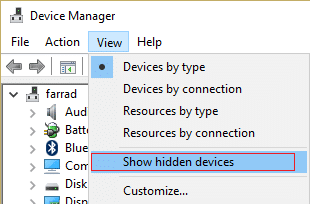
2. Click on View from the device manager menu then select “Show hidden devices“.
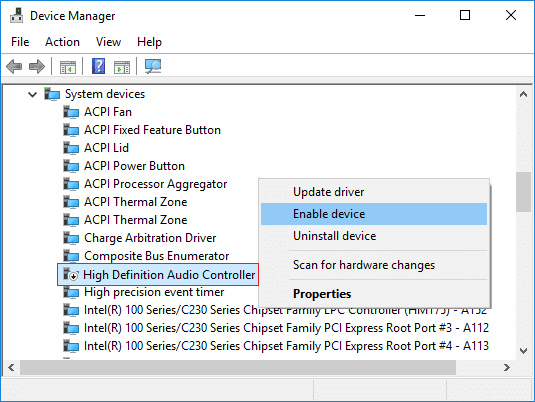
3. Now Expand “System Devices” and find Audio Controller such as “High Definition Audio Controller“.
4. Right-click on High Definition Audio Controller then selects Enable.
Important: If above doesn’t work then right-click on High Definition Audio Controller then select Properties. Now under General tab click “Enable Device” button at the bottom.
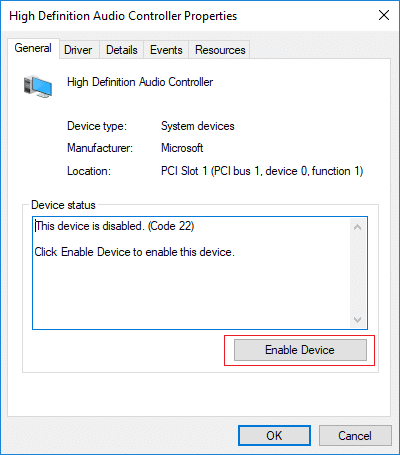
Note: If the Enable button is greyed or don’t see the option, your Audio Controller is already enabled.
5. If you have more than one Audio Controller, you need to follow the above steps to Enable each of them separately.
6. Once finished, reboot your PC to save changes and see if you’re able to Fix HDMI Sound Not Working in Windows 10.
Method 4: Update Graphic Card Drivers
1. Press Windows Key + R then type devmgmt.msc and hit enter to open Device Manager.
2. Next, expand Display adapters and right-click on your Graphics Card and select Enable.

3. Once you have done this again right-click on your graphics card and select “Update Driver“.

4. Select “Search automatically for updated driver software” and let it finish the process.
5. If the above steps helped fix the issue, then very good, if not then continue.
6. Again right-click on your graphics card and select “Update Driver” but this time on the next screen select “Browse my computer for driver software.”
7. Now select “Let me pick from a list of available drivers on my computer.”
8. Finally, select the latest driver from the list and click Next.
9. Let the above process finish and restart your PC to save changes.
Method 5: Rollback Graphic Drivers
1. Press Windows Key + R then type devmgmt.msc and hit Enter to open Device Manager.
2. Expand Display Adapter then right-click on your graphics card and select Properties.
3. Switch to Driver tab then click “Roll Back Driver“.
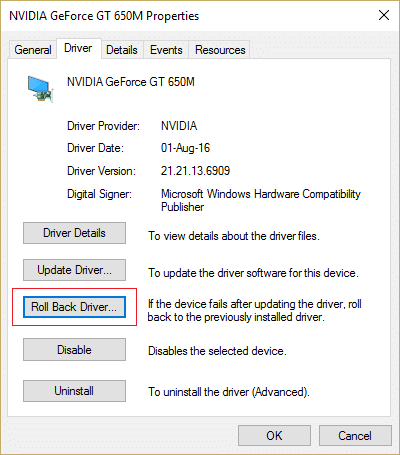
4. You will get a warning message, click Yes to continue.
5. Once your graphics driver is rolled back, reboot your PC to save changes.
If you’re able to Fix HDMI Sound Not Working in Windows 10 Issue, if not then continue with the next method.
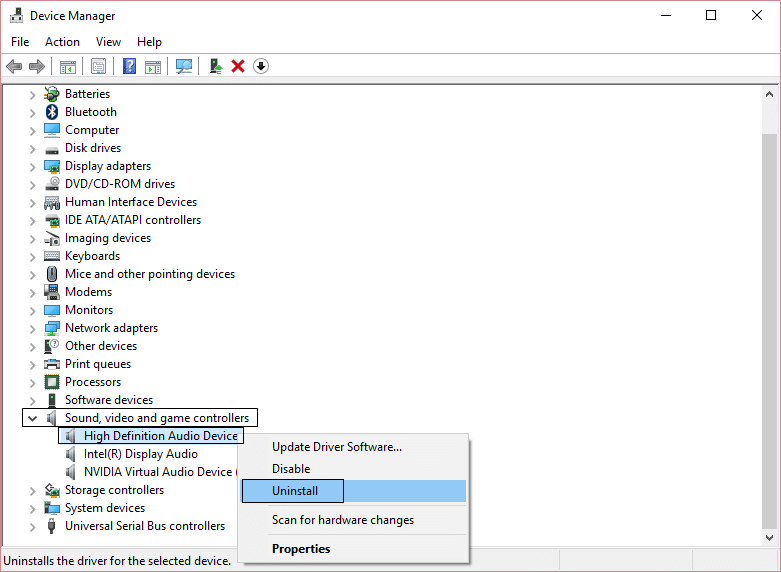
Method 6: Uninstall Graphic and Audio Drivers
1. Press Windows Key + R then type devmgmt.msc and hit Enter to open Device Manager.
2. Expand Display Adapter then right-click on your graphics card and select Uninstall.

3. Click Yes to continue with the uninstallation.
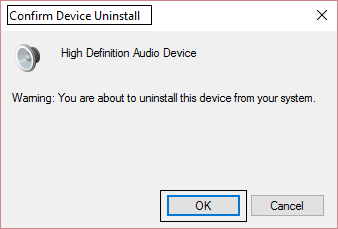
4. Similarly, expand “Sound, video and game controller” then right-click on your Audio device such as “High Definition Audio Device” and select Uninstall.
5. Again click OK to confirm your actions.
6. Once finished, reboot your PC to save changes.
Recommended:
That’s it you have successfully Fix HDMI Sound Not Working in Windows 10 but if you still have any questions regarding this tutorial then feel free to ask them in the comment’s section.