Fix Could Not Create the Java Virtual Machine in Windows 10

Java-based programs or games are ever-reliable when Java is properly installed. But recently users have reported that they could not create the java virtual machine while attempting to run Java programs like Minecraft. It means that the virtual machine used by Java programs to function is not installed properly. If you are also dealing with the same problem, you are at the right place. We bring to you a perfect guide that will help you fix the error: could not create the java virtual machine.
How to Fix Could Not Create the Java Virtual Machine in Windows 10
The error: Could not construct the Java virtual machine is often appears when compiling code in Integrated Development Environment (IDE). It is usually caused by
- Incorrect arguments or options used to open Java: If you run your own app or an open-source application this error may appear and can make system unstable.
- Insufficient Java maximum heap memory: Executing an app that has more maximum heap size than what is set in System Variable may cause this error.
- Java executable or programme running without Administrative privileges: This error may occur when running apps that require admin access to work appropriately.
We now understand the reasons behind this error. There are other similar errors experienced by Java users like Java virtual machine launcher error that mostly occurs due to Java installation issue. Let us begin with the methods to fix could not create the java virtual machine error.
Preliminary Checks
- Check startup arguments: Examine the starting parameters you’ve specified. Even in correct Java version, startup settings can modify the version utilised for compilation. If you’ve done an in-place Java update, it is likely that startup parameters still refer to earlier version.
- Check syntax: Make sure your arguments syntax is correct. Even meagre mistakes in it can prompt could not create the Java virtual machine error. Check for extra hyphens or versions that have been incorrecly recorded.
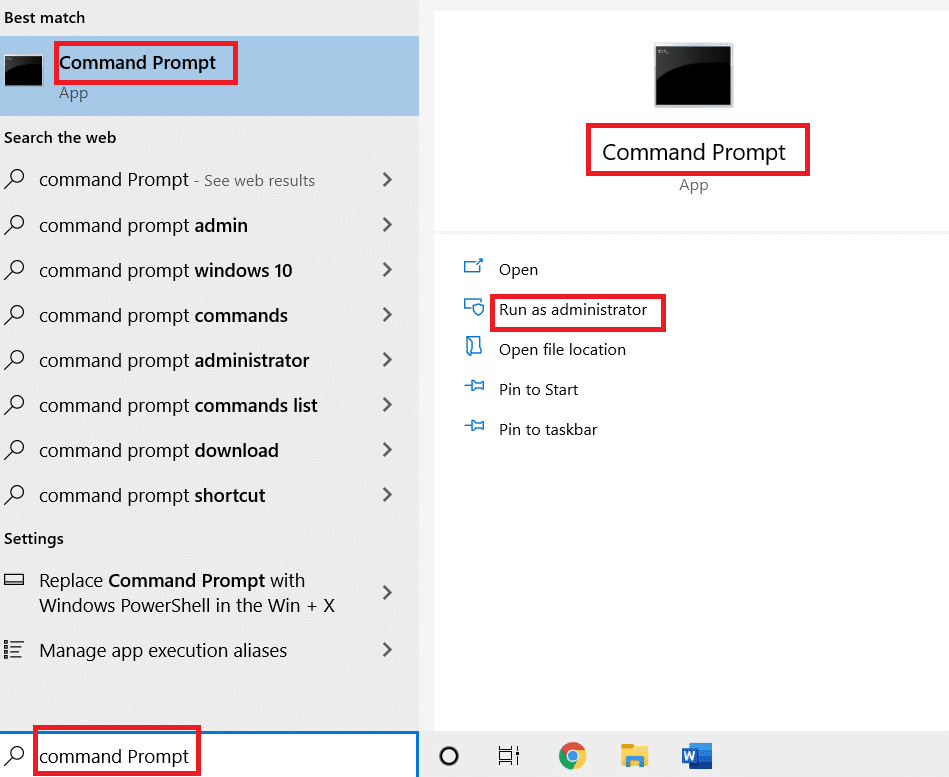
- Check JDK Corruption: A corrupt Java Development Kit can cause error: could not create the java virtual machine. You can check whether it is corrupt or not by following these steps:
1. Hit the Windows key, type Command Prompt and click on Run as administrator.
2 Type c:> java -version and hit the Enter key.
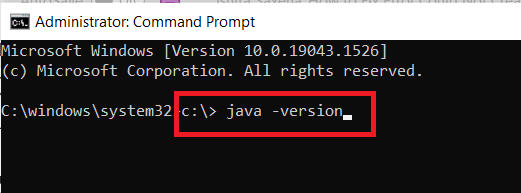
3. If executing the command gives an error, reinstall JDK. Check if reinstalling JDK resolves the issue. If not, try the fixed listed in this article.
Also Read: How to Fix javascript:void(0) Error
Method 1: Run Java in Administrator Mode
Apps without required Admin access can become unstable on Windows PC and may cause issues including error: could not create the java virtual machine. It can be fixed by forcing primary Java executable (java.exe) to run with administrative rights. Follow these steps to do so.
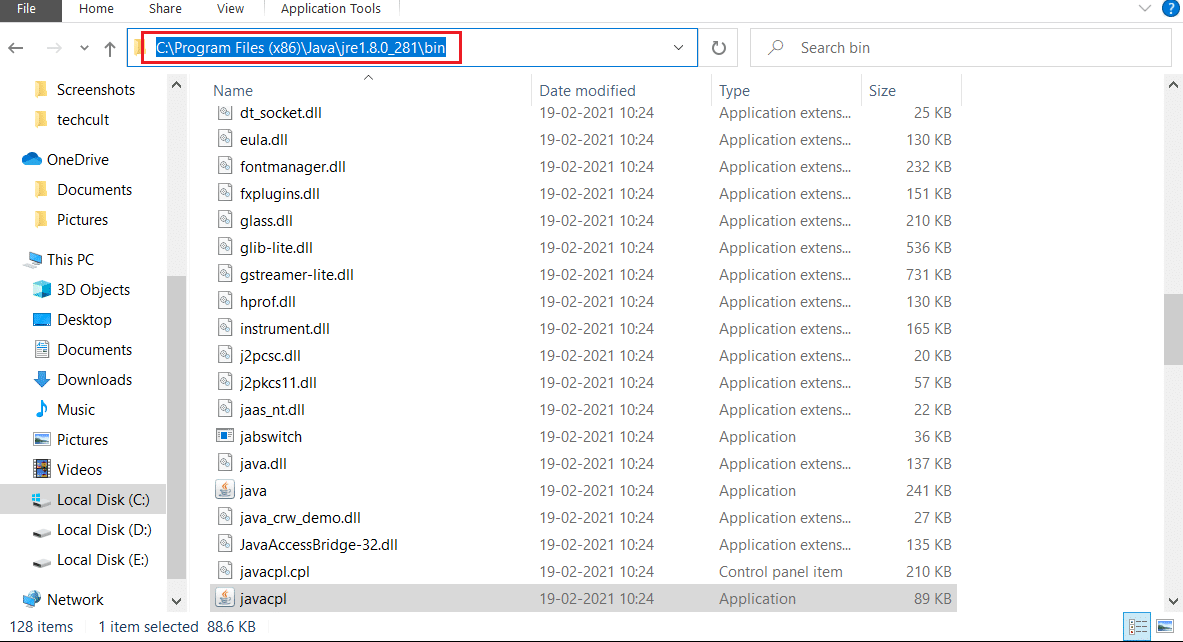
1. Press Windows + E keys to open File Explorer.
2. Navigate to Java.exe in File Explorer. It is generally in
C:Program FilesJava*JRE build version*bin
where JRE build version varies depending on the installed version.
Or
C:Program Files(x86)Common FilesOracleJavajavapath
Note: If you installed Java in a different location, follow that path and locate Java.exe.
3. Right-click on Java.exe and select Properties to open Properties window.

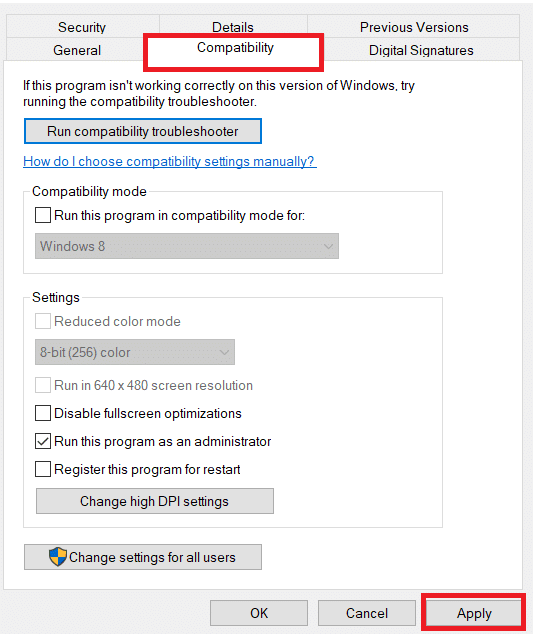
4. Go to Compatibility tab, check the box marked Run this software as an administrator as shown.
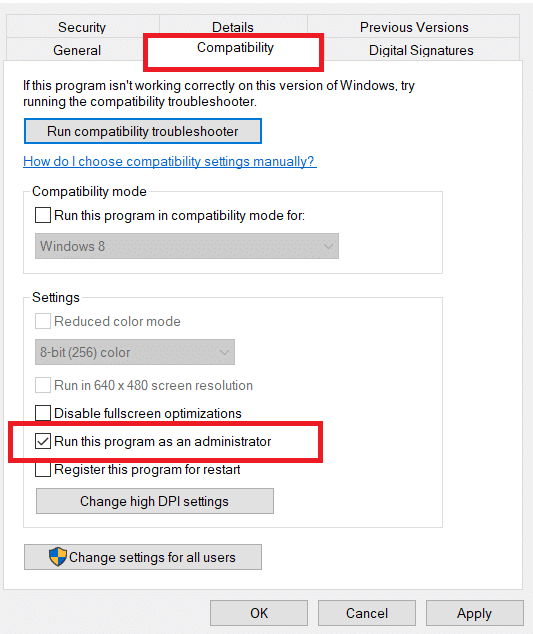
5. Click Apply and OK to save changes.
Now whenever you open Java it will run with admin privileges.
Method 2: Increase Java Heap Size
This error can occur when Java is running out of system memory require to open Virtual Machine client. Java is configured by default to utilise maximum heap size and running an app that exceeds heap size limit, an error will occur. Creating a new System Variable to increase available memory might resolve this issue and you can do that by following these steps
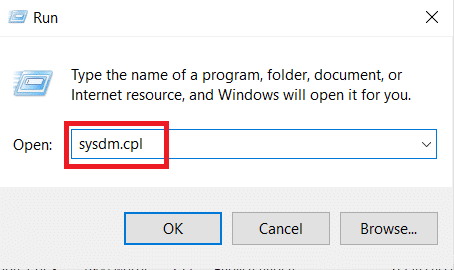
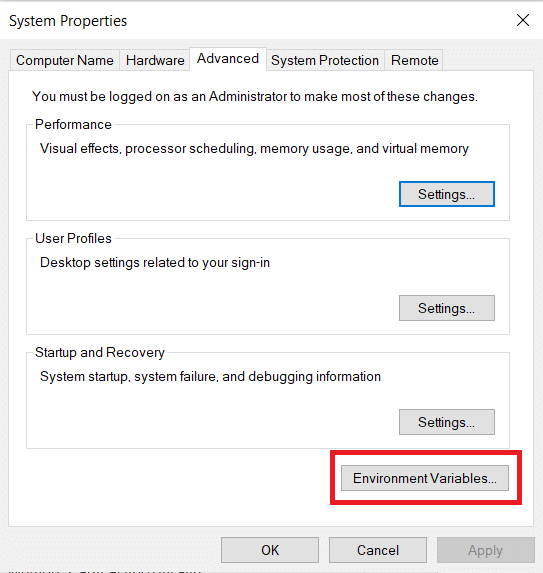
1. Press Windows + R keys together to open the Run dialog box.
2. Type sysdm.cpl and press Enter key to open System Properties.
3. Go to the Advanced tab.
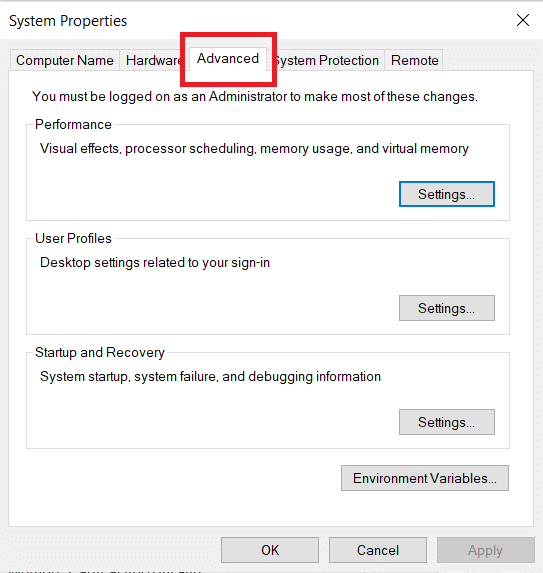
4. Click on Environment Variables… button as shown.
5. In Environment Variables window, click New… button under System Variables.
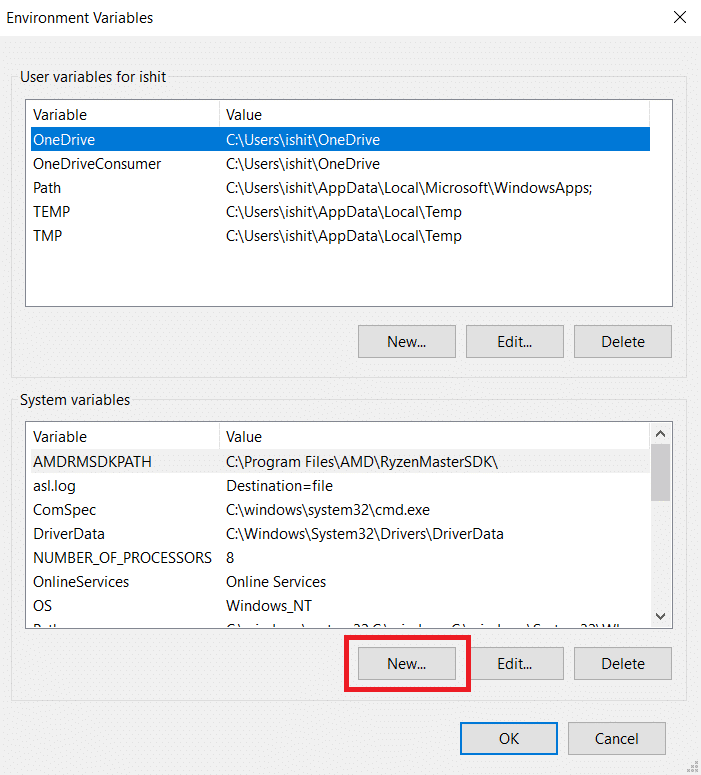
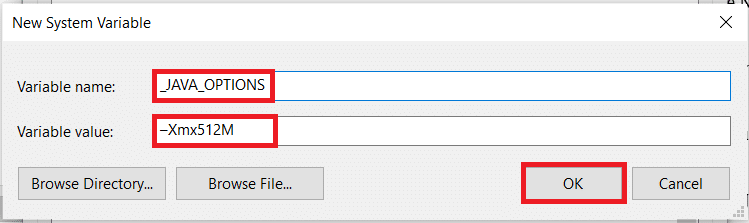
6. Set Variable name to _JAVA_OPTIONS and Variable value to –Xmx512M in New System Variable popup. Click OK to save changes.
Note: If the error persists, you can further increase memory by setting Variable value as –Xmx1024M instead of –Xmx512M as shown in Step 6.
Also Read: How to Enable or Disable JavaScript in your Browser
Method 3: Modify Java Code
Some users have reported that they can fix this error by making some simple changes in their code. Some of them are mentioned below.
1. Replacing double hyphen – with a single hyphen – in your code can fix this problem.
- The code with double hyphen
sony@sony-VPCEH25EN:~$ java –version
Picked up JAVA_TOOL_OPTIONS: –javaagent:/usr/share/java/jayatanaag.jar
Unrecognized option: –version
- The same code with a single hyphen
sony@sony-VPCEH25EN:~$ java -version
Picked up JAVA_TOOL_OPTIONS: -javaagent:/usr/share/java/jayatanaag.jar
Unrecognized option: -version
2. Also, consider eliminating the phrase from your argument:
-Djava.endorsed.dirs=”C:Program FilesApache Software FoundationTomcat 8.5endorsed”
3. Make sure -vm entry is added above vm args in eclipse.ini file or else JVM V6 will be chosen in env wars.
Note: If you use Ubuntu, you must know it only supports Java 8. So, you can uninstall Java as shown in Method 3 and install an older version instead.
Method 4: Modify Eclipse.ini File
If you are using Eclipse IDE, then making some changes in eclipse.ini file can fix error code could not create the java virtual machine.
Note: Eclipse.ini is located inside Eclipse folder in the directory where you have installed Eclipse.
Step I: Decrease Memory Use
1. Right-click on Eclipse.ini file and select open with… > Notepad.
2. Look for a line matching -Xmx256m.
Note: It can also be -Xmx1024m or -Xmx 512m.
3. Change the default value to something more compatible with your PC RAM along with adding the version number.
For example,
-Xmx512m
-Dosgi.requiredJavaVersion=1.6
OR
-Xmx512m
-Dosgi.requiredJavaVersion=1.7
OR
-Xmx512m
-Dosgi.requiredJavaVersion=1.8
4. Try to delete 256m value from -launcher.XXMaxPermSize line.
Step II: Additional Modifications
1. Remove the following line from your file, if possible.
-vm P:Programsjdk1.6bin
2. Replace the following line with the given code below.
set -Dosgi.requiredJavaVersion=1.5
To
set -Dosgi.requiredJavaVersion=1.6.
3. Above -marks! line, try adding this line:
-vm C:Program Files (x86)Javajre6binjavaw.exe
4. Refer to JVM.dll by the following line.
-vm
C:Program FilesJavajre7binclientjvm.dll
5. Replace -vmargs with the path of javaw.exe in eclipse.ini file.
-startup
plugins/org.eclipse.equinox.launcher_1.3.0.v20120522-1813.jar
--launcher.library
plugins/org.eclipse.equinox.launcher.win32.win32.x86_1.1.200.v20120522-1813
-product
com.android.ide.eclipse.adt.package.product
--launcher.XXMaxPermSize
256M
-showsplash
com.android.ide.eclipse.adt.package.product
--launcher.XXMaxPermSize
256m
--launcher.defaultAction
openFile
**-vm “c:Program FilesJavajdk1.7.0_07binjavaw.exe”**
-Dosgi.requiredJavaVersion=1.6
-Xms40m
-Xmx768m
-Declipse.buildId=v21.1.0-569685
6. Place the line at end of eclipse.ini file and check if it works.
-vmargs
-Xms40m
-Xmx512m
-XX:MaxPermSize=256m
7. Delete the following lines from eclipse.ini and check if it solves the issue.
-XX:+UseStringDeduplication
-XX:+UseG1GC
Note: If the problem persists, try erasing the eclipse.ini file, but make a copy beforehand. Also, close all apps that consume high memory before launching Java.
Also Read: Fix Java Virtual Machine or JVM not found error
Method 5: Reinstall Java
In certain circumstances, the issue is caused by Java not being installed correctly or because its installation has been damaged over time. As a result, after entirely removing Java, we will reinstall it in this step. As a result:
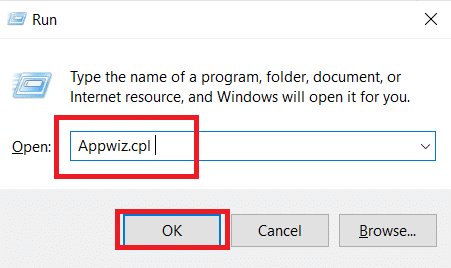
1. Press Windows + R keys together to open the Run dialog box.

2. Type Appwiz.cpl and click OK to launch Programs and Features.
3. Scroll through installed applications and locate Java.
4. Right-click on it and select Uninstall to uninstall Java.
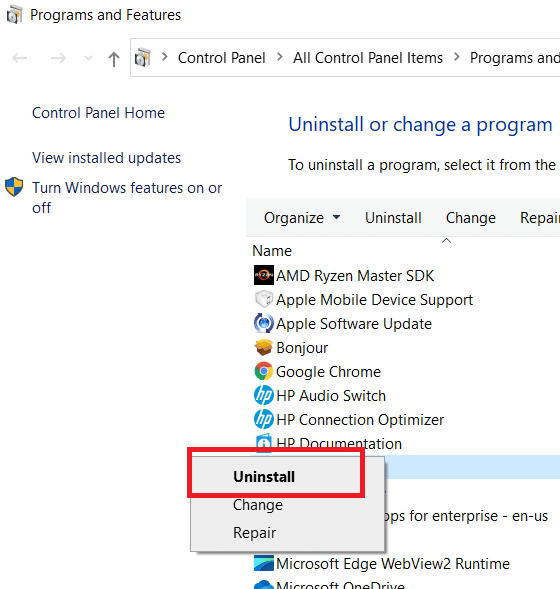
Note: You should also uninstall other Java Development kits and updates.
5. Wait for the uninstallation process to complete and reboot your PC.
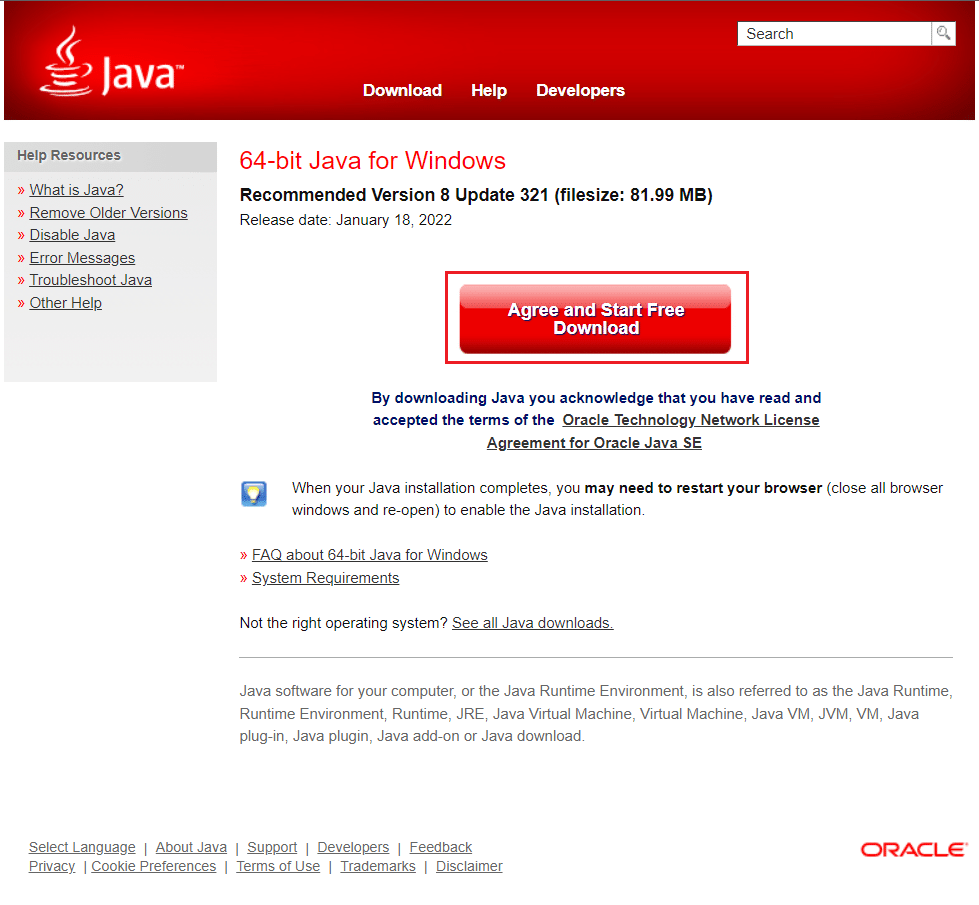
6. Go to Java Downloads page to download the most recent version of Java Runtime Environment.
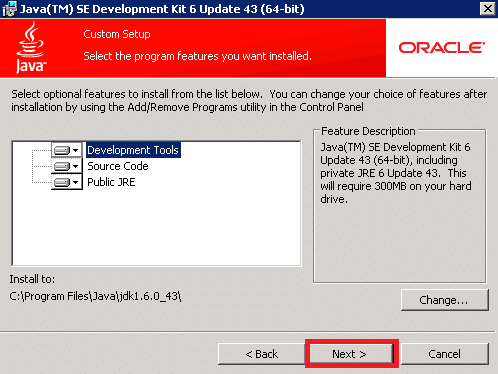
Note 1: If reinstalling Java Runtime Environment doesn’t fix the issue, download the most recent version of JDK.
Note 2: If you already had JDK, try using a different version or delete Java Runtime Environment that came with it.
Frequently Asked Questions (FAQs)
Q1. What does it imply when it says could not construct Java Virtual Machine?
Ans: The -Xmx option is used by Java Virtual Machine to specify maximum heap memory size. The -Xmx option in eclipse.ini file is probably set too high for the present environment which is causing this error message.
Q2. What is the Java Virtual Machine?
Ans: Java Virtual Machine (JVM) is a program that allows a computer to run Java programs and other languages that have been translated to Java Bytecode. JVM is described by a standard that formally describes JVM implementation requirements.
Q3. Is it possible to get Java for free?
Ans: To install Java, you must first download Oracle installer application. Select Free Java Download from drop-down menu. After that, you’ll be asked to read and accept end-user licensing agreement.
Recommended:
We hope that this guide was helpful and that you were able to fix could not create the Java virtual machine issue. Let us know which method worked for you the best. If you have any queries or suggestions then feel free to drop them in the comments section.