Fix Windows couldn’t complete the requested changes

Fix Windows couldn’t complete the requested changes: If you are trying to install .NET Framework on your system then chances are you may face the error “Windows couldn’t complete the requested changes” with error code – 0x80004005, 0x800f0906, 0x800f081f, 0x80070422, 0x800F081F, 0x800736B3, 0x800f0805,0x800f0922, etc. In most of the cases, users are faced with this error message when they try to run a particular program or application which requires .NET Framework 3.5 and when you click Yes to install .NET Framework, after a couple of minutes it will display the message that .NET Framework (including 2.0 and 3.0) successfully installed. But only after you run the program again it again displays the error same error message and asks you to install the .NET Framework.
Now if you even try to disable or uninstall .NET Framework 3.5 (including 2.0 and 3.0) you will get an error message saying ” Windows couldn’ t complete the requested changes: Unspecified error, error code 0x800#####. The same error message will be displayed if you try to enable .NET Framework, in case it’s already disabled. So without wasting any time let’s see how to actually Fix Windows couldn’t complete the requested changes with the help of below-listed troubleshooting guide.
Fix Windows couldn’t complete the requested changes
Make sure to create a restore point just in case something goes wrong.
Method 1: Run DISM Tool
1.Press Windows Key + X then select Command Prompt (Admin).

2.Type the following command into cmd and hit Enter:
Dism /online /enable-feature /featurename:NetFx3 /All /Source:[drive_letter]:sourcessxs /LimitAccess

Note: Don’t forget to replace [drive_letter] with your system drive or installation media drive.
3.Reboot your PC to save changes and again try to install .NET Framework.
Method 2: Perform a Clean Boot
Sometimes 3rd party software can conflict with .NET Framework installation and can cause the issue. In order to Fix Windows couldn’t complete the requested changes error, you need to perform a clean on your PC and then try to install .NET Framework.

Method 3: Make sure Windows is up to date
1.Press Windows Key + I then select Update & Security.

2.Next, again click Check for updates and make sure to install any pending updates.

3.After the updates are installed reboot your PC and see if you’re able to Fix Windows couldn’t complete the requested changes error.
Method 4: Enable .NET Framework 3.5
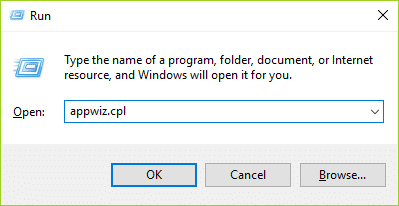
1.Press Windows Key + R then type appwiz.cpl and hit Enter.
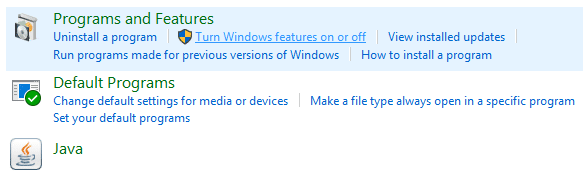
2.Now from the left-hand menu click on “Turn Windows features on or off”
 .
.
3.From Windows Features window make sure to check mark “.NET Framework 3.5 (includes .NET 2.0 and 3.0)”.
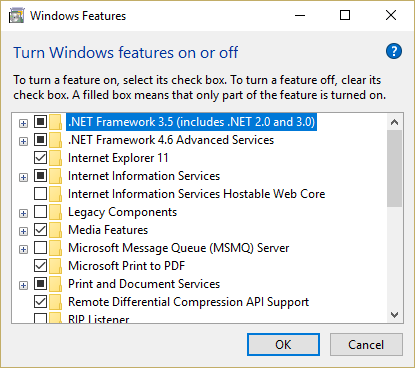
4.Click OK and follow-on screen instruction to complete the installation and restart your PC to save changes.
Method 5: Registry Fix
1.Press Windows Key + R then type regedit and hit Enter to open Registry Editor.

2.Navigate to the following registry key:
ComputerHKEY_LOCAL_MACHINESOFTWAREPoliciesMicrosoftWindowsWindowsUpdateAU
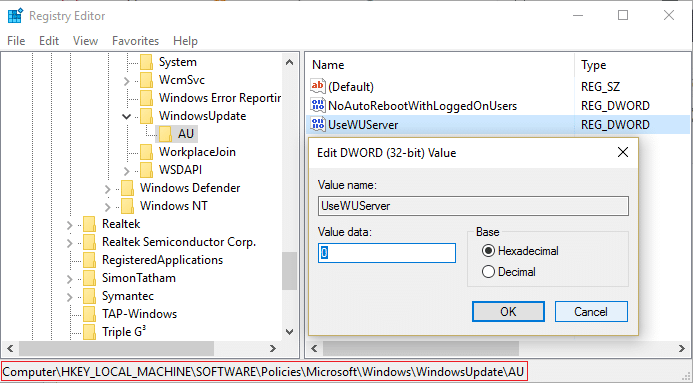
3.Make sure to select AU than in the right window pane double click on UseWUServer DWORD.
Note: If you can’t find the above DWORD then you need to create it manually. Right-click on AU then select New > DWORD (32-bit) value. Name this key as UseWUServer and hit Enter.
4.Now in the Value data field enter 0 and click on OK.
5.Reboot your PC to save changes and then again try to run Windows Update.
Method 6: Install .NET Framework using Windows 10 Installation media
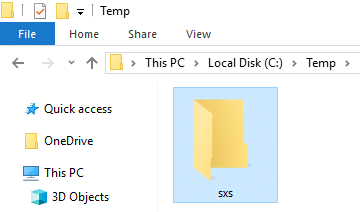
1.Create a temporary folder called Temp under C: directory. The complete address of the directory would be C:Temp.
2.Mount Windows 10 Installation Media using DAEMON Tools or Virtual CloneDrive.
3.If you have a Bootable USB then simply plug it and browse to the drive letter.
4.Open Sources folder then copy the SxS folder inside it.
5.Copy the sxs folder to C:Temp directory.
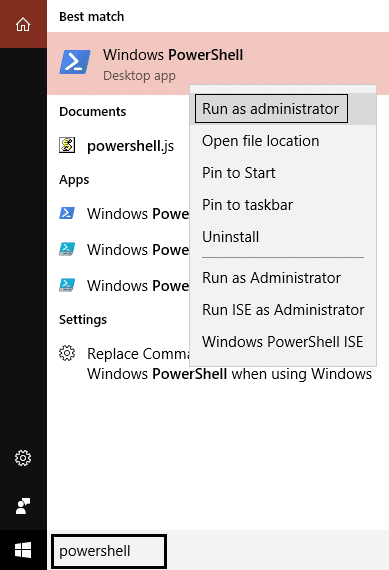
6.Type powershell in Windows Search and right-click on PowerShell then select Run as administrator.
7.Next, type the following command into powershell window:
dism.exe /online /enable-feature /featurename:NetFX3 /All /Source:c:tempsxs /LimitAccess
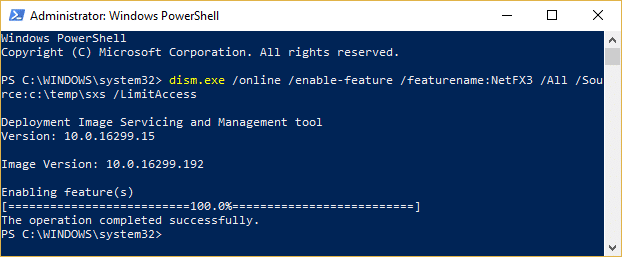
8.After few minutes you will get “The operation completed successfully” message which means that the installation of .NET Framework was successful.
9.Reboot your PC and see if you’re able to Fix Windows couldn’t complete the requested changes error.
Method 7: Enable Specify settings for optional component installation and component repair setting
1.Press Windows Key + R then type gpedit.msc and hit Enter to open Group Policy Editor.

2.Navigate to the following path:
Computer Configuration > Administrative Templates > System
3.Make sure you have selected System folder then in the right window find “Specify settings for optional component installation and component repair”.
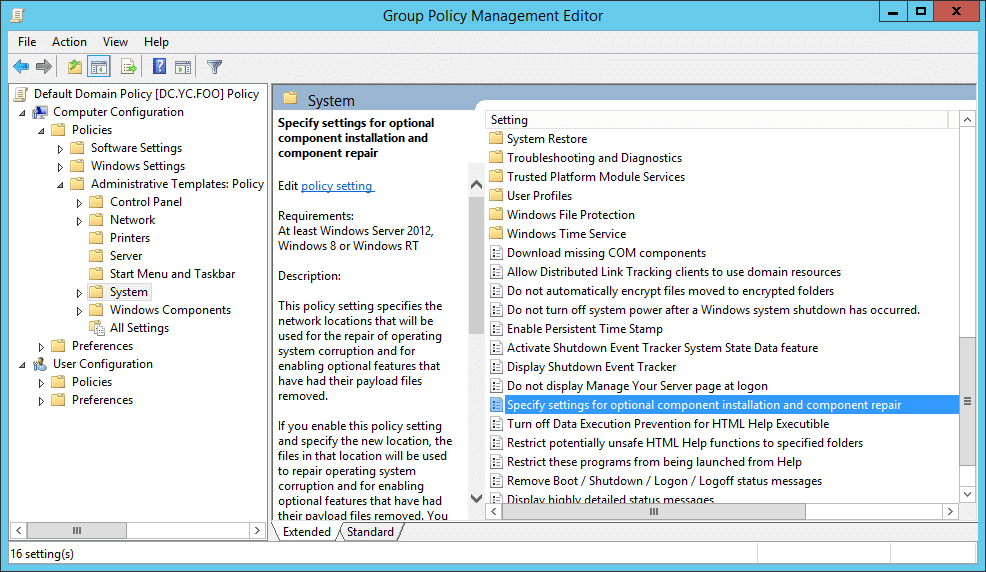
4.Double-click on it and check mark Enabled.

5.Click Apply followed by OK.
6.Now again try to install .Net Framework 3.5 on your system and this time it would work.
Method 8: Run Windows Update Troubleshooter
From Microsoft Website download the Windows Update Troubleshooter and run it. Now in order to Fix Windows couldn’t complete the requested changes error, you need to run Windows Update successfully as it is crucial in updating the version of .NET framework.
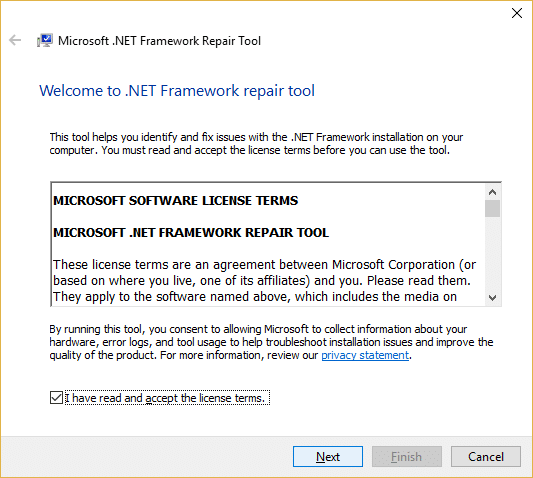
Method 9: Run Microsoft .NET Framework Repair Tool
If you’re facing any issues with Microsoft .NET Framework then this tool will try to repair and fix any issues you are facing. Just download and run the tool in order to repair .NET Framework.
Method 10: Use .NET Framework Cleanup Tool
This tool must be used as a last resort, if nothing works then, at last, you could try using .NET Frame Cleanup Tool. This will remove the selected version of .NET Framework on your system. This tool helps in case you are encountering .NET Framework installation, uninstallation, repair or patching errors. For more information go to this official NET Framework Cleanup Tool User’s Guide. Run the .NET Framework Cleanup Tool and once it uninstalls the .NET Framework then again install the specified version. Links to various .NET Framework are in the bottom of the above URL.
Recommended for you:
That’s it you have successfully Fix Windows couldn’t complete the requested changes error but if you still have any questions regarding this guide then feel free to ask them in the comment’s section.