Key Takeaways
To turn off hibernation and delete the hyberfil.sys file, open a Command Prompt window with admin rights and execute the “powercfg -h off” command. You can disable hibernation in Power Options too, but the hyberfil.sys file will continue taking up storage space.
You can fix certain driver-related issues as well as free up your storage space by disabling hibernation on your Windows 10 PC. Turning hibernation off is a cinch in either Command Prompt or Power Options, and we’ll show you how.
What Is Hibernation in Windows 10?
Hibernation is a power-saving state where your PC offloads your currently open apps and documents to a local file, allowing you to resume your activities when you turn your computer back on.
Basically, when you activate hibernation, your PC saves all the data for your current PC state in a file (the file’s called hyberfil.sys) and then turns off your PC. Later, when you turn your computer back on, your PC loads this file and lets you resume your work where you left it. In that way, hibernation saves you time that you’d otherwise spend opening each document or app manually.
However, note that hibernation is only helpful if you think you’ll be away from your PC for extended periods of time. Sleep mode works better if you’re just leaving your machine unattended for a short period of time. That’s because sleep mode turns your PC back on faster and doesn’t use the multiple gigabytes of local storage that hibernation does.
Why Disable Hibernate in Windows 10?
One reason to disable hibernation is that you want to reclaim the storage space used by the hibernation file. This file can consume several gigabytes’ worth of storage, and disabling the feature helps get back that space. Note that you must use the command-line method below to get rid of the hibernation file, as the graphical settings method doesn’t delete this file—it only disables the hibernation function.
Another reason to disable hibernate is that you may have a specific driver issue. Some drivers don’t work well with hibernation, causing various issues on your PC. Turning off hibernation can fix those issues.
How to Turn Off Hibernation in Windows 10
There are two ways to disable hibernation in Windows 10: using the command-line method that turns off the feature and deletes the hiberfil.sys file, and the graphical method that only turns off the feature.
Disabling hibernation on Windows 10 can help you reclaim disk space and prevent your computer from entering hibernation mode. Here’s how you can disable it:
### Method 1: Using Command Prompt
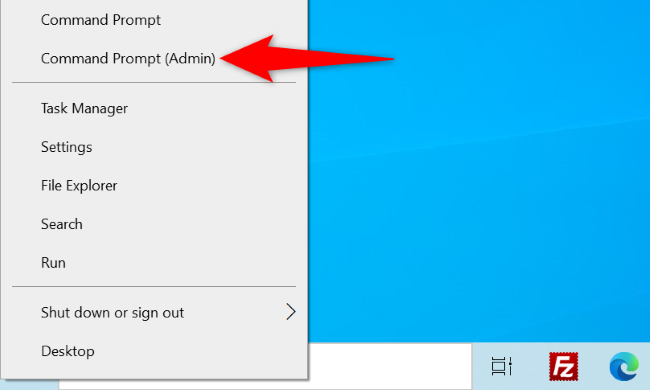
1. **Open Command Prompt as Administrator**:
– Press `Windows Key + X` to open the Power User menu.
– Select `Command Prompt (Admin)` or `Windows PowerShell (Admin)`.
2. **Run the Command to Disable Hibernation**:
– Type the following command and press `Enter`:
“`shell
powercfg /hibernate off
“`
3. **Confirm**:
– After running the command, hibernation should be disabled, and the `hiberfil.sys` file (which is used by hibernation) will be deleted from your system.
### Method 2: Using Registry Editor
1. **Open Registry Editor**:
– Press `Windows Key + R` to open the Run dialog box.
– Type `regedit` and press `Enter`.
2. **Navigate to the Hibernate Settings**:
– Go to the following path:
“`
HKEY_LOCAL_MACHINE\SYSTEM\CurrentControlSet\Control\Power
“`
3. **Modify HibernateEnabled Value**:
– Find the `HibernateEnabled` value on the right pane.
– Double-click on `HibernateEnabled` and set its value to `0`.
4. **Restart Your Computer**:
– Close the Registry Editor and restart your computer to apply the changes.
### Method 3: Using Power Options
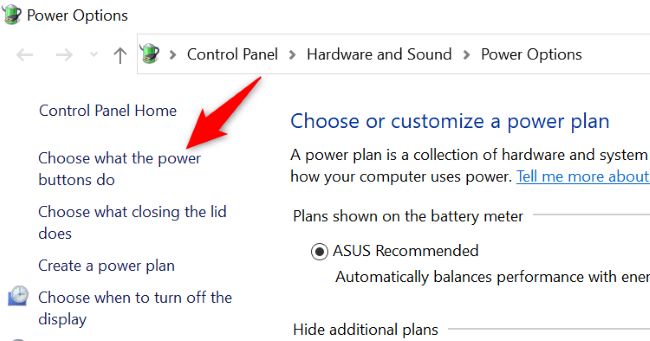
1. **Open Power Options**:
– Press `Windows Key + S` and type `Power Options`, then select `Power & sleep settings`.
2. **Additional Power Settings**:
– Click on `Additional power settings` on the right.
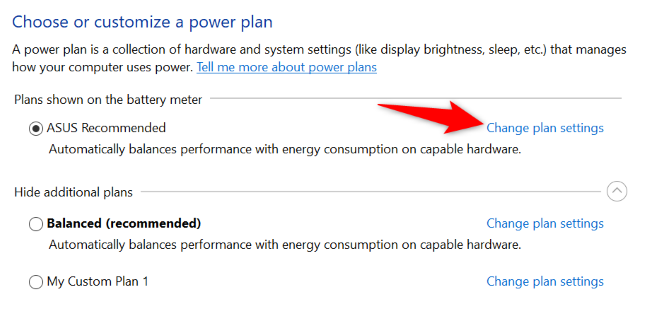
3. **Change Plan Settings**:
– Select `Change plan settings` next to your selected power plan.
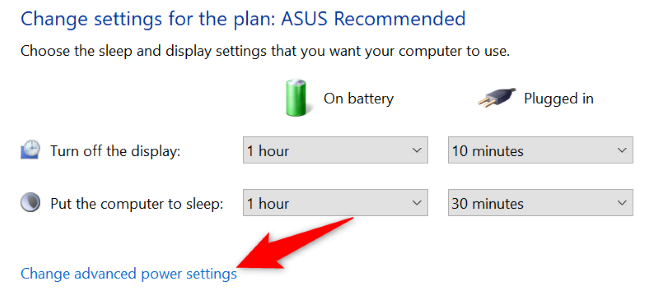
4. **Change Advanced Power Settings**:
– Click on `Change advanced power settings`.
5. **Disable Hibernate in Advanced Settings**:
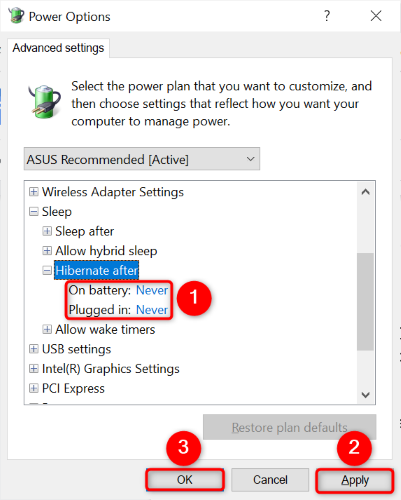
– In the Power Options window, expand `Sleep`, then expand `Hibernate after`.
– Set the `Setting (Minutes)` to `Never`.
6. **Save Changes**:
– Click `Apply` and then `OK` to save the changes.
After completing these steps, hibernation should be disabled on your Windows 10 system. If you want to enable hibernation again, you can follow the same steps and adjust the settings accordingly (e.g., using `powercfg /hibernate on` in Command Prompt).
In the “User Account Control” prompt, select “Yes.”
See Also:
How to Encrypt Your Windows System Drive With VeraCrypt
How to Open File Explorer Using Command Prompt on Windows 10
On the Command Prompt window, type the following command and press Enter:
powercfg -h off
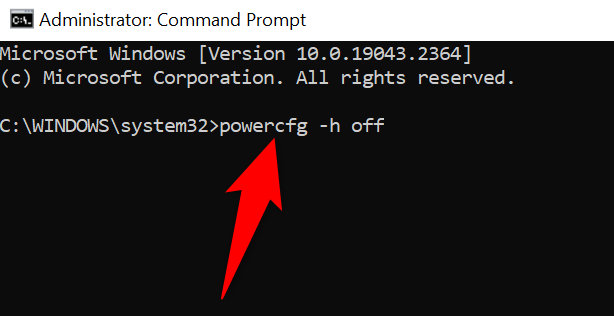
Command Prompt won’t display a confirmation message, but hibernation is now disabled and the associated file is deleted.
In the future, if you’d like to turn hibernation back on, type the following command in Command Prompt:
powercfg.exe /hibernate on
Using Power Options
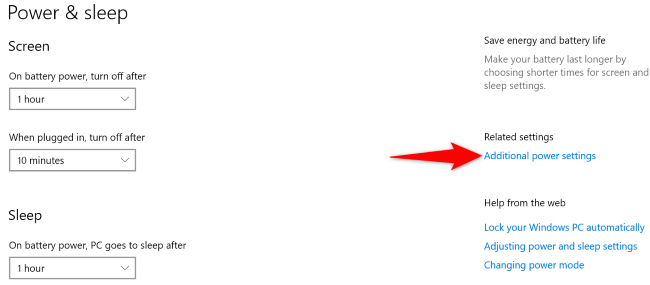
If you prefer to use a graphical interface to disable hibernation (don’t mind leaving the hiberfil.sys in storage) you can do so by right-clicking the “Start” menu icon and choosing “Power Options.”
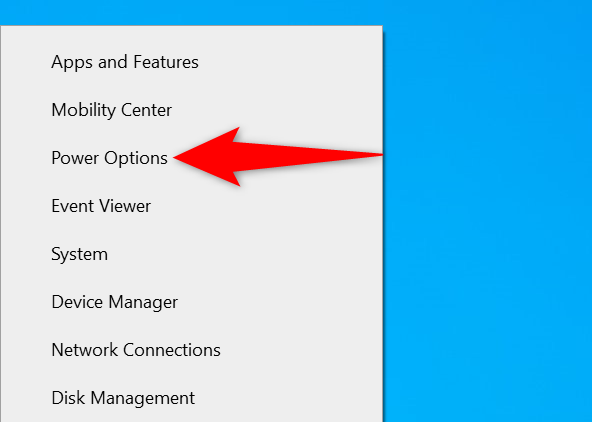
On the “Power & Sleep” page, in the right sidebar, select “Additional Power Settings.”
Save your settings by selecting “Save Changes” at the bottom.
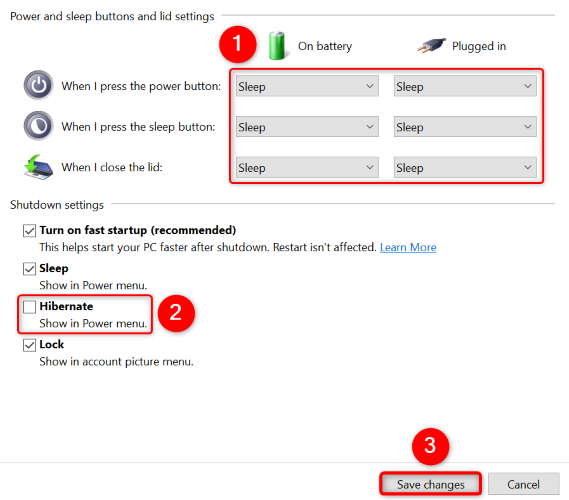
0 . This will make these menus say “Never” (which means to never use hibernation).
Then, save your changes by selecting “Apply” followed by “OK” at the bottom.