Quickly Access Steam Screenshot Folder on Windows 10

Did you just manage to kill off the entire opponent team by yourself in call of duty or counter strike? Maybe you survived the onslaught of opponents in Fortnite or PUBG and were the last one standing? Or just want to show off your latest construction in Minecraft over on Reddit?
A simple screenshot is all it takes to show off your gaming prowess/skills and gain some bragging rights over your friends. In-game screenshots are also of paramount importance to report any bugs to the developer. Taking a screenshot in a steam game is quite easy. Simply press the default key F12 to grab a screenshot of the current screen while playing the game.
However, finding a particular screenshot can be difficult if you are new to steam and don’t know your way around.
There are two ways to access the screenshots and we will be discussing the same in this article.
How to Access Steam Screenshots?
There are a total of two methods by which you can get a hold of all the screenshots you took while playing a game on steam. The screenshots can either be accessed through the screenshot manager in steam directly or by locating the steam application folder on your personal computer. Both the methods are quite simple and users shouldn’t face any issue in following them. Find the below-listed step by step guides to easily find steam screenshot folder on Windows 10:
How to Quickly Access Steam Screenshot Folder on Windows 10
Method 1: Screenshot Manager in Steam
Steam has a builtin screenshot manager that categorizes your screenshots based on the games they were clicked from along with allowing the user to upload them to their steam profiles or back them up on cloud storage. Backing all your screenshots to a remote cloud server can be particularly useful in case of a hard drive failure or any other hardware related issue. The Steam cloud storage available to each user by default is 1 GB which is more than enough to save all your gaming feats.
Screenshot manager also lets you open the physical location where all screenshots are saved and thus, upload them to your social media handles or show them off to your friends.
To access steam screenshots via Screenshot manager follow the below guide:
1. Start by launching Steam on your personal computer. Follow one of the three methods to open steam.
a. Double-click on the Steam application icon on your desktop or right-click on it and select open.
b. Press Windows Key + S (or click on the start button), type Steam and click on Open from the right panel.
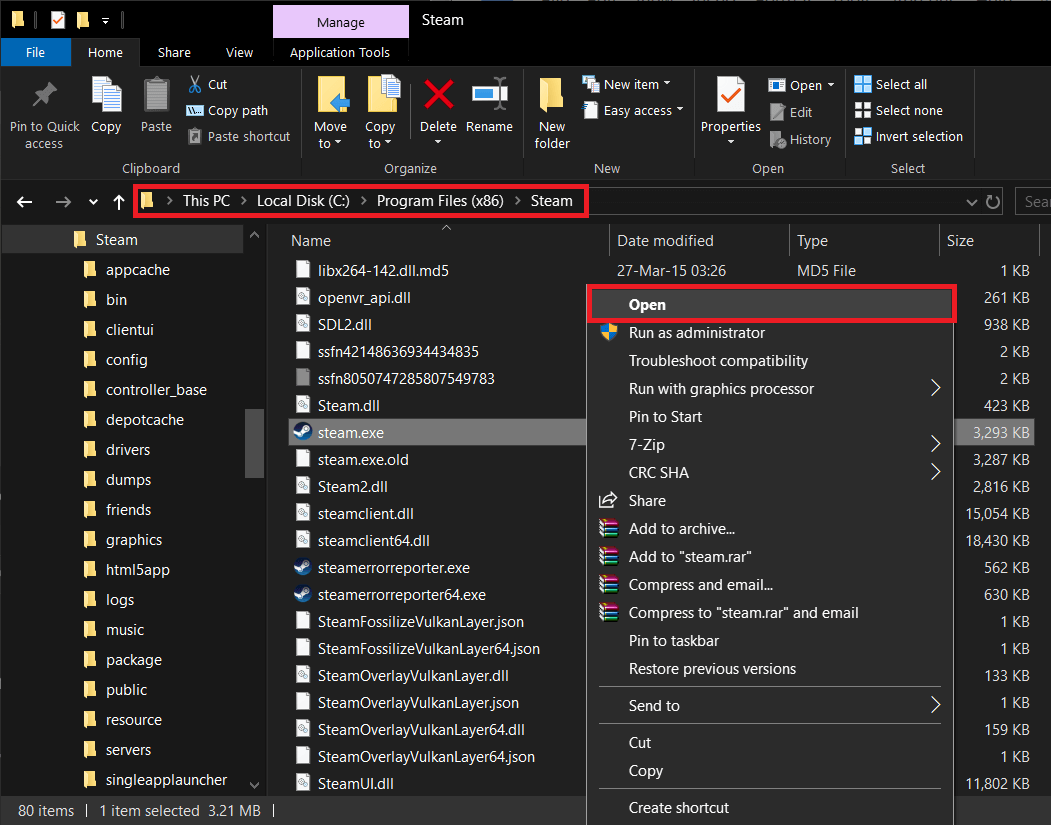
c. Launch Windows Explorer (Windows Key + E), open C drive and go down the following path C drive > Program Files (x86) > Steam. Once in the destination folder, locate the steam.exe file, right-click on the same and select Open.
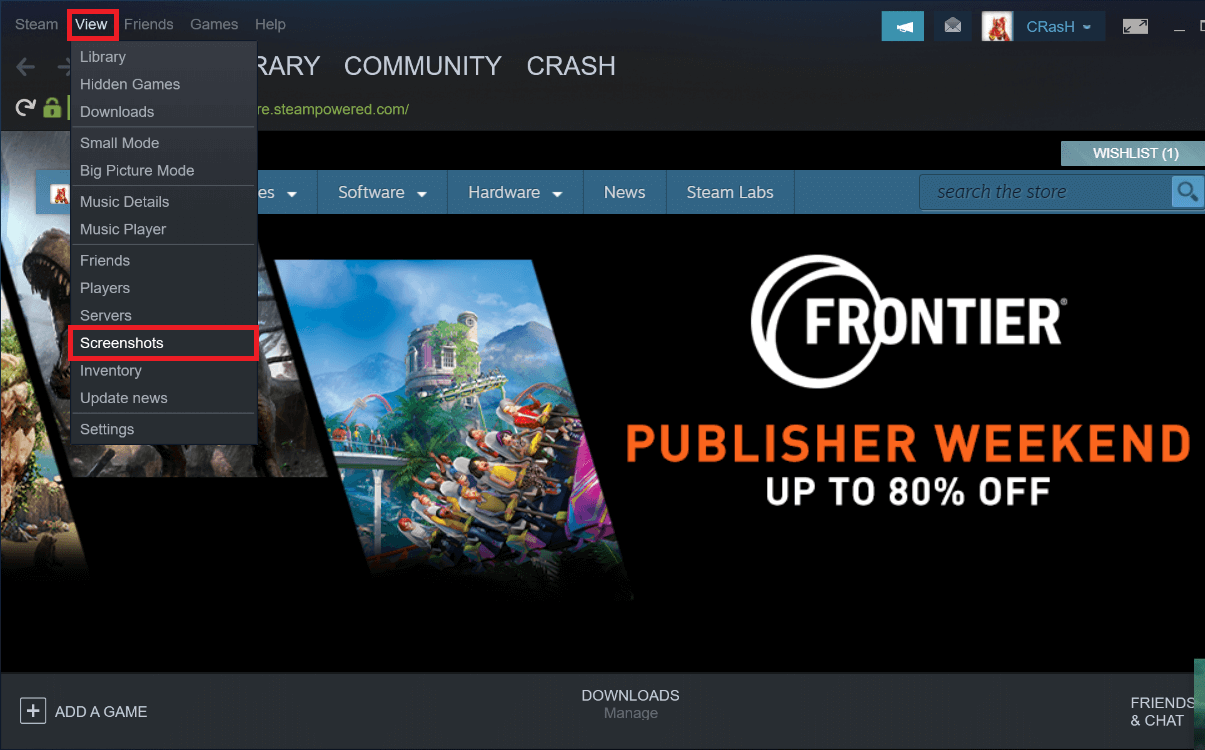
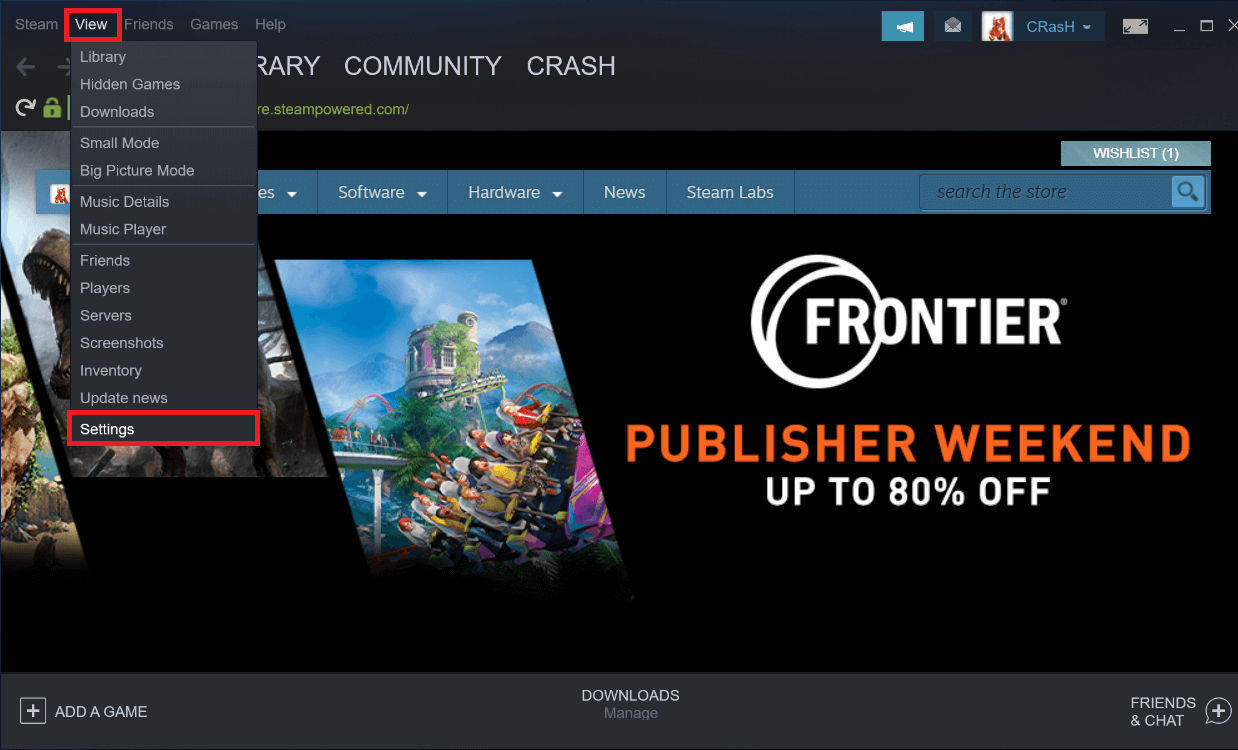
2. Once the steam application has launched, click on the View drop-down menu located at the top left corner of the application window.
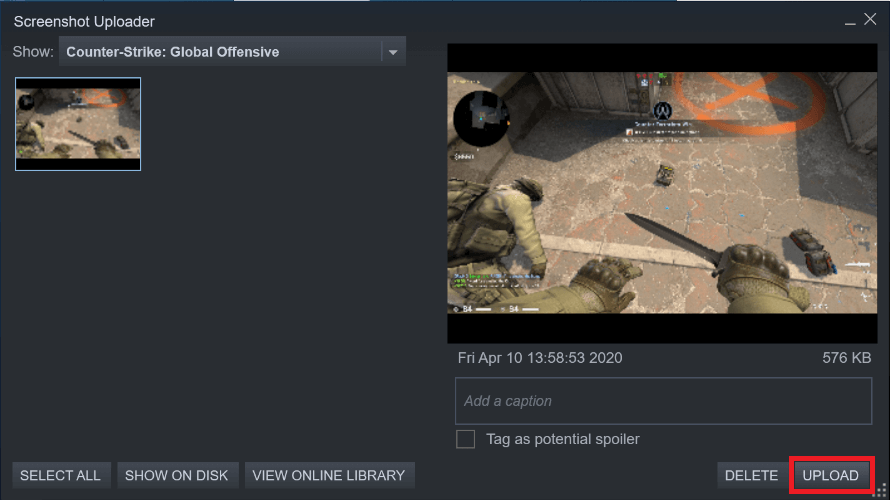
3. From the ensuing drop-down menu, click on Screenshots to view all the screenshots you have captured so far.
4. Once you click on Screenshots, a new window titled Screenshot uploader will launch displaying all available screenshots.
5. Use the drop-down menu next to the Show label to surf through various games you have been playing and their respective screenshots.

6. In the same window, you will find a button labelled Show On Disk at the bottom. Select any of the screenshots by clicking on its thumbnail and click on Show On Disk if you would like to open the folder containing the screenshot.
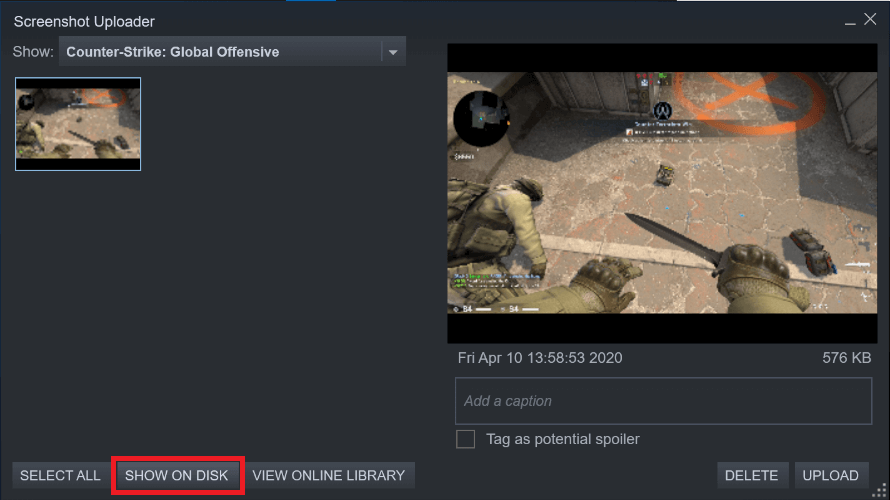
7. To check all the screenshots you have uploaded on Steam cloud for safekeeping, click on View Online Library next to Show on Disk.
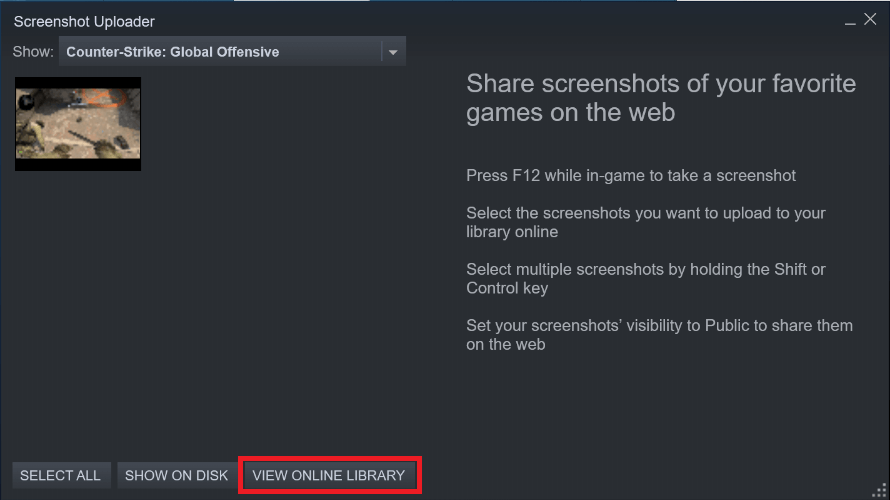
8. Similarly, select any screenshot and click on Upload to upload it to your Steam profile.
Other options in the Steam screenshot manager include the choice to make screenshots public or keep them private, delete and organize them.
Also Read: Fix Could Not Connect to the Steam Network Error
Method 2: Manually locating the Steam Screenshot Folder
If launching steam itself takes some time on your personal computer, you can bypass the whole process by physically locating the screenshots folder in the File Explorer. The screenshots folder is found within the Steam application folder and each game has its own unique folder with a numerical title assigned to it.
1. Press Windows Key + E to directly launch the Launch File Explorer on your personal computer.
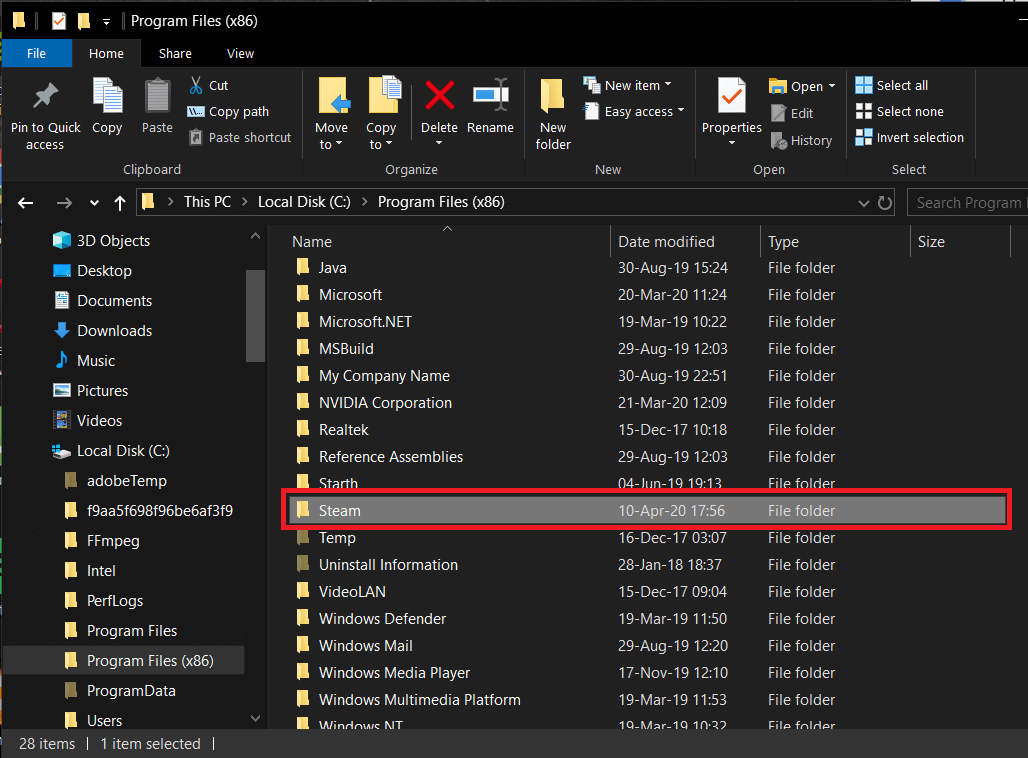
2. Once inside File Explorer, open up the drive where you installed steam. It should be the C drive for most users out there. So double-click on C drive.

3. Locate the Program Files (x86) folder and double-click on it to open.

4. The Program Files (x86) contains folders and data related to various applications installed on your personal computer.
5. Go through the list of folders, find Steam and double-click to open.
6. Inside the steam application folder, open the userdata subfolder (usually the last folder in the list)
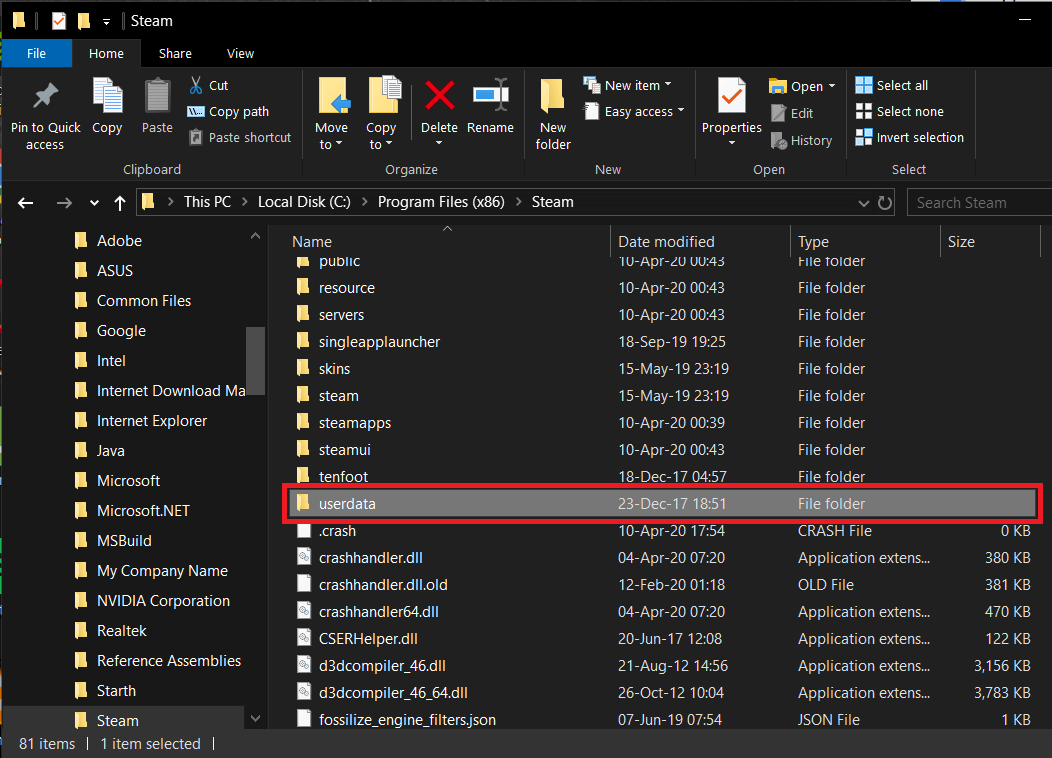
Here, you will find a bunch of subfolders labelled with a random set of numbers.
These numbers are actually the Steam ID which in itself is unique to your Steam log. If you play multiple games on steam, each game will have its own unique steam ID and a folder with the same numerical ID assigned to it.
Check the next section to know how to retrieve your steam ID. Alternatively, you can force your way in by opening each folder and checking if the contents match your needs.
7. Once you have opened the steam ID folder you would like to access, go down the following path
Steam_ID > 760 > remote > App_ID > screenshots
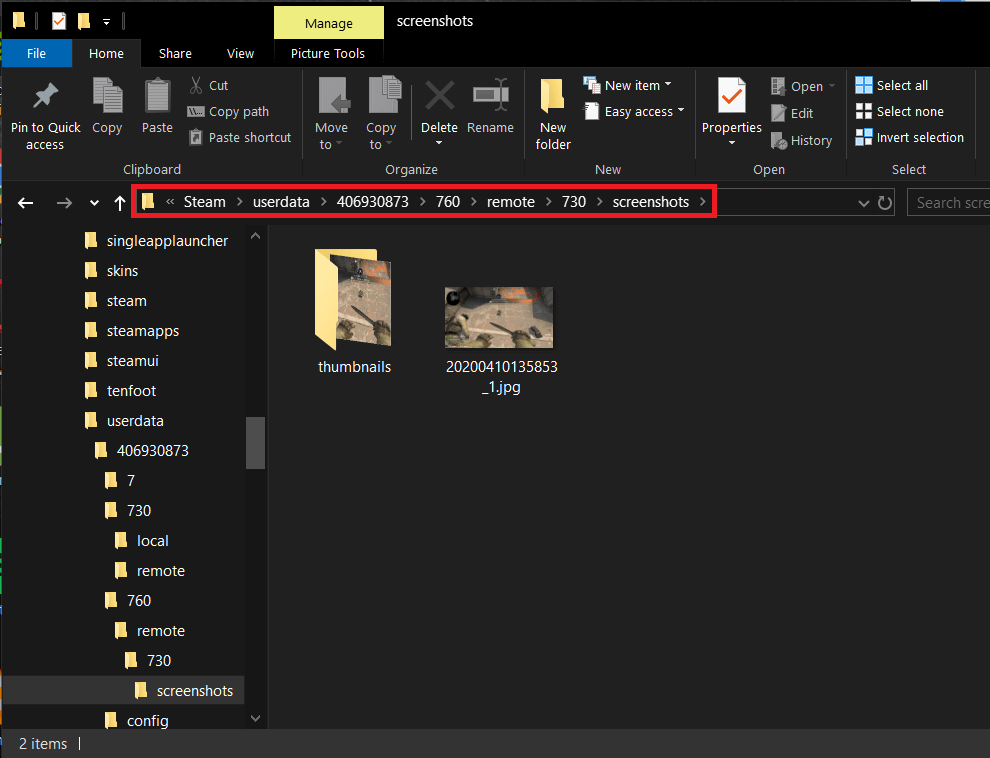
8. Here you will find all the screenshots you took.
This is how you can easily access Steam Screenshot Folder on Windows 10, but what if you want to find your Steam ID or change the default steam screenshot folder? That can be easily done, just follow the below-listed steps.
How to find your Steam ID?
Physically accessing screenshots requires you to know your Steam ID. Fortunately, retrieving your steam ID is quite easy and can be done via the Steam client.
1. Launch Steam by any method mentioned in the first step of the first method.
2. Again, click on View to open the drop-down menu and from the drop-down menu select Settings.
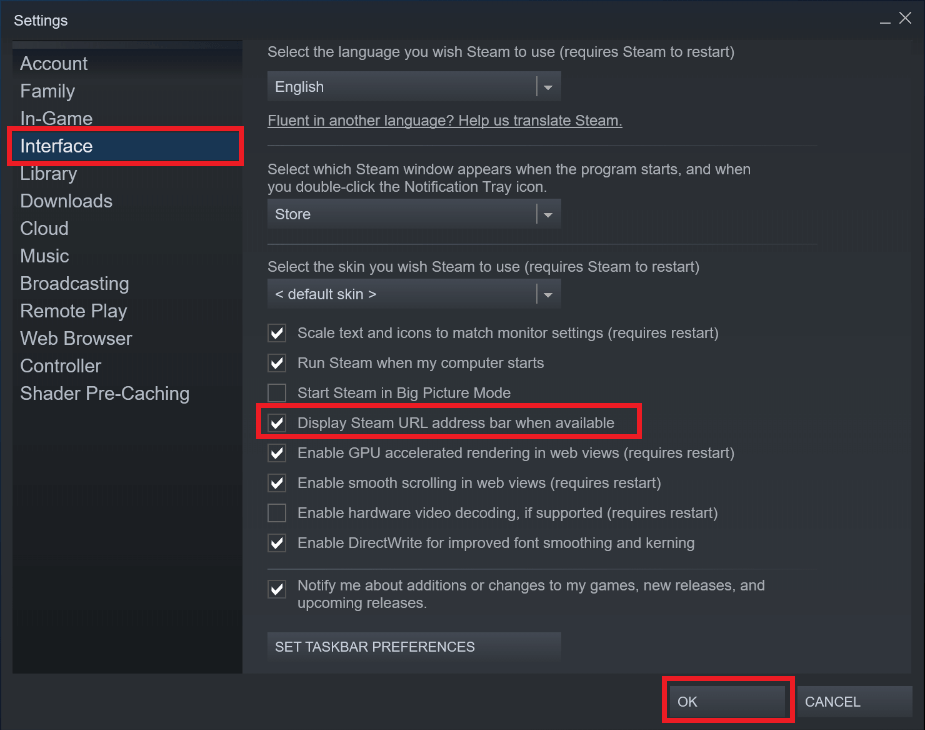
3. From the left pane, click on Interface.
4. Tick the box next to ‘Display Steam URL address bar when available’ and click on the Ok button present at the bottom of the window.
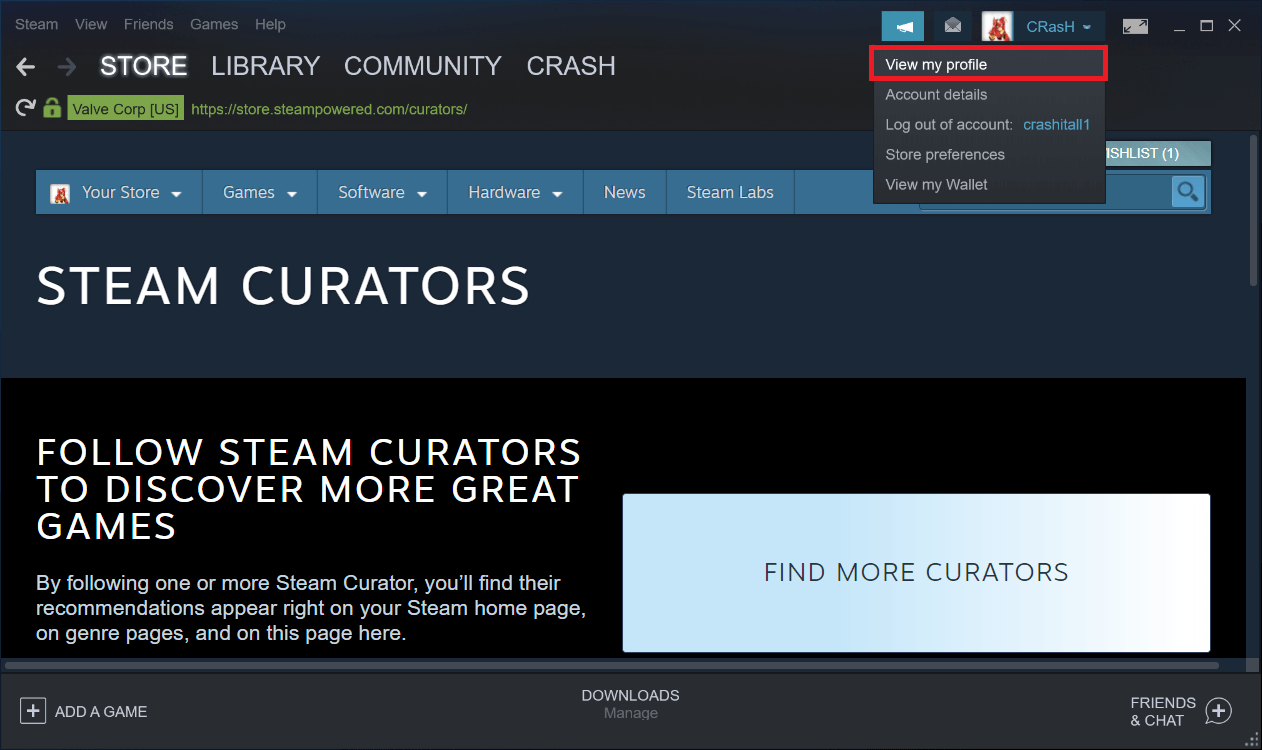
5. Click on your steam profile picture and name at the top right corner and select View My Profile.
6. Your steam ID will be included in the URL that appears below the menu containing items like Store, Library, Community, etc.
The steam ID is the numerical combination at the end of the URL after the ‘profiles/’ bit.
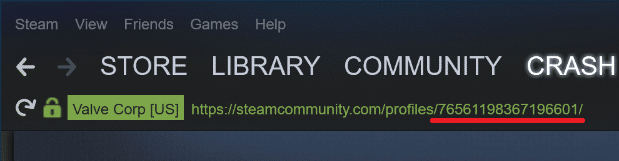
Note this number down for future purposes.
How to change the Steam Screenshot Folder?
Now that you’re were able to access Steam screenshot folder, you must think how you can change this default screenshot folder? Don’t worry Steam also gives you the option to change the location where all your screenshots get saved. This feature comes in handy if you are one of those folks who take a lot of screenshots and like having quick access to them. After all, opening steam just to access the screenshots or digging your way through multiple folders in the file explorer might be time-consuming for some. To change the steam screenshots destination folder, follow the below steps:
1. Launch Steam, click on View and select Settings.
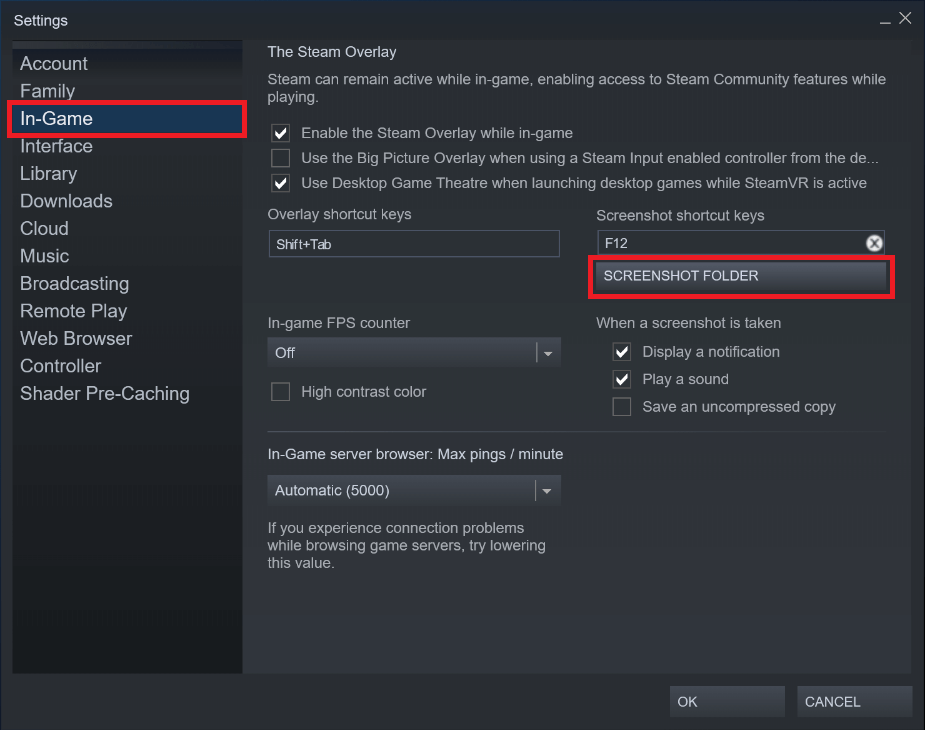
2. In the settings window, click on In-Game present on the left panel.
3. On the right panel, you should see a button labelled Screenshot folder. Click on it and select the destination folder or create a new folder where you would like all your gaming screenshots to be saved.
Finally, click on Ok to save all the changes you made.
Recommended:
We hope you were able to find the Steam screenshot folder and the particular screenshot you were looking for. If you have any other doubts following any of the guides mentioned in this article then let us know in the comments below and we will get back to you.