How to Run File Explorer as Administrator in Windows 11

Sometimes, you might find yourself in a rabbit hole in the Windows folder. While you are at it, you are bombarded with the User Account Control (UAC) prompt every time you try to access a new folder. This can be exhausting and makes you wonder how to get rid of it. So the simplest solution to your woes is to run file explorer as an admin. So, today we are going to show you how to run File Explorer as Administrator in Windows 11.
How to Run File Explorer as Administrator in Windows 11
There are three methods to run File Explorer as Administrator on Windows 11. They are explained below.
Method 1: Run as Admin in File Explorer
Follow the steps below to run file explorer as admin through File Explorer itself:
1. Press Windows + E keys together to open File Explorer window.
2. Type C:Windows in the address bar, as shown, and press the Enter key.

3. In the Windows folder, scroll down and right-click on explorer.exe and select Run as administrator, as depicted below.
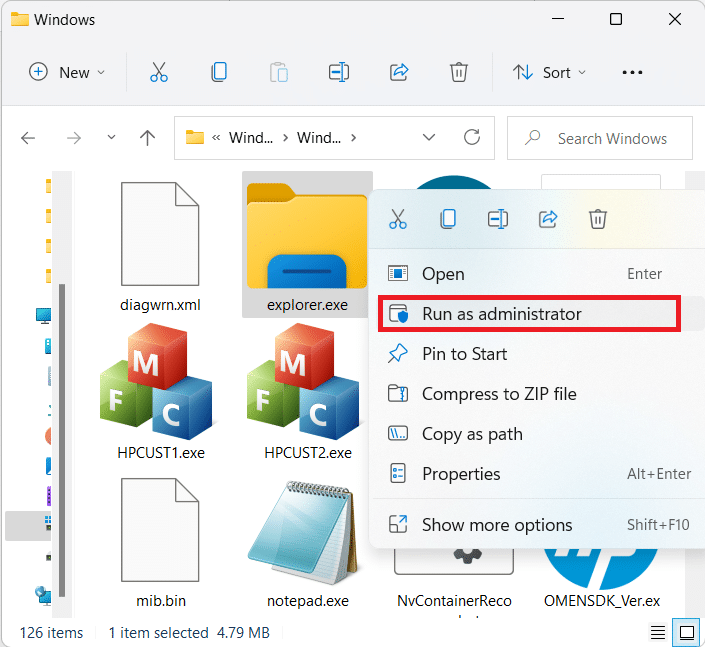
4. Click on Yes in the User Account Control (UAC) prompt to confirm.
Also Read: How to Hide Recent Files and Folders on Windows 11
Method 2: Run Process in Task Manager
Another way to run File Explorer as Administrator in Windows 10 is through Task Manager.
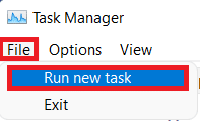
1. Press Ctrl + Shift + Esc keys together to open Task Manager.
2. In the Task Manager window, click on File in the menu bar and select Run New Task from the File menu.
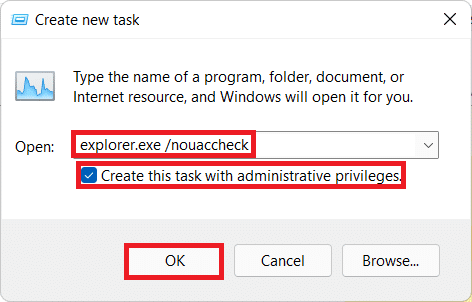
3. In the Create new task dialog box, type explorer.exe /nouaccheck.
4. Check the box titled Create this task with administrative privileges and click on OK, as illustrated below.
5. A new File Explorer window will appear with elevated permissions.
Also Read: How to Create a Local Account in Windows 11
Method 3: Run Command in Windows PowerShell
Furthermore, you can use Windows PowerShell to run file explorer as administrator on Windows 11:
1. Click on the Search icon and type Windows PowerShell. Then, click on Run as administrator.

2. Click on Yes in the User Account Control (UAC) prompt.
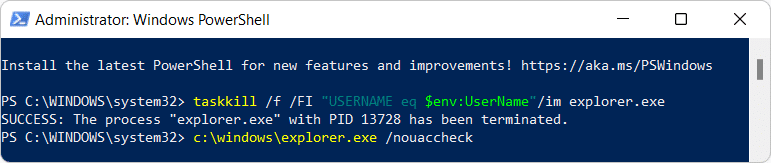
3. In the Windows PowerShell window, type the following command and hit Enter:
taskkill /f /FI "USERNAME eq $env:UserName"/im explorer.exe
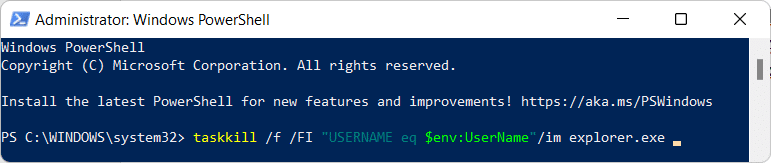
4. You should receive SUCCESS: The process “explorer.exe” with PID has been terminated message.
5. Once the said message appears, type c:windowsexplorer.exe /nouaccheck and press the Enter key, as depicted.
Recommended:
Hope this article helped to answer how to run File Explorer as Administrator in Windows 11. If you have any suggestions or queries about this article, reach out to us in the comment section down below. We post new tech-related articles daily so stay tuned.