Fix NVIDIA Control Panel Missing in Windows 10

Be it for an avid gamer or a normal computer user, the NVIDIA graphics card always holds a special place. This GPU application was developed and launched by NVIDIA corporation, a leading tech product manufacturer in the world. Generally, an NVIDIA GPU is added to your system to experience high performance and powerful graphics. Here, NVIDIA Control Panel app enables you to control and access the settings, properties, and functioning of the graphics card. But what happens when you are unable to open or even find the NVIDIA control panel app out of the blue? It leaves you worried. Roll up the sleeves everybody who is struggling with this issue! This article will guide you to fix the NVIDIA control panel missing Windows 10 problem. So, continue reading to fix NVIDIA control panel display settings missing issue.
How to Fix NVIDIA Control Panel Missing in Windows 10
Various reasons can be listed for missing NVIDIA Control Panel app in Windows 10. But note these reasons are not the direct cause of the issue which means only the possible outcomes or scenarios that led to this issue are compiled together.
- Presence of outdated, corrupted, or incompatible driver cause errors in your graphics card.
- The recent Windows 10 update might not be compatible with the NVIDIA Driver. Thus, you need to roll it back to the earlier version.
- When the files get damaged in the NVIDIA Control Panel application, it gets corrupt.
- Other common bugs and errors may cause trouble with this particular issue.
Before proceeding further, ensure to check if you have an NVIDIA chip installed on your PC. Implement the steps given below to check the presence of the NVIDIA Control Panel Windows 10 app via task manager service.
1. Press the Ctrl + Shift + Esc keys together to open Task Manager.
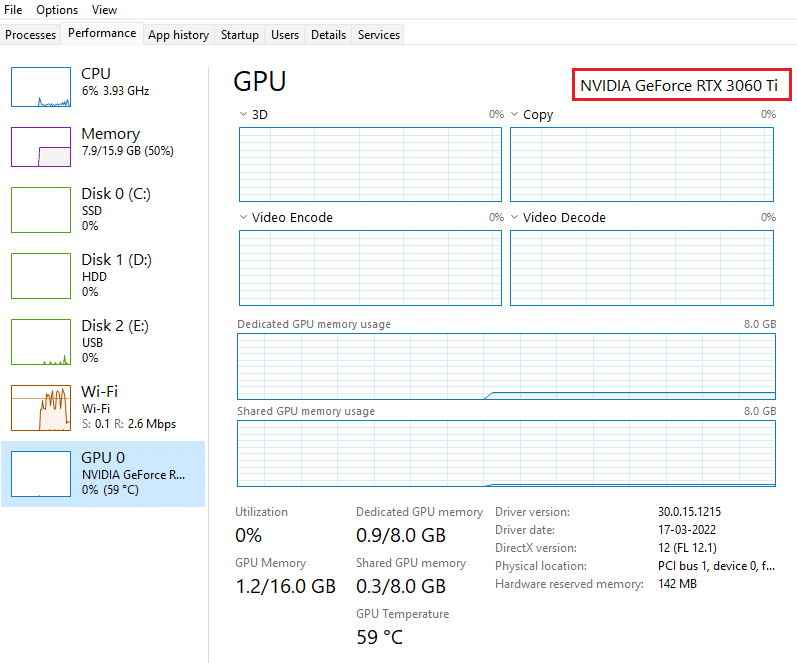
2. On the Task Manager window, switch to the Performance tab and select GPU 0 or GPU 1 on the left pane.
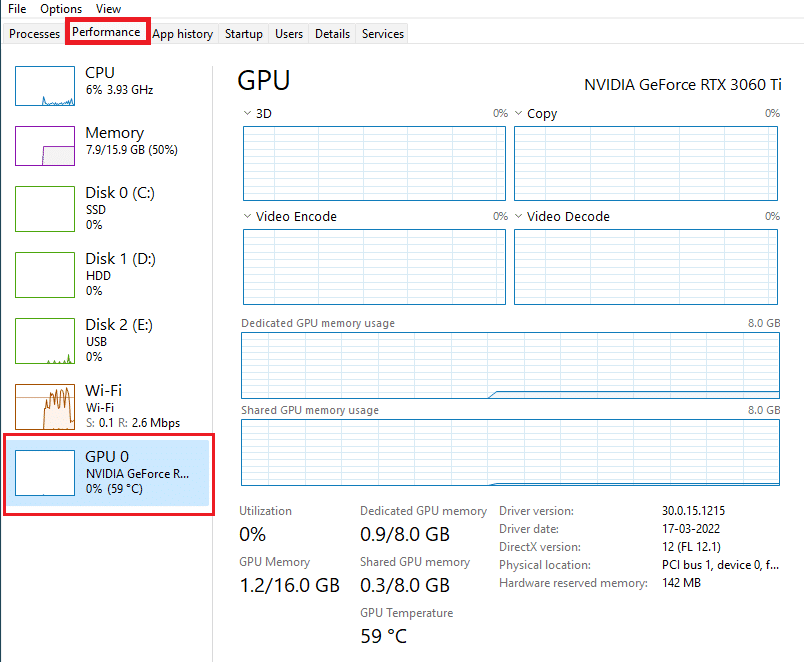
3. On the right pane of GPU, see the graphics card model name present at the top right corner of the page. If it starts with NVIDIA, then the NVIDIA Control Panel should be available on your computer.
After the check, if the NVIDIA driver graces you with its presence and only the NVIDIA Control Panel is missing then you can follow the troubleshooting methods mentioned below to fix this issue.
Method 1: Roll Back Windows Update
The eye to updating your Windows 10 operating system is an appreciative effort. But sometimes it is possible that your graphics driver might not be compatible with the latest release or upgraded version of Windows. Thus, revert your latest windows update from your system to resolve the NVIDIA control panel missing Windows 10 issue.
1. Press the Windows + I keys to launch Settings.
2. Select Update & Security.
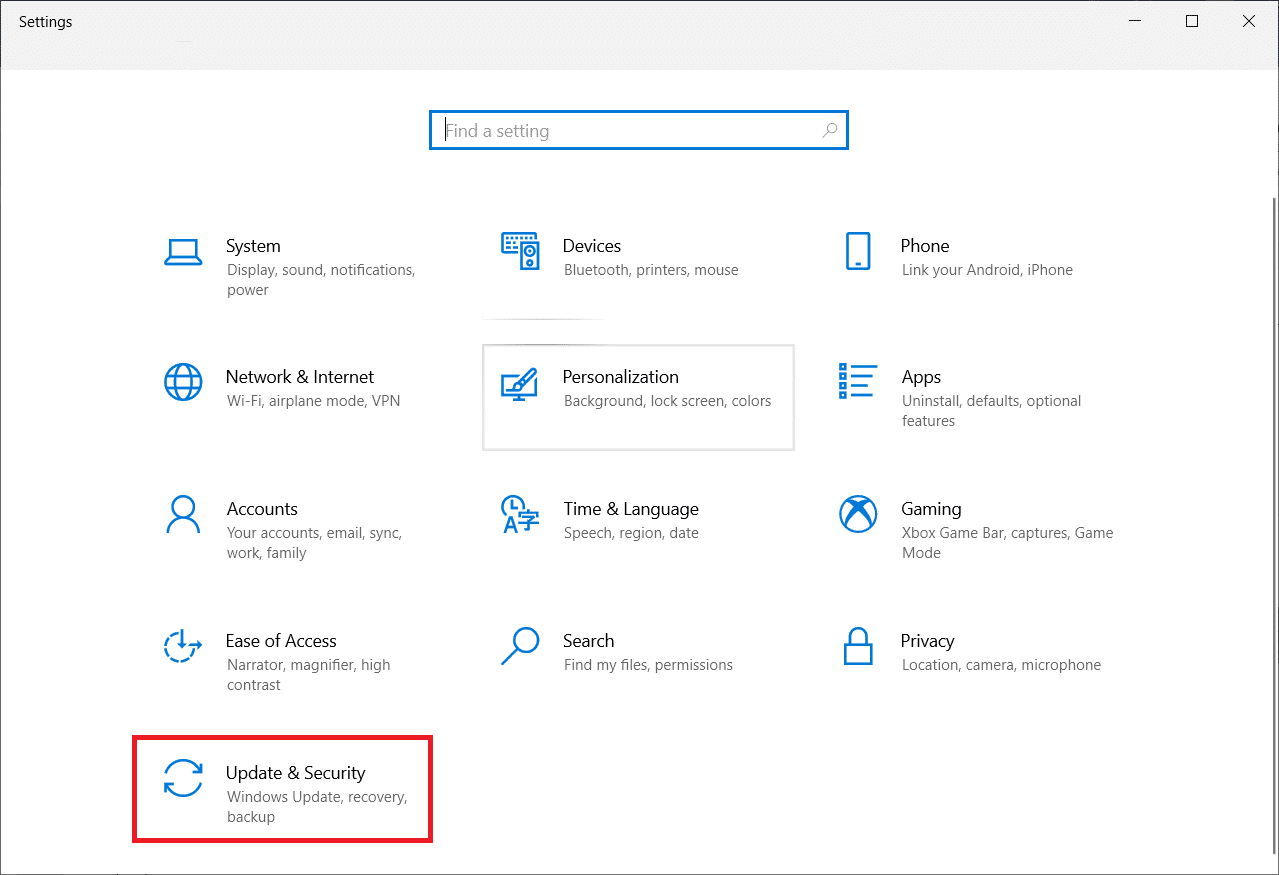
3. Select Recovery from the left pane.
4. Click on Get started button.
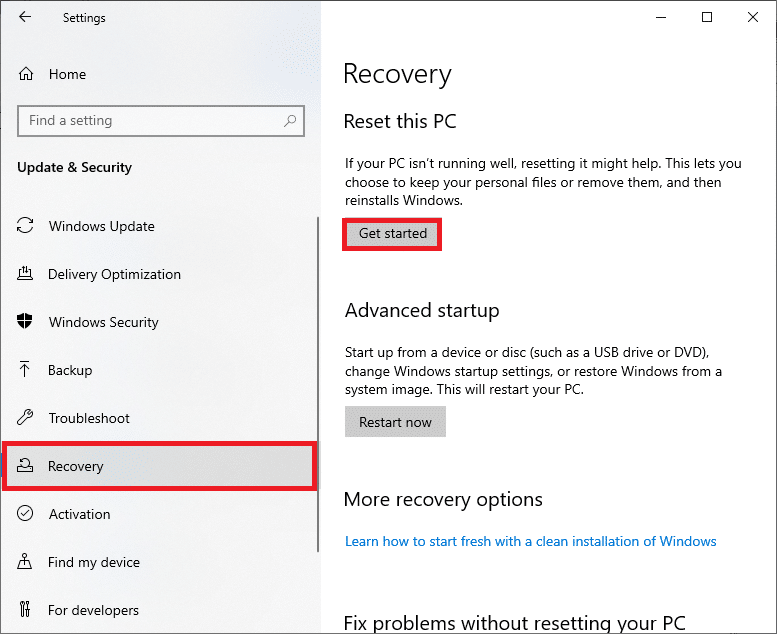
5. Follow the on-screen instruction and your Windows will roll back to the previous version.
Method 2: Unhide NVIDIA Control Panel
Unknowingly sometimes if you hide the NVIDIA Control Panel, it goes missing. Rarely, it is also possible that your Windows 10 or a third-party application hide the icon. Thus, it might look like it’s missing. Perform the steps given below and unhide the NVIDIA Control Panel.
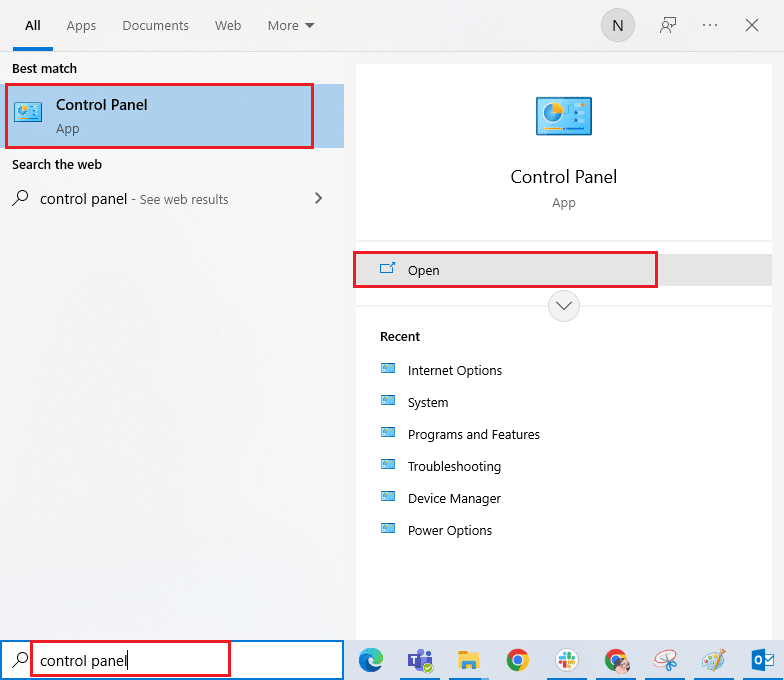
1. Press Windows key, type control panel and click on Open.
2. Here, set View by as Large icons, then select NVIDIA Control Panel from the list of items.
3. Select the Desktop menu present at the top.
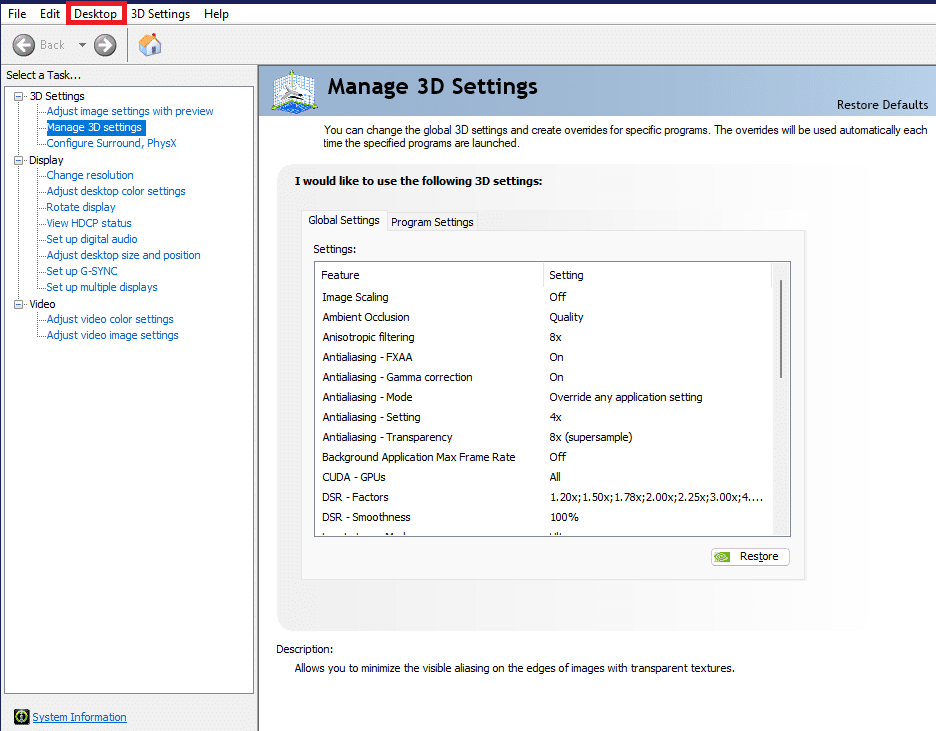
4. Under the Desktop menu, ensure Add Desktop Context Menu and Show Notification Tray Icon options are enabled. If not, check to mark it.
![]()
5. Finally, close the NVIDIA Control Panel application and try opening it via Desktop or system tray.
Also Read: Fix NVIDIA Control Panel Not Opening
Method 3: Restart NVIDIA Services
Various services are running constantly in the background to make other apps run smoothly. Therefore, restart all the NIVIDIA-related services to make its control panel appear again. Here is how to do it and resolve the NVIDIA control panel display settings missing issue.
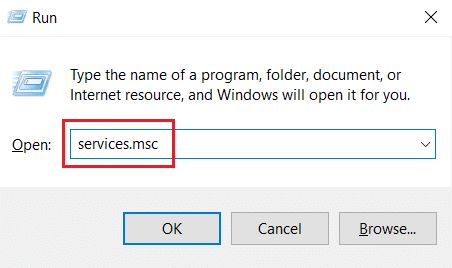
1. Press the Windows + R keys together to launch the Run dialog box.
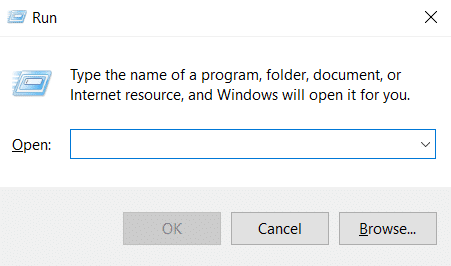
2. Type services.msc and press Enter key to open the Services window.
3. On the Services windows, locate services that start with the name NVIDIA. Right-click each such service and select Restart from the context menu.
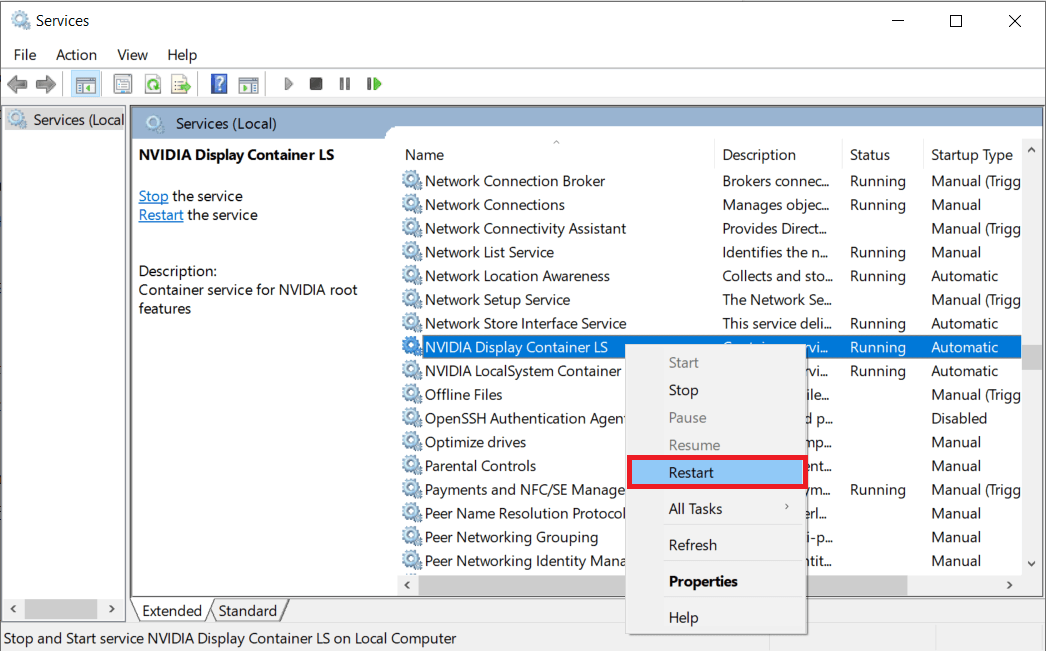
4. If the service is not running, then right-click it once again and click on Start.
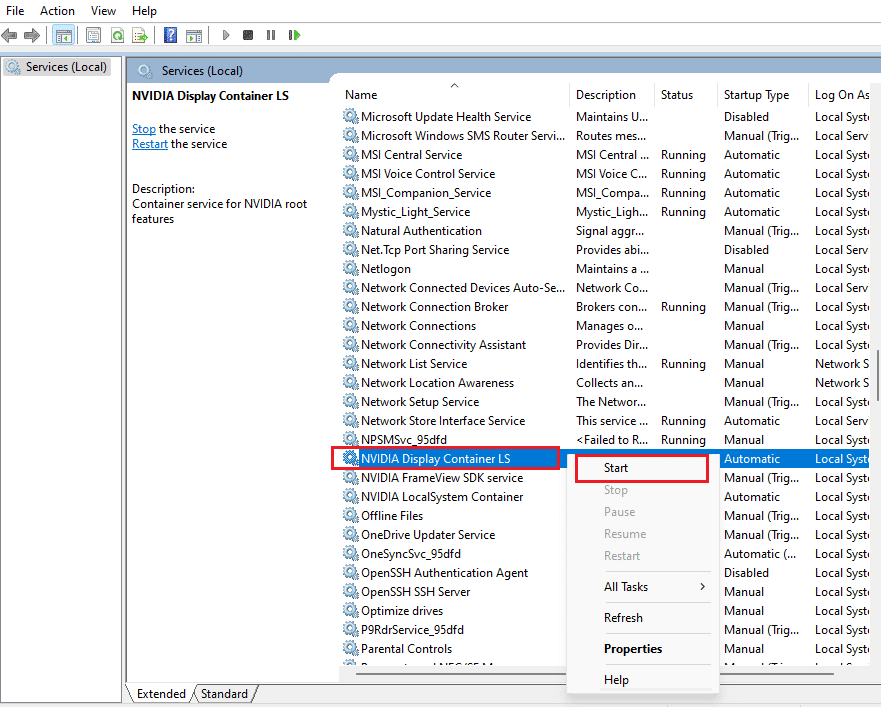
5. Repeat steps 3 and 4 for restarting the following services as well:
- NVIDIA LocalSystem Container
- NVIDIA NetworkService Container
- NVIDIA Telemetry Container
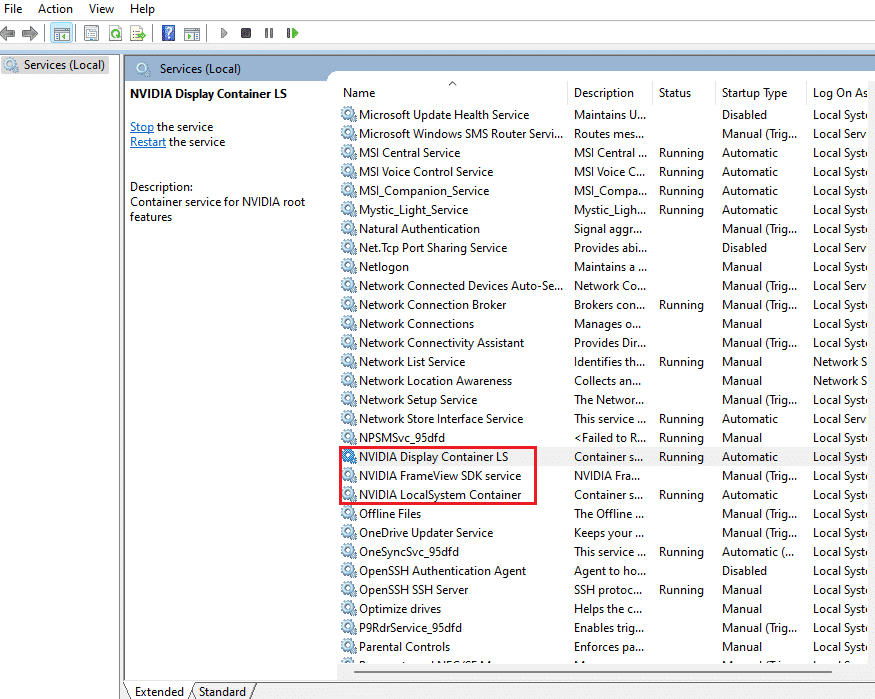
Check if this method brings back the NVIDIA Control Panel app. If not, don’t lose hope yet. Try the next solution to rectify the NVIDIA control panel missing Windows 10 problem.
Method 4: Update NVIDIA Graphics Driver
The graphic driver is an essential feature of any online game or computer itself. The GPU manufacturers often release updates and features. Also, to avoid any kind of technical problems like flickering screen, improper display working, screen on/off, and so forth, it is necessary to update the graphic driver as they are responsible for the efficiency and performance of the computer. So, update the graphic driver and see if this update works out. Read our guide on 4 ways to update graphic drivers in Windows 10.

Also Read: How to Disable or Uninstall NVIDIA GeForce Experience
Method 5: Manually Open NVIDIA Control Panel
You can force the NVIDIA Control Panel to appear by launching it manually. To do so, follow the steps given below.
1. Press the Windows + E keys simultaneously to launch File Explorer.

2. Navigate to the following location path.
C:Program FilesNVIDIA Corporation
Note: The location may vary as per your installation.
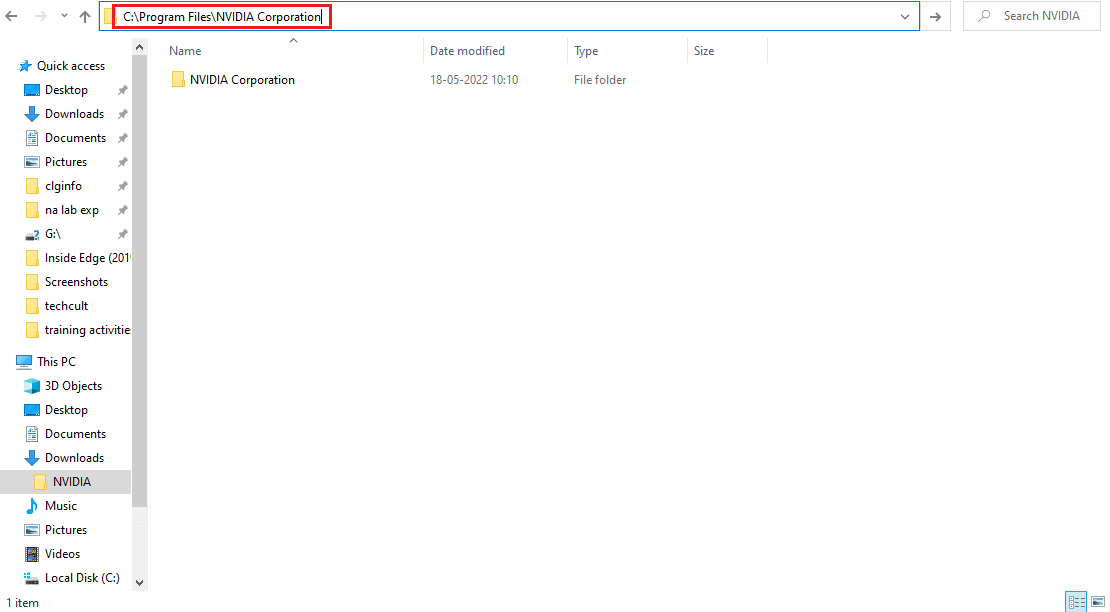
3. Double-click and open the Control Panel Client folder. Locate and right-click the nvcplui.exe file. Then, select Run as administrator from the context menu.
Check if the NVIDIA Control Panel missing Windows 10 is found again.
Method 6: Do Not Overclock GPU
Overclocking GPU removes the limitation of the graphics card and enables it to carry out above its safety limit. Thus, this process may cause an error sometimes. Therefore, it is necessary not to cross the limit. This is because going forward the limitation might stop the functioning of your graphics card. And this overclocked GPU could be the reason behind the missing NVIDIA Control Panel. Though the direct cause is not found, many users disclosed that reducing GPU overclock enabled the NVIDIA Control Panel to be visible again.
Also Read: What is NVIDIA Virtual Audio Device Wave Extensible?
Method 7: Modify Compatibility Settings
If the error repeats often even after rectifying it, then NVIDIA Support provided us with a permanent solution. Follow the steps given below to modify compatibility settings and fix NVIDIA control panel display settings missing issue.
1. Press the Windows + E keys together to open File Explorer.
2. Navigate to the following location.
C:Program FilesNVIDIA CorporationDisplay.NvContainer
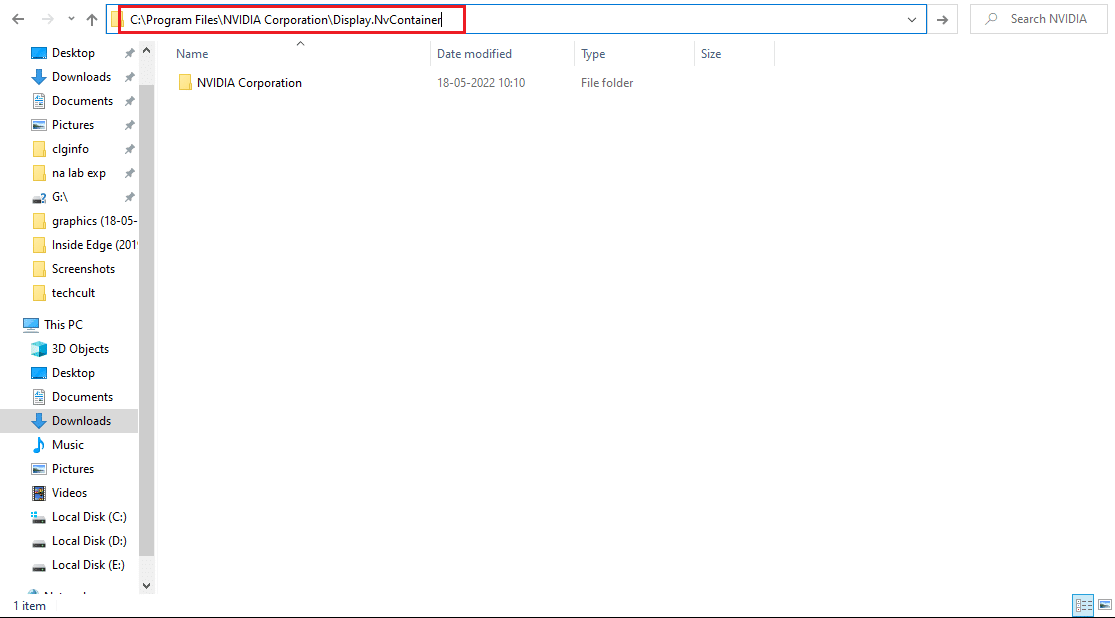
3. On the Display.NvContainer folder, locate the file Display.NvContainer. Right-click on it and select Copy from the context menu.
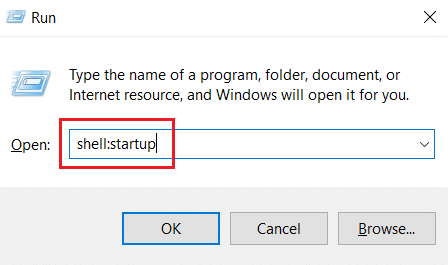
4. Press Windows + R keys together to launch the Run dialog box.

5. Type shell:startup and hit Enter key to launch the Startup folder.
6. On the folder, press Ctrl + V keys simultaneously to paste the copied folder.
7. Then, right-click the copied Display.NvContainer folder and select Properties from the context menu.
8. On the Properties window, go to the Compatibility tab. Now, check the Run this program as administrator box under the Settings section. Select Apply and then click OK to save the changes made.
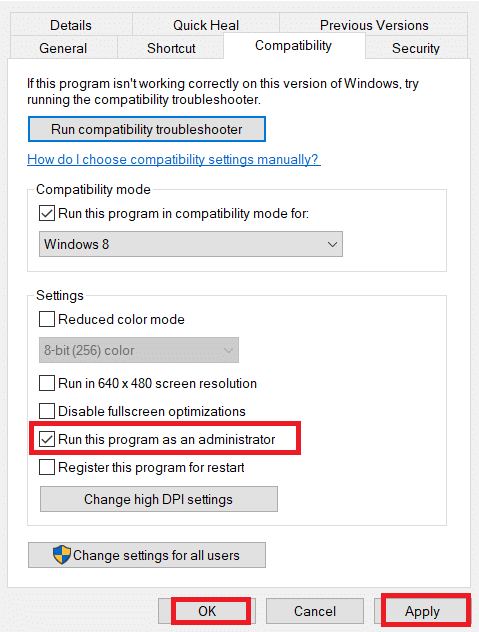
Check if the NVIDIA control panel display settings missing in your Windows 10 are fixed.
Method 8: Reinstall NVIDIA Graphics Driver
None of the above solutions worked out? Do not worry. You have one final method to work out. It is to try and reinstall the NVIDIA Control Panel application. Here is how to uninstall and reinstall the application.
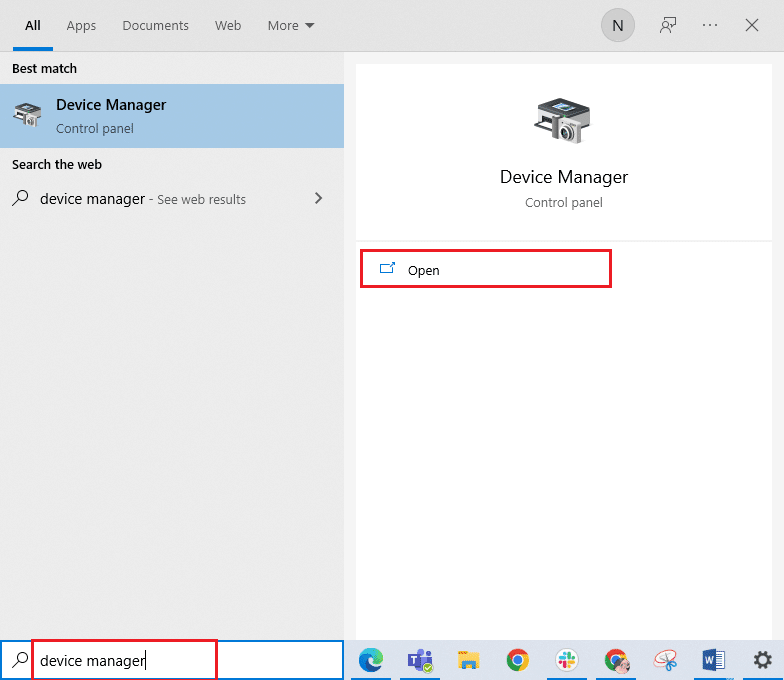
1. Hit the Windows key, type device manager, and click on Open.
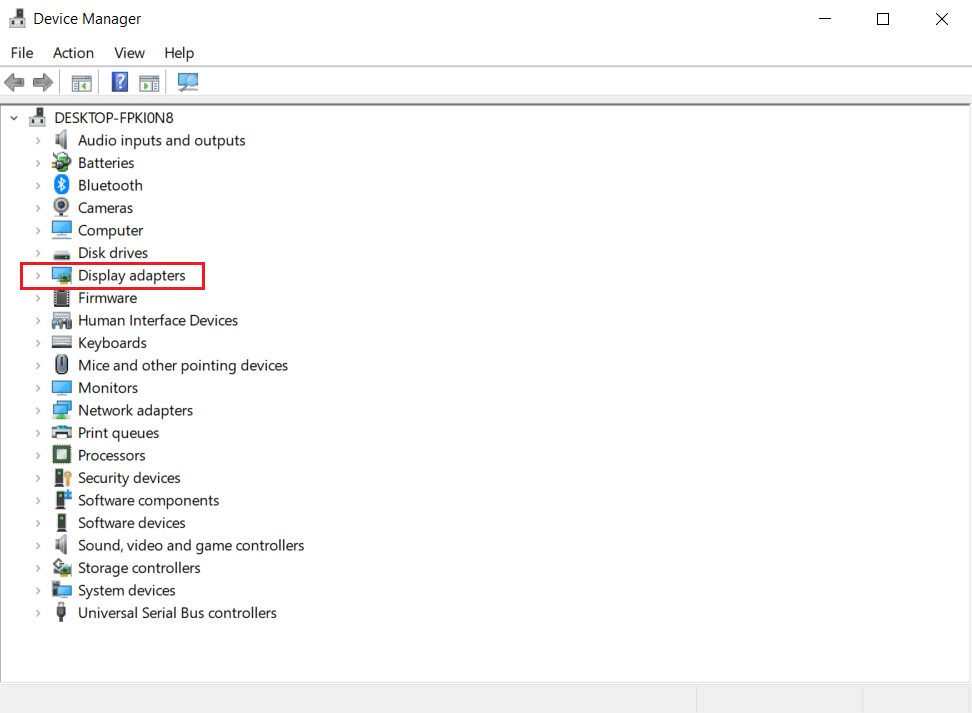
2. Double-click on Display adapters to expand the driver.
3. Here, right-click the NVIDIA graphics driver or adapter and select Uninstall device in the context menu.
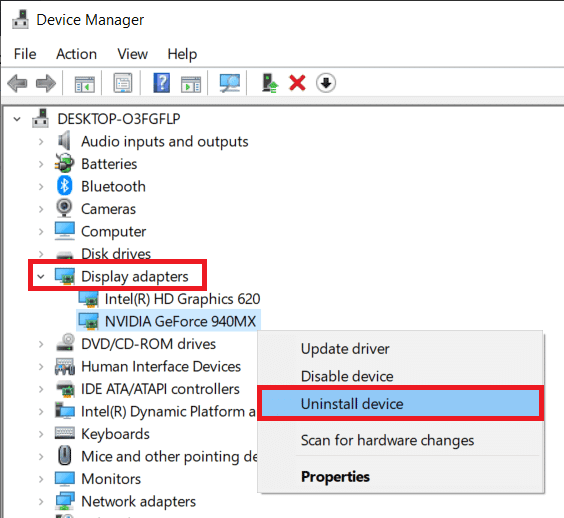
4. Follow the on-screen instructions to uninstall the driver and restart the PC.
5. Go to the NVIDIA drivers download page and fill up the NVIDIA adapter model details and select Search.
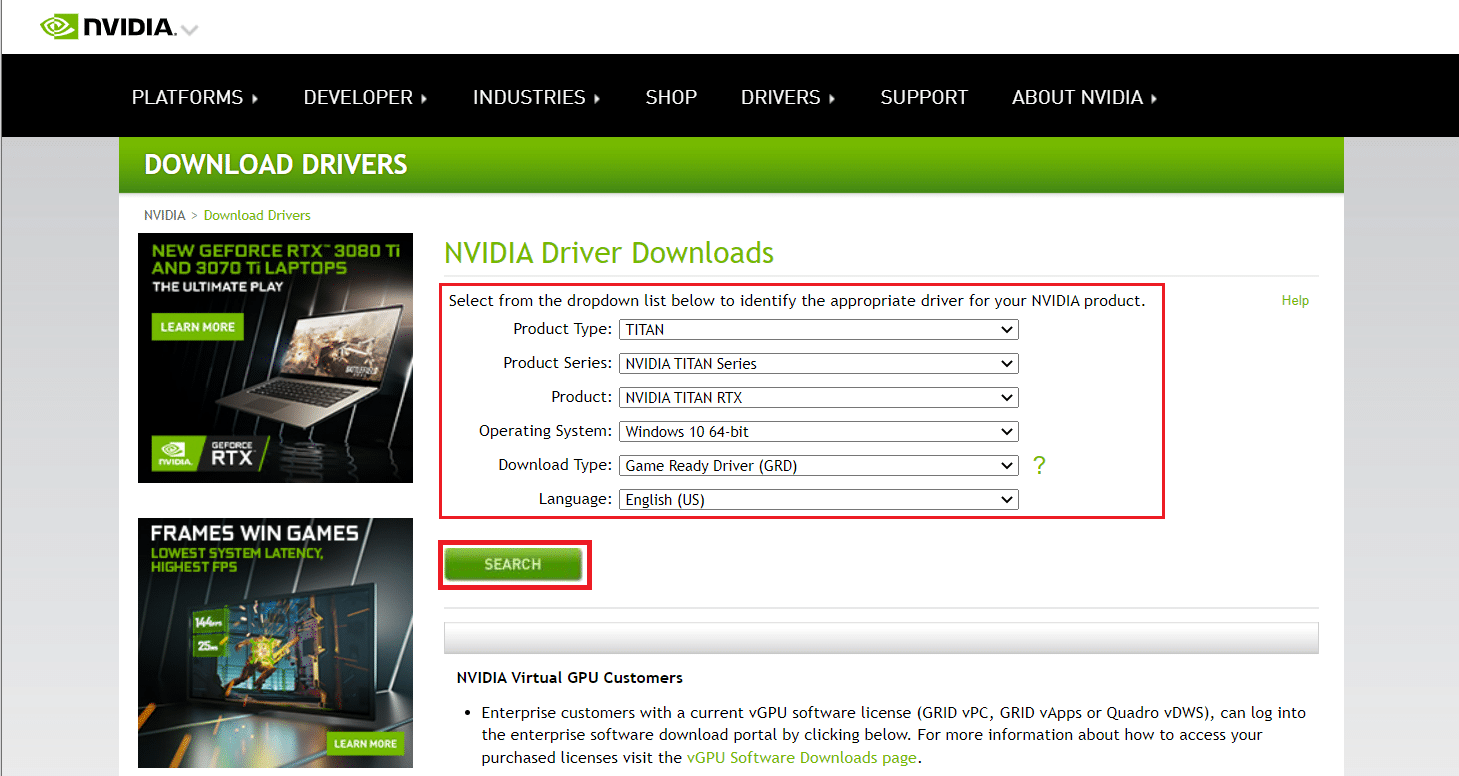
6. On the new page, click Download to download the installation wizard.
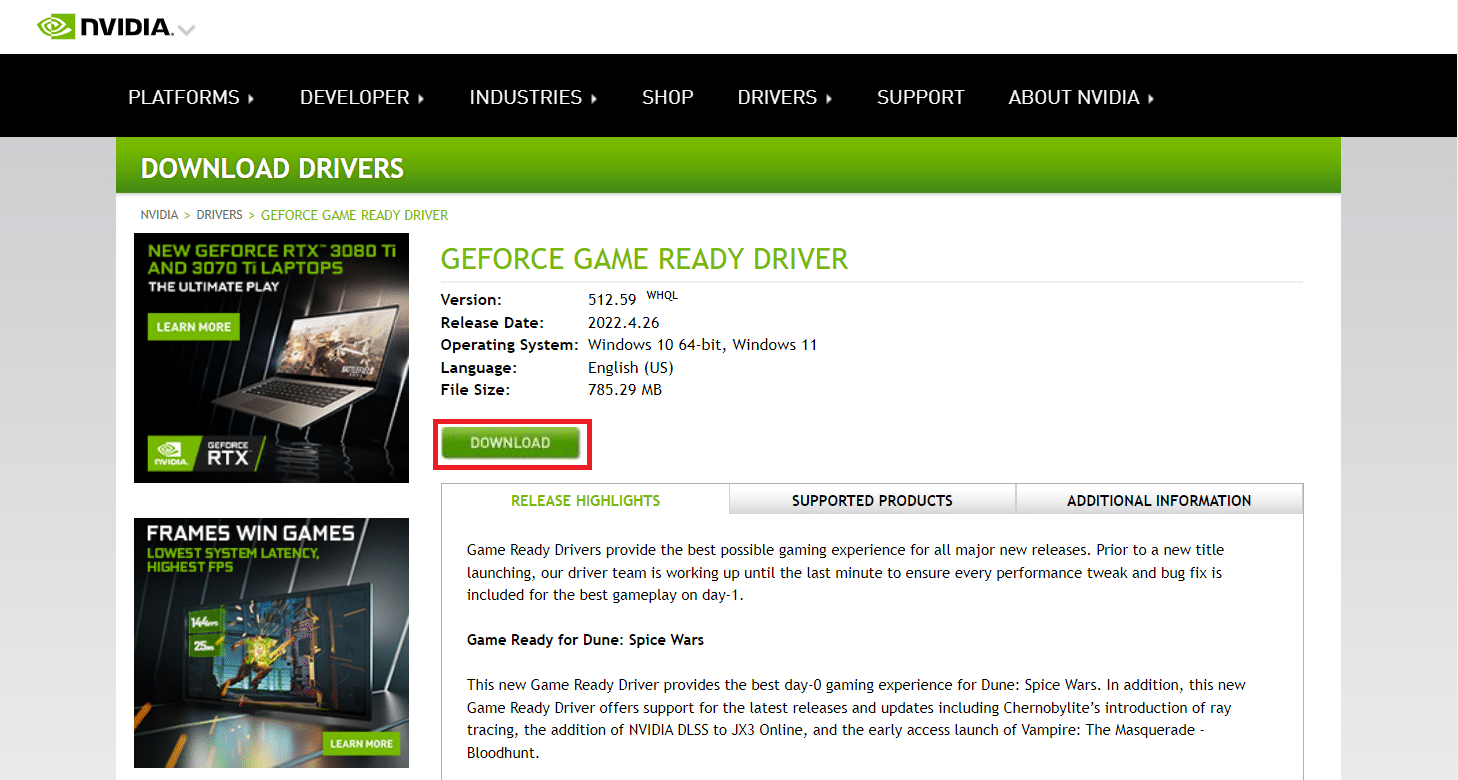
7. Once downloaded, run the setup file and install the driver on your system.
8. Finally, reboot your PC and see if you can find NVIDIA Control Panel on the desktop or system tray.
Also Read: How to Disable or Uninstall NVIDIA GeForce Experience
Pro Tip: How to Install NVIDIA Control Panel App
To install NVIDIA Control App from Microsoft Store, implement the steps given below:
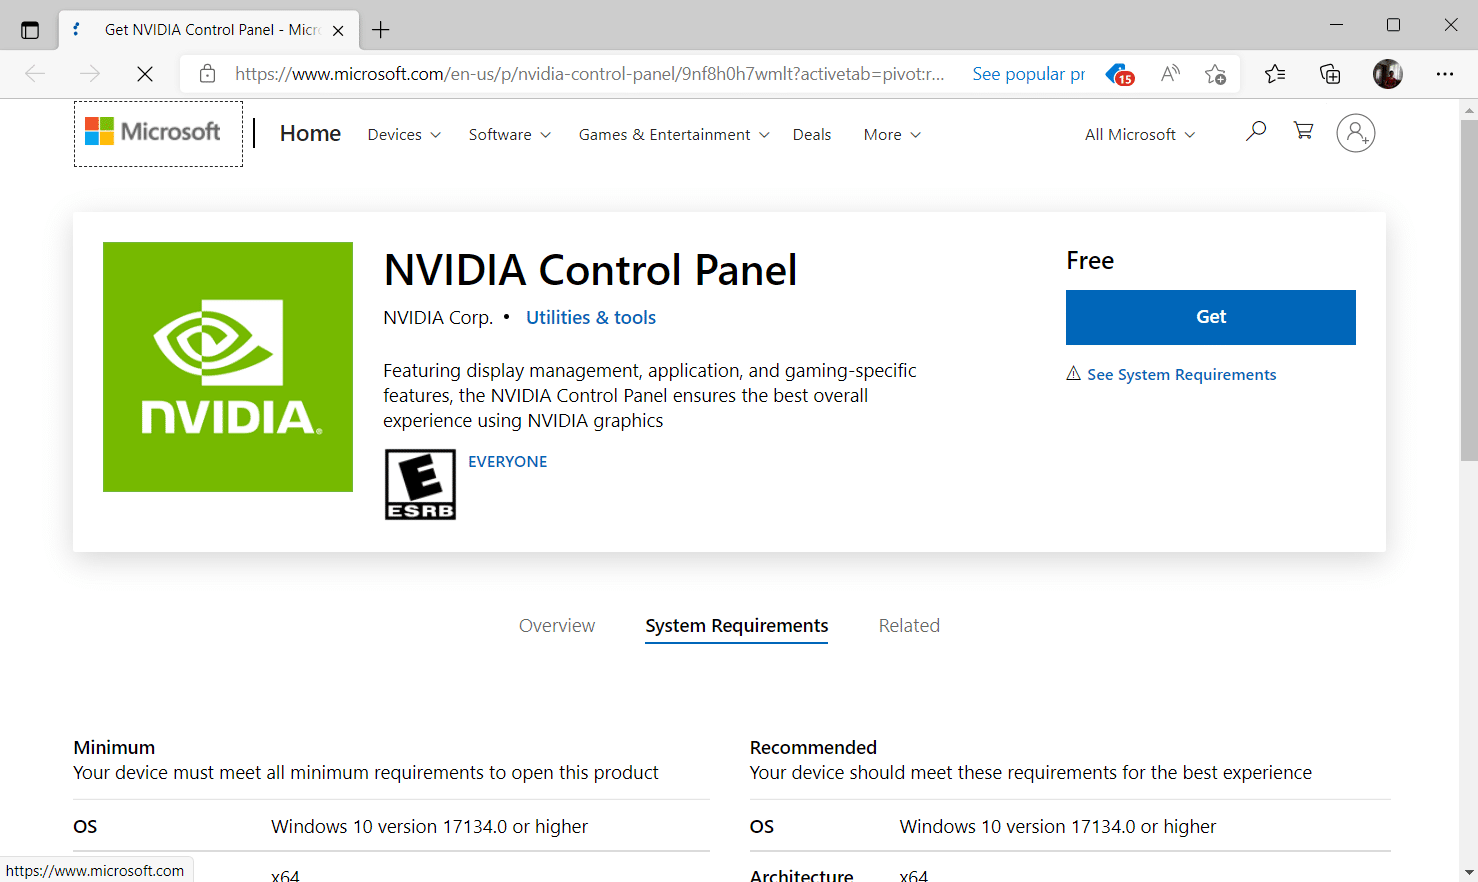
1. Go to the NVIDIA Control Panel Microsoft store page.
Note: Ensure all the system requirements are met.
2. Select the Get button to install the application.
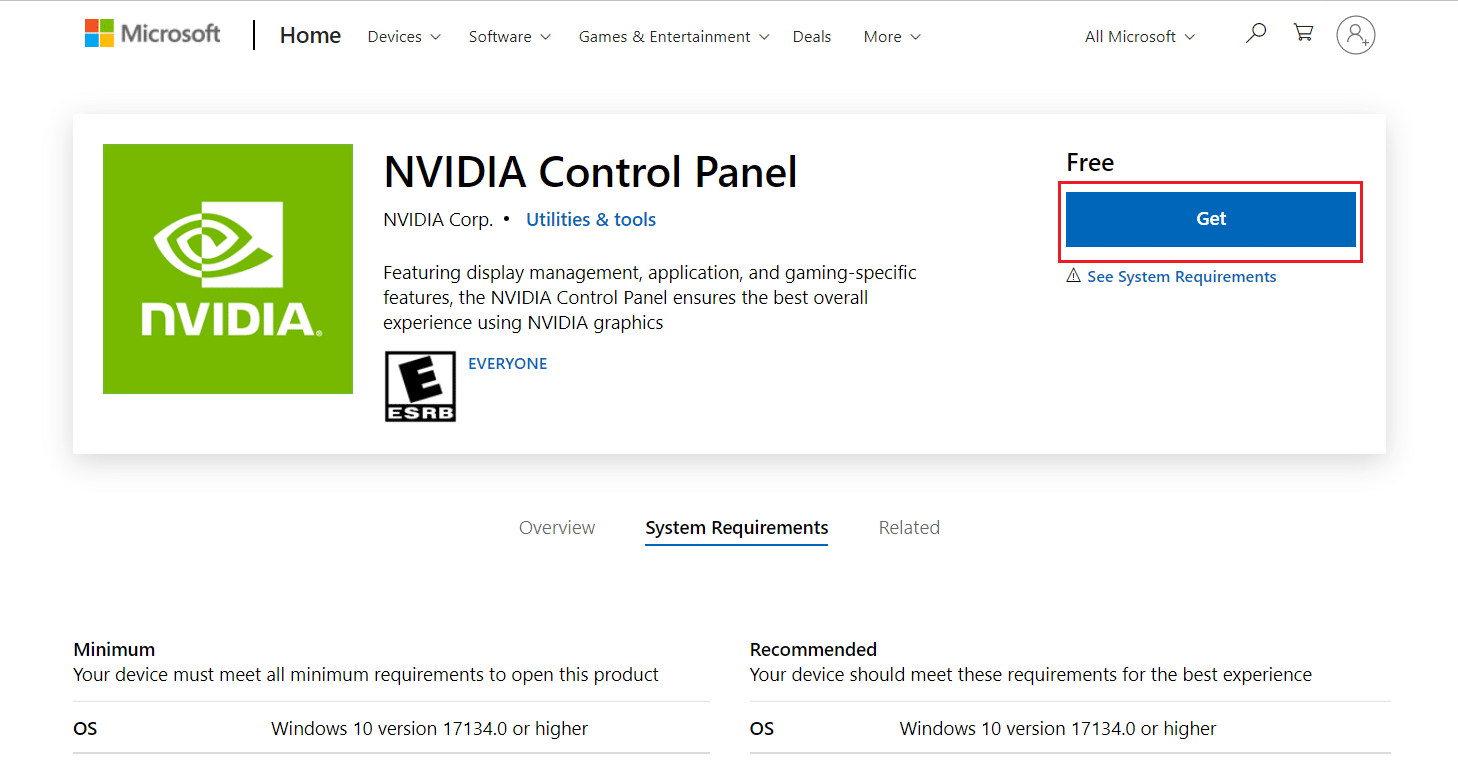
Check if the NVIDIA control panel missing Windows 10 issue still exists.
Recommended:
We hope this guide was helpful and you were able to fix NVIDIA control panel missing in Windows 10. Let us know which method worked the best. Please feel free to reach out to us for any queries or suggestions via the comment section given below. Also, let us know what you want to learn next.