Disable Auto Arrange in Folders in Windows 10
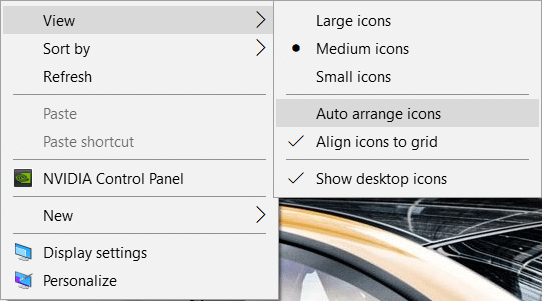
If you try to re-arrange files or folders in Explorer in Windows 10, then you will see that they will be automatically auto-arranged and aligned to a grid. In previous Windows versions, you could freely arrange icons inside folders in Explorer, but this feature is not available in Windows 10. By default, you could not disable auto arrange and align to grid option in Windows 10 File Explorer but don’t worry as in this post we will show you how to disable auto arrange in Folders in Windows 10.
Disable Auto Arrange in Folders in Windows 10
Make sure to create a restore point just in case something goes wrong.
Step 1: Reset all the folder views and customizations
1. Press Windows Key + R then type regedit and hit Enter to open Registry Editor.
2. Navigate to the following registry key:
HKEY_CURRENT_USERSoftwareClassesLocal SettingsSoftwareMicrosoftWindowsShell
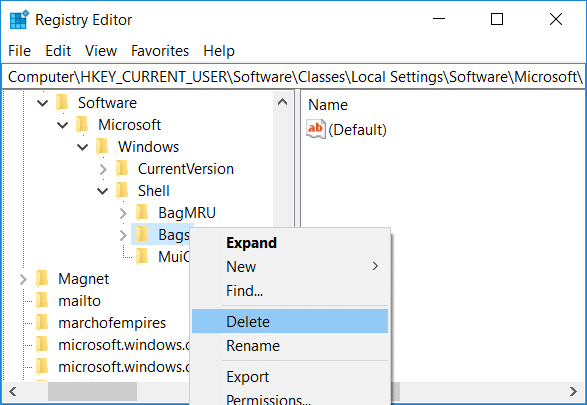
3. Make sure to expand Shell, where you would find a sub-key named Bags.
4. Next, right-click on Bags then select Delete.
5. Similarly go to the following locations and delete the Bags sub-key:
HKEY_CURRENT_USERSoftwareMicrosoftWindowsShell
HKEY_CURRENT_USERSoftwareMicrosoftWindowsShellNoRoam
6. Now restart Windows Explorer to save the changes, or you could restart your PC.
Step 2: Disable Auto Arrange in Folders in Windows 10
1. Open Notepad then copy & paste the following as it is:
REM --- 1. Step: Add keys
REM --- 1a for General Folders
REG ADD "HKCUSoftwareClassesLocal SettingsSoftwareMicrosoftWindowsShellBagsAllFoldersShell{5C4F28B5-F869-4E84-8E60-F11DB97C5CC7}" /v FFlags /t REG_DWORD /d 0x43000001 /f
REG ADD "HKCUSoftwareClassesLocal SettingsSoftwareMicrosoftWindowsShellBagsAllFoldersShell{5C4F28B5-F869-4E84-8E60-F11DB97C5CC7}" /v Mode /t REG_DWORD /d 0x00000004 /f

REM --- 1b for Documents Folders
REG ADD "HKCUSoftwareClassesLocal SettingsSoftwareMicrosoftWindowsShellBagsAllFoldersShell{7D49D726-3C21-4F05-99AA-FDC2C9474656}" /v FFlags /t REG_DWORD /d 0x43000001 /f
REG ADD "HKCUSoftwareClassesLocal SettingsSoftwareMicrosoftWindowsShellBagsAllFoldersShell{7D49D726-3C21-4F05-99AA-FDC2C9474656}" /v Mode /t REG_DWORD /d 0x00000004 /f

REM --- 1c for Music Folders
REG ADD "HKCUSoftwareClassesLocal SettingsSoftwareMicrosoftWindowsShellBagsAllFoldersShell{94D6DDCC-4A68-4175-A374-BD584A510B78}" /v FFlags /t REG_DWORD /d 0x43000001 /f
REG ADD "HKCUSoftwareClassesLocal SettingsSoftwareMicrosoftWindowsShellBagsAllFoldersShell{94D6DDCC-4A68-4175-A374-BD584A510B78}" /v Mode /t REG_DWORD /d 0x00000004 /f

REM --- 1d for Picture Folders
REG ADD "HKCUSoftwareClassesLocal SettingsSoftwareMicrosoftWindowsShellBagsAllFoldersShell{B3690E58-E961-423B-B687-386EBFD83239}" /v FFlags /t REG_DWORD /d 0x43000001 /f
REG ADD "HKCUSoftwareClassesLocal SettingsSoftwareMicrosoftWindowsShellBagsAllFoldersShell{B3690E58-E961-423B-B687-386EBFD83239}" /v Mode /t REG_DWORD /d 0x00000004 /f

REM --- 1e for Videos Folders
REG ADD "HKCUSoftwareClassesLocal SettingsSoftwareMicrosoftWindowsShellBagsAllFoldersShell{5FA96407-7E77-483C-AC93-691D05850DE8}" /v FFlags /t REG_DWORD /d 0x43000001 /f
REG ADD "HKCUSoftwareClassesLocal SettingsSoftwareMicrosoftWindowsShellBagsAllFoldersShell{5FA96407-7E77-483C-AC93-691D05850DE8}" /v Mode /t REG_DWORD /d 0x00000004 /f

REM --- 2. Step: Export everything under the key AllFolders in a separate file AllFolders.reg
REG EXPORT "HKCUSoftwareClassesLocal SettingsSoftwareMicrosoftWindowsShellBagsAllFolders" AllFolders.reg

REM --- 3. Step: Delete everything under the key Bags
REG DELETE "HKCUSoftwareClassesLocal SettingsSoftwareMicrosoftWindowsShellBags" /f

REM --- 4. Step: Import again exported file AllFolders.reg
REG IMPORT AllFolders.reg

REM --- 5. Step: Delete exported file AllFolders.reg
del AllFolders.reg
Source: This BAT file has been created by unawave.de.
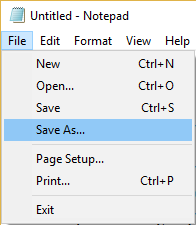
2. Now from Notepad menu, click on File then select Save as.
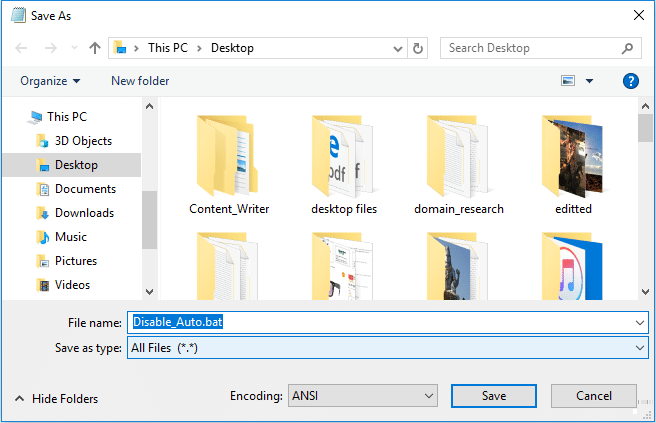
3. The “Save as type” drop-down select All Files and name the file as Disable_Auto.bat (.bat extension is very important).
4. Now navigate to where you want to save the file and click Save.
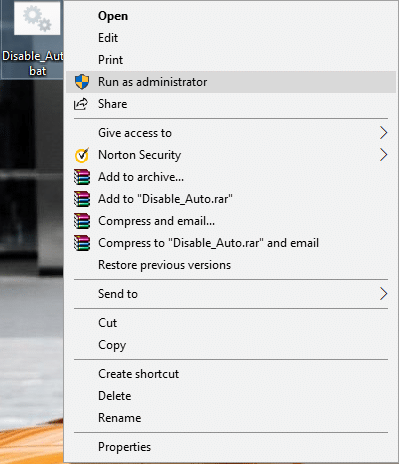
5. Right-click on the file then selects Run as administrator.
6. Restart your PC to save changes.
Step 3: Test if you can Disable Auto Arrange in Folders
1. Open File Explorer then navigate to any folder and switch the View to “Large icons“.
2. Now right-click in an empty area inside the folder then select View and make sure to click on “Auto arrange” to uncheck it.
3. Try to drag the icons freely wherever you want.
4. To undo this feature run a system restore.
Recommended:
That’s it, and you successfully learned How To Disable Auto Arrange in Folders in Windows 10 but if you still have any queries regarding this tutorial then feel free to ask them in the comment’s section.

