How to Delete Skype and Skype Account

Skype is one of the most popular Voice over Internet Protocol (VoIP) applications out there. It safe to say that millions of people use Skype on an everyday basis. With the help of skype, you can call your friend and family who are thousands of miles apart, with just a click and have lifelike conversations with them. There are other uses of Skype such as online interviews, business calls, meetings, etc.
Skype: Skype is a telecommunication application using which users can make free video and voice calls between computers, tablets, smartphones, and other devices using the internet. You can also make group calls, send instant messages, share files with others, etc. You can also make phones call using skype but that is chargeable with very low rates.
Skype is supported by almost all platforms like Android, iOS, Windows, Mac, etc. Skype is available either using the web application or using the Skype app that you can download & install from Microsoft Store, Play Store, App Store (Apple), or Skype’s own website. If you face any issues, read how to Fix Microsoft Store Not Installing Apps here.. In order to use Skype, you just have to create a Skype account using a valid email id and a strong password. Once done, you will be good to go.
Now regardless of the ease of use or various features of the skype, there might come a time when you don’t want to use it anymore or simply you want to switch to another application. If such a case arises, you will need to uninstall skype but note that you won’t be able to delete your skype account. So what is the alternative? Well, you can always remove all your personal information from Skype, which makes it impossible for other users to discover you on skype.
In short, Microsoft makes it difficult to delete the Skype account. And it’s understandable that no company would advertise how to delete their account. With that in mind, if you are looking to delete the skype account permanently then don’t worry as in this guide we will find out how to delete Skype account without losing access to other accounts. But note that deleting a skype account permanently is a multi-step process and you need to have little patience in order to follow all the steps.
How to Delete Skype and Skype Account
How To Permanently Delete Skype Account?
Deleting the Skype account is not as easy as deleting Skype from your device. Unlike other applications, Microsoft makes it very difficult to fully remove a Skype account because Skype account is directly linked to a Microsoft account. If you’re not careful while deleting the skype account then you may lose access to your Microsoft as well which is obviously a huge loss as you won’t be able to access any Microsoft service like Outlook.com, OneDrive, etc.
Deleting Skype account permanently is a multi-step process and before doing so it is recommended to perform the below tasks:
- Unlink the Microsoft account from the Skype account.
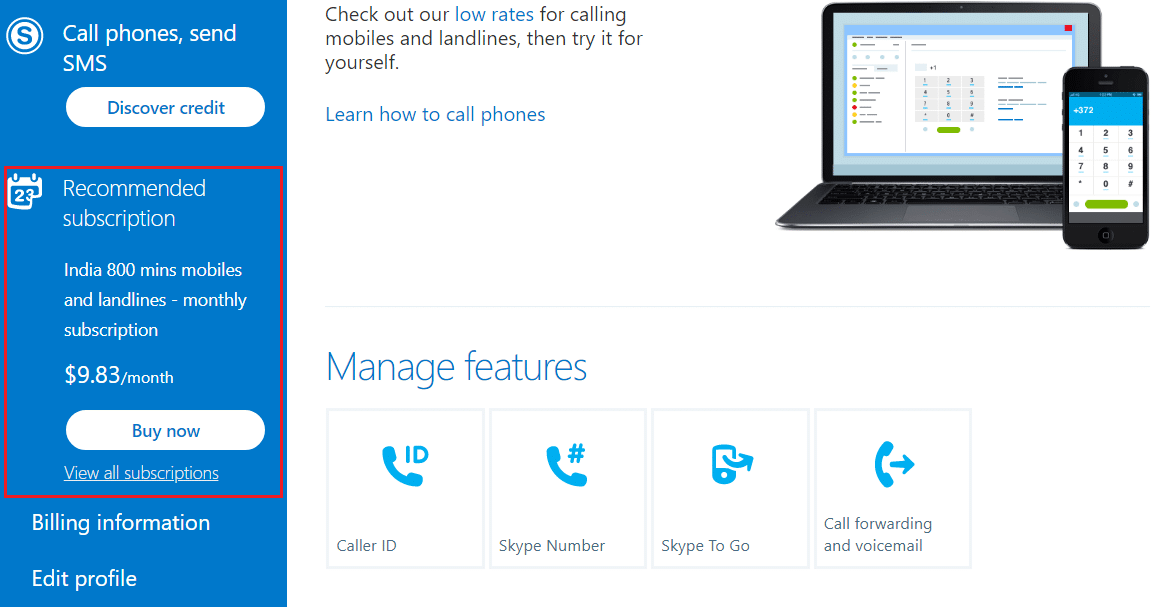
- Cancel any active subscription and request a refund for unused credits.
- If you have added a Skype number, cancel it.
- Set your Skype status to Offline or Invisible.
- Sign out of Skype from all the devices in which you are using Skype with the same account.
- Remove all the personal details from your Skype account.
The first step to delete Skype account permanently involves removing all the personal information from the Skype account so that no one can use your data to find you on Skype directly. In order to remove your personal information from Match account or Skype account, first of all, login into your account then delete your personal details by following the below steps:
Remove Profile Picture
Removing the profile picture is important as it can reveal your identity and other users might be able to identify you. To remove the profile picture on Skype follow the below steps:
1. Sign in to your Skype account by navigating to skype.com in a web browser.
2. Click on your profile picture then click on Use Skype online.
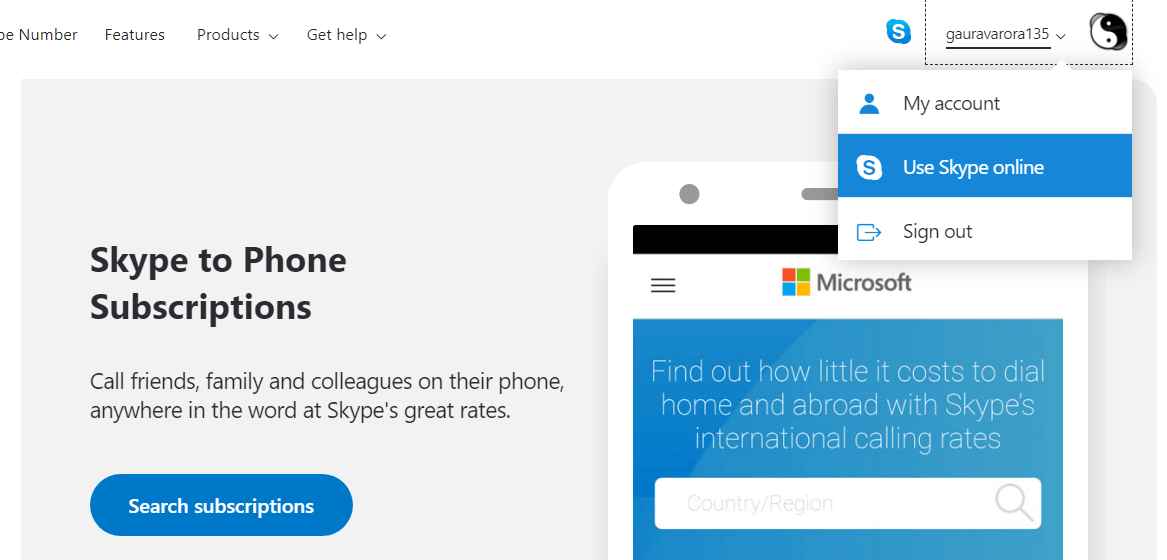
3. The below screen will open up. Click on the three dots then select Settings.

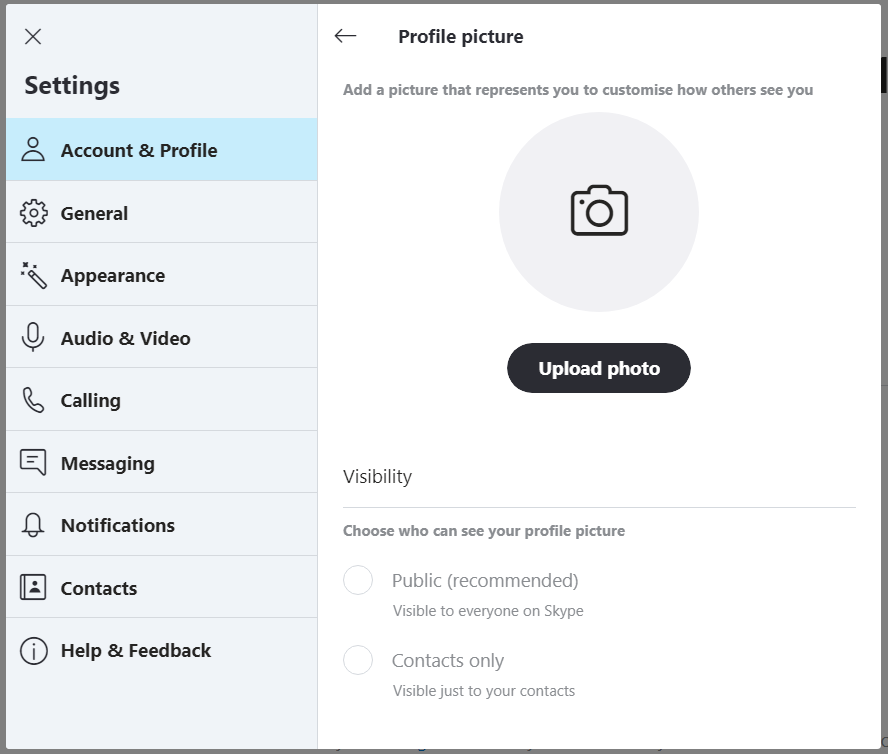
4. Now under Settings, select Account & Profile then click on Profile picture.
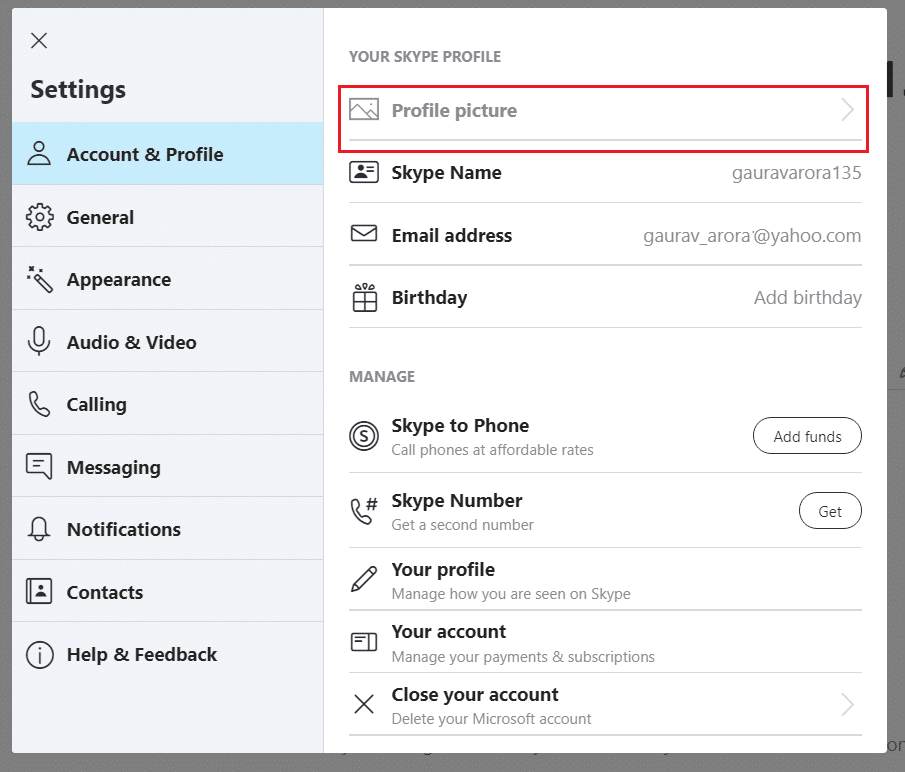
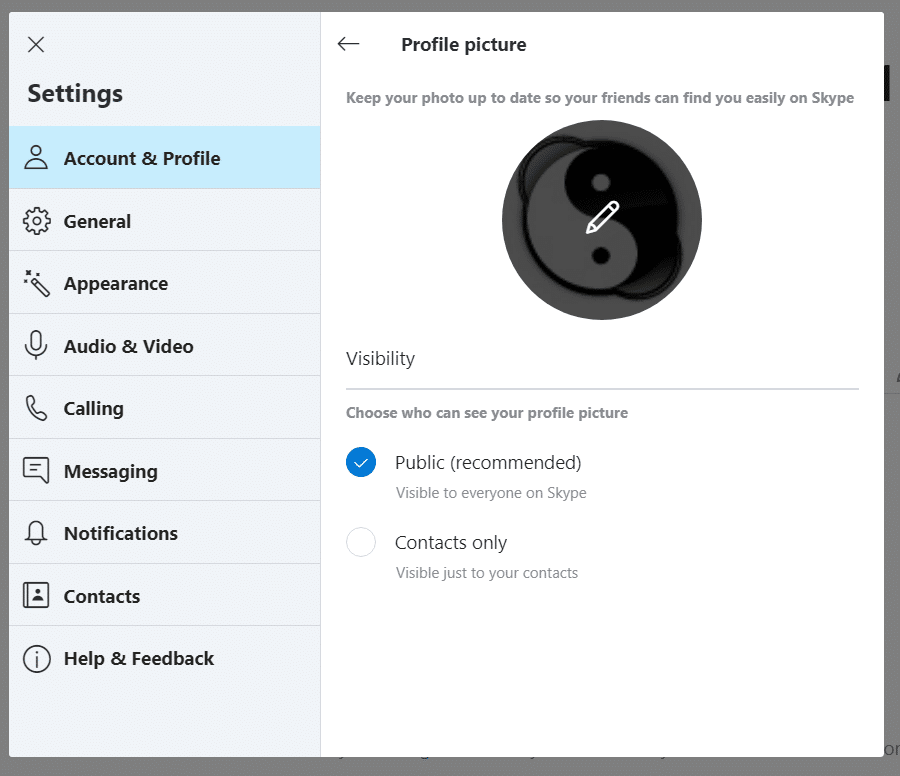
5. Now click on the Profile picture, as soon as you hover over the profile picture, the Edit icon will appear.
6. From the subsequent menu that appears, click on Remove photo.
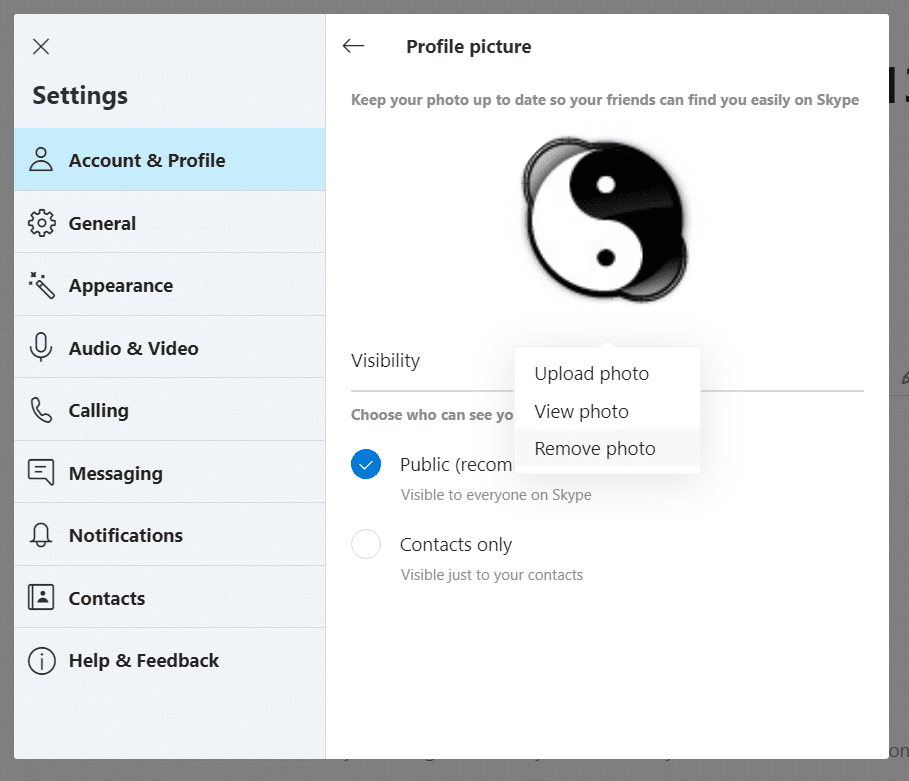
7. A confirmation pop-up will appear, click on Remove.
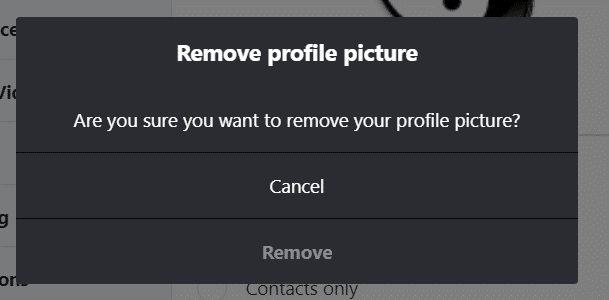
8. Finally, your profile picture will be removed from your Skype account.
Also Read: How to Delete Your eHarmony Account
Change Your Status
Before deleting your Skype account permanently, you should set your Skype status to Offline or Invisible do that no thinks that you’re online or available. To change your status follow the below steps:
1. Inside your Skype account, click on the Profile picture or icon from the top left corner.
2. Under the Menu, click on your current status (in this case it’s Active) then select the Invisible option.
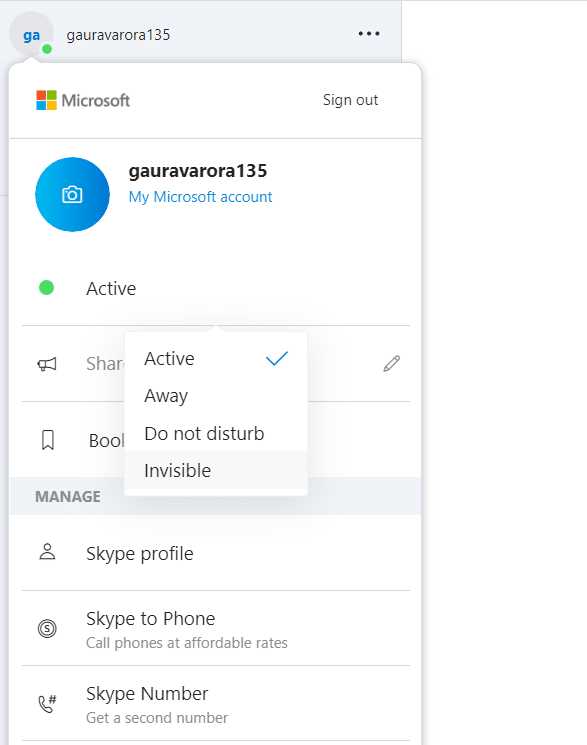
3. Your status will be updated to the new one.
Sign out Skype from all the Devices
Before deleting your account on any app you should sign out from all the devices that you use to sign-in to Skype. This step is necessary since you may accidentally log in to your skype account after deletion which will again re-activate your account (only applicable for the first 30 days after which your account is deleted permanently).
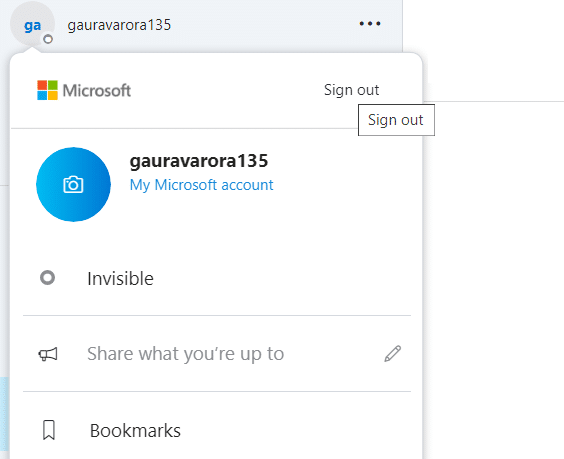
1. Inside your Skype account, click on the Profile picture or icon from the top left corner.
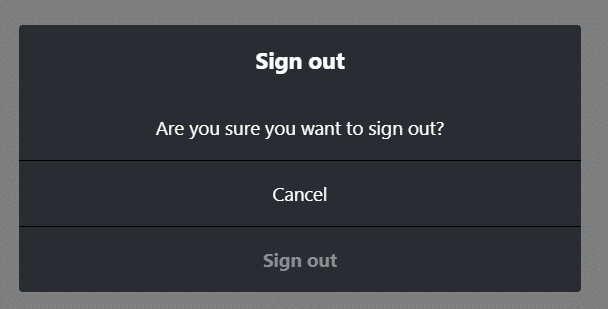
2. A menu will open up. Click on the Sign Out option from the menu.
3. A confirmation pop-up will appear. Click on Sign out to confirm and you will be signed out from the Skype account.
Remove Other Profile Details in Skype
Removing other profile details from Skype is easier in the web interface than the app itself. So, to remove other profile details, open Skype.com in any browser and sign in into your account then follow the below steps to remove other profile details:
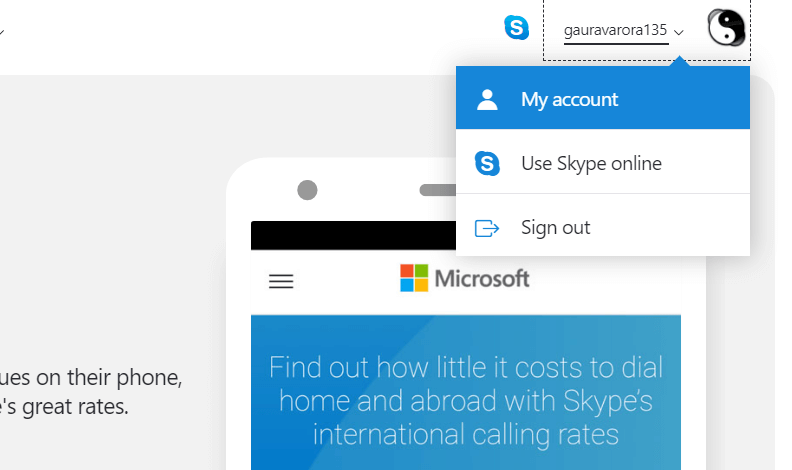
1. Click on your profile picture then click on My account.
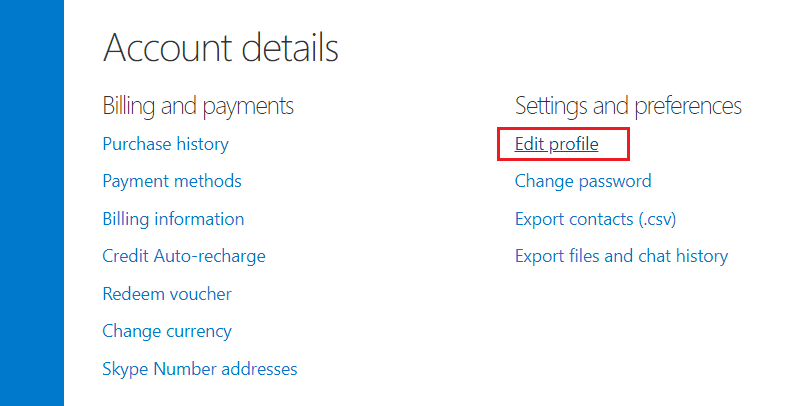
2. Now under your profile, scroll to the bottom of the page and click on the Edit profile option under Settings and preferences.
3. Under Profile, in the Personal Information section, click on the Edit Profile button.

4. Remove all the information from the Personal Information and Contact details sections.
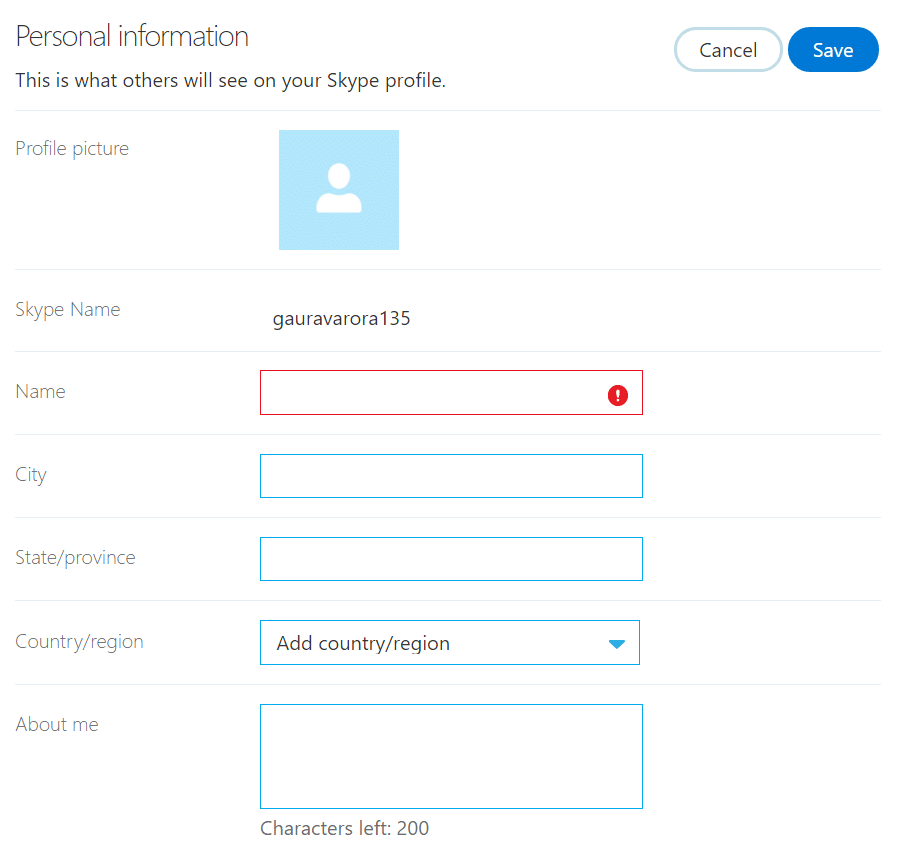
Note: You cannot remove your Skype name.
5. Once you have removed all the information, click on the Save button.
Unlink your Microsoft Account from the Skype Account
It is mandatory to unlink your Microsoft account from the Skype account before deleting the Skype account. To unlink the Microsoft account from Skype account, open Skype.com in any browser and sign in into your Skype account and then follow the below steps for further procedure:
Note: If your skype primary email address is live or outlook then unlinking the account will cause you to lose all your Skype contacts.
1. Inside your profile, scroll to the bottom of the page and click on the Account Settings option under Settings and preferences.
2. Inside account settings, next to your Microsoft account click on the Unlink option.
Note: If you will see Not Linked option rather than unlink option, it means Microsoft account is not linked to your Skype account.
3. A confirmation message will appear. Click on Continue to confirm the action and your Microsoft account will be unlinked from your Skype account.
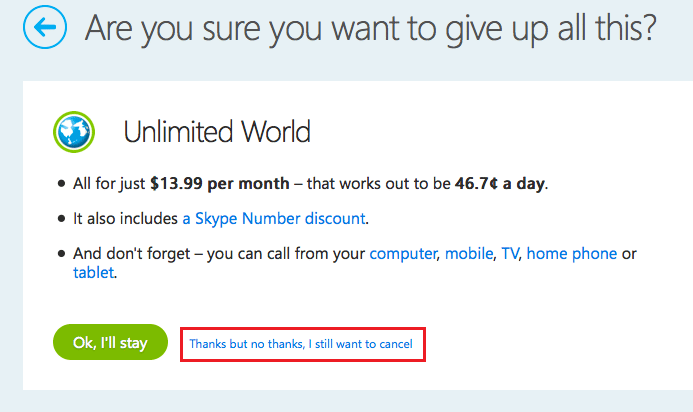
4. Finally, you need to cancel any active Skype subscription. In your Skype account settings, click the subscription you want to cancel from the left bar.
5. Click Cancel Subscription to continue. Finally, click Thanks but no thanks, I still want to cancel to confirm subscription cancellation.
Once you have removed all your personal information and unlink your Microsoft account, now you can proceed to delete your Skype account. You cannot delete or close your Skype account on your own. You have to contact your Skype Customer service and tell them to delete or close your account permanently.
If you use Microsoft account to sign in to Skype then you need to close your Microsoft account by following these steps. Your Microsoft account will be closed in 60 days. Microsoft waits 60 days before permanently deleting your Microsoft account in case you need to again access it or change your mind about deleting your account.
Remember, after deleting your Skype account, your name on Skype will appear for 30 days but no one will be able to contact you. After 30 days, your name will completely disappear from Skype and no one will be able to find you on Skype.
Also Read: Fix Skype Audio Not Working Windows 10
How to Uninstall Skype?
Skype is supported by almost all platforms like Windows, Android, Mac, iOS, etc., so there are different methods to uninstall Skype from these different platforms. If you will follow the below steps then you will be able to easily delete skype from these different platforms. It might also interest you to read How to Delete Your ICQ Account Permanently. Just follow the below methods step-by-step according to the platform or OS you are using and you will be able to delete Skype easily from your device.
How to Uninstall Skype on iOS
Follow the below steps to delete Skype from your iOS device:
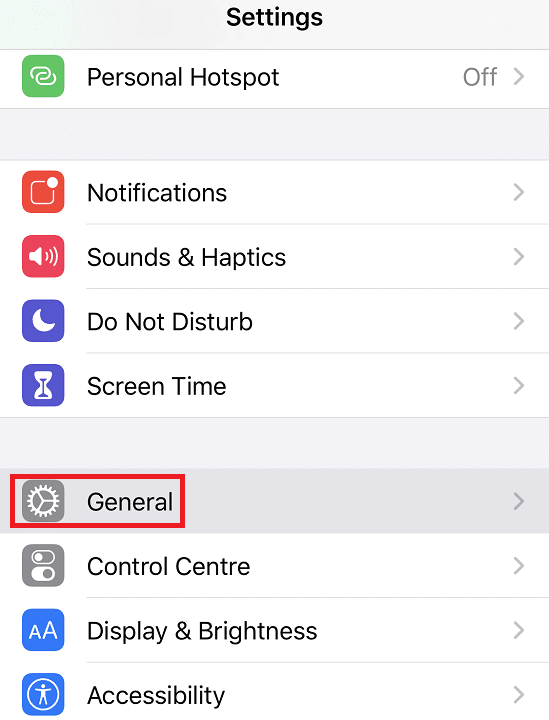
1. In your iPhone or iPad, launch the Settings app by clicking on the Settings icon.
![]()
2. Under Settings, click on the General option.
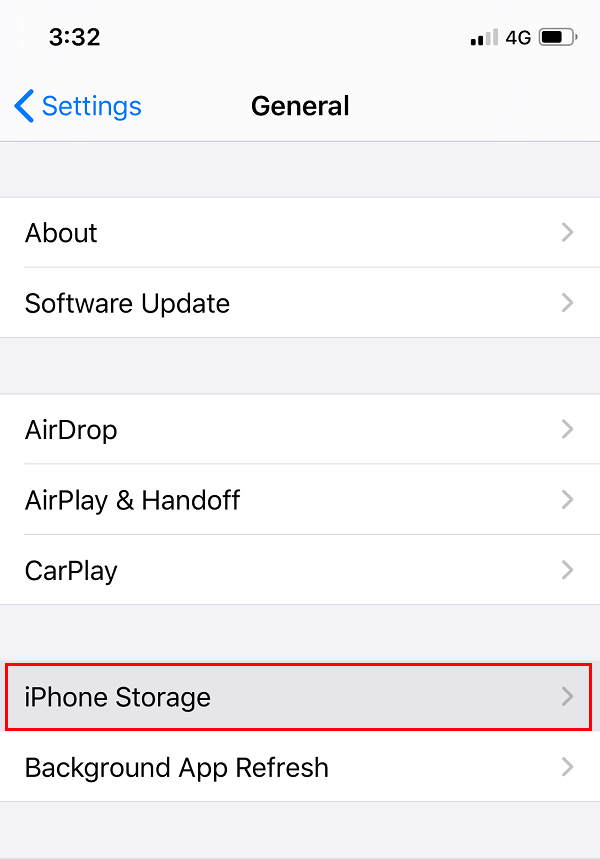
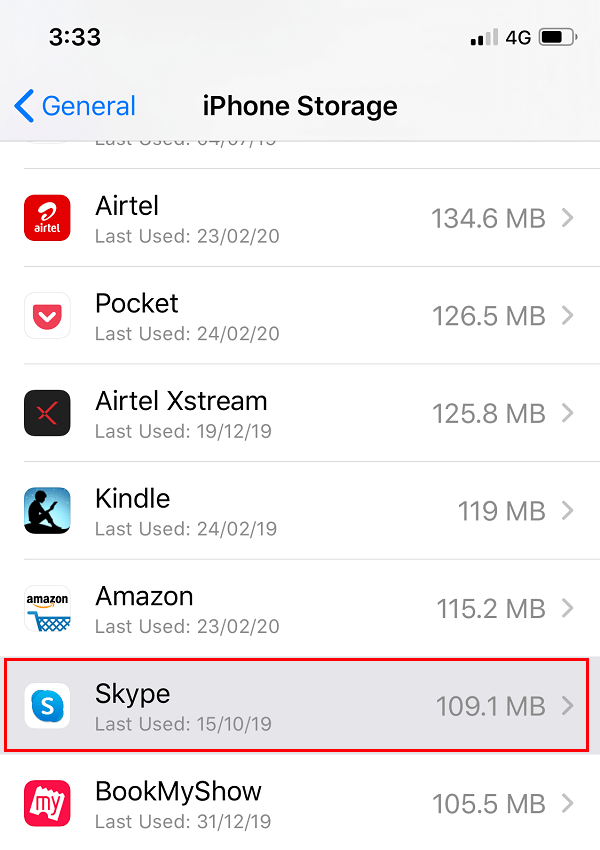
3. Under General, select iPhone Storage.
4. List of all the applications that are available on your iPhone or iPad will open up.
5. Look for the Skype application from the list and click on it.
5. Under Skype, click on the Delete app button that will be available at the bottom of the screen.
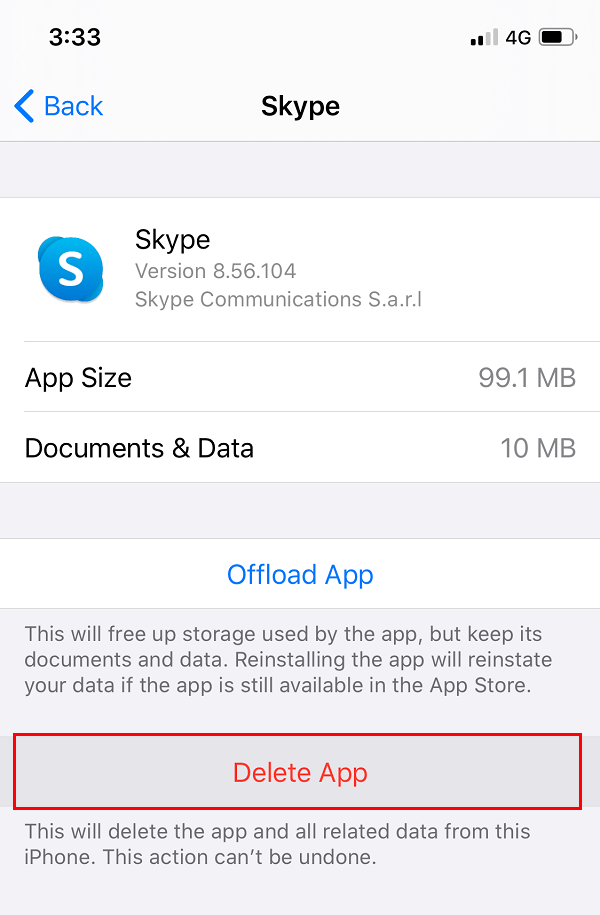
After completing the above steps, Skype will be deleted from your iOS device.
How to Uninstall Skype on Android
Deleting Skype from Android is as easy as deleting Skype from iOS.
To delete Skype from Android follow the below steps:
1. Open the Play Store app on your Android phone by tapping on its icon.
![]()
2. Type & search for skype in the Search Bar at the top of the Play Store.

3. You will see the Open button if the Skype app is already installed on your system.
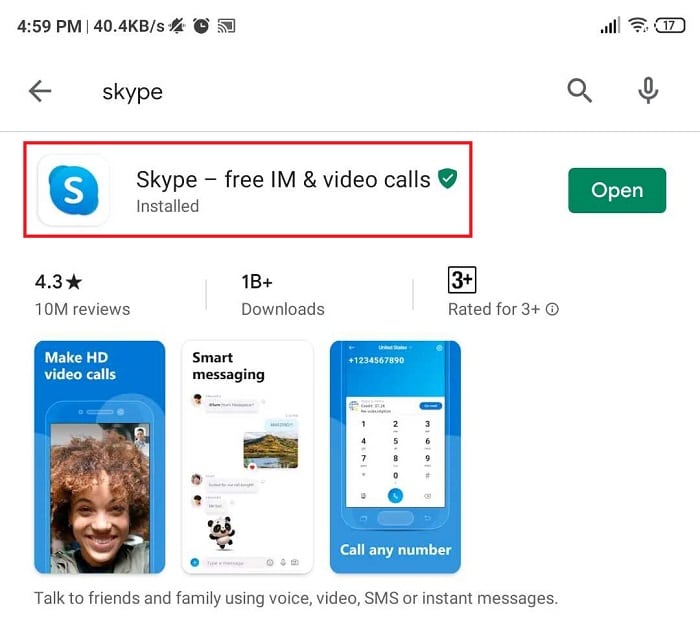
4. Next, click on the app name (where skype is written) & two options will appear, Uninstall and Open. Click on the Uninstall button.

5. A confirmation pop up will appear. Click on the OK button and your app will start uninstalling.
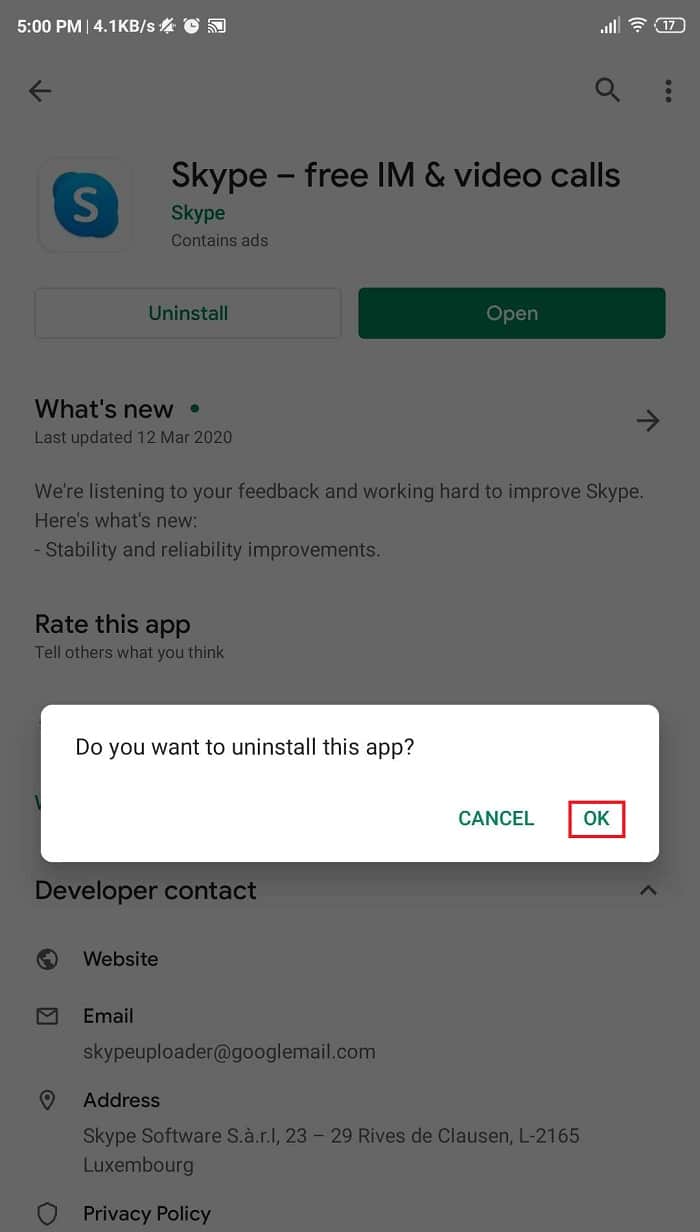
After completing the above steps, Skype will be deleted from your Android phone.
Also Read: How to Disable Skypehost.exe on Windows 10
How to Uninstall Skype on Mac
In order to permanently delete Skype from the Mac, you need to make sure that the app is closed and then follow the below steps:
1. Open Finder on Mac. Click on the Applications folder from the left panel.
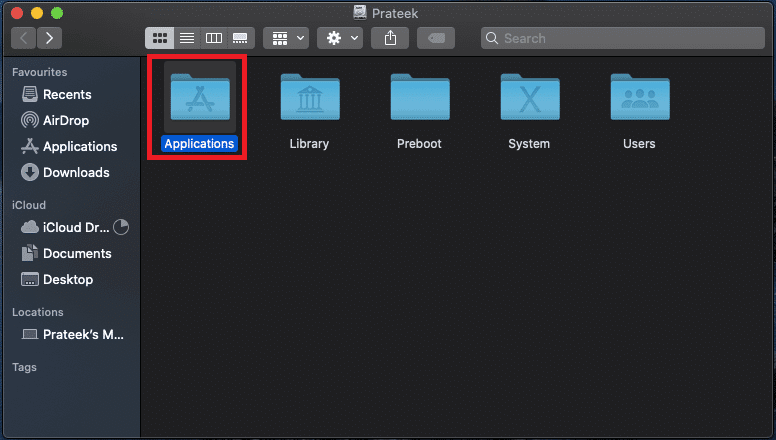
2. Inside the application folder, look for a Skype icon then drag & drop it into the trash.
![]()
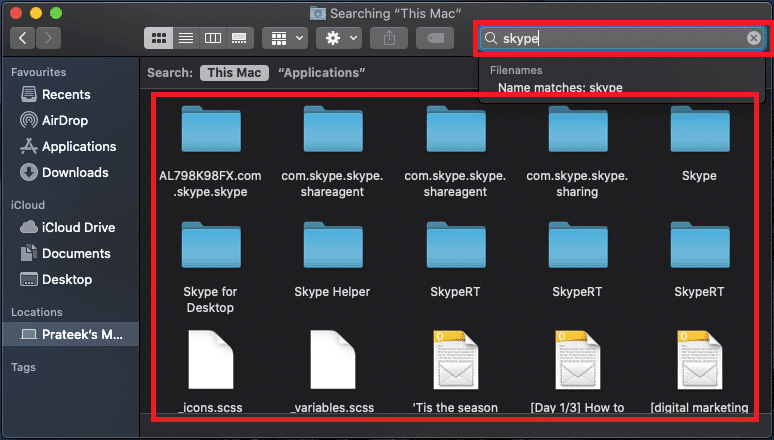
3. Again, in the Finder window, search for skype in the search bar that is available at the top right corner of the window, select all the search results and drag them into the trash as well.
4. Now, go to the trash icon, right-click on it and select the Empty Bin option.
![]()
Once the trash can is empty, Skype will be deleted from your Mac.
How to Uninstall Skype on PC
Before deleting the Skype app from PC, make sure the app is closed. Once the app is closed, follow the below steps to delete Skype permanently from your PC:
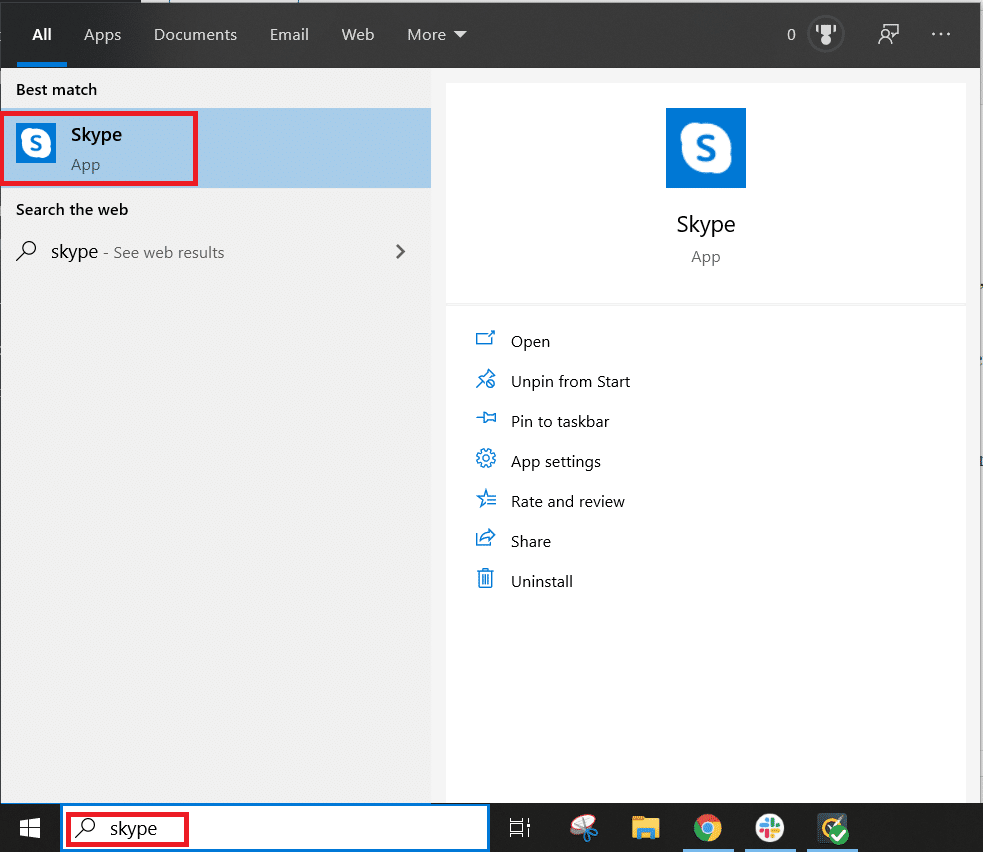
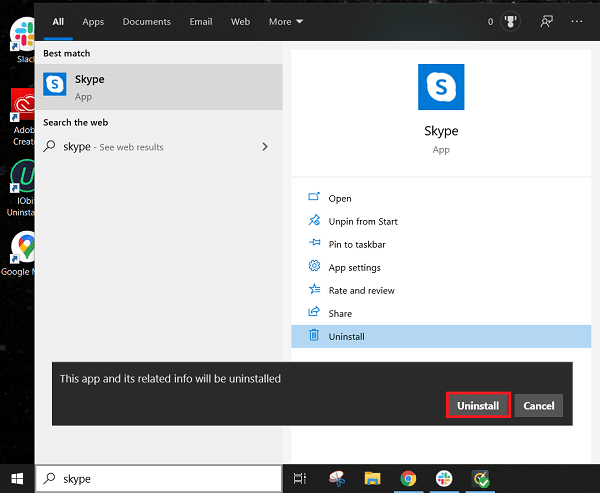
1. Type and search for Skype in the Start Menu Search Bar. Click on the search result that appeared.
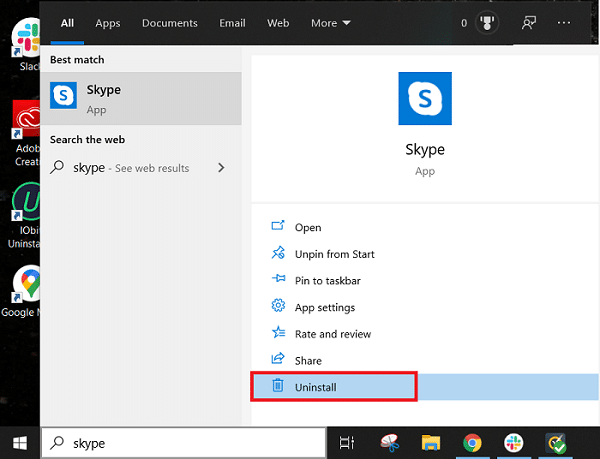
2. Now click on the Uninstall option from the list as shown below.
3. A confirmation pop up will appear. Click on the Uninstall button again.
Also Read: How to fix Skype error 2060: Security sandbox violation
And that is how you delete your skype and skype account the right way! If you still have any questions regarding this tutorial then feel free to ask them in the comment section.
And, if you do discover another way to delete your skype, please share it with others in the comments below.