Enable or Disable Action Center in Windows 10: Well as you know that Action Center in Windows 10 is there to help you with app notifications and quick access to various settings but it’s not necessary that all the user’s like it or actually use it, so a lot of users want to just disable Action Center and this tutorial is just about how to enable or disable Action Center. But to be fair Action Center actually helps a lot as you can customize your own quick actions button and it shows all of your past notifications until you clear them.
On the other hand, if you hate to manually clear out all the unread notifications then you will pretty much feel that the Action Center is useless. So if you are still looking for a way to disable Action Center then without wasting any time let’s see How to Enable or Disable Action Center in Windows 10 with the help of the below-listed tutorial.
Enable or Disable Action Center in Windows 10
Make sure to create a restore point just in case something goes wrong.
Method 1: Enable or Disable Action Center Using Windows 10 Settings
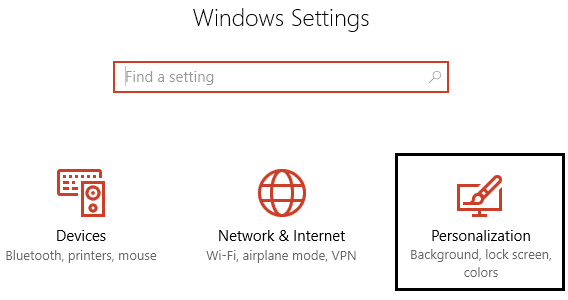
1.Press Windows Key + I to open Settings then click on Personalization.
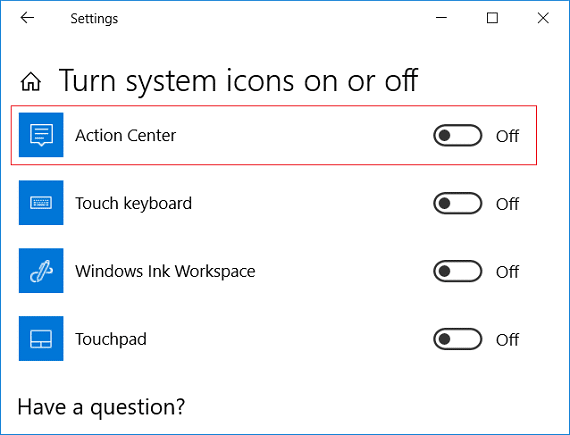
2.From the left-hand menu select Taskbar then click on Turn system icons on or off.
![]()
3.Toggle the switch to Off next to Action Center in order to disable Action Center.

Note: If in future you need to enable Action Center, simply turn ON the toggle for Action Center above.
4.Close everything and reboot your PC.
Method 2: Enable or Disable Action Center Using Registry Editor
1.Press Windows Key + R then type regedit and hit Enter.

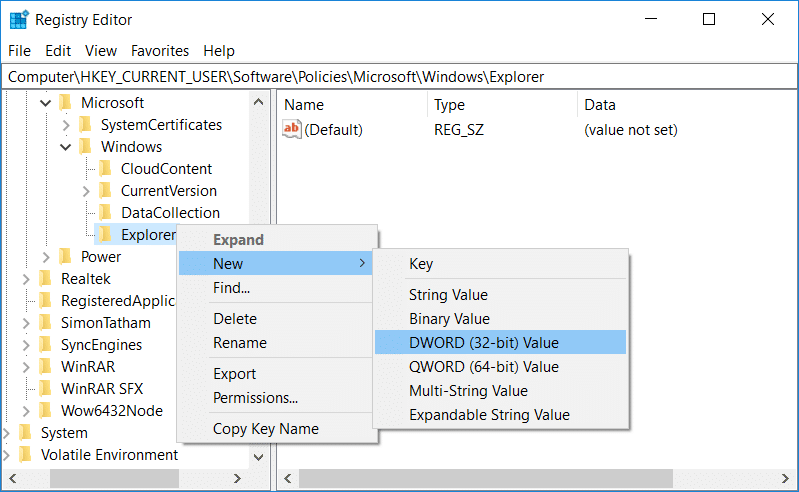
2.Navigate to the following registry key:
HKEY_CURRENT_USERSOFTWAREPoliciesMicrosoftWindowsExplorer
3.Right-click on Explorer then select New > DWORD (32-bit) Value.
4.Name this newly created DWORD as DisableNotificationCenter then double-click on it and change its value according to:
0= Enable Action Center
1 = Disable Action Center
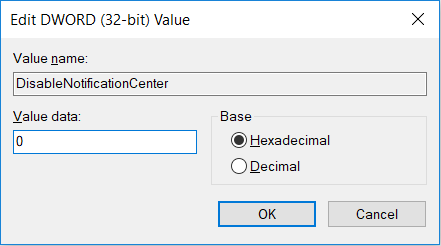
5.Hit Enter or click Ok to save changes.
6.Close registry editor and restart your PC.
Method 3: Enable or Disable Action Center Using Group Policy Editor
1.Press Windows Key + R then type gpedit.msc and hit Enter.

2.Navigate to the following path:
User Configuration > Administrative Templates > Start Menu and Taskbar
3.Make sure to select Start Menu and Taskbar then in the right window pane double-click on Remove Notifications and Action Center.
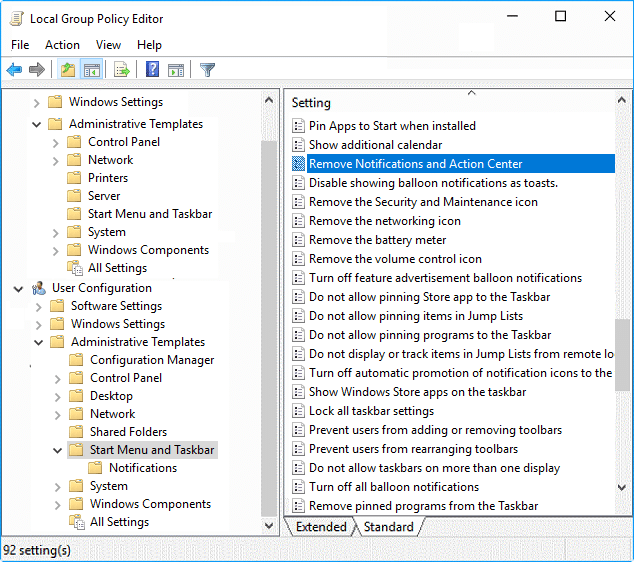
4.Checkmark the Enabled radio button, and click OK to disable the Action Center.

Note: If you need to Enable Action Center then simply checkmark Not Configured or Disabled for “Remove Notifications and Action Center”.
Recommended:
That’s it you have successfully learned How to Enable or Disable Action Center in Windows 10 but if you still have any queries regarding this guide then feel free to ask them in the comment’s section.