Enable or Disable Reserved Storage on Windows 10
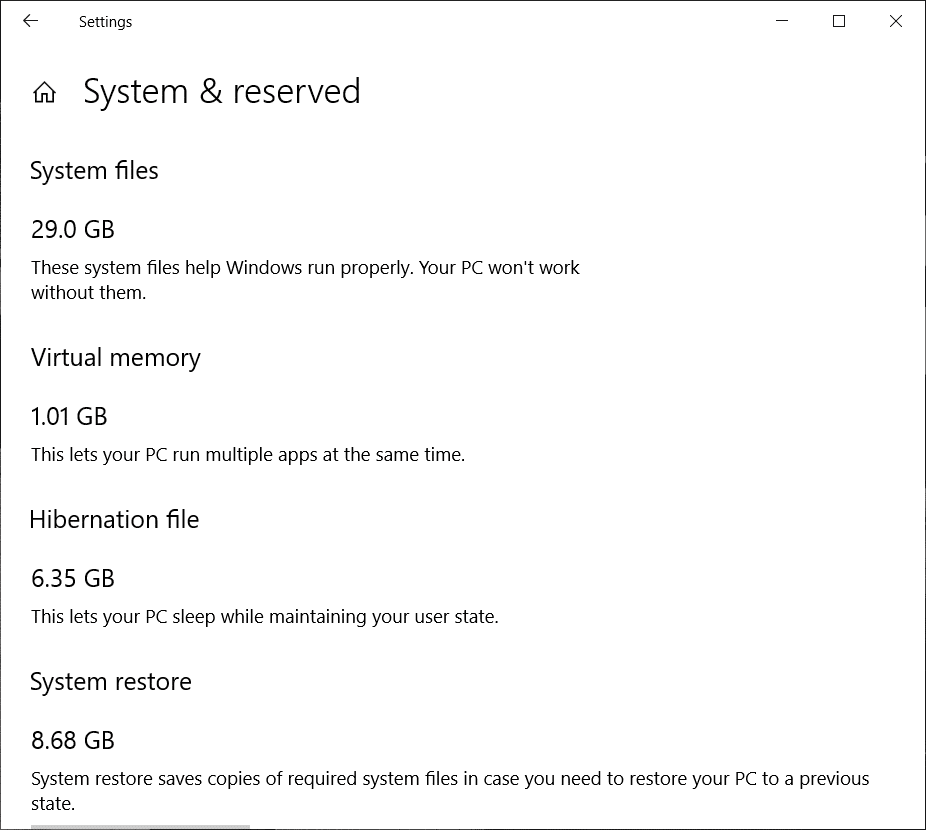
Looking to Enable to Disable Reserved Storage on Windows 10 but don’t know how? Don’t worry, in this guide, we will see exact steps to enable to disable this feature on Windows 10.
Storage woes are a common issue in the tech world. A couple of years ago, 512 GB of internal memory was considered as overkill but now, the same amount is considered the base variant or even below-par storage option. Every gigabyte of storage is considered of utmost importance and the statement holds even more weight when talking about entry-level laptops and personal computers.

Amid such storage hardships, if a particular feature or software hogs up unnecessary space then it is best to let it go. A similar case is presented by Reserved Storage, a Windows feature introduced last year which occupies a set amount of memory (ranging in gigabytes) for software updates and other optional features. Disabling the feature helps make some room and get a bit of precious storage space back.
In this article, we will learn if it is safe to disable the Reserved Storage feature and how to go about it.
What is Reserved Storage?
Starting from the Windows 1903 version (May 2019 update), Windows started reserving about 7GB of the available disk space on a system for software updates, certain built-in apps, temporary data like caches, and other optional files. The update and the Reserved Storage feature was rolled out after many users complained about not being able to download the new Windows updates, about low storage space, slow update experience, and similar stuff. All of these issues are caused due to a lack of residual storage or disk space available for updates. The feature by reserving a set amount of memory helps resolve all of these issues.
Earlier, if you didn’t have enough free disk space on your personal computer, Windows wouldn’t be able to download and install any new updates. The fix would then require the user to clear up space by deleting or uninstalling some valuable cargo from his or her system.
Now, with Reserved Storage enabled in newer systems, all updates will first utilize the space reserved by the feature; and eventually, when it is time to update the software, all temporary and unnecessary files will be deleted from the Reserved Storage and the update file will occupy the entire reserve space. This ensures that systems will be able to download and install software updates even when one has very little disk space left and without having to clear additional memory.
With essential disk space reserved for software updates and other important files, the feature also ensures that all critical and necessary OS functions always have some memory to operate out of. The amount of memory occupied by Reserved Storage is said to vary over time and based on how one uses their system.
The feature comes enabled in any and all new systems that have Windows version 1903 pre-installed or on systems that perform a clean install of that specific version. If you are updating from previous versions then you will still receive the Reserved Storage feature but it will be disabled by default.
Enable or Disable Reserved Storage on Windows 10
Fortunately, enabling and disabling Reserved Storage on a particular system is quite easy and can be done in a matter of a few minutes.
Note: Make sure to create a restore point just in case something goes wrong.
How to Disable Reserved Storage?
Disabling the reserved storage feature on your windows system involves messing with the Windows Registry. However, one has to be extremely careful when using the Windows Registry as an incorrect step or any accidental modification of an item in the Registry can cause serious issues to your system. So, be extremely cautious when following the guide.
Also, before we get started with the procedure let’s check if there indeed is some storage reserved by Windows for updates in our systems and make sure our actions don’t turn out futile.
To check if there is Reserved Storage on your computer:
Step 1: Open Windows Settings by any of the following methods:
- Press Windows Key + S on your keyboard (or click on the start button in the taskbar) and search for Settings. Once found, hit enter or click on open.
- Press Windows Key + X or right-click on the start button and click on Settings.
- Press Windows Key + I to directly open Windows Settings.
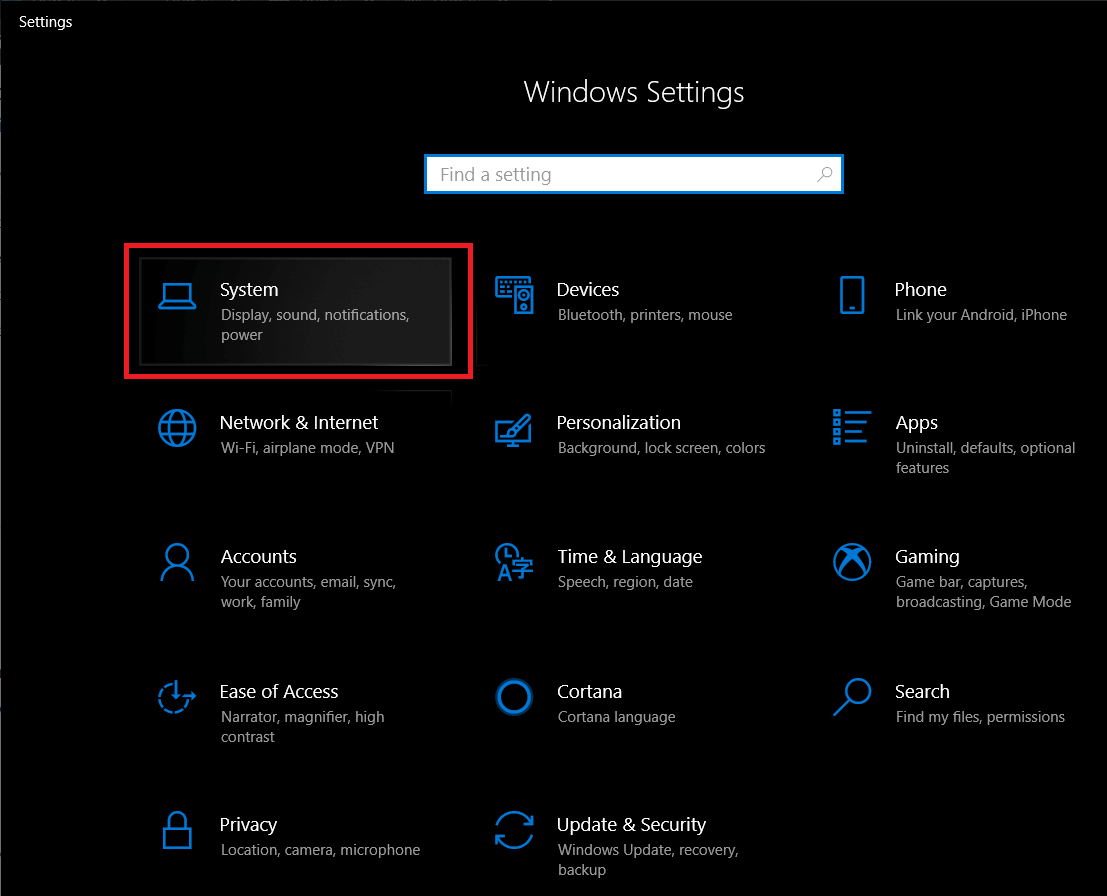
Step 2: In the Window Settings panel, look for System (the very first item in the list) and click on the same to open.
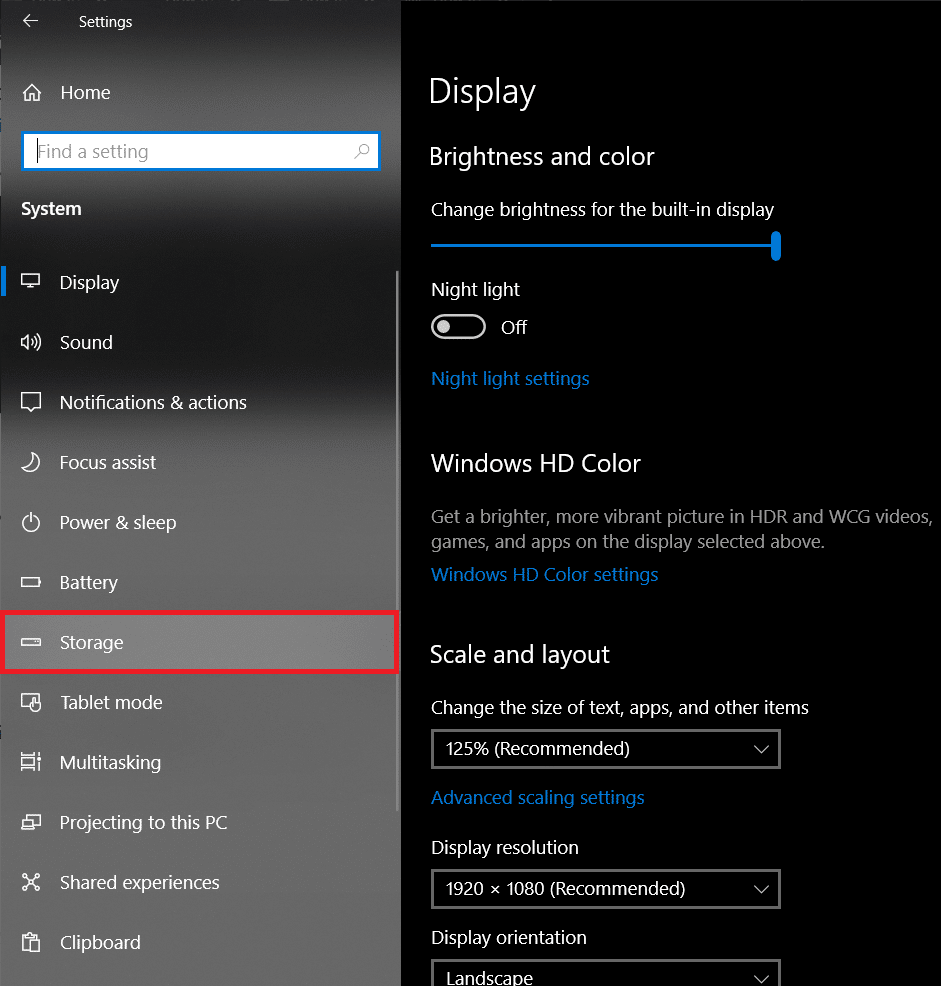
Step 3: Now, in the left-hand panel locate and click on Storage to open Storage settings and information.
(You could also directly open Storage Settings by pressing Windows key + S on your keyboard, searching for Storage Settings and pressing enter)
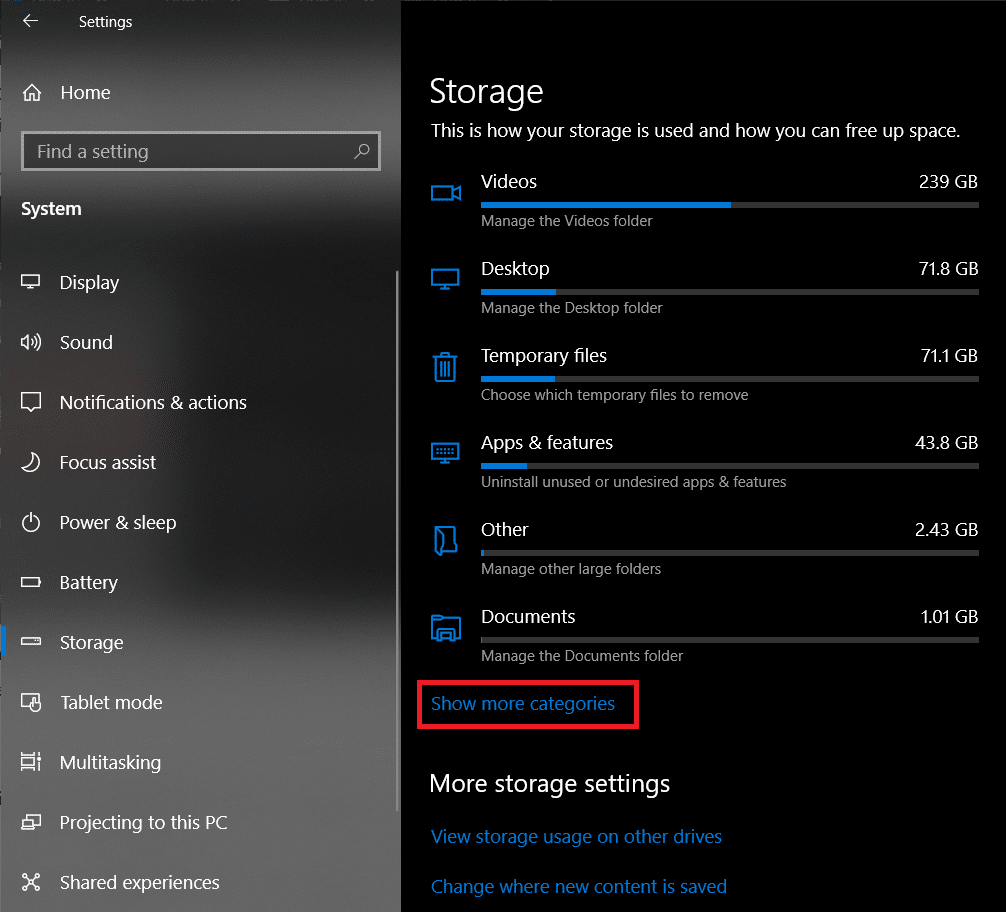
Step 4: Information regarding Reserved Storage is hidden under Show more categories. So click on it to be able to see all the categories and the space occupied by them.
Step 5: Find System & reserved and click to open the category for more information.
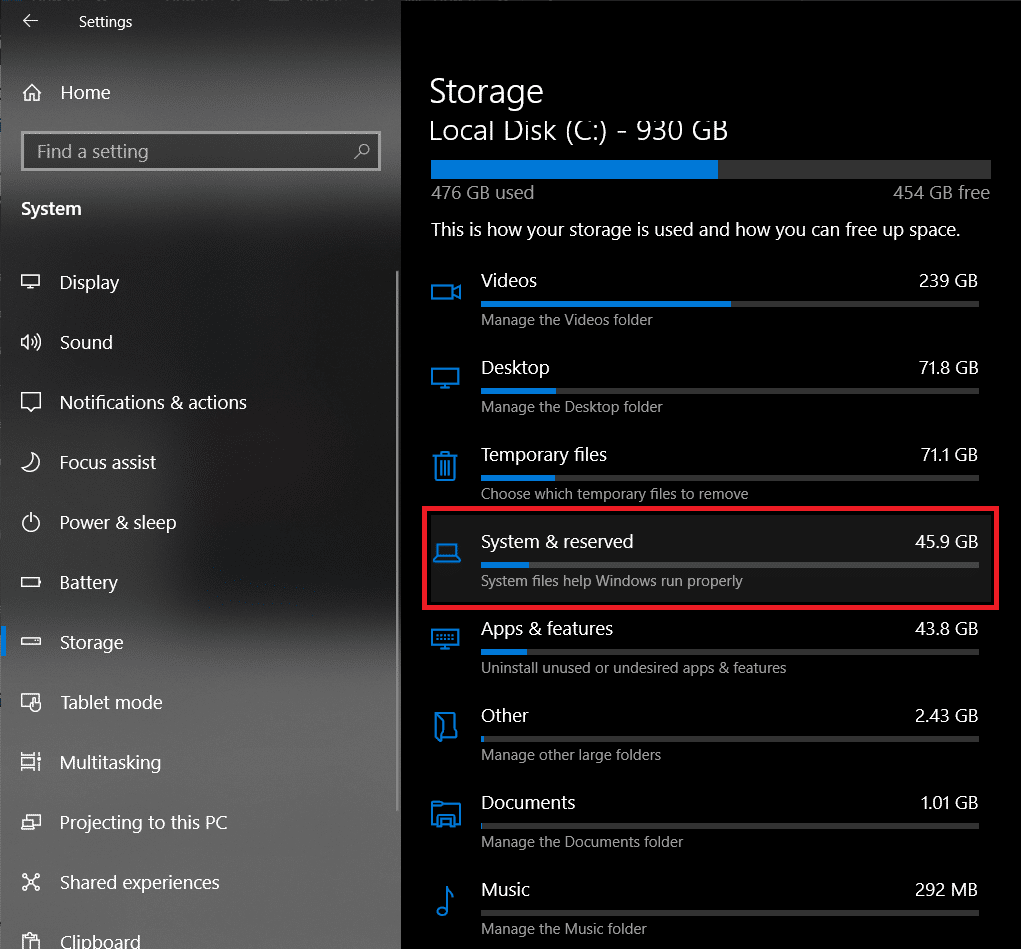
If you do not see a “Reserved Storage” section, it implies the feature is already disabled or not available in the build currently installed on your system.
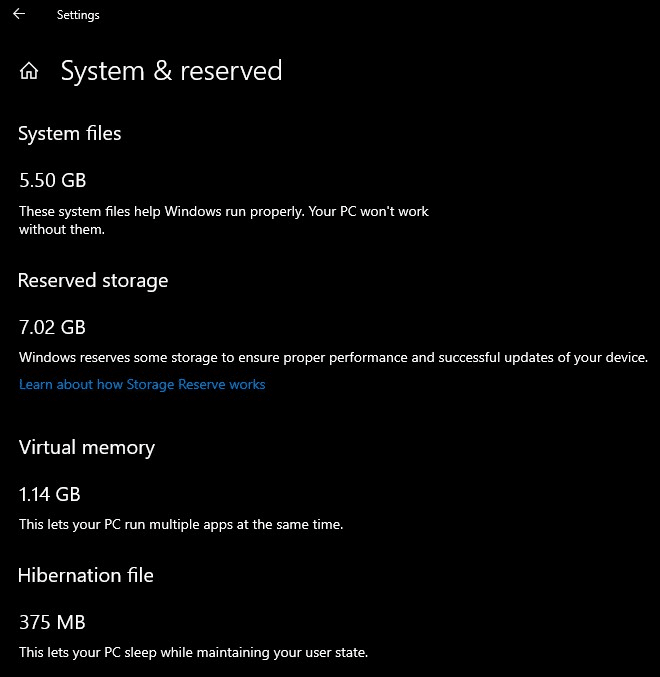
However, if there indeed is a Reserved Storage section and you wish to disable it then follow the below guide carefully:
Step 1: First, launch Run command by pressing Windows key + R on your keyboard. Now, type in regedit and press enter or click on the OK button to open the Registry Editor.
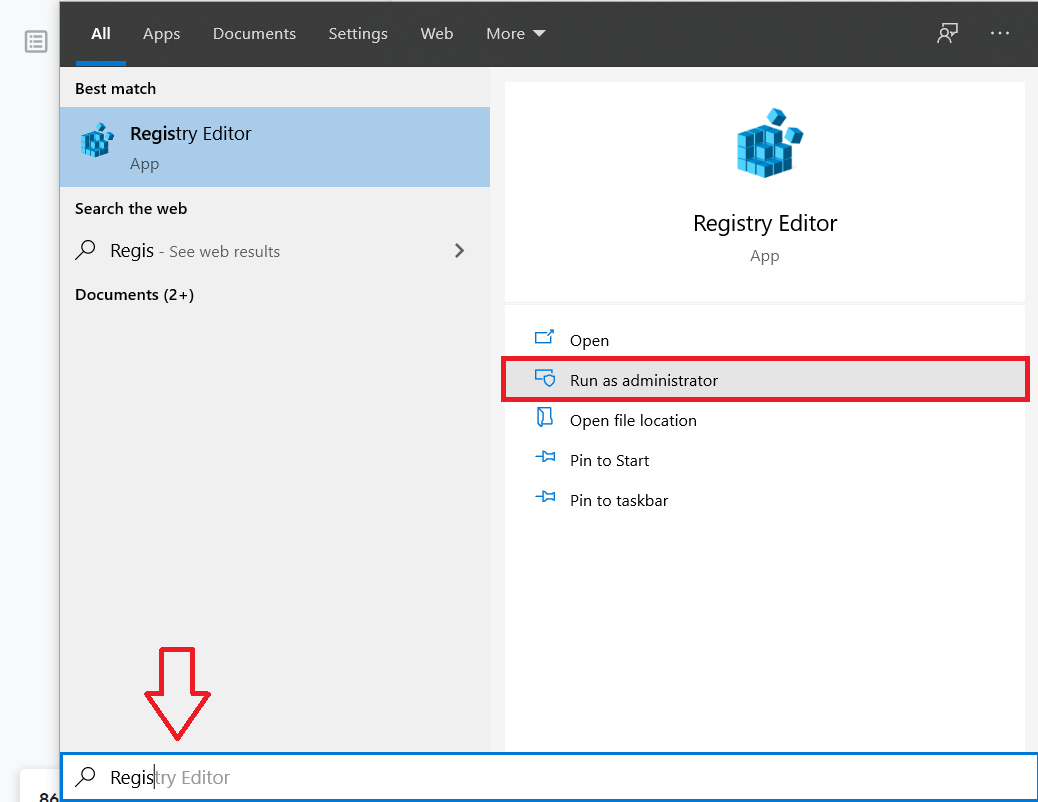
You could also launch the Registry Editor by searching for it in the search bar and then selecting Run as Administrator from the right panel.
(The user account control will ask for permission to allow the application Registry Editor to make changes to your device, simply click on Yes to grant permission.)
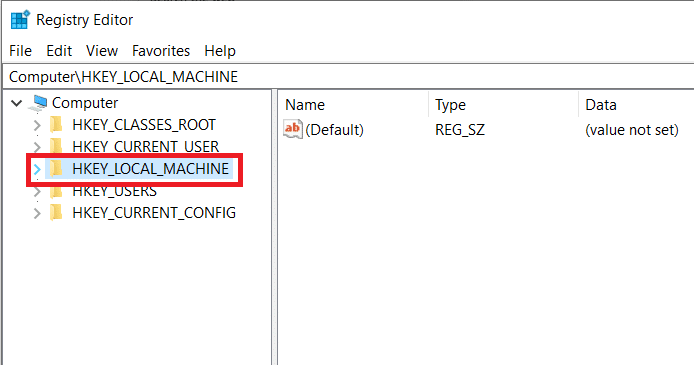
Step 2: From the list of items in the left panel of the Registry Editor, click on the drop-down arrow next to HKEY_LOCAL_MACHINE. (or simply double click on the name)
Step 3: From the drop-down items, open up SOFTWARE by clicking on the arrow next to it.
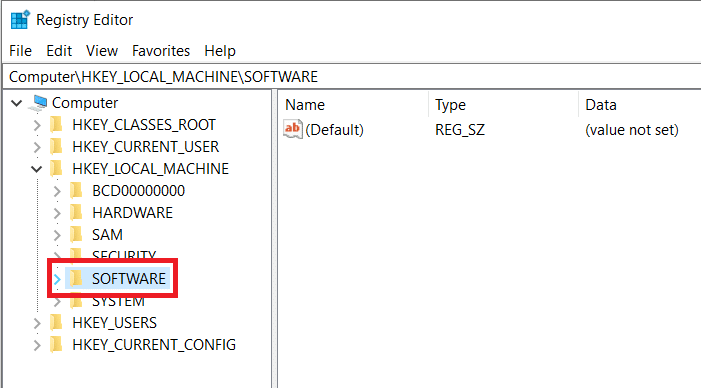
Step 4: Following the same pattern, make your way to the following path
HKEY_LOCAL_MACHINESOFTWAREMicrosoftWindowsCurrentVersionReserveManager
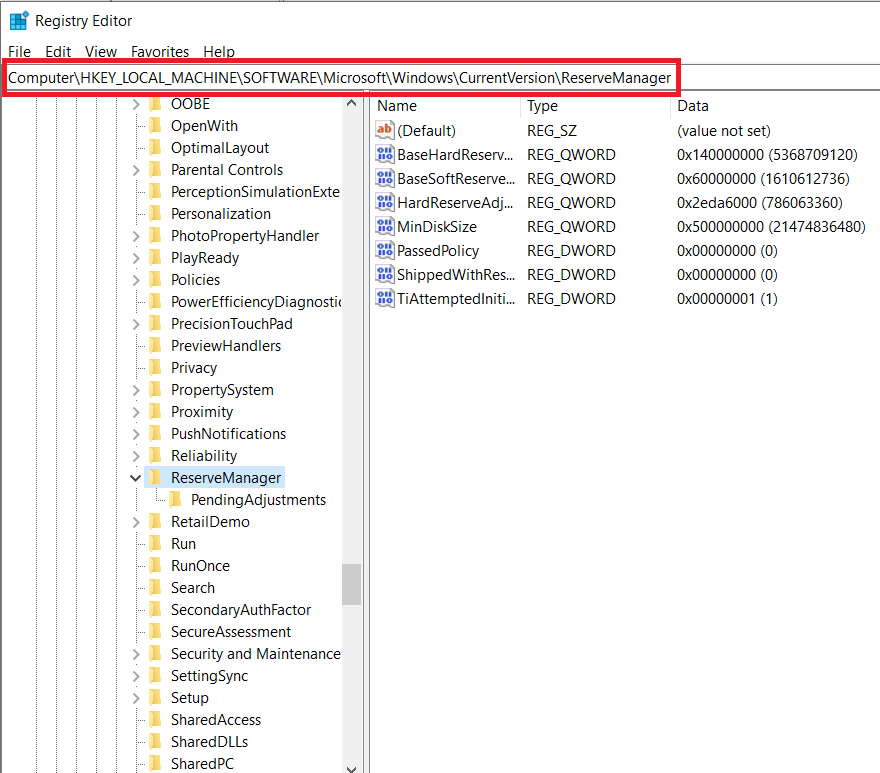
Step 5: Now, in the right panel double-click on the entry ShippedWithReserves. This will open up a dialog box to change the DWORD value for ShippedWithReserves.
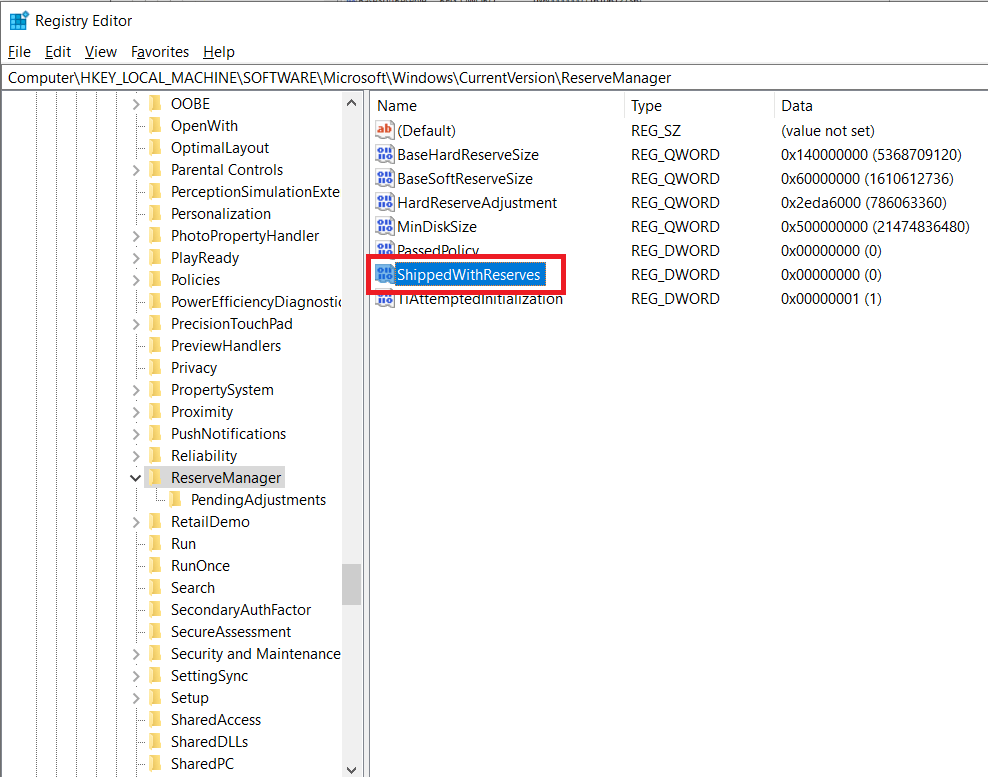
Step 6: By default, the value is set to 1 (which indicates Reserved Storage is enabled). Change the value to 0 to disable reserved storage. (And vice versa if you want to enable the Reserved Storage feature)
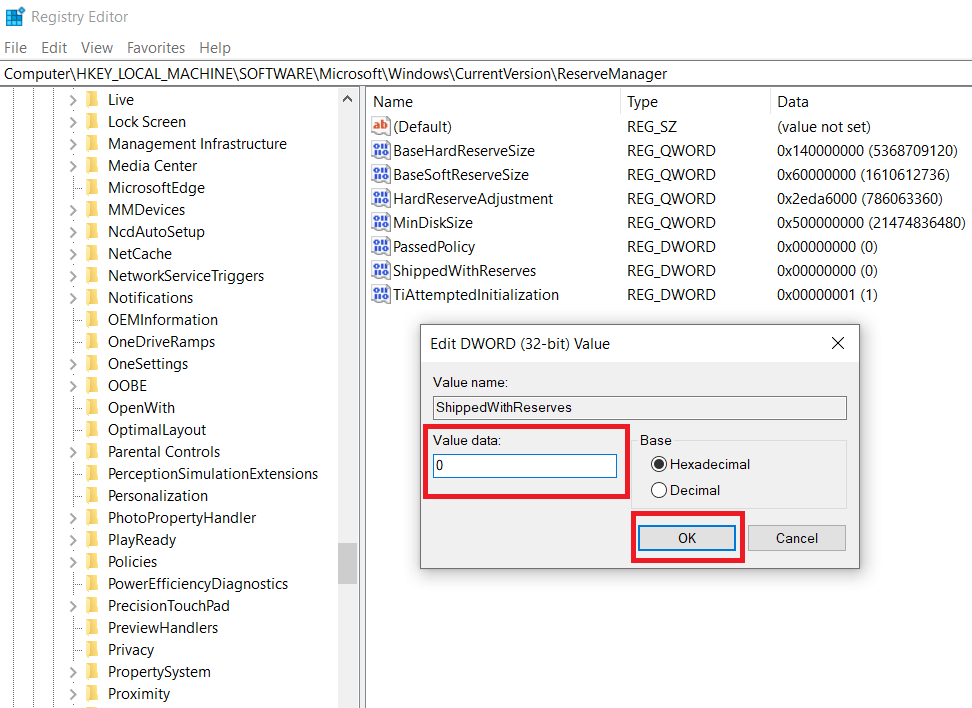
Step 7: Click the OK button or press enter to save the changes. Close Registry Editor and reboot your computer to apply the changes we made.
However, restarting/rebooting won’t disable the Reserved Storage feature right away. The feature will be disabled in the next Windows upgrade you receive and perform.
When you do receive and perform an upgrade, follow the earlier guide to check if the reserved storage has been disabled or is still enabled.
Also Read: Enable or Disable Windows 10 Sandbox Feature
How to reduce Reserved Storage in Windows 10?
Apart from entirely disabling Reserved Storage on your personal computer, you could also choose to reduce the amount of space/memory that is Reserved by Windows for updates and other stuff.
This is achieved by uninstalling optional features that come pre-installed on Windows, the ones the operating system installs automatically on demand, or manually installed by you. Every time an optional feature is installed, Windows automatically increases the size of Reserved Storage to ensure the features have enough space and are maintained on your system when updates are installed.
Many of these optional features seldom get utilized by the user and can be uninstalled/removed to reduce the amount of Reserved Storage.
To reduce the memory the Reserved Storage feature occupies perform the below steps:
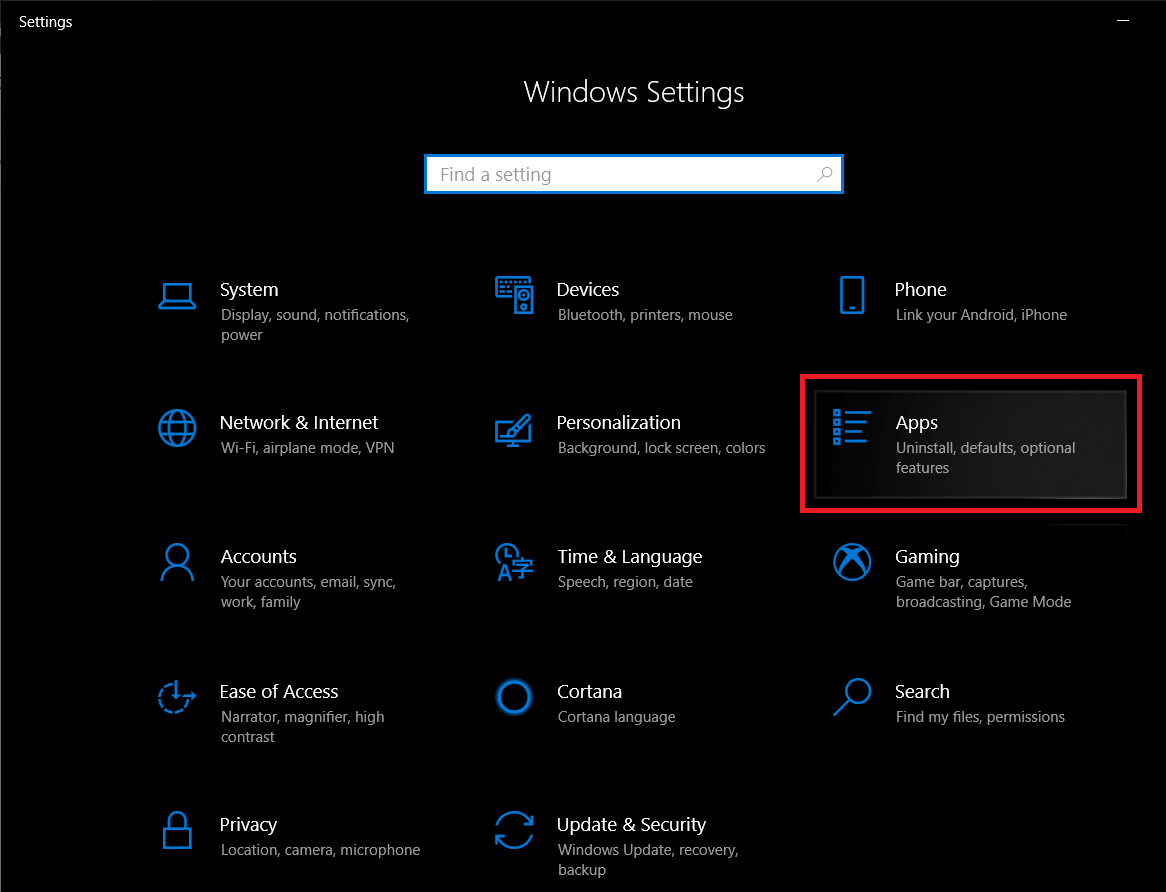
Step 1: Open up Windows Settings (Windows key + I) again by any of the three methods discussed earlier and click on Apps.
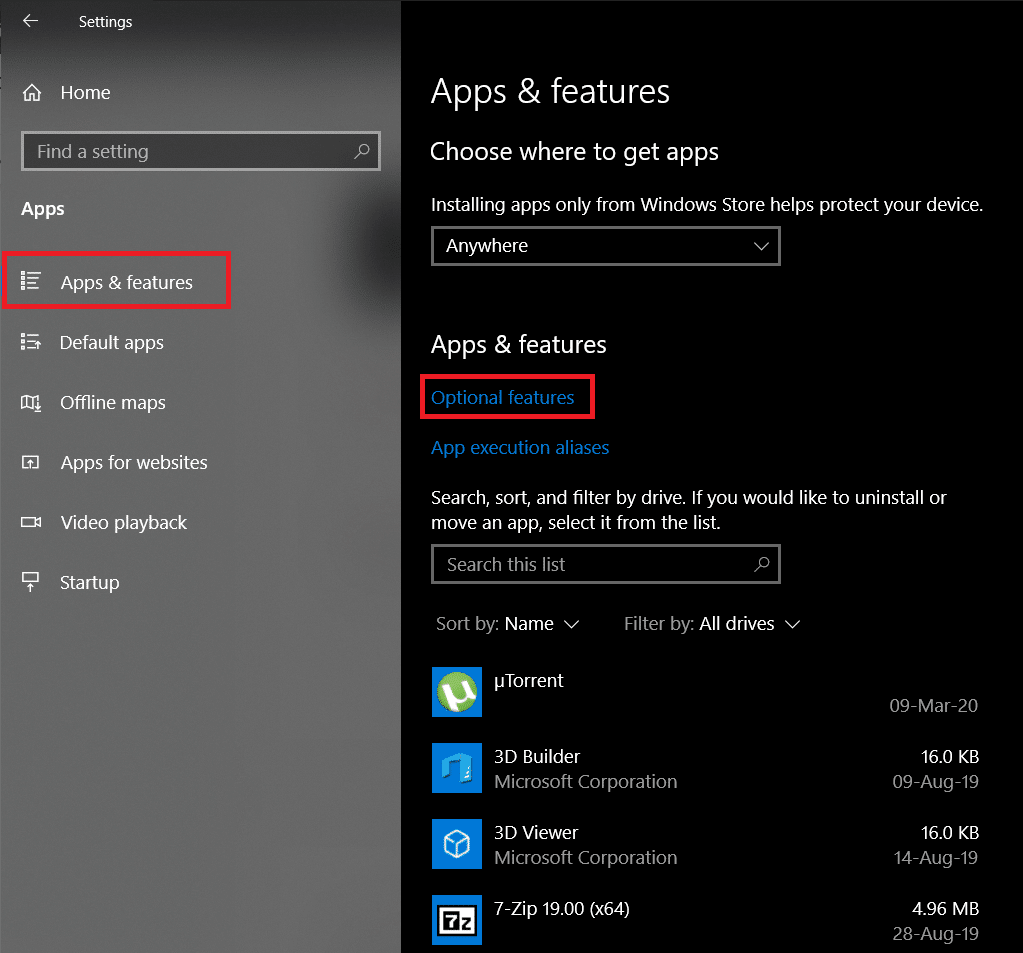
Step 2: By default, you should have the Apps & Features section open. If that’s not the case for you then click on Apps & Features in the left panel to do so.
Step 3: Click on Optional Features (highlighted in blue). This will open up a list of all the optional features and programs (software) installed on your personal computer.
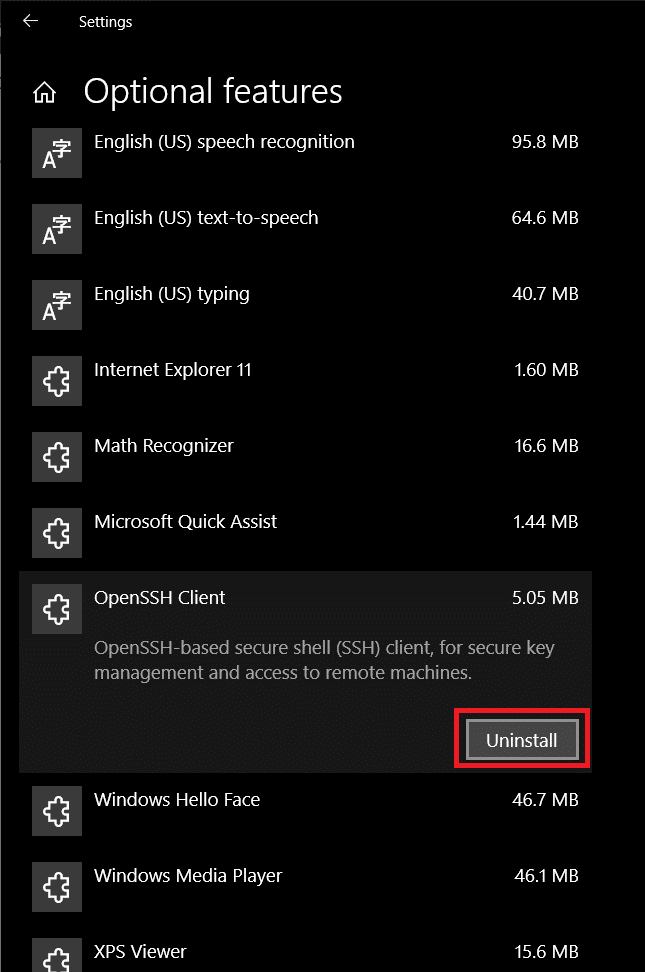
Step 4: Go through the list of Optional Features and uninstall any and all features that you do not find yourself ever using.
This can be done by simply clicking on the feature/application name to expand it and clicking on the Uninstall button that appears afterward.
Along with uninstalling optional features, you can further reduce Reserved Storage by uninstalling any language packages installed on your personal computer that you do not have a use for. Although most users only use one language, many switch between two or three languages, and every time a new language is installed, just like optional features, Windows automatically increases the size of Reserved Storage to ensure they are maintained when you update your system.
To reduce the amount of Reserved Storage by removing languages follow the below steps:
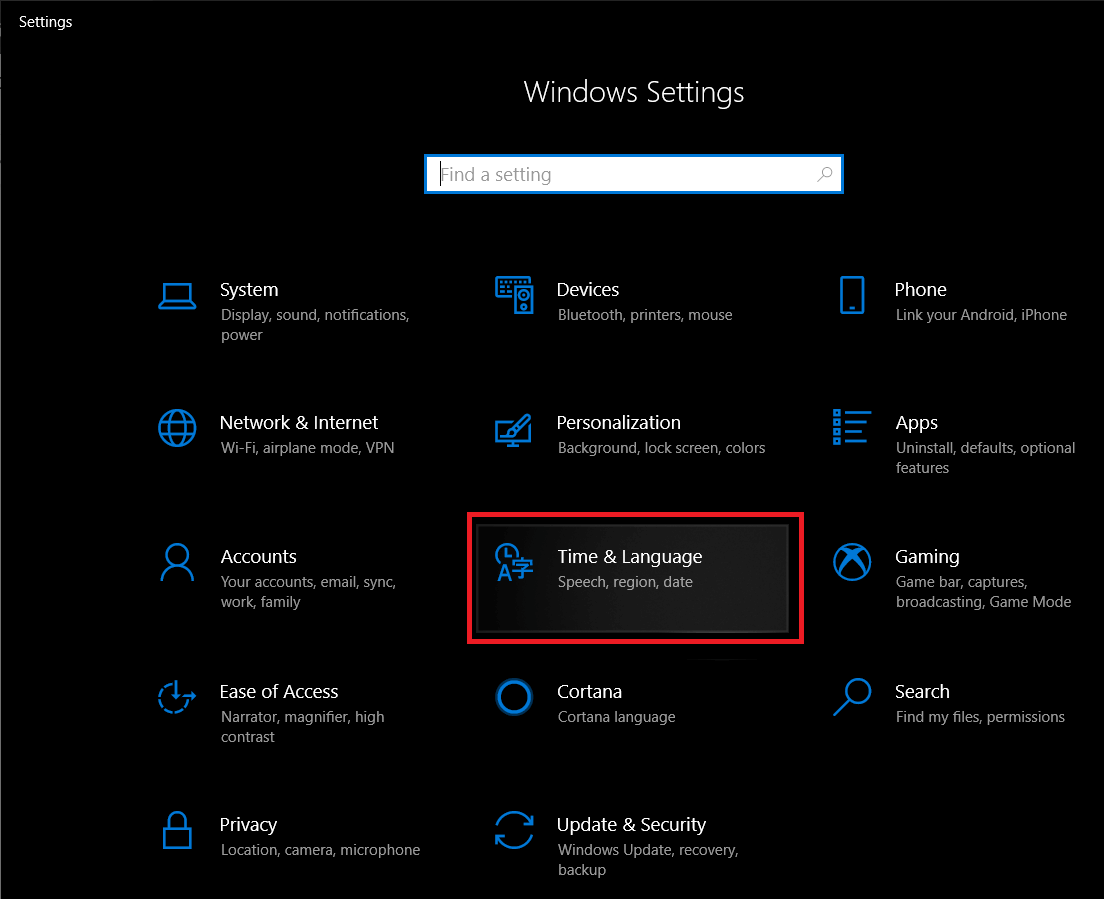
Step 1: In the Window Settings window, click on Time and Language.
Step 2: Click on Language in the left panel.
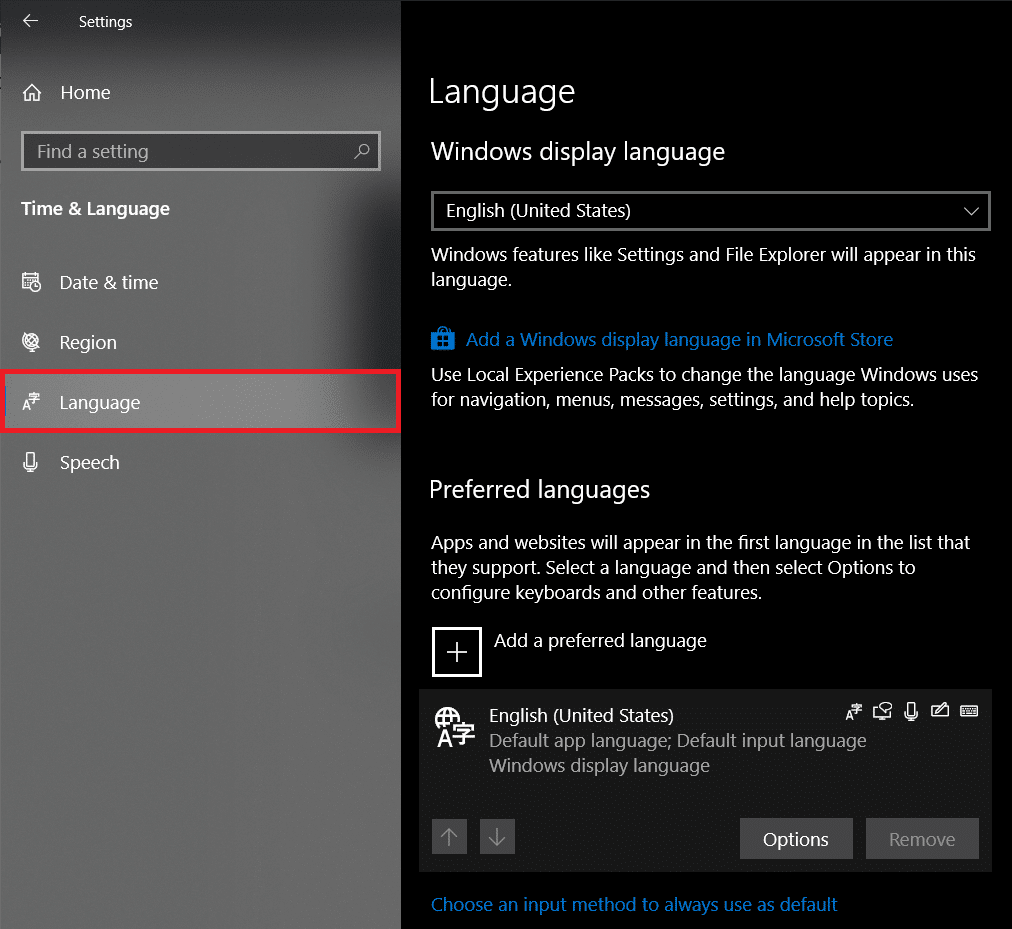
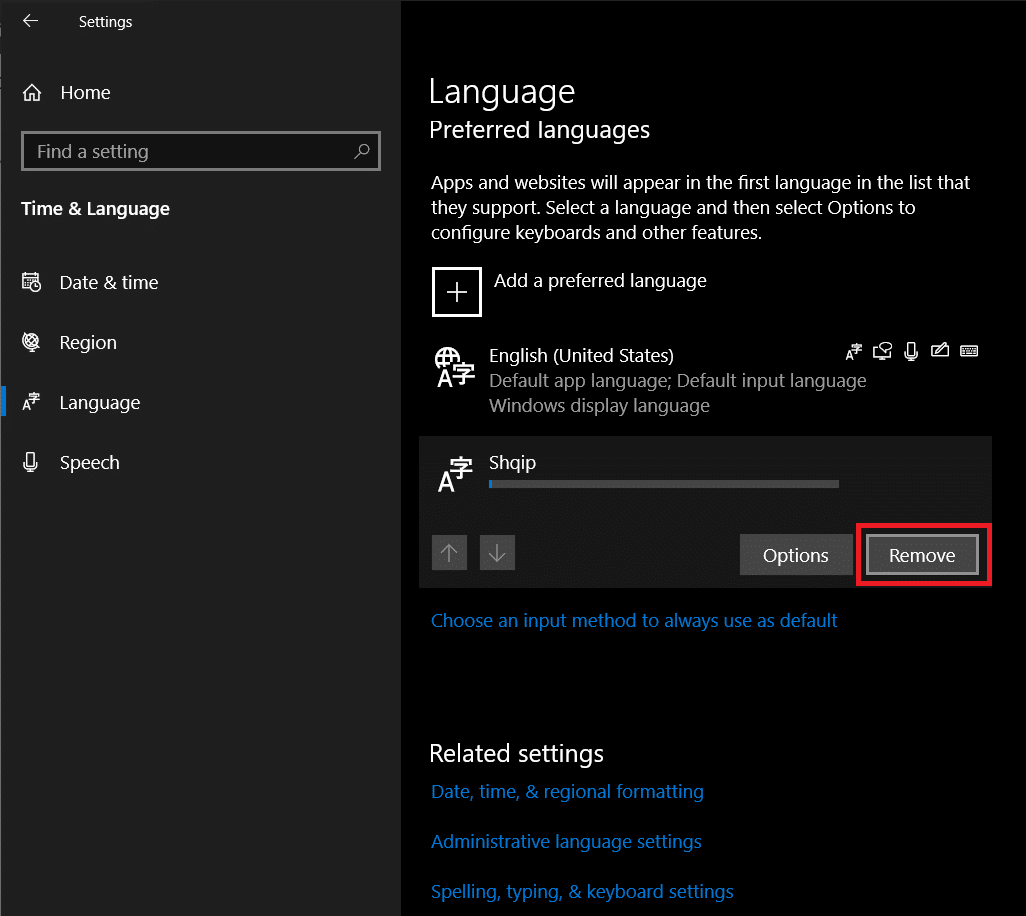
Step 3: Now, a list of Languages installed on your system will be displayed on the right. Expand a particular language by clicking on it and finally click on the Remove button to uninstall.
As for if you should consider disabling Reserved Storage? The choice is really up to you. The feature was rolled out to make updating windows a smoother experience and seems to do that particularly well.
Recommended: 10 Ways to Free Up Hard Disk Space On Windows 10
But while Reserved Storage does not hog up a big portion of your memory, in dire situations entirely disabling this feature or reducing it to a negligible size can prove helpful. We hope the above guide helped you to Enable or Disable Reserved Storage on Windows 10 and you were able to clear up a few gigabytes on your personal computer.