If you are facing 100% Disk usage in Task Manager issue even though you are not doing any memory-intensive task then don’t worry as today we are going to see a way to fix this issue. This issue is not limited to users who have low specs PC as many users who have the latest configuration such as i7 processor and 16 GB RAM are also facing a similar issue.
This is a serious issue because you are not using any apps but when you open Task Manager (Ctrl+Shift+Esc) you see that Disk Usage is near 100% which makes your PC so slow that it is almost impossible to use. When the disk usage is at 100% even system apps can’t run properly because there is no more disk usage left to utilize.
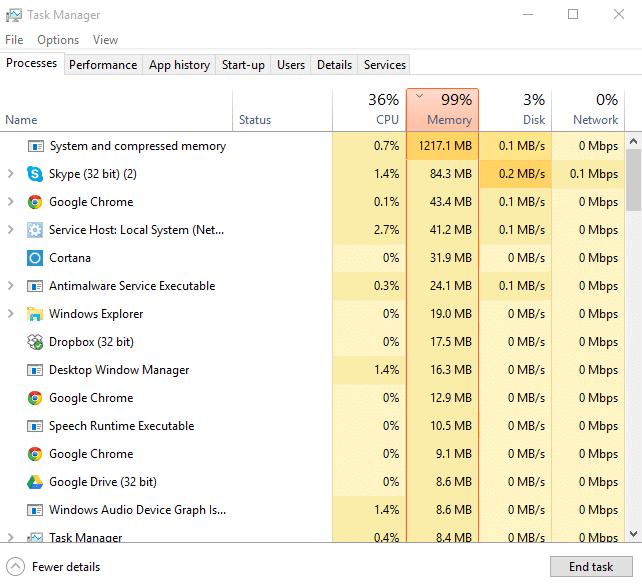
Troubleshooting this issue is quite difficult as there is no single program or app which is utilizing all the disk usage and therefore, there is no way to find out which app is the culprit. In some cases, you might find the program which is causing the issue but in 90% that won’t be the case. Anyway, without wasting any time let’s see How to Fix 100% Disk Usage In Task Manager In Windows 10 with the help of the below-listed tutorial.
What are the common causes of 100% CPU Usage in Windows 10?
- Windows 10 Search
- Windows Apps Notifications
- Superfetch Service
- Startup Apps and Services
- Windows P2P update sharing
- Google Chrome Predication Services
- Skype Permission Issue
- Windows Personalization Services
- Windows Update & Drivers
- Malware Issues
Fix 100% Disk Usage In Task Manager In Windows 10
Make sure to create a restore point just in case something goes wrong.
Method 1: Disable Windows Search
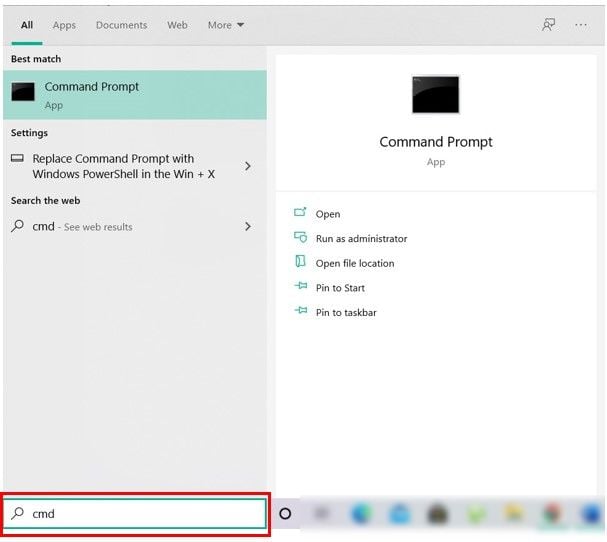
1. Open Command Prompt. The user can perform this step by searching for ‘cmd’ and then press Enter.
2. Type the following command into cmd and hit Enter:
net.exe stop “Windows search”
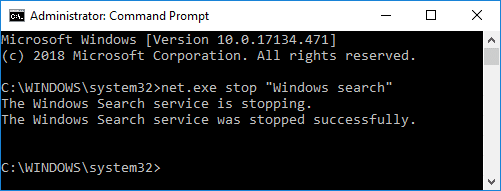
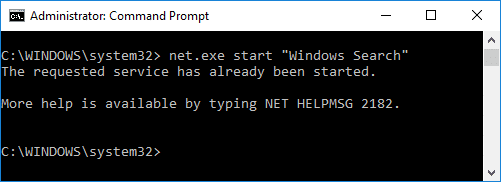
Note: This would only temporarily disable Windows Search service if you want you can enable the Windows Search service using this command: net.exe start “Windows Search”
3. Once the Search service is disabled, check if your disk usage issue is resolved or not.
4. If you’re able to fix 100% disk usage in Task Manager then you need to permanently disable Windows Search.
5. Press Windows Key + R then type services.msc and hit Enter.

6. Scroll down and find Windows Search service. Right-click on it and select Properties.
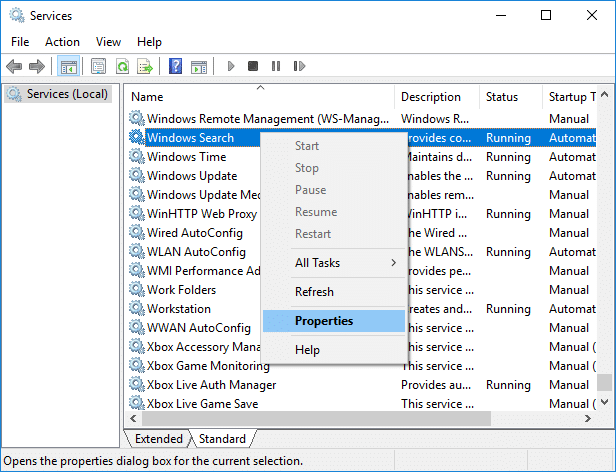
7. From the Startup type drop-down select Disabled.
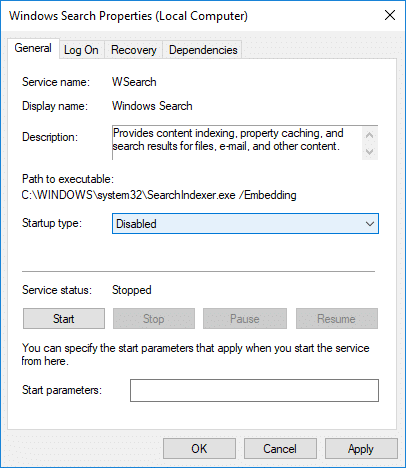
8. Click Apply followed by Ok to save your changes.
9. Again open Task Manager (Ctrl+Shift+Esc) and see if the system is no longer using 100% of the disk usage which means you have fixed your issue.
Method 2: Disable Get tips, tricks, and suggestions as you use Windows
1. Press Windows Key + I to open Settings and then click System.

2. Now from the left-hand menu click on Notifications & actions.
3. Scroll down till you find “Get tips, tricks, and suggestions as you use Windows.”
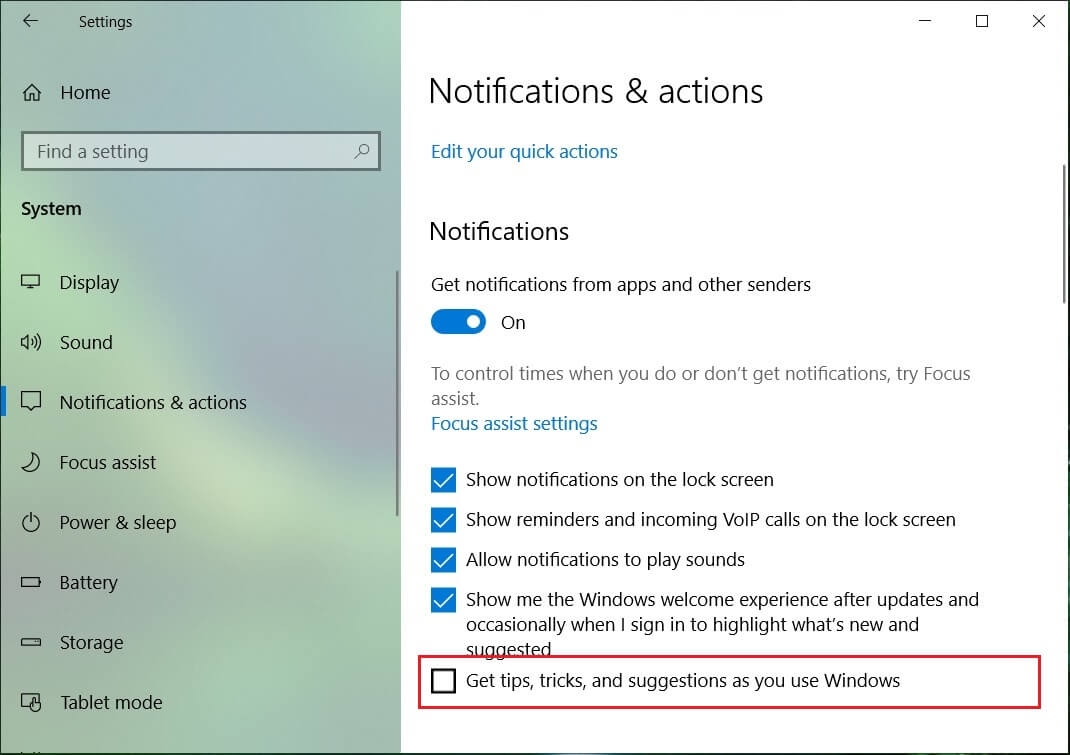
4. Make sure to turn off the toggle in order to disable this setting.
5. Reboot your PC and see if you’re able to fix 100% Disk Usage In Task Manager In Windows 10.
Method 3: Disable Superfetch
1. Press Windows Key + R then type services.msc and hit enter.
2. Scroll down the list and find Superfetch service in the list.
3. Right-click on Superfetch and select Properties.
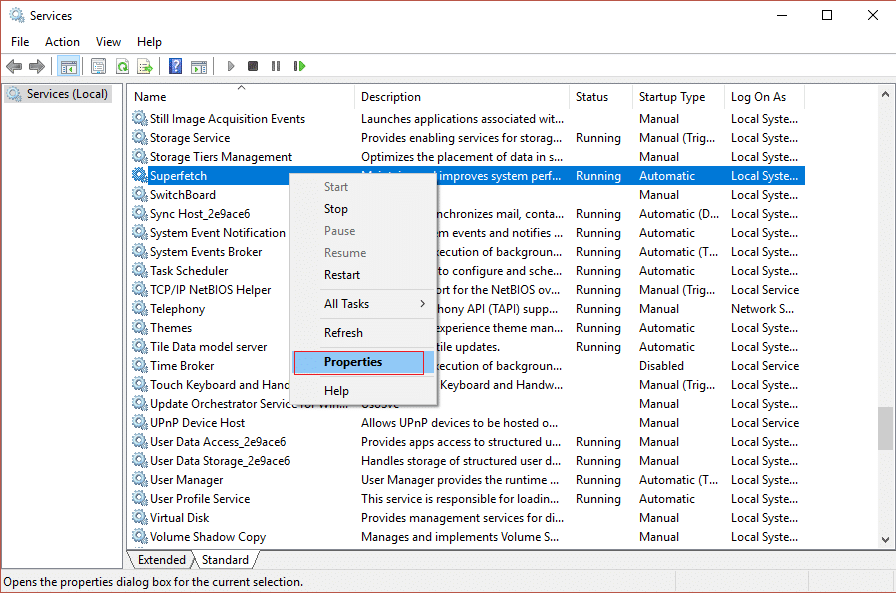
4. First, click on Stop and set the startup type to Disabled.

5. Reboot your PC to save changes and this may be able to Fix 100% Disk Usage In Task Manager In Windows 10.
Method 4: Disable RuntimeBroker
1. Press Windows Key + R then type regedit and hit enter to open Registry Editor.

2. In Registry Editor navigate to the following:
HKEY_LOCALMACHINESYSTEMCurrentControlSetServicesTimeBrokerSvc
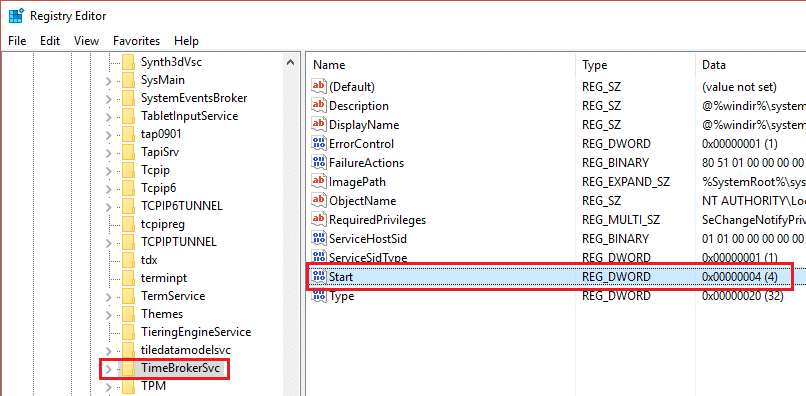
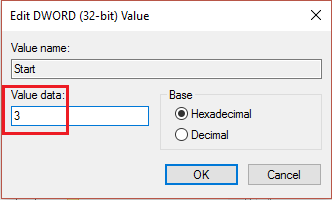
3. In the right pane, double-click on Start and change it Hexadecimal value from 3 to 4. (Value 2 means Automatic, 3 means manual and 4 means disabled)
4. Close the Registry Editor and reboot your PC to apply changes.
Method 5: Reset Virtual Memory
1. Press Windows Key + R then type sysdm.cpl and hit Enter to open System Properties.

2. Switch to Advanced tab then click on the Settings button under Performance.

3. Now again switch to Advanced tab under Performance Options then click on “Change” button under Virtual memory.

4. Make sure to uncheck “Automatically manage paging file size for all drives“.
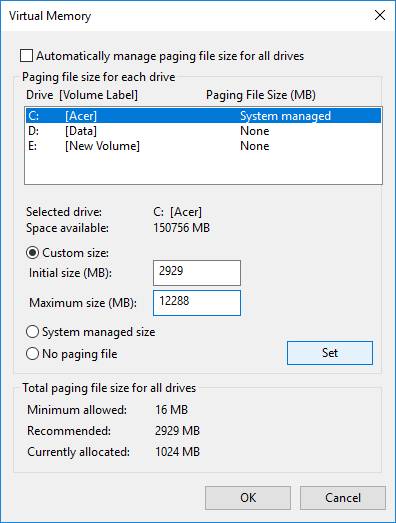
5. Next, highlight your system drive (generally C: drive) under Paging file size and select Custom size options. Then set the suitable values for fields: Initial size (MB) and Maximum size (MB). It is highly recommended to avoid selecting No paging file option here.
Note: If you are not sure what to set for the value field of Initial size, then use the number from “Recommend” under “Total paging file size for all drives” section. For Maximum size, don’t set the value too high and it should be set about 1.5x the amount of RAM installed. So, for a PC running 8 GB of RAM, the maximum size should be 1024 X 8 X 1.5 = 12,288 MB.
6. Once you have Entered the suitable value click Set and then click OK.
7. Next, step would be to clear the temporary files of Windows 10. Press Windows Key + R then type temp and hit Enter.
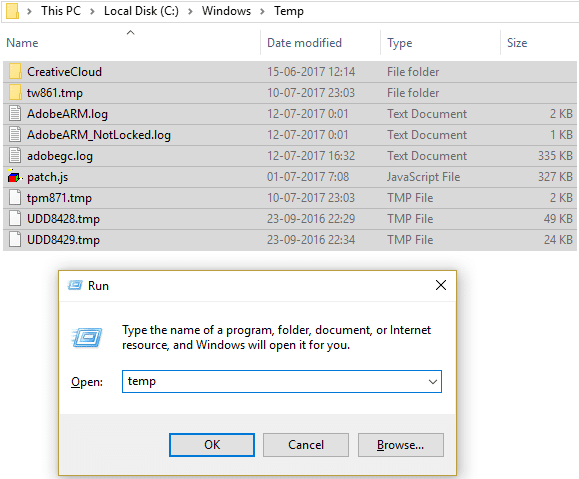
8. Click on Continue to open the Temp folder.
9. Select all the files or folders present inside the Temp folder and permanently delete them.
Note: To permanently delete any file or folder, you need to press Shift + Del button.
10. Now open Task Manager (Ctrl+Shift+Esc) and see if you’re able to Fix 100% Disk Usage In Task Manager In Windows 10.
Method 6: Fix your StorAHCI.sys driver
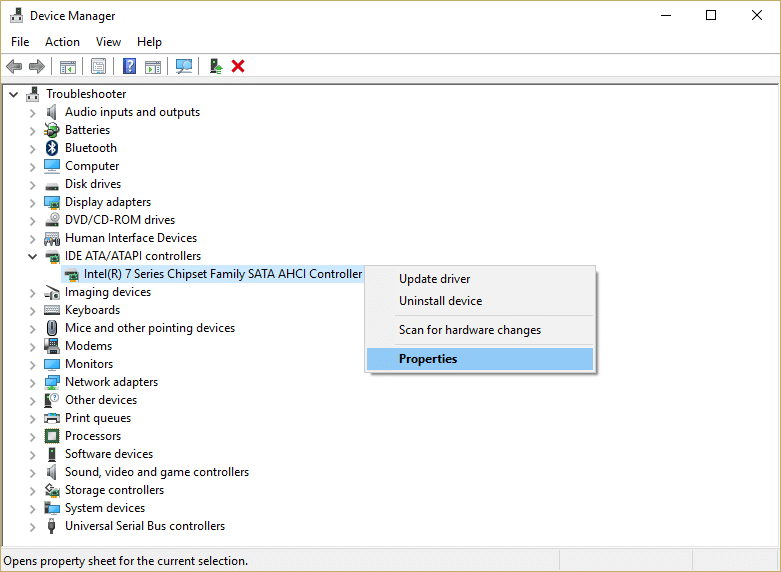
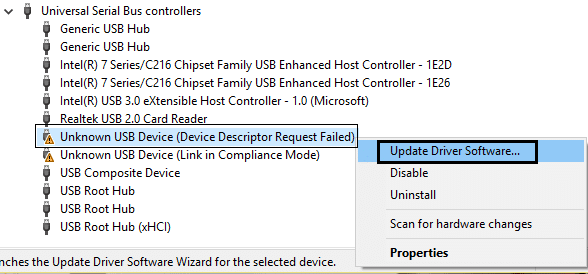
1. Press Windows Key + R then type devmgmt.msc and hit Enter to open Device Manager.

2. Expand the IDE ATA/ATAPI Controllers and then right-click on AHCI controller and select Properties.
3. Switch to Driver tab then click on the Driver Details button.
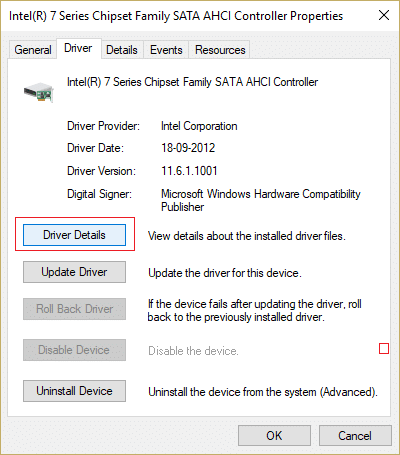
4. If in the Driver File Details window, you see the C:WINDOWSsystem32DRIVERSstorahci.sys in the Driver files field then your system might be affected by a bug in Microsoft AHCI driver.
5. Click Ok to close the Driver File Details window and switch to Details tab.
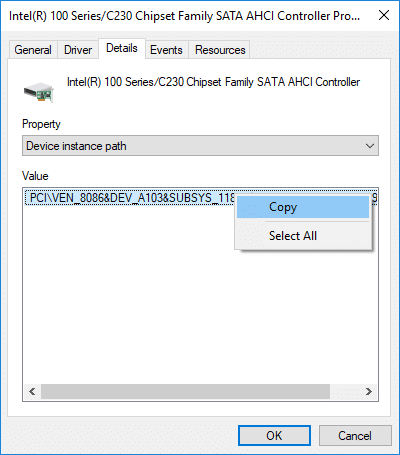
6. Now from the Property drop-down select “Device instance path“.
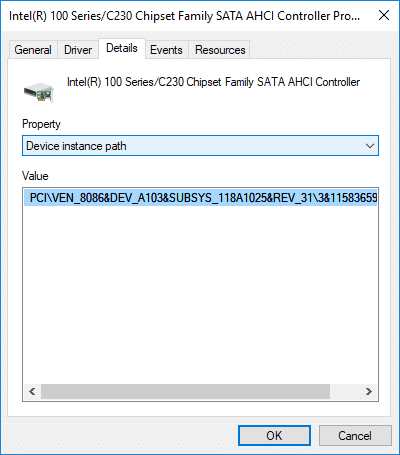
7. Right-click on the text present inside Value field and select Copy. Paste the text into a Hex editor notepad++ file or somewhere safe.
PCIVEN_8086&DEV_A103&SUBSYS_118A1025&REV_313&11583659&0&B8
8. Press Windows Key + R then type regedit and hit Enter to open Registry Editor.
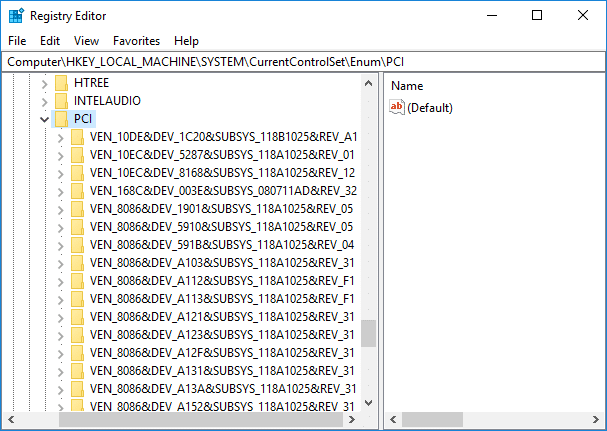
9. Navigate to the following registry path:
HKEY_LOCAL_MACHINESystemCurrentControlSetEnumPCI
10. Now under PCI, you need to find the AHCI Controller, in the above example (on step 7) the correct value of AHCI Controller would be “VEN_8086&DEV_A103&SUBSYS_118A1025&REV_31”.
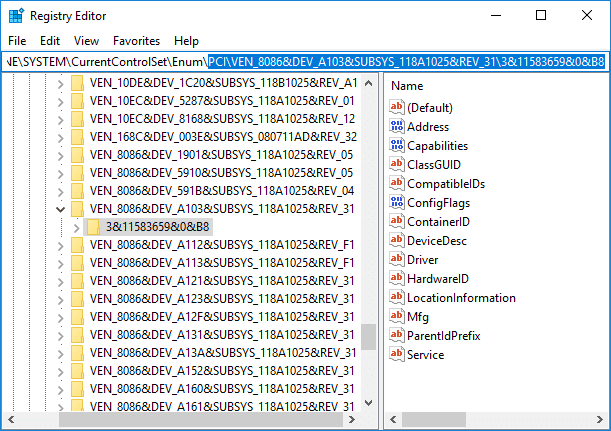
11. Next, the second part of the above example (on step 7) is 3&11583659&0&B8, which you will find when you expand “VEN_8086&DEV_A103&SUBSYS_118A1025&REV_31” registry key.
12. Once again make sure you are at the correct location in the registry:
HKEY_LOCAL_MACHINESystemCurrentControlSetEnumPCI <AHCI Controller><Random Number>
Example: ComputerHKEY_LOCAL_MACHINESYSTEMCurrentControlSetEnumPCIVEN_8086&DEV_A103&SUBSYS_118A1025&REV_313&11583659&0&B8
13. Next, under the above key, you need to navigate to:
Device Parameters > Interrupt Management > MessageSignaledInterruptProperties
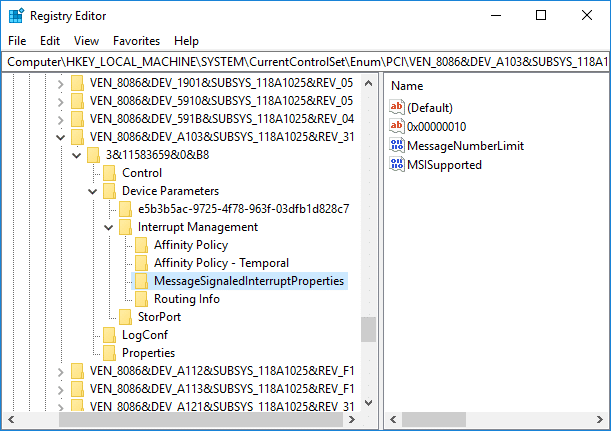
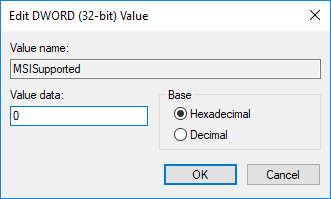
14. Make sure to select “MessageSignaledInterruptProperties” key and then in right window pane double-click on MSISupported DWORD.
15.Change the value of MSISupported DWORD to 0 and click OK. This would turn off MSI on your system.
16. Close everything and reboot your PC to save changes.
Method 7: Disable Startup Apps And Services
1. Press Ctrl + Shift + Esc key simultaneously to open Task Manager.
2. Then switch to the Startup tab and Disable all the services which have a High impact.

3. Make sure to only Disable 3rd party services.
4. Reboot your PC to save changes.
Method 8: Disable P2P sharing
1. Press Windows Key + I to open Settings.
2. From Settings windows click on Update & Security icon.
![]()
3. Next, under Update settings click Advanced options.
4.Now click “Choose how updates are delivered.”

5.Make sure to turn off the toggle for “Updates from more than one place.”

6.Restart your PC and again check if you’re able to Fix 100% Disk Usage In Task Manager In Windows 10.
Method 9: Disable the ConfigNotification task
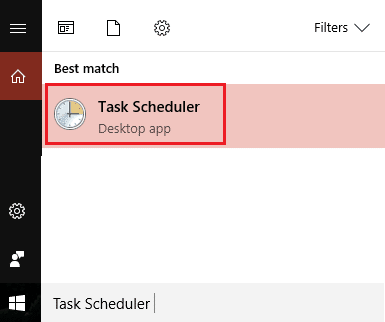
1.Type Task Scheduler in Windows search bar and click on Task Scheduler.
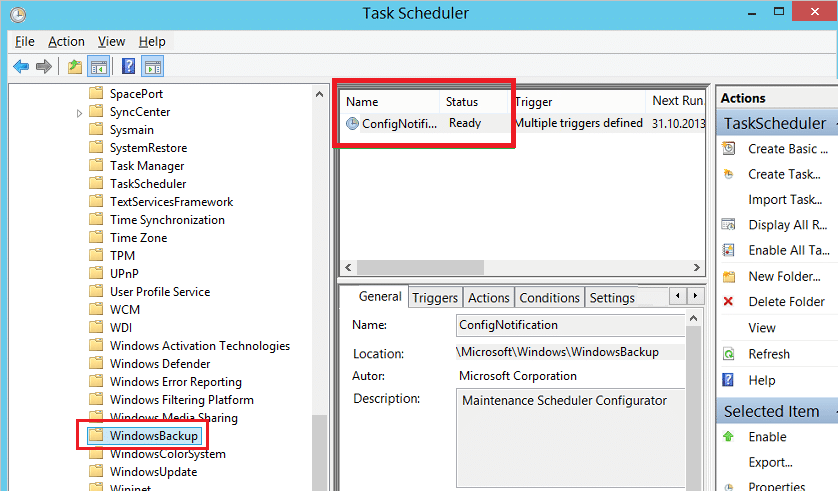
2.From Task Scheduler go to Microsoft than Windows and finally select WindowsBackup.
3.Next, Disable ConfigNotification and apply changes.
4.Close Event Viewer and restart your PC and this may Fix 100% Disk Usage In Task Manager In Windows 10, if not then continue.
Method 10: Disable Prediction Service in Chrome
1.Open Google Chrome and then click on the three vertical dots (more button) then select Settings.

2.Scroll down and click on Advanced.
3.Then under Privacy and security make sure to disable the toggle for “Use a prediction service to load pages more quickly.”

4.Once finished, restart your PC to save changes.
Method 11: Run System Maintenance Troubleshooter
1.Press Windows Key + R then type control and hit Enter to open Control Panel.

2.Search Troubleshoot and click on Troubleshooting.

3.Next, click on View all in the left pane.
4.Click and run the Troubleshooter for System Maintenance.

5.The Troubleshooter may be able to Fix 100% Disk Usage In Task Manager In Windows 10.
Method 12: Update Windows and Drivers
1.Press Windows Key + I and then select Update & Security.
![]()
2.Then under Update status click on “Check for updates.”

3.If an update is found for your PC, install the update and reboot your PC.
4.Now press Windows Key + R then type “regedit” and hit enter to open Device Manager.
5.Make sure there is no yellow exclamation mark and update drivers which are outdated.
6.In many cases updating drivers was able to Fix 100% Disk Usage In Task Manager In Windows 10.
Method 13: Defragment Hard Disk
1.In Windows Search bar type “defragment” and then click on Defragment and Optimize Drives.
2.Next, select all the drives one by one and click on Analyze.

3.If the percentage of fragmentation is above 10% then make sure to select the drive and click on Optimize (This process can take some time so be patient).
4.Once fragmentation is done restart your PC and check if you’re able to Fix 100% Disk Usage In Task Manager In Windows 10. This process might also assist you to fix WaasMedicSVC.exe High Disk Usage in Windows 10.
Method 14: Run CCleaner and Malwarebytes
1.Download and install CCleaner & Malwarebytes.
2.Run Malwarebytes and let it scan your system for harmful files.
3.If malware is found it will automatically remove them.
4.Now run CCleaner and in the “Cleaner” section, under the Windows tab, we suggest checking the following selections to be cleaned:

5.Once you’ve made certain the proper points are checked, simply click Run Cleaner, and let CCleaner run its course.
6.To clean your system further select the Registry tab and ensure the following are checked:

7.Select Scan for Issue and allow CCleaner to scan, then click Fix Selected Issues.
8.When CCleaner asks “Do you want backup changes to the registry?” select Yes.
9.Once your backup has completed, select Fix All Selected Issues.
10.Restart your PC to save changes and see if you’re able to Fix 100% Disk Usage In Task Manager In Windows 10.
Method 15: Run System File Checker And DISM
1.Press Windows Key + X then click on Command Prompt(Admin).

2.Now type the following in the cmd and hit enter:
Sfc /scannow
sfc /scannow /offbootdir=c: /offwindir=c:windows (If above fails then try this one)

3.Wait for the above process to finish and once done restart your PC.
4.Again open cmd and type the following command and hit enter after each one:
a) Dism /Online /Cleanup-Image /CheckHealth
b) Dism /Online /Cleanup-Image /ScanHealth
c) Dism /Online /Cleanup-Image /RestoreHealth

5.Let the DISM command run and wait for it to finish.
6.Reboot your PC to save changes and see if you’re able to Fix 100% Disk Usage In Task Manager In Windows 10.
Method 16: Disable Fast Startup
1.Press Windows Key + R then type control and hit Enter to open Control Panel.
2.Click on Hardware and Sound then click on Power Options.
3.Then from the left window pane select “Choose what the power buttons do.”
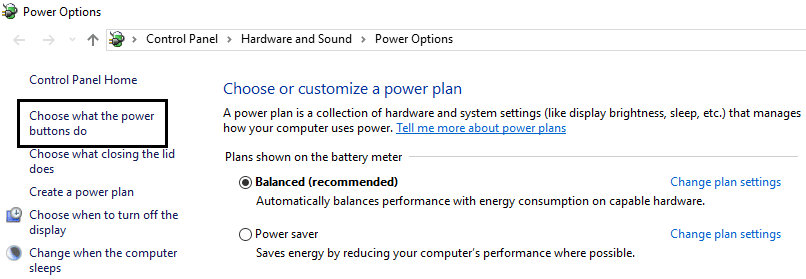
4.Now click on “Change settings that are currently unavailable.”

5.Uncheck “Turn on fast startup” and click on Save changes.
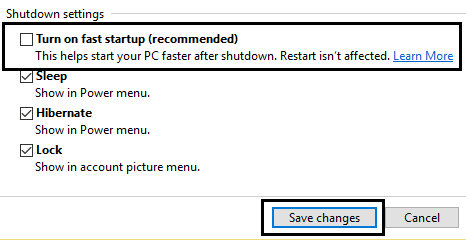
6.Restart your PC and see if you’re able to Fix 100% Disk Usage In Task Manager In Windows 10.
Method 17: 100% Disk Usage by Skype
1.Press Windows key + R then type “C:Program Files (x86)SkypePhone” and hit enter.
2.Now right-click on “Skype.exe” and select Properties.

6.Switch to the Security tab and make sure to highlight “ALL APPLICATION PACKAGES” then click Edit.

7.Again make sure “ALL APPLICATION PACKAGES” is highlighted then checkmark Write permission.

8.Click Apply followed by Ok and then restart your PC to save changes.
Method 18: Disable System and Compressed Memory Process
1.Press Windows Key + R then type Taskschd.msc and hit Enter to open Task Scheduler.

2.Navigate to the following path:
Task Scheduler Library > Microsoft > Windows > MemoryDiagnostic
3.Right-click on RunFullMemoryDiagnostic and select Disable.
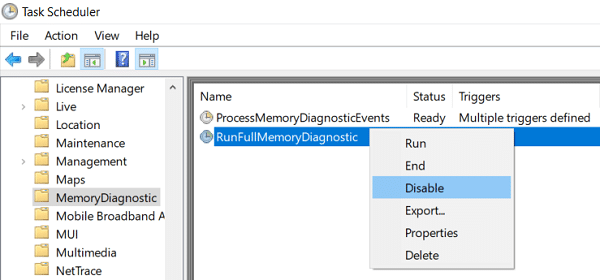
4.Close Task Scheduler and restart your PC.
Method 19: Temporarily Disable Your Antivirus Software
1.Right-click on the Antivirus Program icon from the system tray and select Disable.

2.Next, select the time frame for which the Antivirus will remain disabled.

Note: Choose the smallest amount of time possible for example 15 minutes or 30 minutes.
3.Once done, again check if you’re able to fix the 100% disk usage in task manager.
Recommended:
That’s it you have successfully learned How to Fix 100% Disk Usage In Task Manager In Windows 10 but if you still have any questions regarding this tutorial then feel free to ask them in the comment’s section.