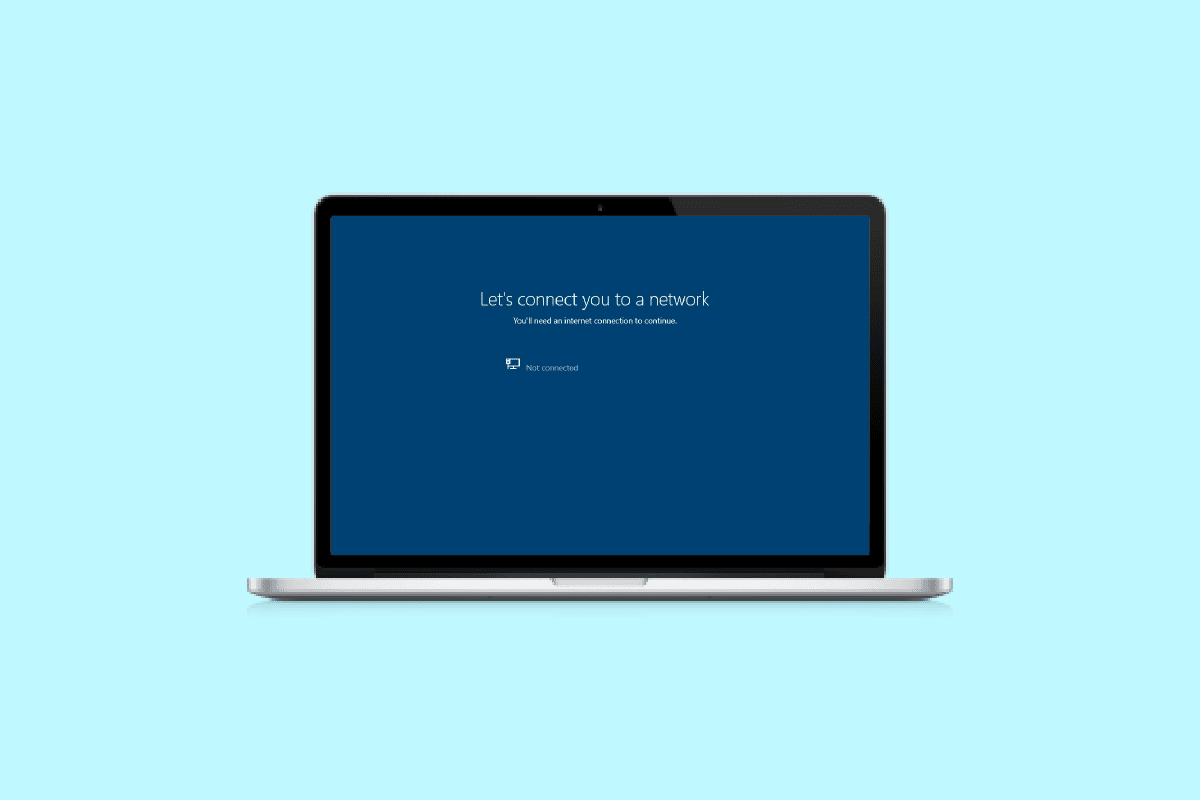
While the installation of fresh Windows brings new features to your system, it is also a must to install new updates to keep up with the changes. Fresh installation of Windows makes your system run faster and better. Also, it optimizes the functions of your PC as well. Although it is suggested to install new Windows updates when they are released, it is also a task to do so. Especially, some people, when they try to install a new one, they happen to face issues while connecting to the network. If you have been facing the same issue, we have a perfect guide for you that will help you fix computer stuck on lets connect you to a network. In this doc, we will know how to bypass let’s connect you to a network error in different ways. Along with that, we will also uncover reasons why this issue occurs in the first place. So, without any further ado, let us get started with our most awaited guide on how to fix not being able to connect to the network.
How to Fix Computer Stuck on Lets Connect You to a Network
Continue reading to bypass let’s connect you to a network on Windows PC.
What is Lets Connect you to a Network Error?
Before starting with ways to fix computer stuck on lets connect you to a network, it is first wise to explore the error and know more about it. Usually, a system or a PC connects to the internet to share data packets to access data and files on the network. In case, if the system is unable to set up this connection due to a network, you can encounter lets connect you to a network error.
Reasons Behind Lets Connect you to a Network Error
There are a number of reasons can be behind lets connect you to a network error. Let us explore these network issues reasons below:
- Outdated Drivers: The first reason that is known to trigger the error is outdated drivers on your system. Drivers usually help in the smooth and efficient working of software and applications on your system. Hence, they must be regularly updated to avoid any network errors.
- Infected Files: The next reason behind this network problem can be malware-infected files that affect the working of the system. So, you must check if files filled with malware are the reason why your system cannot connect to a network.
- Bug-filled Updates: Windows often release new updates that happen to fix errors and bugs on your system. However, if the update itself is infected with bugs or malware, it can result in network issues on your PC.
- Physical Damage: The last reason that can cause network malfunction in your PC is physical damage to your router or Ethernet card. If so, you must check if your router and card are physically in good condition.
How to Bypass Let’s Connect you to a Network Error
While let’s connect you to a network issue is often encountered by Windows users, it is easy to tackle this issue easily with the help of the below given tested methods:
Method 1: Forget Network
The first step in order to fix the issue of network connectivity is to forget the current network. Usually, a system stores the credentials when you connect to a network. However, when changes are made in the settings by the provider then the system might face issues in connecting back to it and therefore, the error. So, you must forget the network and connect to it again to resolve the issue of lets connect you to a network. You can check our guide on 3 Ways to Forget a Wi-Fi network on Windows 10 for more help.

Method 2: Use Mobile Hotspot
In order to fix not being able to connect to the network, you can also use a mobile hotspot. Sometimes, users may find it difficult to connect to a wireless connection, in such a case mobile hotspot can be used as a rescue. You can simply disconnect all other devices connected to your PC and connect to your mobile hotspot.
Also Read: Fix No WiFi Networks Found in Windows 10
Method 3: Enable/Disable Airplane Mode
Airplane mode is a great utility for Windows users that helps them to enable or disable all the connections to their system with a single click. You can enable and then disable airplane mode on your PC to connect to a network without a problem.
1. Click on the Wi-Fi icon present at the bottom of your system screen.
![]()
2. Now, click on the Airplane mode option to enable it. This will disconnect all your connections.
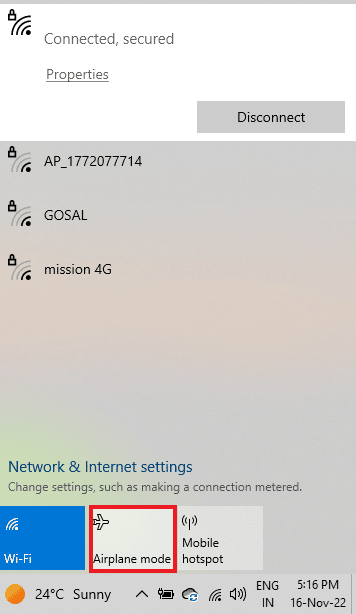
3. Next, click on the same tab after some time to connect to a network successfully.
Method 4: Run Network Adapter Troubleshooter
Windows systems have in-built troubleshooters like one for a network that can help you to bypass let’s connect you to a network trouble. This can also help you to locate errors while connecting to the network alongside fixing it. Our guide on How to Troubleshoot Network Connectivity Problems on Windows 10 can help you a great deal with this method.

Also Read: Fix Internet Keeps Dropping on Windows 10
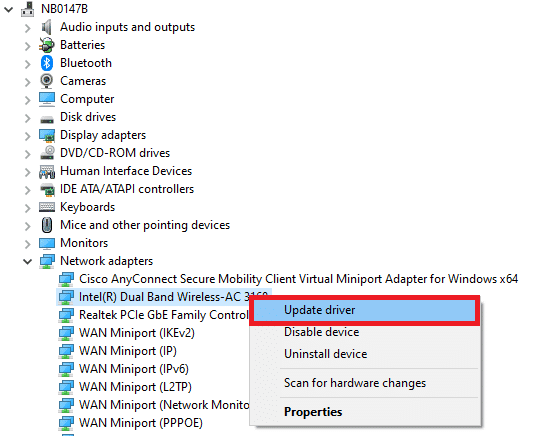
Method 5: Update Network Adapter Drivers
Let us move on to our next method which involves updating network adapter drivers to fix the issue of network connectivity. Sometimes, a faulty or outdated network adapter driver can be responsible for the whole connectivity issue on your device, so it is important to keep them updated always. You can go through our guide on How to Update Network Adapter Drivers on Windows 10 for more.
Method 6: Set Up Connection Manually
The next step involves setting up your network connection manually to fix all network issues and make it easy for your device to install Windows.
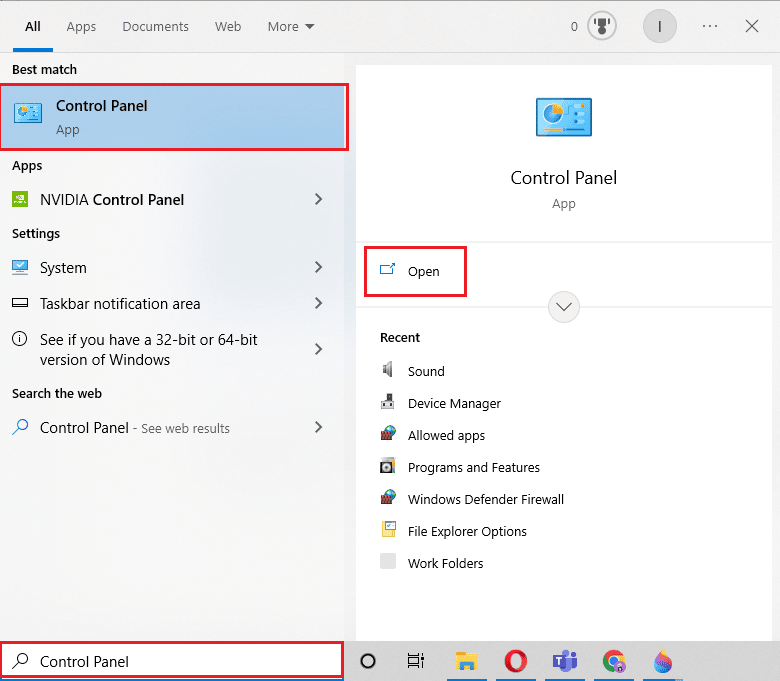
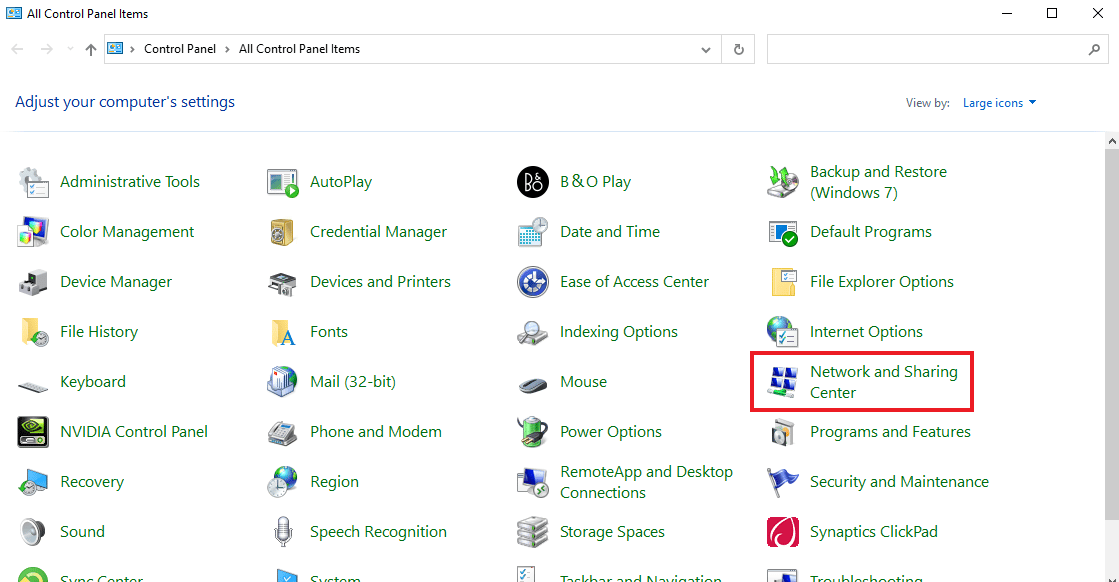
1. Hit the Windows key, type Control Panel, and click on Open.
2. Set View by > Large icons, then click on Network and Sharing Center.

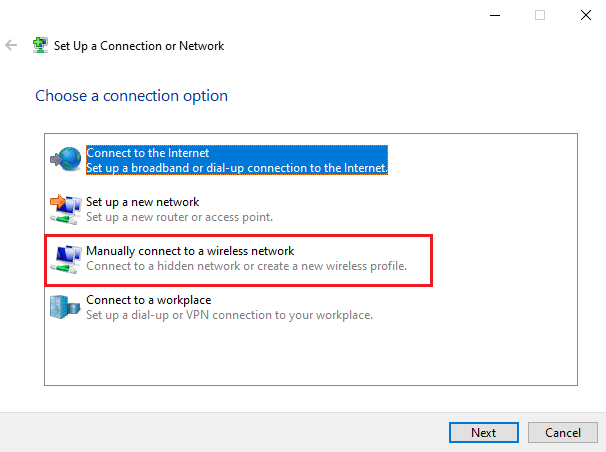
3. Now, select Set up a new connection or network.
4. Next, select Manually connect to a wireless network and click Next.
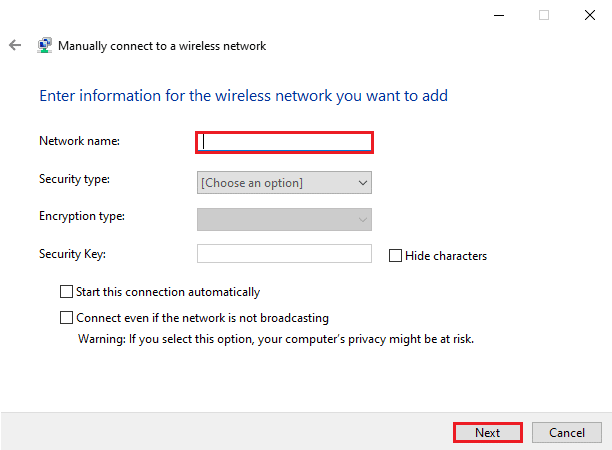
5. Now, enter the Network name and other essential details required, and finally click on Next.
Also Read: How to Setup Network Files Sharing on Windows 10
Method 7: Change Wireless Network Mode
In this step, you will be required to change your wireless network mode to fix computer stuck on lets connect you to a network. These wireless networks allow users to connect to a particular network.
1. From Control Panel, open the Network and Sharing Center.

2. Now, select your network and click on it to open its Properties.

3. Now, in the Wi-Fi Properties window in the Networking tab, click on Configure.

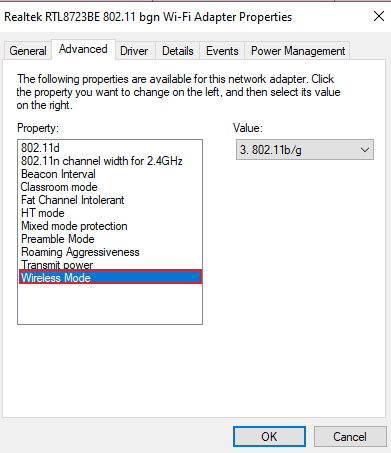
4. Then, in the Advanced tab, select Wireless Mode.
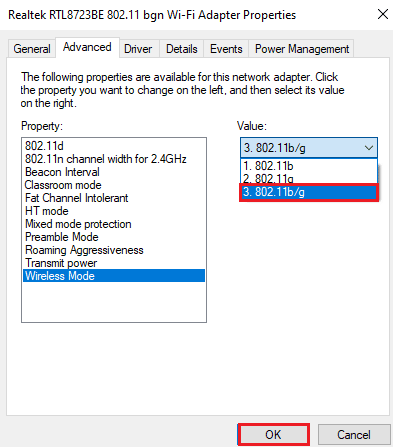
5. Finally, under Value click on 802.11b/g and select OK.
Method 8: Ensure Adapter and Windows Use Same Security Type
The next method to attempt involves ensuring that the adapter and Windows of your system use the same security type. As Wi-Fi is protected with security both the mentioned utilities must use the same security feature that is offered by the network provider. You can ensure this with the help of the following steps:
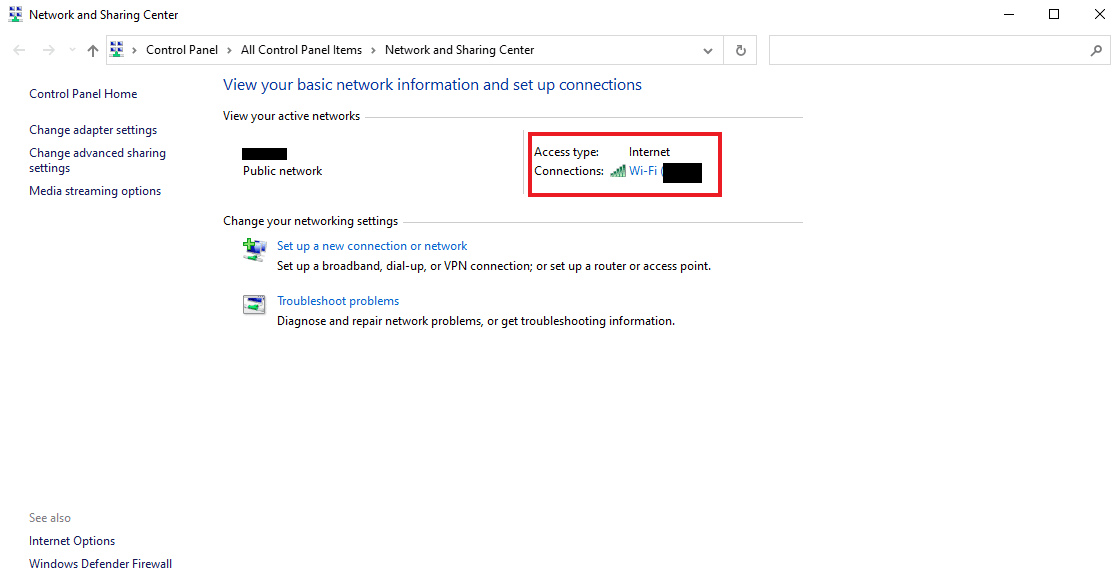
1. Launch Network and Sharing Center from the Control Panel.
2. Now, click on your Wi-Fi network.
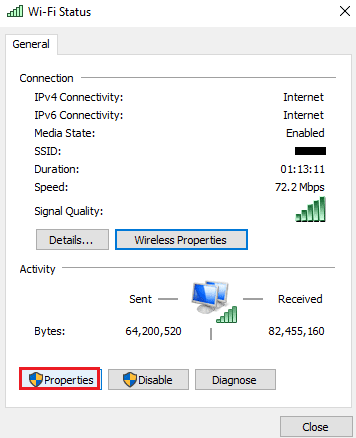
3. Next, in the Wi-Fi Status window, click on Wireless Properties.
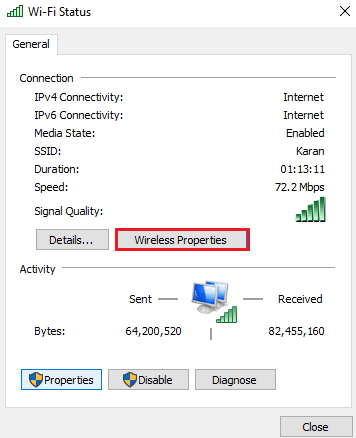
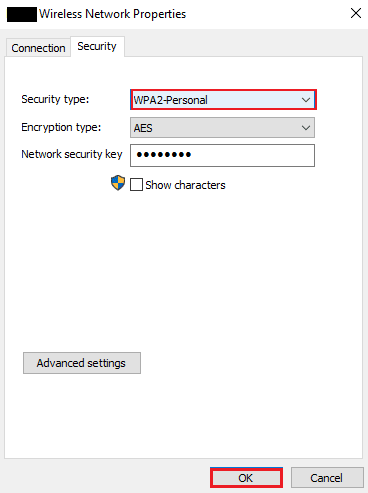
4. Now, under the Security tab, verify the Security type, and select OK.
Also Read: Fix Ethernet Doesn’t Have a Valid IP Configuration Error
Method 9: Change Channel Width for Network Adapter
You can also fix not being able to connect to the network by changing the width of the channel through which the system connects to the network which will eventually help you to install Windows on your PC.
1. Right-click on the Wi-Fi icon on your desktop screen and click on Open Network & Internet settings.
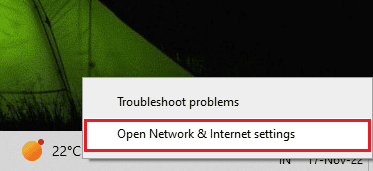
2. In it, open Network and Sharing Center.
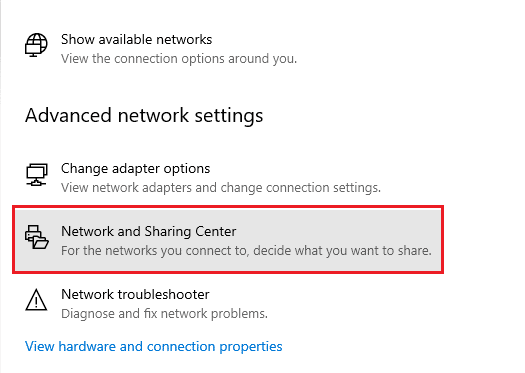
3. Now, select Change adapter settings.
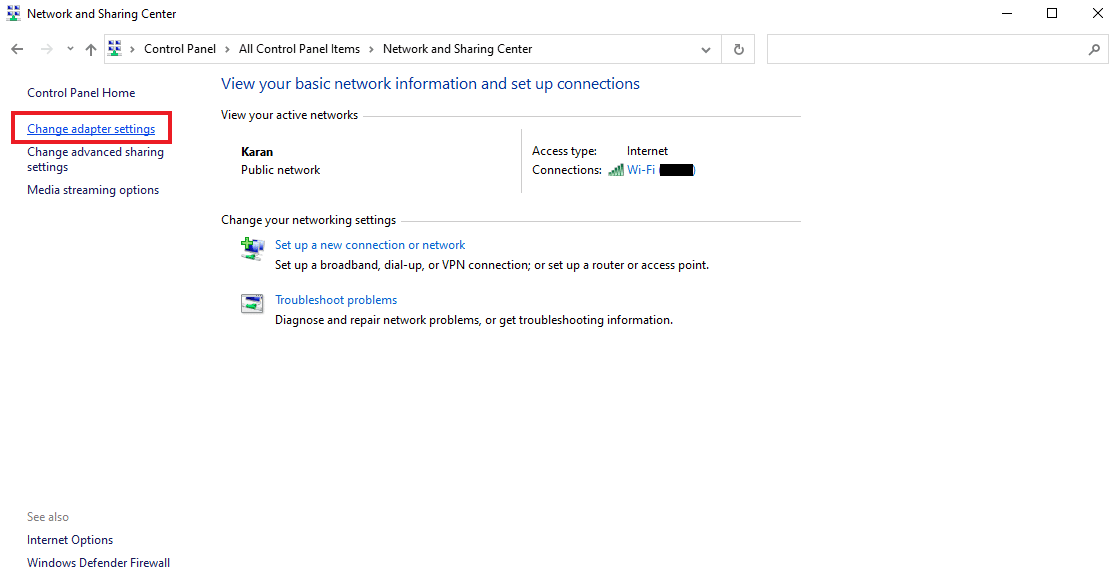
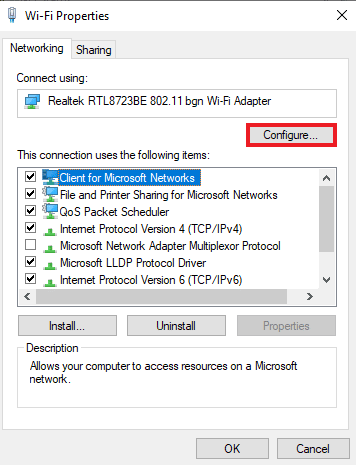
4. Next, right-click on your Wi-Fi network and select Properties.
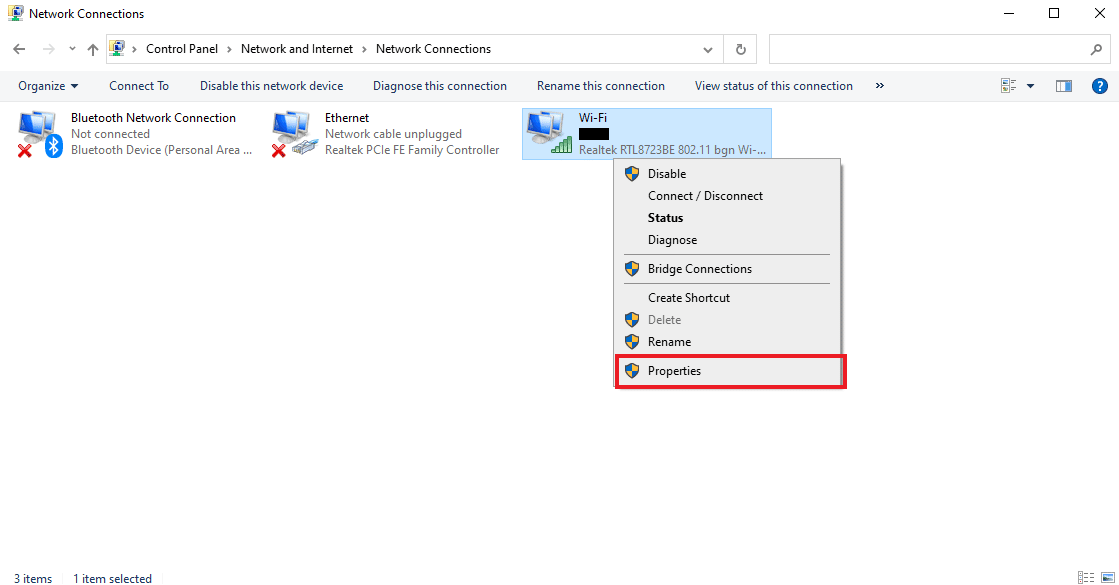
5. Now, in the Networking tab, click on Configure…
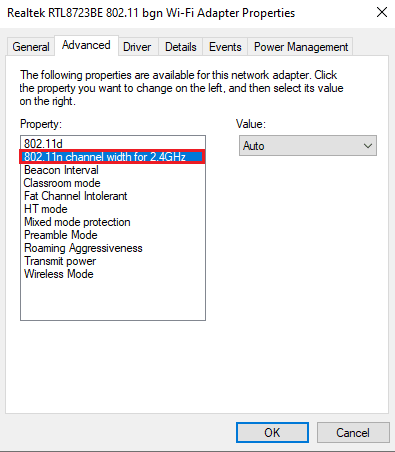
6. In the Advanced tab, click on 802.11n Channel Width for 2.4GHz.
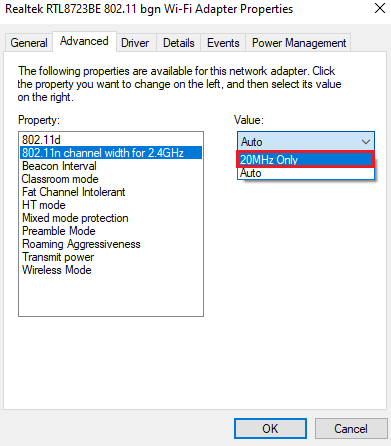
7. Now, select 20MHz Only under Value.
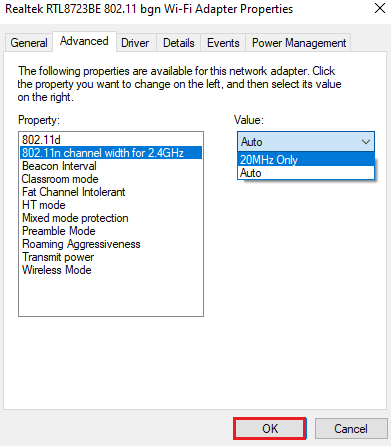
8. Finally, select OK at the bottom.
Method 10: Change Power Options
Finally, to bypass let’s connect you to a network error and all other network issues on your computer, you can try changing the power options. This action will also help you to increase the performance of your PC.
1. Press the Windows key, type Power & sleep settings, then click on Open.
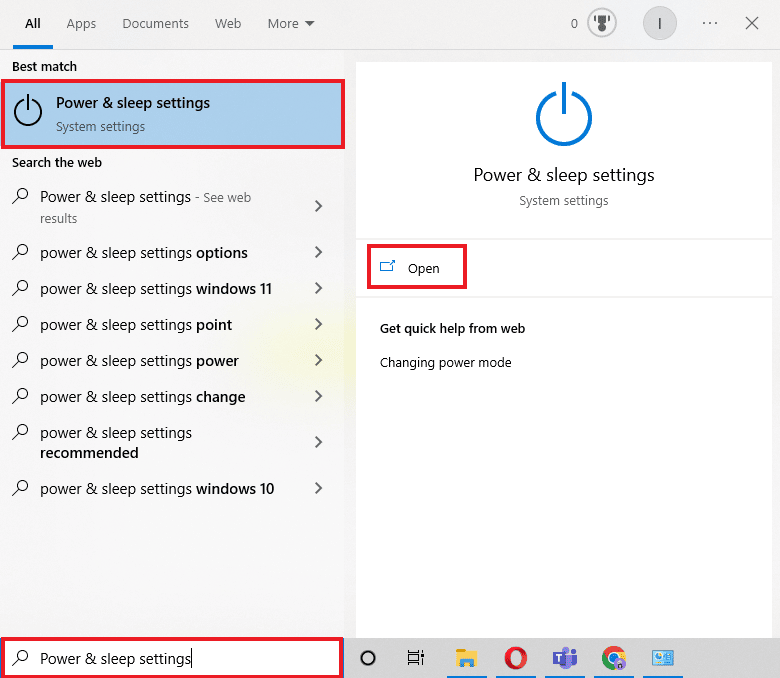
2. Now, click on the Additional power settings option.
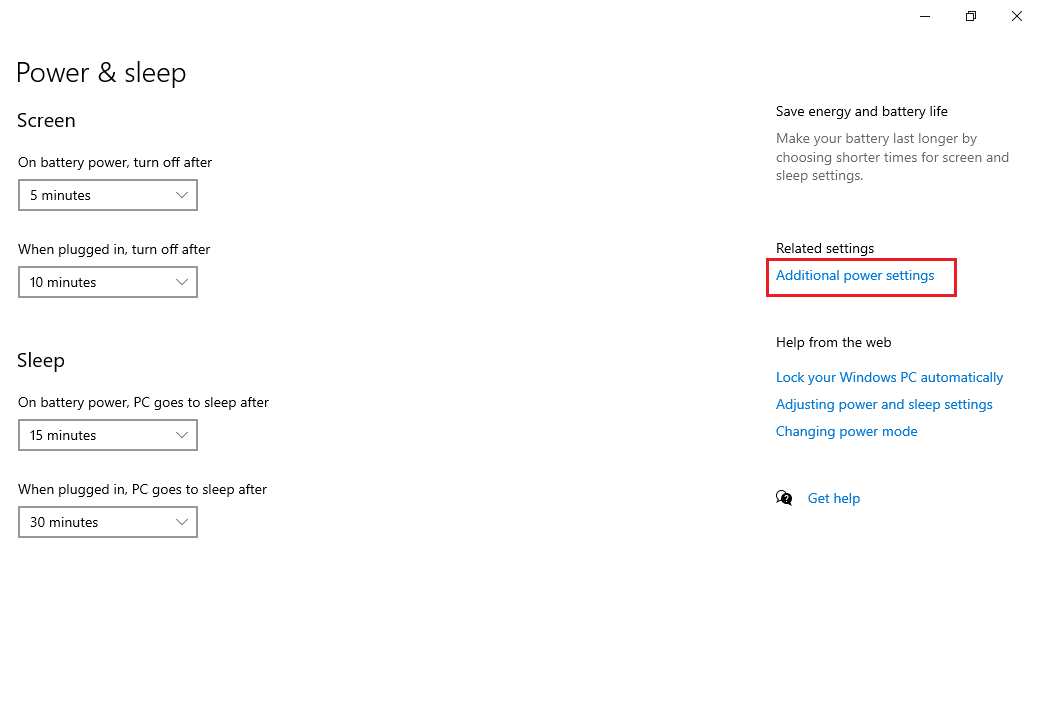
3. Next, click on Change plan settings.
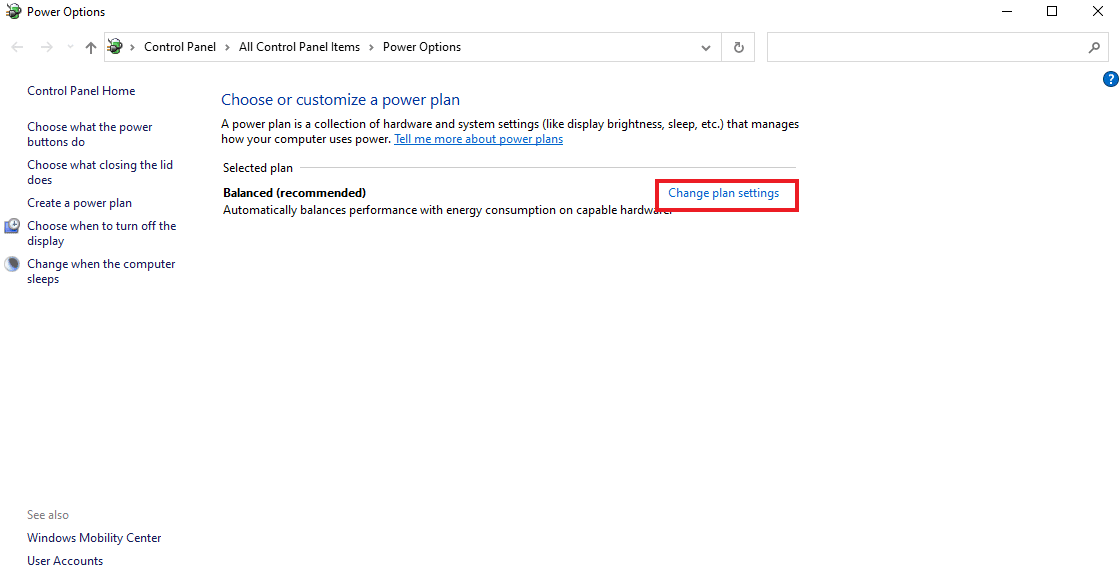
4. Then, click on Change advanced power settings.
5. Now, double-click on Wireless Adapter Settings to open Power Saving Mode.
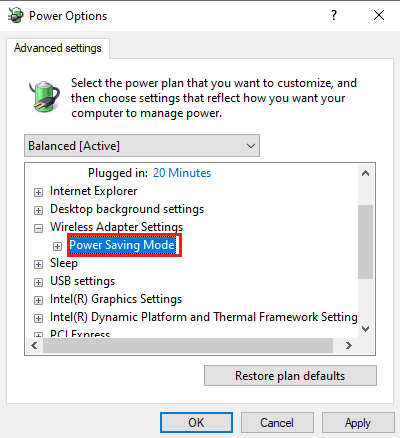
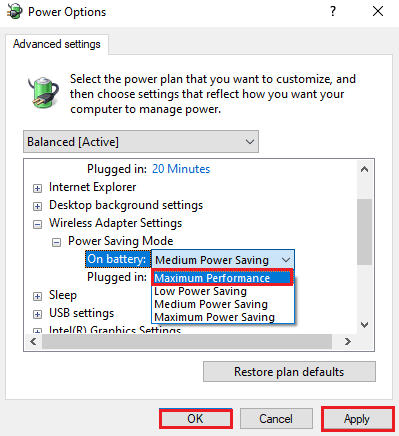
6. Then, select Maximum Performance for On battery and select OK and then Apply.
Also Read: Fix Windows could not automatically detect this Network’s Proxy settings
Method 11: Disable IPv6
While most Windows PCs use IPv4 there are specific tasks that need IPv6 to process. So, you can disable IPv6 for the time being and enable it when it is required to fix not being able to connect to the network. You can know about how to disable IPv6 with the help of the following steps:
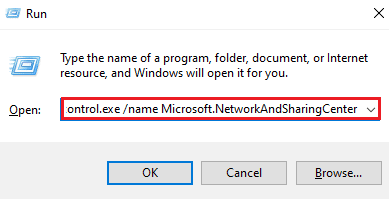
1. Launch the Run dialog box by hitting the Windows + R keys simultaneously.

2. Next, enter the control.exe /name Microsoft.NetworkAndSharingCenter command and press the Enter key.
3. Now, click on your current connection to open its settings.

4. Next, click on Properties.
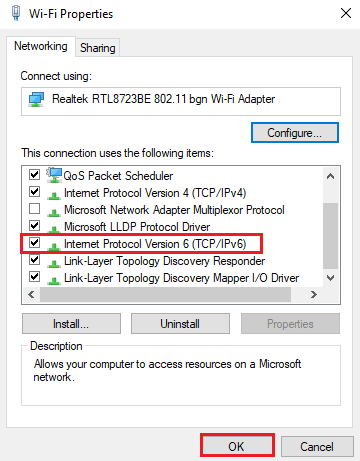
5. Now, in the Network tab, uncheck the box for Internet Protocol Version 6 (TCP/IPv6) and click OK.
6. Then, reboot the PC and check if you have bypass let’s connect you to a network issue.
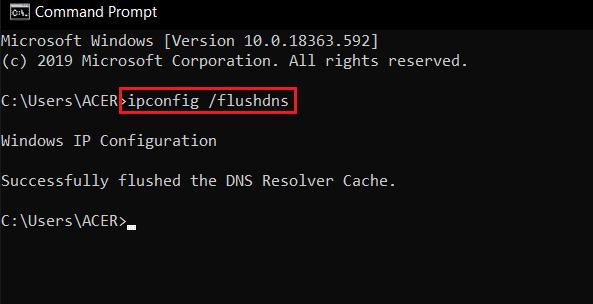
Method 12: Flush and Reset DNS Cache
The next method involves flushing and resetting the DNS cache to fix computer stuck on lets connect you to a network. Your system might face some issues in connecting to a network if your DNS is not flushed. It may also cause your system to work slower and present you with no results. You can learn about How to Flush and Reset the DNS Cache in Windows 10 with the help of our informative guide.
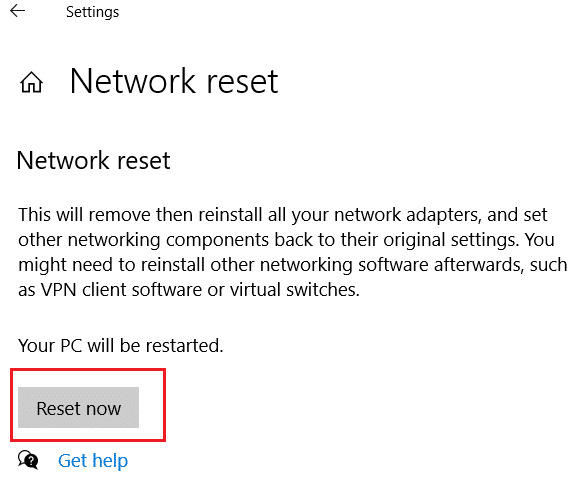
Method 13: Reset Network
If even troubleshooting network problems does not help you out with the error on your PC, you can try resetting the network. If you want to attempt this method, our doc on How to Reset Network Settings on Windows 10 will guide you well.
Also Read: Fix Computers Not Showing Up on Network in Windows 10
Method 14: Disable/Enable NIC
Network Interface Card (NIC) is a hardware component that is essential to connect computers over a network. You can try to disable or enable NIC to resolve any network issues on your PC.
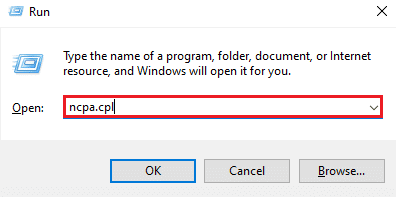
1. Open the Run dialog box.
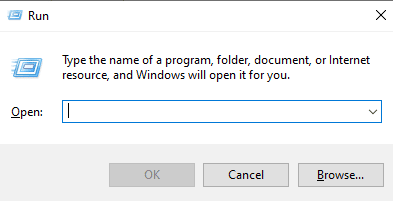
2. Next, type ncpa.cpl and hit the Enter key to launch Network Connections.
3. Now, right-click on your Wi-Fi network and click on Disable.
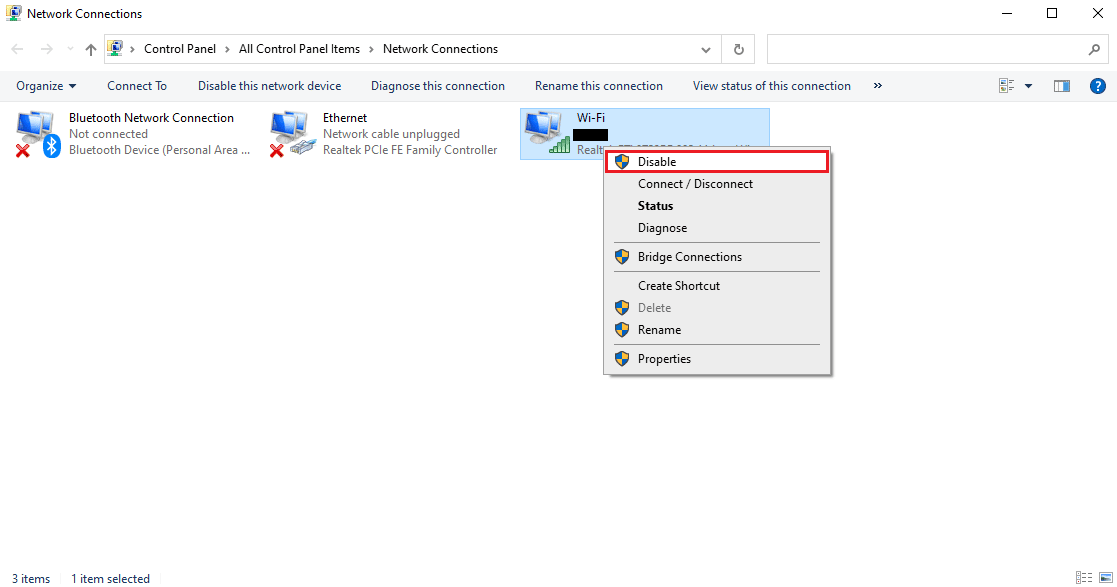
4. Then, enable your network and restart the PC.
Recommended:
We hope that our elaborative and informative guide on how to fix Computer stuck on lets connect you to a network was successful in answering all your doubts about the error and different ways that can help you fix it. Let us know by leaving your comments below if you have any queries or suggestions.