Fix Wireless Mouse Not Working in Windows 10: If the wireless mouse is not working or wireless mouse is getting stuck or freezes on your PC then you are at the right place, as today we are going to discuss on how to fix this issue. Now there are various reasons because of which this issue can occur such as outdated, corrupt or incompatible drivers, power management issues, battery discharge, USB port problem etc. So without wasting any time let’s see how to Fix Wireless Mouse Not Working in Windows 10 with help of the below-listed troubleshooting guide.
You may experience the following problem with your Wireless Mouse:
- Mouse pointer moves randomly
- The Pointer is stuck or freezes
- Mouse Button click does not respond
- Mouse settings greyed out
- Mouse drivers not detected by Windows
Make sure you have charged your batteries of Wireless Mouse or entirely change them with a new set of batteries. Also, test your Wireless Mouse if it’s working on another PC or not. If it doesn’t work then this means your device is faulty and you need to replace it.
Fix Wireless Mouse Not Working in Windows 10
Make sure to create a restore point just in case something goes wrong. Use USB Mouse, Touchpad or PS2 Mouse connector in order to access Mouse functionality on your PC and then try the following steps.
Method 1: For USB/Bluetooth Mouse or Keyboard
1.Type control in Windows Search then click on Control Panel.

2.Then click on View Devices and Printers under Hardware and Sound.

3.Right-click on your USB Mouse or Keyboard then select Properties.
4.Switch to Hardware tab and then click on the HID Device, click properties.
5.Now click on Change Settings then switch to the Power Management Tab.
6.Uncheck the option “Allow the computer to turn off this device to save power.“
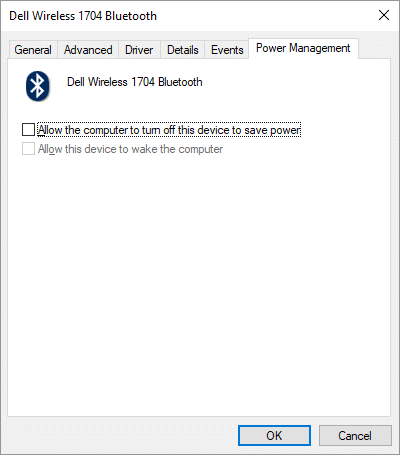
7.Click Apply followed by OK.
8.Reboot your PC to save changes and see if you’re able to Fix Wireless Mouse Not Working in Windows 10.
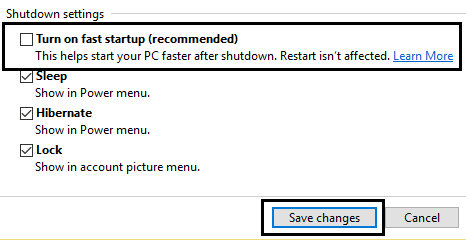
Method 2: Disable Fast Startup
1.Press Windows Key + R then type control and hit Enter to open Control Panel.

2.Click on Hardware and Sound then click on Power Options.
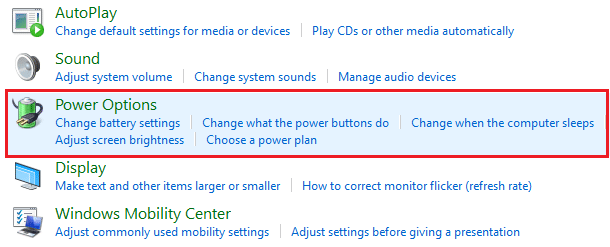
3.Then from the left window pane select “Choose what the power buttons do.“
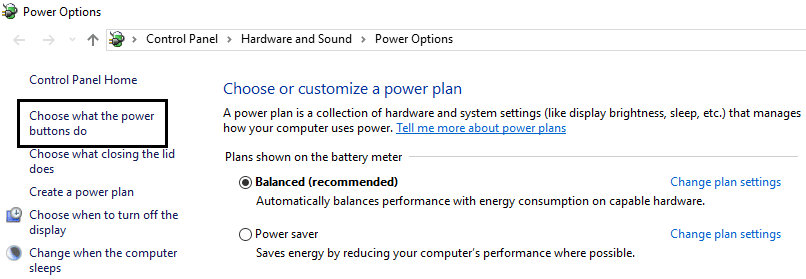
4.Now click on “Change settings that are currently unavailable.“

5.Uncheck “Turn on fast startup” and click on Save changes.
Method 3: Turn off Filter Keys
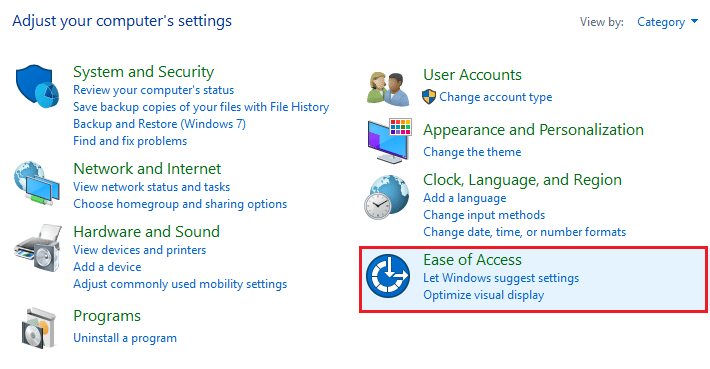
1.Type control in the Windows Search then click on Control Panel.
2.Inside Control Panel click on Ease of Access.
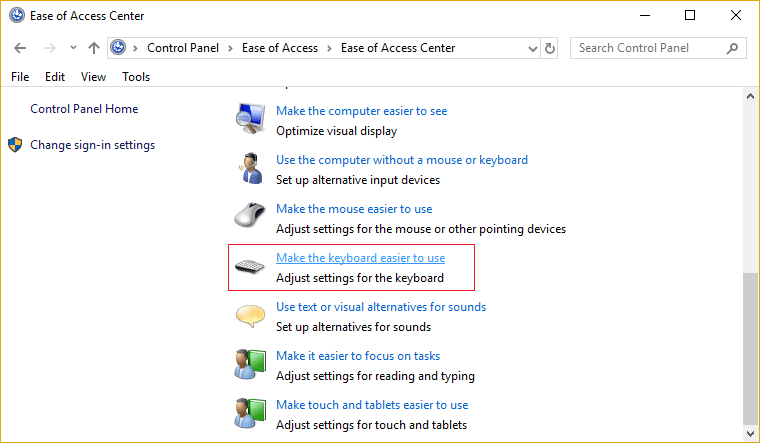
3.Now you need to again click on Ease of Access.
4.On the next screen scroll down and select Make the keyboard easier to use option.
5.Make sure to uncheck Turn on Filter Keys under Make it easier to type.
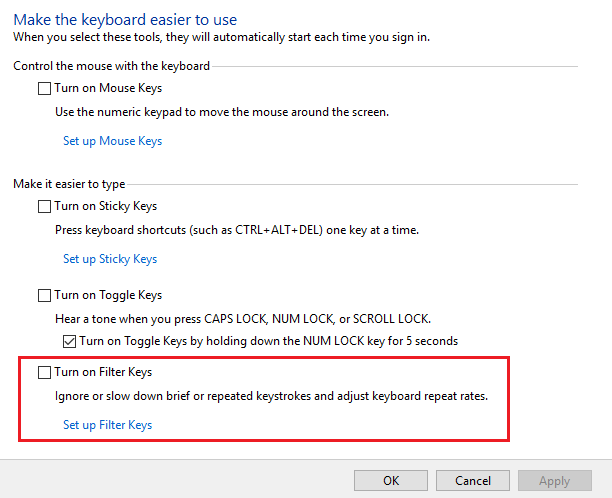
6.Click Apply followed by OK.
7.Reboot your PC to save changes and see if you are able to Fix Wireless Mouse Not Working in Windows 10.
Method 4: Reinstall Wireless Mouse Driver
1.Press Windows Key + R then type “devmgmt.msc” and hit Enter to open Device Manager.

2.Expand Mice and other pointing devices then right-click your Wireless Mouse and select Update Driver.
3.On the next screen click on “Browse my computer for driver software.“

4.Click “Let me pick from a list of device drivers on my computer“.

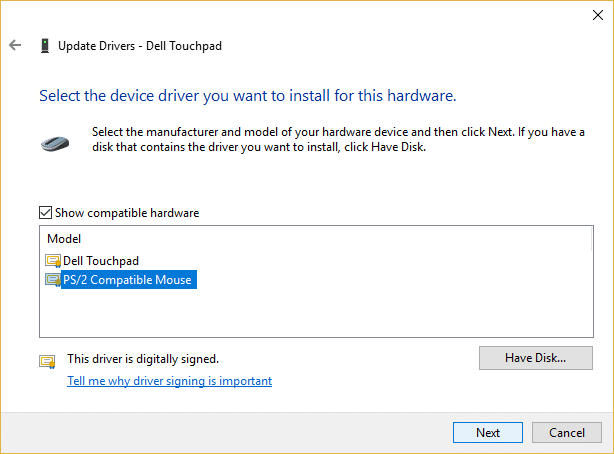
5.Uncheck “Show compatible hardware” and select any one of the listed devices.
6.Click Next to continue and if asks for confirmation select Yes.
7.Reboot your PC to save changes and again follow the steps from 1-4.
8.Again check “Show compatible hardware” and select the listed driver preferably PS/2 Compatible Mouse and click Next.
9.Restart your PC and see if you’re able to Fix Wireless Mouse Not Working in Windows 10.
Method 5: Uninstall Wireless Drivers
1.Press Windows Key + R then type devmgmt.msc and hit Enter.
2.Expand Mice and other pointing devices then right-click your wireless mouse and select Uninstall.
3.Reboot your PC to save changes and Windows will automatically install the default drivers for your device.
Method 6: Perform Clean Boot
Sometimes 3rd party software can conflict with Mouse Drivers and therefore, you should not be able to use the Wireless Mouse. In order to Fix Wireless Mouse Not Working Issue, you need to perform a clean boot on your PC and diagnose the issue step by step.

Method 7: Install IntelliPoint software
If you already have this software installed then make sure to check if your wireless device works or not. Again Resintall IntelliPoint software in order to run Mousinfo diagnostic tool. For more information how to use this tool refer to this Microsoft Article.
Recommended for you:
That’s it you have successfully Fix Wireless Mouse Not Working in Windows 10 issue but if you still have any queries regarding this guide then feel free to ask them in the comment’s section.