How to Boot Windows 11 in Safe Mode

Safe Mode is useful for troubleshooting a multitude of Windows-related problems. When you boot into Safe Mode, it only loads the necessary drivers and operating system files. It does not launch any third-party programs. As a result, Safe Mode provides an effective troubleshooting environment. Previously, until Windows 10, you could start your computer in Safe Mode by pressing the appropriate keys. However, because the startup time has been drastically lowered, this has become much more difficult. Many computer manufacturers have also disabled this feature. Since it is imperative to learn how to start Windows 11 in Safe mode, hence, today, we are going to discuss how to boot Windows 11 in Safe mode.

How to Boot Windows 11 in Safe Mode
There are different types of Safe Mode on Windows 11, each one befitting the need for a specific scenario. These modes are:
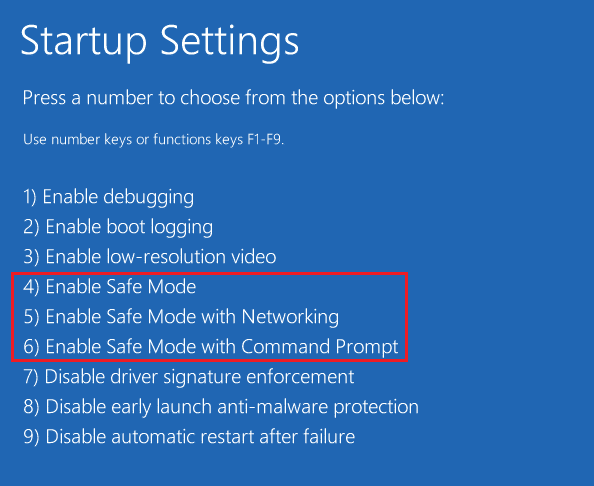
- Safe Mode: This is the most basic model, with minimal drivers and no third-party software being booted. The graphics are not great and the icons appear to be large and unclear. Safe Mode would also be displayed on the four corners of the screen.
- Safe Mode with Networking: In this mode, in addition to the drivers and settings installed in minimal Safe mode, Network drivers will be loaded. While this enables you to connect to the internet in Safe mode, it is not suggested that you do so.
- Safe Mode with Command Prompt: When you choose Safe Mode with Command Prompt, only the Command Prompt is opened, and not the Windows GUI. This is used by users for advanced troubleshooting.
There are five different ways to start Windows 11 in Safe mode.
Method 1: Through System Configuration
The System configuration or commonly known as msconfig, is the easiest way to boot Windows 11 in Safe mode.
1. Press Windows + R keys together to open the Run dialog box.
2. Here, type msconfig and click on OK, as shown.
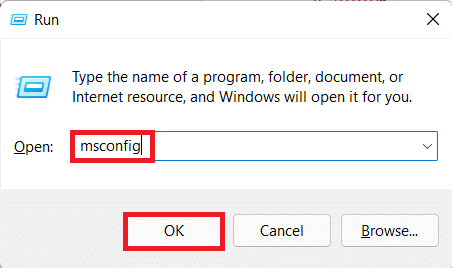
3. Then, go to the Boot tab in the System Configuration window.
4. Under Boot options, check the Safe Boot option and choose the type of Safe boot (e.g. Network) you want to boot in.
5. Click on Apply > OK to save these changes.
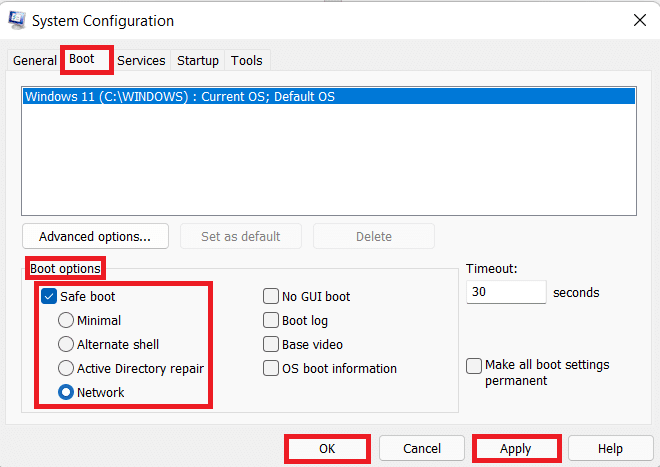
6. Now, click on Restart in the confirmation prompt that appears.

Method 2: Through Command Prompt
Booting in Safe mode using Command Prompt is possible using just a single command, as follows:
1. Click on the Search icon and type Command Prompt.
2. Then, click Open, as depicted below.

3. Type the command: shutdown.exe /r /o and hit Enter. Windows 11 will boot into Safe mode automatically.

Also Read: Fix Command Prompt Appears then Disappears on Windows 10
Method 3: Via Windows Settings
Windows Settings houses many important tools and utilities for its users. To boot into safe mode using Settings, follow these steps:
1. Press Windows + I keys simultaneously to open the Settings window.
2. In the System tab, scroll down and click on Recovery.
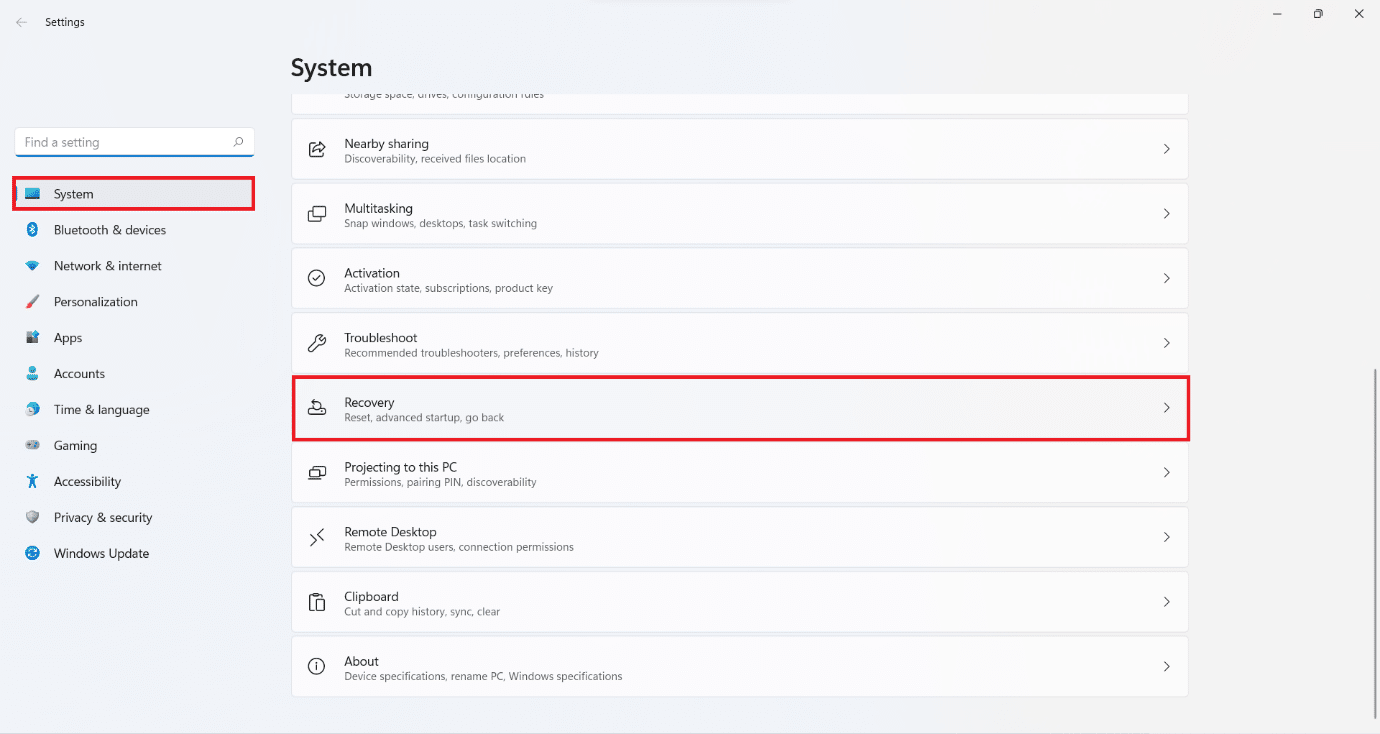
3. Then, click the Restart now button in the Advanced startup option under Recovery options, as shown.
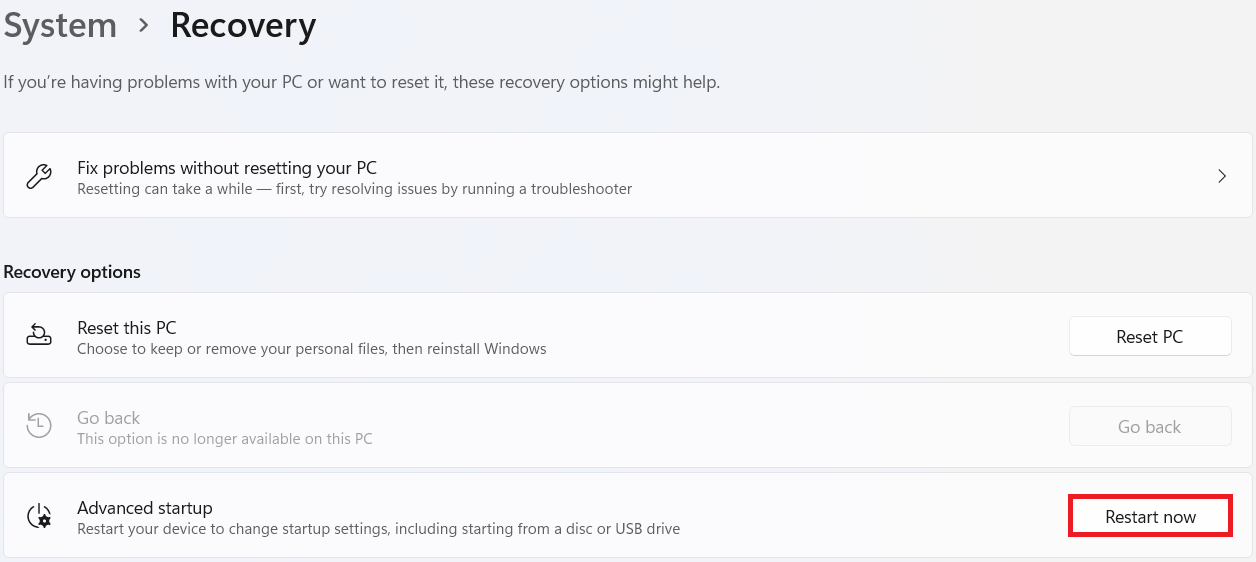
4. Now, click on Restart now in the prompt that appears.

5. Your system will restart and boot in Windows Recovery Environment (RE).
6. In Windows RE, click on Troubleshoot.
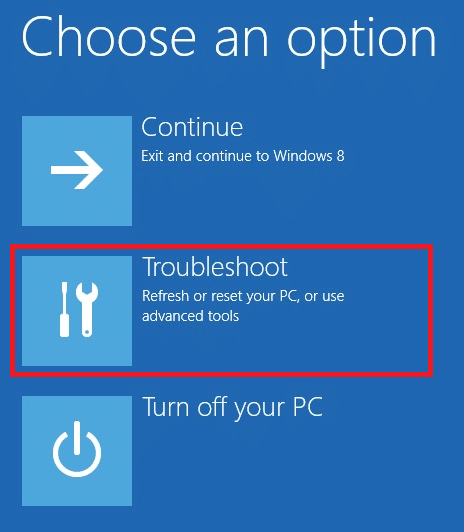
7. Then, select Advanced options.

8. And from here, select Startup Settings, as depicted below.
![]()
9. Finally, click on Restart from the bottom right corner.
10. Press the corresponding Number or Function key to boot into the respective Safe Boot type.
Also Read: Fix Start Menu Not Working in Windows 10
You can simply boot into Safe mode on Windows 11 by using the Start menu as:
1. Click on Start.
2. Then, select the Power icon.
3. Now, click on the Restart option while holding the Shift key. Your system will boot in Windows RE.
![]()
4. Follow Steps 6- 10 of Method 3 to boot into Safe Mode of your choice.
Recommended:
We hope you could learn how to boot Windows 11 in Safe mode. Let us know which method you found to be the best. Also, drop your suggestions and queries in the comment section below. We would love to know which topic you want us to explore next.